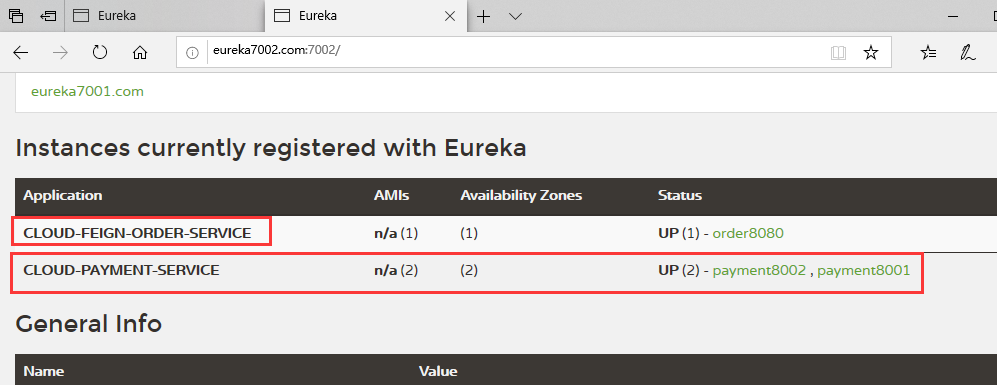
Feign:
Feign 是一个声明式的WebService 客户端。使用 Feign能让编写WebService 客户端更加简单。
它的使用方式是 定义一个服务接口然后在上面添加注解。Feign 也支持可插拔式的编码器和解码器。SpringCloud 对Feign进行了封装,使其支持了SpringMVC标准注解和HttpMessageConverters。Feign 可以与Eureka 和 Ribbon 组合使用以支持负载均衡。
官方解释:
1. Declarative REST Client: Feign
Feign is a declarative web service client. It makes writing web service clients easier. To use Feign create an interface and annotate it. It has pluggable annotation support including Feign annotations and JAX-RS annotations. Feign also supports pluggable encoders and decoders. Spring Cloud adds support for Spring MVC annotations and for using the same
HttpMessageConvertersused by default in Spring Web. Spring Cloud integrates Ribbon and Eureka, as well as Spring Cloud LoadBalancer to provide a load-balanced http client when using Feign.
Feign 旨在使编写 java http 客户端变得更容易。
前面使用 Ribbon + RestTemplate时,利用RestTemplate对http请求的封装处理,形成了一套模板化的调用方法。但是在实际开发中,由于对服务依赖的调用可能不止一处,往往一个接口会被多处调用,所以通常都会针对每个微服务自行封装一些客户端类来包装这些依赖服务的调用。所以,Feign在此基础上做了进一步封装,由他来帮助我们定义和实现依赖服务接口的定义。在Feign的实现下,我们只需创建一个接口并使用注解的方式来配置它(以前是Dao接口上标注Mapper注解,现在是一个微服务接口上标注一个Feign注解即可),即可完成对服务提供方的接口绑定,简化了使用SpringCloud Ribbon时,自动封装调用客户端的开发量。
Feign 集成了 Ribbon
利用Ribbon维护了各个服务提供者的服务列表信息,并且通过默认或用户自定义的规则实现了客户端的负载均衡。与Ribbon不同的是,通过Feign只需要定义服务绑定接口且以声明式的方法,优雅而简单的实现了服务调用。
Feign 和 OpenFeign 的区别:

OpenFeign 的使用:

1. 创建一个Module:cloud-consumer-feign-order8080
2. 引入OpenFeign依赖(将之前的cloud-consumer-order8080中的依赖全部复制过来,添加下面的OpenFeign依赖):
        <dependency>
            <groupId>org.springframework.cloud</groupId>
            <artifactId>spring-cloud-starter-openfeign</artifactId>
        </dependency>

<?xml version="1.0" encoding="UTF-8"?>
<project xmlns="http://maven.apache.org/POM/4.0.0"
         xmlns:xsi="http://www.w3.org/2001/XMLSchema-instance"
         xsi:schemaLocation="http://maven.apache.org/POM/4.0.0 http://maven.apache.org/xsd/maven-4.0.0.xsd">
    <parent>
        <artifactId>yct-cloud-parent</artifactId>
        <groupId>com.yct.springcloud</groupId>
        <version>1.0-SNAPSHOT</version>
    </parent>
    <modelVersion>4.0.0</modelVersion>

    <artifactId>cloud-consumer-feign-order8080</artifactId>


    <dependencies>

        <dependency>
            <groupId>com.yct.springcloud</groupId>
            <artifactId>cloud-base-api</artifactId>
            <version>1.0-SNAPSHOT</version>
            <scope>compile</scope>
        </dependency>

        <dependency>
            <groupId>org.springframework.cloud</groupId>
            <artifactId>spring-cloud-starter-openfeign</artifactId>
        </dependency>

        <!-- https://mvnrepository.com/artifact/org.springframework.cloud/spring-cloud-starter-eureka-server -->
        <dependency>
            <groupId>org.springframework.cloud</groupId>
            <artifactId>spring-cloud-starter-netflix-eureka-client</artifactId>
            <exclusions>
                <exclusion>
                    <groupId>com.fasterxml.jackson.dataformat</groupId>
                    <artifactId>jackson-dataformat-xml</artifactId>
                </exclusion>
            </exclusions>
        </dependency>

        <!-- https://mvnrepository.com/artifact/org.springframework.boot/spring-boot-starter-web -->
        <dependency>
            <groupId>org.springframework.boot</groupId>
            <artifactId>spring-boot-starter-web</artifactId>
        </dependency>

        <!-- https://mvnrepository.com/artifact/org.springframework.boot/spring-boot-starter-web  -->
        <dependency>
            <groupId>org.springframework.boot</groupId>
            <artifactId>spring-boot-starter-actuator</artifactId>
        </dependency>

        <!-- https://mvnrepository.com/artifact/org.springframework.boot/spring-boot-devtools -->
        <dependency>
            <groupId>org.springframework.boot</groupId>
            <artifactId>spring-boot-devtools</artifactId>
            <scope>runtime</scope>
            <optional>true</optional>
        </dependency>

        <!-- https://mvnrepository.com/artifact/org.projectlombok/lombok -->
        <dependency>
            <groupId>org.projectlombok</groupId>
            <artifactId>lombok</artifactId>
            <optional>true</optional>
        </dependency>

        <!-- https://mvnrepository.com/artifact/org.springframework.boot/spring-boot-starter-test -->
        <dependency>
            <groupId>org.springframework.boot</groupId>
            <artifactId>spring-boot-starter-test</artifactId>
            <scope>test</scope>
        </dependency>
    </dependencies>


</project>
3. YML文件(将之前的cloud-consumer-order8080中的YML文件直接复制过来使用,可以修改一下服务名,也可以不修改):

server:
  port: 8080
spring:
  application:
    name: cloud-feign-order-service

eureka:
  client:
    register-with-eureka: true
    fetchRegistry: true
    service-url:
      defaultZone: http://eureka7001.com:7001/eureka,http://eureka7002.com:7002/eureka  #集群版
#      defaultZone: http://localhost:7001/eureka
  instance:
    instance-id: order8080
    prefer-ip-address: true
4. 主启动类(添加注解:@EnableFeignClients):

package com.yct.springcloud;

import org.springframework.boot.SpringApplication;
import org.springframework.boot.autoconfigure.SpringBootApplication;
import org.springframework.cloud.netflix.eureka.EnableEurekaClient;
import org.springframework.cloud.openfeign.EnableFeignClients;

@EnableEurekaClient
@SpringBootApplication
@EnableFeignClients //开启使用OpenFeign组件
public class CustomerFeignOrderApplication8080 {
    public static void main(String[] args) {
        SpringApplication.run(CustomerFeignOrderApplication8080.class,args);
    }

}
5. 创建一个和服务提供者类似的接口 IPaymentService,并添加注解:@FeignClient(value = "CLOUD-PAYMENT-SERVICE")

package com.yct.springcloud.service;


import com.yct.springcloud.support.CommonResult;
import org.springframework.cloud.openfeign.FeignClient;
import org.springframework.stereotype.Component;
import org.springframework.web.bind.annotation.GetMapping;
import org.springframework.web.bind.annotation.PathVariable;

@Component
@FeignClient(value = "CLOUD-PAYMENT-SERVICE")
public interface IPaymentService {

    /**
     * 根据ID查询支付数据
     *
     * @param id
     * @return
     */
    @GetMapping(value = "/yct/payment/get/{id}")
    public CommonResult getPaymentById(@PathVariable("id") Long id);
}
6. 创建Controller,直接调用上面的接口的方法:

package com.yct.springcloud.controller;


import com.yct.springcloud.entity.pay.Payment;
import com.yct.springcloud.service.IPaymentService;
import com.yct.springcloud.support.CommonResult;
import lombok.extern.slf4j.Slf4j;
import org.springframework.beans.factory.annotation.Autowired;
import org.springframework.web.bind.annotation.GetMapping;
import org.springframework.web.bind.annotation.PathVariable;
import org.springframework.web.bind.annotation.RestController;

/**
 * 订单Controller
 */
@RestController
@Slf4j
public class OrderController {

    @Autowired
    IPaymentService iPaymentService;

    @GetMapping(value = "/consumer/payment/feign/getPayment/{id}")
    public CommonResult<Payment> getPayment(@PathVariable("id") Long id) {

        log.info("Consumer:根据id【" + id + "】查询支付数据。");

        return iPaymentService.getPaymentById(id);

    }
}
启动测试:


默认是轮询的负载均衡策略(如果需要修改的话,方式和修改Ribbon的负载均衡策略是相同的,因为OpenFeign本身就集成了Ribbon)。
OpenFeign的超时控制:
默认情况下,Feign客户端只等待一秒钟,如果服务端处理超过了一秒钟,则Feign客户端就直接会报错。
效果演示(在服务提供方,故意弄一个有延时的服务接口,比如,睡3秒钟再返回):
1. 在服务提供者8001的Controller中,增加一个模仿延时的接口。

2. 消费者访问这个接口(按照之前的访问方式)。
3.只留8001一个服务提供者,然后再进行访问,访问结果:超时

为了避免Feign等待超时这种情况,我们需要设置Feign客户端的超时控制:
yml 文件中开启配置:
ribbon:
  ReadTimeout:  5000
  ConnectTimeout: 5000
注意:IDEA会提示没有这两个属性,不用管,弄上去就行。

再次测试,可以了:

OpenFeign的日志打印功能:
Feign提供了日志打印功能,我们可以通过配置来调整日志级别,从而了解Feign中Http请求的细节。
说白了就是对Feign接口的调用情况进行监控和输出。
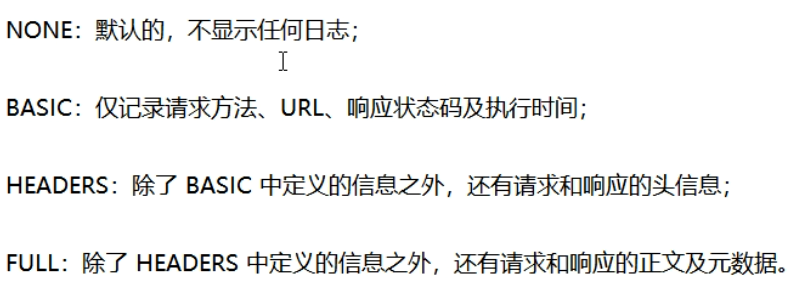
日志级别:

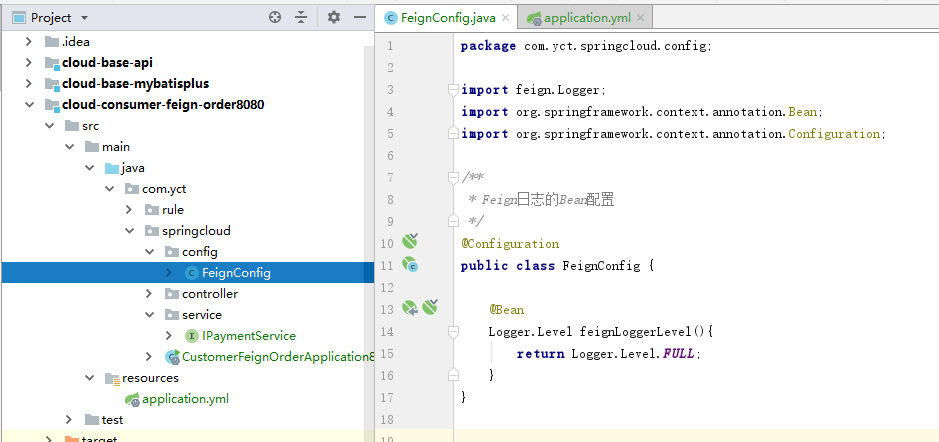
配置日志bean:

package com.yct.springcloud.config;

import feign.Logger;
import org.springframework.context.annotation.Bean;
import org.springframework.context.annotation.Configuration;

/**
 * Feign日志的Bean配置
 */
@Configuration
public class FeignConfig {

    @Bean
    Logger.Level feignLoggerLevel(){
        return Logger.Level.FULL;
    }
}

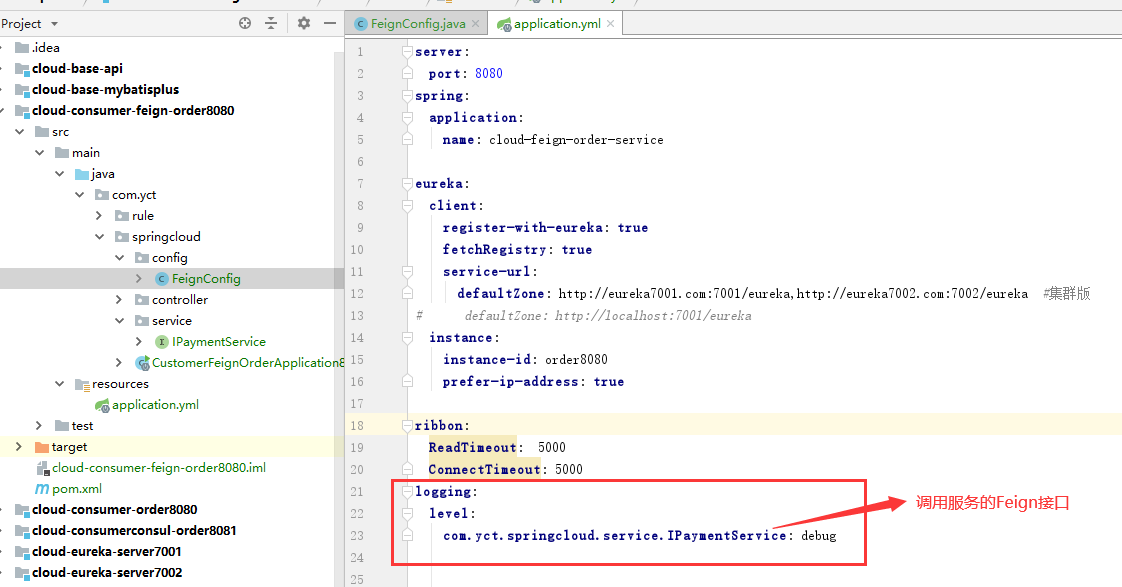
yml中开启日志的Feign客户端。
logging:
  level:
    com.yct.springcloud.service.IPaymentService: debug

测试结果:

