目录·:
1、概述
2、设备号、设备节点
3、字符设备驱动框架
4、申请设备号
5、创建设备节点
6、实现文件IO接口--fops
7、应用程序控制驱动
8、驱动程序控制外设
1、概述:
linux中一切皆文件,设备也如此,并且以操作文件即文件IO的方式访问设备。
应用程序只能通过库函数中的系统调用来操作硬件,对于每个系统调用,驱动程序中都会有一个与之对应的函数,对于字符设备驱动,这些函数集中在file_operations结构体中。当应用程序使用系统调用read、write等函数访问设备时,最终会调用到file_opeartions中的成员,当然一开始fops中的只是一大堆函数指针的调用接口,具体的函数就需要我们在驱动中实现,实现对应操作函数后,与fops一对接,应用程序最终就能对硬件进行控制了。
那么问题来了,当应用程序使用系统调用访问设备时,linux系统怎么知道调用哪一个驱动的fops中的成员呢?
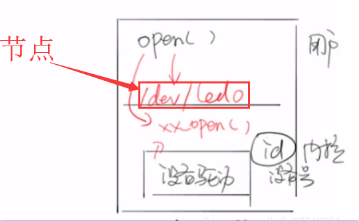
2、设备号、设备节点
设备号和驱动相关联
设备号是一个ID,设备节点就是驱动文件
字符设备和块设备是独立的,虽然设备号可能相同,但却是不同的设备
3、字符设备驱动框架
作为字符设备驱动要素:
    1,必须有一个设备号,用在众多到设备驱动中进行区分
    2,用户必须知道设备驱动对应到设备节点(设备文件)
        linux把所有到设备都看成文件

        crw-r----- 1 root root 13, 64 Mar 28 20:14 event0
        crw-r----- 1 root root 13, 65 Mar 28 20:14 event1
        crw-r----- 1 root root 13, 66 Mar 28 20:14 event2
    3,对设备操作其实就是对文件操作,应用空间操作open,read,write的时候
        实际在驱动代码有对应到open, read,write
4、申请设备号
// 1、注册获取设备号
// 2、初始化设备
// 3、操作设备 file_operations – open release read write ioctl…
// 4、两个宏定义 module_init module_exit
// 5、注册设备号 register_chrdev_region
// 6、cdev_init 初始化字符设备
// 7、cdev_add 添加字符设备到系统
1)向系统申请主设备号
int register_chrdev(unsigned int major, const char * name, const struct file_operations * fops)

//参数:
//1、major:主设备号
//     设备号(32bit–dev_t)==主设备号(高12bit) + 次设备号(低20bit)
//      主设备号:表示一类设备—(如:camera)
//      次设备号: 表示一类设备中某一个—(如:前置camera/后置camera)
//       0 -->动态分配  ; 250 --> 给定整数,静态指定
//2、name: 描述设备信息,可自定义
//        在目录/proc/devices列举出了所有的已经注册的设备
//3、fops: 文件操作对象
//         提供open, read,write
//返回值:成功-0,失败-负数
2)释放设备号
void unregister_chrdev(unsigned int major, const char * name)
3)例:主设备号的申请


 1 #include <linux/init.h>
 2 #include <linux/module.h>
 3 #include <linux/fs.h>
 4
 5 //静态指定
 6 static int dev_major = 250;
 7
 8 const struct file_operations my_fops = {};
 9
10 static int __init chr_drv_init(void)
11 {
12     //申请设备号
13     int ret;
14     ret = register_chrdev(dev_major, "chr_dev", &my_fops);
15     if(ret == 0)
16     {
17         printk("register success!
");
18     }
19     else
20     {
21         printk("register failed!
");
22         return -EFAULT;
23     }
24     return 0;
25 }
26
27 static void __exit chr_drv_exit(void)
28 {
29     //释放设备号资源
30     unregister_chrdev(dev_major, "chr_dev");
31 }
32
33 module_init(chr_drv_init);
34 module_exit(chr_drv_exit);
35
36 MODULE_LICENSE("GPL");
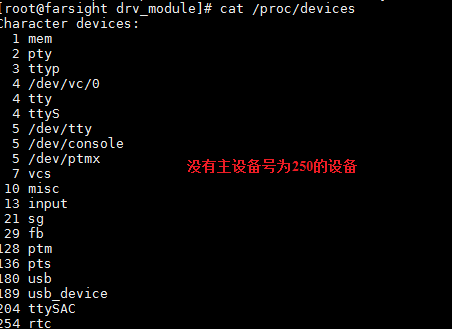
加载驱动前:
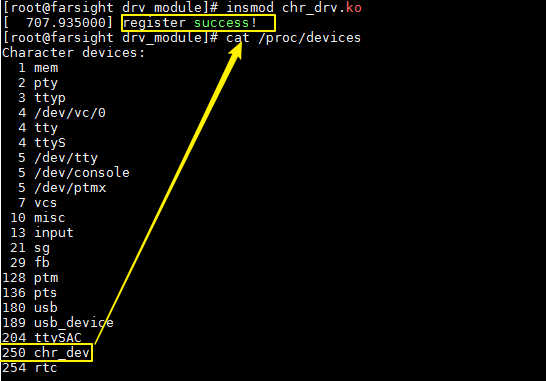
加载驱动后:
5、创建设备节点
1)手动创建
·· 缺点/dev/目录中文件都是在内存中,断电后/dev/文件就会消失
    mknod /dev/设备名  类型  主设备号 次设备号
    (主设备号要和驱动中申请的主设备号保持一致)
    比如:
        mknod  /dev/chr0  c  250 0
    eg:
    [root@farsight drv_module]# ls /dev/chr0 -l
     crw-r--r--    1 0        0         250,   0 Jan  1 00:33 /dev/chr0
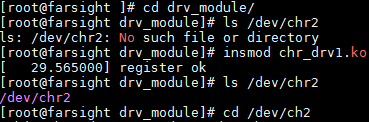
2)自动创建
通过udev/mdev机制
struct class *class_create(owner, name)//创建一个类

//参数:
//1、owner:THIS_MODULE
//2、name :字符串名字,自定义
//返回:
//        返回一个class指针
创建一个设备文件:
//创建一个设备文件
struct device *device_create(struct class * class, struct device * parent, dev_t devt, void * drvdata, const char * fmt,...)

//参数:
//1、class结构体,class_create调用之后的返回值
//2、表示父亲,一般直接填NULL
//3、设备号类型 dev_t
//4、私有数据,一般直接填NULL
//5/6、表示可变参数,字符串,表示设备节点名字

设备号类型:dev_t devt
        #define MAJOR(dev)    ((unsigned int) ((dev) >> MINORBITS))     //获取主设备号
        #define MINOR(dev)    ((unsigned int) ((dev) & MINORMASK))     //获取次设备号
        #define MKDEV(ma,mi)  (((ma) << MINORBITS) | (mi))      //生成设备号
销毁设备文件:
void device_destroy(devcls,  MKDEV(dev_major, 0));
//参数:
//1、class结构体,class_create调用之后到返回值
//2、设备号类型 dev_t

void class_destroy(devcls);
//参数:class结构体,class_create调用之后到返回值
3)示例:
 1 #include <linux/init.h>
 2 #include <linux/module.h>
 3 #include <linux/fs.h>
 4 #include <linux/device.h>
 5
 6 /*
 7 设备号给定方式有两种:
 8         1,动态--参数1直接填0
 9         2,静态--指定一个整数,250
10 */
11 static unsigned int dev_major = 250;
12 static unsigned int dev_minor = 0;
13 static struct class *devcls;
14 static struct device *dev;
15
16 const struct file_operations my_fops = {
17
18 };
19
20 static int __init chr_dev_init(void)
21 {
22     //装载一般都是申请设备号资源
23     //申请设备号
24     int ret;
25
26     ret = register_chrdev(dev_major, "chr_dev_test", &my_fops);
27     if(ret == 0){
28         printk("register ok
");
29     }
30     else{
31         printk("register failed
");
32         return -EINVAL;
33     }
34
35     //自动创建设备节点
36     devcls = class_create(THIS_MODULE, "chr_cls");
37     dev = device_create(devcls,NULL,MKDEV(dev_major,dev_minor),NULL,"chr2");
38
39     return 0;
40 }
41
42 static void __exit chr_dev_exit(void)
43 {
44      //卸载一般都是释放资源
45
46     //销毁节点和类
47     device_destroy(devcls,MKDEV(dev_major,dev_minor));
48     class_destroy(devcls);
49     //释放设备号
50      unregister_chrdev(dev_major, "chr_dev_test");
51 }
52
53 module_init
54 (chr_dev_init);
55 module_exit(chr_dev_exit);
56 MODULE_LICENSE("GPL");
7、实现文件IO接口--fops
1)驱动中实现文件io操作接口:struct file_operations
 1 struct file_operations {
 2         struct module *owner;
 3         loff_t             (*llseek) (struct file *, loff_t, int);
 4         ssize_t         (*read) (struct file *, char __user *, size_t, loff_t *);
 5         ssize_t         (*write) (struct file *, const char __user *, size_t, loff_t *);
 6         ssize_t         (*aio_read) (struct kiocb *, const struct iovec *, unsigned long, loff_t);
 7         ssize_t         (*aio_write) (struct kiocb *, const struct iovec *, unsigned long, loff_t);
 8         int             (*iterate) (struct file *, struct dir_context *);
 9         unsigned int     (*poll) (struct file *, struct poll_table_struct *);
10         long             (*unlocked_ioctl) (struct file *, unsigned int, unsigned long);
11         long             (*compat_ioctl) (struct file *, unsigned int, unsigned long);
12         int             (*mmap) (struct file *, struct vm_area_struct *);
13         int             (*open) (struct inode *, struct file *);
14         ....
16         long             (*fallocate)(struct file *file, int mode, loff_t offset, loff_t len);
17         int             (*show_fdinfo)(struct seq_file *m, struct file *f);
18     }; //函数指针的集合,其实就是接口,我们写驱动到时候需要去实现
19
20     const struct file_operations my_fops = {
21             .open = chr_drv_open,
22             .read = chr_drv_read,
23             .write = chr_drv_write,
24             .release = chr_drv_close,
25     };
示例:
 1 #include <linux/init.h>
 2 #include <linux/module.h>
 3 #include <linux/fs.h>
 4 #include <linux/device.h>
 5
 6 /*
 7 设备号给定方式有两种:
 8         1,动态--参数1直接填0
 9         2,静态--指定一个整数,250
10 */
11 static unsigned int dev_major = 250;
12 static unsigned int dev_minor = 0;
13 static struct class *devcls;
14 static struct device *dev;
15
16 ssize_t chr_drv_write (struct file *filp, char __user *buf, size_t count, loff_t *fpos)
17 {
18     printk("---------write %s-------------
",__FUNCTION__);
19
20     return 0;
21 }
22
23 ssize_t chr_drv_read (struct file *filp, const char __user *buf, size_t count, loff_t *fops)
24 {
25     printk("---------read %s-------------
",__FUNCTION__);
26
27     return 0;
28 }
29
30 int chr_drv_open (struct inode *inode, struct file *filp)
31 {
32     printk("---------open %s-------------
",__FUNCTION__);
33
34     return 0;
35 }
36
37 int chr_drv_close (struct inode *inode, struct file *filp)
38 {
39     printk("---------close %s-------------
",__FUNCTION__);
40
41     return 0;
42 }
43
44
45
46 const struct file_operations my_fops = {
47     .open    = chr_drv_open,
48     .read    = chr_drv_read,
49     .write   = chr_drv_write,
50     .release = chr_drv_close
51 };
52
53 static int __init chr_dev_init(void)
54 {
55     //装载一般都是申请设备号资源
56     //申请设备号
57     int ret;
58
59     ret = register_chrdev(dev_major, "chr_dev_test", &my_fops);
60     if(ret == 0){
61         printk("register ok
");
62     }
63     else{
64         printk("register failed
");
65         return -EINVAL;
66     }
67
68     //自动创建设备节点
69     devcls = class_create(THIS_MODULE, "chr_cls");
70     dev = device_create(devcls,NULL,MKDEV(dev_major,dev_minor),NULL,"chr2");
71
72     return 0;
73 }
74
75 static void __exit chr_dev_exit(void)
76 {
77      //卸载一般都是释放资源
78
79     //销毁节点和类
80     device_destroy(devcls,MKDEV(dev_major,dev_minor));
81     class_destroy(devcls);
82     //释放设备号
83      unregister_chrdev(dev_major, "chr_dev_test");
84 }
85
86 module_init
87 (chr_dev_init);
88 module_exit(chr_dev_exit);
89 MODULE_LICENSE("GPL");
实现了底层的fops成员函数,再实现应用程序的调用
2)应用程序调用文件IO控制驱动 :open、read...
 1 #include <linux/init.h>
 2 #include <linux/module.h>
 3 #include <linux/fs.h>
 4 #include <linux/device.h>
 5
 6 /*
 7 设备号给定方式有两种:
 8         1,动态--参数1直接填0
 9         2,静态--指定一个整数,250
10 */
11 static unsigned int dev_major = 250;
12 static unsigned int dev_minor = 0;
13 static struct class *devcls;
14 static struct device *dev;
15
16 ssize_t chr_drv_write (struct file *filp, char __user *buf, size_t count, loff_t *fpos)
17 {
18     printk("---------write %s-------------
",__FUNCTION__);
19
20     return 0;
21 }
22
23 ssize_t chr_drv_read (struct file *filp, const char __user *buf, size_t count, loff_t *fops)
24 {
25     printk("---------read %s-------------
",__FUNCTION__);
26
27     return 0;
28 }
29
30 int chr_drv_open (struct inode *inode, struct file *filp)
31 {
32     printk("---------open %s-------------
",__FUNCTION__);
33
34     return 0;
35 }
36
37 int chr_drv_close (struct inode *inode, struct file *filp)
38 {
39     printk("---------close %s-------------
",__FUNCTION__);
40
41     return 0;
42 }
43
44
45
46 const struct file_operations my_fops = {
47     .open    = chr_drv_open,
48     .read    = chr_drv_read,
49     .write   = chr_drv_write,
50     .release = chr_drv_close
51 };
52
53 static int __init chr_dev_init(void)
54 {
55     //装载一般都是申请设备号资源
56     //申请设备号
57     int ret;
58
59     ret = register_chrdev(dev_major, "chr_dev_test", &my_fops);
60     if(ret == 0){
61         printk("register ok
");
62     }
63     else{
64         printk("register failed
");
65         return -EINVAL;
66     }
67
68     //自动创建设备节点
69     devcls = class_create(THIS_MODULE, "chr_cls");
70     dev = device_create(devcls,NULL,MKDEV(dev_major,dev_minor),NULL,"chr2");
71
72     return 0;
73 }
74
75 static void __exit chr_dev_exit(void)
76 {
77      //卸载一般都是释放资源
78
79     //销毁节点和类
80     device_destroy(devcls,MKDEV(dev_major,dev_minor));
81     class_destroy(devcls);
82     //释放设备号
83      unregister_chrdev(dev_major, "chr_dev_test");
84 }
85
86 module_init
87 (chr_dev_init);
88 module_exit(chr_dev_exit);
89 MODULE_LICENSE("GPL");
 1 #include <stdio.h>
 2 #include <string.h>
 3 #include <stdlib.h>
 4 #include <unistd.h>
 5 #include <sys/types.h>
 6 #include <sys/stat.h>
 7 #include <fcntl.h>
 8
 9 int main(int argc, char * argv [ ])
10 {
11     //调用驱动
12     int fd;
13     int value = 0;  //buf
14
15     fd = open("/dev/chr2", O_RDWR);
16     if(fd < 0)
17     {
18         perror("open");
19         exit(1);
20     }
21
22     read(fd, &value, 4);
23
24     write(fd, &value, 4);
25
26     close(fd);
27
28     return 0;
29 }
 1 ROOTFS_DIR = /home/linux/source/rootfs#根文件系统路径
 2
 3 APP_NAME = chr_test
 4
 5 CROSS_COMPILE = /home/linux/toolchains/gcc-4.6.4/bin/arm-none-linux-gnueabi-
 6 CC = $(CROSS_COMPILE)gcc
 7
 8 ifeq ($(KERNELRELEASE),)
 9
10 KERNEL_DIR = /home/linux/kernel/linux-3.14-fs4412          #编译过的内核源码的路径
11 CUR_DIR = $(shell pwd)     #当前路径
12
13 all:
14     make -C $(KERNEL_DIR) M=$(CUR_DIR) modules  #把当前路径编成modules
15     $CC $(APP_NAME).c -o $(APP_NAME)
16     @#make -C 进入到内核路径
17     @#M 指定当前路径(模块位置)
18
19 clean:
20     make -C $(KERNEL_DIR) M=$(CUR_DIR) clean
21
22 install:
23     sudo cp -raf *.ko $(APP_NAME) $(ROOTFS_DIR)/drv_module     #把当前的所有.ko文件考到根文件系统的drv_module目录
24
25 else
26
27 obj-m += chr_drv1.o    #指定内核要把哪个文件编译成ko
28
29 endif
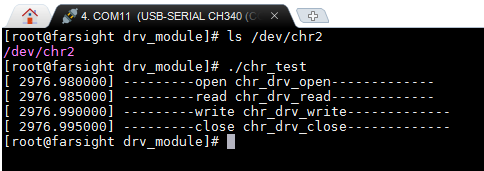
测试结果;
7、应用程序控制驱动
应用程序要控制驱动,就涉及用户空间与内核空间的数据交互,如何实现?通过以下函数:
1)copy_to_user
1 //将数据从内核空间拷贝到用户空间,一般是在驱动中chr_drv_read()用
2 int copy_to_user(void __user * to, const void * from, unsigned long n)
3 //参数:
4 //1:应用驱动中的一个buffer
5 //2:内核空间到一个buffer
6 //3:个数
7 //返回值:大于0,表示出错,剩下多少个没有拷贝成功等于0,表示正确
2)copy_from_user
1 //将数据从用户空间拷贝到内核空间,一般是在驱动中chr_drv_write()用
2 int copy_from_user(void * to, const void __user * from, unsigned long n)
3 //参数:
4 //1:内核驱动中的一个buffer
5 //2:应用空间到一个buffer
6 //3:个数
示例:
  1 #include <linux/init.h>
  2 #include <linux/module.h>
  3 #include <linux/fs.h>
  4 #include <linux/device.h>
  5 #include <asm/uaccess.h>
  6
  7
  8 /*
  9 设备号给定方式有两种:
 10         1,动态--参数1直接填0
 11         2,静态--指定一个整数,250
 12 */
 13 static unsigned int dev_major = 250;
 14 static unsigned int dev_minor = 0;
 15 static struct class *devcls;
 16 static struct device *dev;
 17
 18 static int kernal_val = 555;
 19
 20 // 用户空间向内核空间传数据
 21 ssize_t chr_drv_write (struct file *filp, char __user *buf, size_t count, loff_t *fpos)
 22 {
 23     printk("---------write %s-------------
",__FUNCTION__);
 24
 25     int ret;
 26     int value;  //从用户空间获取到的数据存在value中
 27     ret = copy_from_user(&value, buf, count);
 28     if(ret > 0)
 29     {
 30         printk("copy_from_user");
 31         return -EFAULT;
 32     }
 33
 34     printk("__KERNEL__: value = %d
", value);
 35
 36     return 0;
 37 }
 38
 39 // read(fd, buf, size)  用户空间获取内核空间的数据
 40 ssize_t chr_drv_read (struct file *filp, const char __user *buf, size_t count, loff_t *fops)
 41 {
 42     printk("---------read %s-------------
",__FUNCTION__);
 43
 44     int ret;
 45     ret = copy_to_user(buf, &kernal_val, count);
 46     if(ret > 0)
 47     {
 48         printk("copy_to_user");
 49         return -EFAULT;
 50     }
 51
 52     return 0;
 53 }
 54
 55 int chr_drv_open (struct inode *inode, struct file *filp)
 56 {
 57     printk("---------open %s-------------
",__FUNCTION__);
 58
 59     return 0;
 60 }
 61
 62 int chr_drv_close (struct inode *inode, struct file *filp)
 63 {
 64     printk("---------close %s-------------
",__FUNCTION__);
 65
 66     return 0;
 67 }
 68
 69
 70
 71 const struct file_operations my_fops = {
 72     .open    = chr_drv_open,
 73     .read    = chr_drv_read,
 74     .write   = chr_drv_write,
 75     .release = chr_drv_close
 76 };
 77
 78 static int __init chr_dev_init(void)
 79 {
 80     //装载一般都是申请设备号资源
 81     //申请设备号
 82     int ret;
 83
 84     ret = register_chrdev(dev_major, "chr_dev_test", &my_fops);
 85     if(ret == 0){
 86         printk("register ok
");
 87     }
 88     else{
 89         printk("register failed
");
 90         return -EINVAL;
 91     }
 92
 93     //自动创建设备节点
 94     devcls = class_create(THIS_MODULE, "chr_cls");
 95     dev = device_create(devcls,NULL,MKDEV(dev_major,dev_minor),NULL,"chr2");
 96
 97     return 0;
 98 }
 99
100 static void __exit chr_dev_exit(void)
101 {
102      //卸载一般都是释放资源
103
104     //销毁节点和类
105     device_destroy(devcls,MKDEV(dev_major,dev_minor));
106     class_destroy(devcls);
107     //释放设备号
108      unregister_chrdev(dev_major, "chr_dev_test");
109 }
110
111 module_init
112 (chr_dev_init);
113 module_exit(chr_dev_exit);
114 MODULE_LICENSE("GPL");
 1 #include <stdio.h>
 2 #include <string.h>
 3 #include <stdlib.h>
 4 #include <unistd.h>
 5 #include <sys/types.h>
 6 #include <sys/stat.h>
 7 #include <fcntl.h>
 8
 9
10 int main(int argc, char * argv [ ])
11 {
12     //调用驱动
13     int fd;
14     int value = 0;  //buf
15
16     fd = open("/dev/chr2", O_RDWR);
17     if(fd < 0)
18     {
19         perror("open");
20         exit(1);
21     }
22
23     read(fd, &value, 4);   //应用程序从内核获取4字节数据存放在value中
24     printf("__USER__: value = %d
", value);  //打印获取的值
25     sleep(1);  //sleep1秒,防止串口打印信息不完整
26
27     //重新给value赋值,传给内核
28     value = 666;
29     write(fd, &value, 4);
30
31
32     close(fd);
33
34     return 0;
35 }
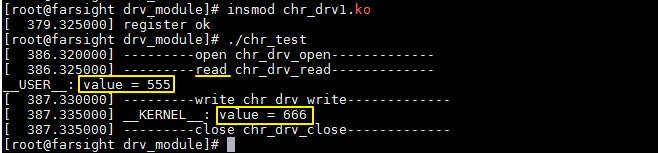
测试:
8、驱动程序控制外设
之前我们了解了应用程序如何与内核空间进行数据交互,那么内核驱动与外设间的控制是怎么样的?
写过裸机程序的都知道,可以通过修改外设对应的控制寄存器来控制外设,即向寄存器的地址写入数据,这个地址就是物理地址,且物理地址是已知的,有硬件设计决定。
在内核中,同样也是操作地址控制外设,但是内核中的地址,是经过MMU映射后的虚拟地址,而且CPU通常并没有为这些已知的外设I/O内存资源的物理地址预定义虚拟地址范围,驱动程序并不能直接通过物理地址访问I/O内存资源,而必须将它们映射到核心虚地址空间内,然后才能根据映射所得到的核心虚地址范围,通过访内指令访问这些I/O内存资源。Linux在io.h头文件中声明了函数ioremap(),用来将I/O内存资源的物理地址映射到核心虚地址空间中

ioremap的函数如下:
1 //映射虚拟地址
2 void *ioremap(cookie, size)
3 //参数:
4 //1、cookie:物理地址
5 //2、size:长度(连续映射一定长度的地址空间)
6 //返回值:虚拟地址
解除映射:
1 //去映射--解除映射
2 void iounmap(void __iomem *addr)
3 //参数:映射后的虚拟地址
实例:通过驱动控制LED灯
LED —— GPX2_7 —— GPX2CON —— 0x11000C40
GPX2DAT—— 0x11000C44
将0x11000c40映射为虚拟地址
  1 #include <linux/init.h>
  2 #include <linux/module.h>
  3 #include <linux/fs.h>
  4 #include <linux/device.h>
  5 #include <asm/uaccess.h>
  6 #include <asm/io.h>
  7
  8 //物理地址
  9 #define GPX2CON 0x11000C40
 10 #define GPX2_SIZE 8
 11
 12 //存放虚拟地址的指针
 13 volatile unsigned long *gpx2conf;
 14 volatile unsigned long *gpx2dat;
 15
 16 static unsigned int dev_major = 250;
 17 static unsigned int dev_minor = 0;
 18 static struct class *devcls;
 19 static struct device *dev;
 20
 21 static int kernal_val = 555;
 22
 23 // 用户空间向内核空间传数据
 24 ssize_t chr_drv_write (struct file *filp, char __user *buf, size_t count, loff_t *fpos)
 25 {
 26
 27     int ret;
 28     int value;  //从用户空间获取到的数据存在value中
 29     ret = copy_from_user(&value, buf, count);
 30     if(ret > 0)
 31     {
 32         printk("copy_from_user");
 33         return -EFAULT;
 34     }
 35
 36     if(value)  //根据用户传递的值决定灯的亮灭
 37     {
 38         *gpx2dat |=  (0x1<<7);
 39     }else
 40         {
 41         *gpx2dat &= ~(0x1<<7);
 42     }
 43
 44     return 0;
 45 }
 46
 47 // read(fd, buf, size)  用户空间获取内核空间的数据
 48 ssize_t chr_drv_read (struct file *filp, const char __user *buf, size_t count, loff_t *fops)
 49 {
 50     printk("---------read %s-------------
",__FUNCTION__);
 51
 52     int ret;
 53     ret = copy_to_user(buf, &kernal_val, count);
 54     if(ret > 0)
 55     {
 56         printk("copy_to_user");
 57         return -EFAULT;
 58     }
 59
 60     return 0;
 61 }
 62
 63 int chr_drv_open (struct inode *inode, struct file *filp)
 64 {
 65     printk("---------open %s-------------
",__FUNCTION__);
 66
 67     return 0;
 68 }
 69
 70 int chr_drv_close (struct inode *inode, struct file *filp)
 71 {
 72     printk("---------close %s-------------
",__FUNCTION__);
 73
 74     return 0;
 75 }
 76
 77
 78
 79 const struct file_operations my_fops = {
 80     .open    = chr_drv_open,
 81     .read    = chr_drv_read,
 82     .write   = chr_drv_write,
 83     .release = chr_drv_close,
 84 };
 85
 86 static int __init chr_dev_init(void)
 87 {
 88     //装载一般都是申请设备号资源
 89     //申请设备号
 90     int ret;
 91
 92     ret = register_chrdev(dev_major, "chr_dev_test", &my_fops);
 93     if(ret == 0){
 94         printk("register ok
");
 95     }
 96     else{
 97         printk("register failed
");
 98         return -EINVAL;
 99     }
100
101     //自动创建设备节点
102     devcls = class_create(THIS_MODULE, "chr_cls");
103     dev = device_create(devcls,NULL,MKDEV(dev_major,dev_minor),NULL,"chr2");
104
105     //对地址进行映射
106     gpx2conf = ioremap(GPX2CON, GPX2_SIZE);  //映射两个寄存器
107     gpx2dat  = gpx2conf + 1;
108
109     printk("After ioremap : gpx2conf = 0x%p, gpx2dat = 0x%p
",gpx2conf,gpx2dat);
110
111     //配置GPIO为输出功能
112     *gpx2conf &= ~(0xf << 28);
113     *gpx2conf |=  (0x1 << 28);
114
115     return 0;
116 }
117
118 static void __exit chr_dev_exit(void)
119 {
120      //卸载一般都是释放资源
121     iounmap(gpx2conf);
122
123     //销毁节点和类
124     device_destroy(devcls,MKDEV(dev_major,dev_minor));
125     class_destroy(devcls);
126     //释放设备号
127      unregister_chrdev(dev_major, "chr_dev_test");
128 }
129
130 module_init
131 (chr_dev_init);
132 module_exit(chr_dev_exit);
133 MODULE_LICENSE("GPL");
 1 #include <stdio.h>
 2 #include <string.h>
 3 #include <stdlib.h>
 4 #include <unistd.h>
 5 #include <sys/types.h>
 6 #include <sys/stat.h>
 7 #include <fcntl.h>
 8
 9
10 int main(int argc, char * argv [ ])
11 {
12     //调用驱动
13     int fd;
14     int value = 0;  //buf
15
16     fd = open("/dev/chr2", O_RDWR);
17     if(fd < 0)
18     {
19         perror("open");
20         exit(1);
21     }
22
23     read(fd, &value, 4);   //应用程序从内核获取4字节数据存放在value中
24     printf("__USER__: value = %d
", value);  //打印获取的值
25     sleep(1);               //sleep1秒,防止串口打印信息不完整
26
27     //应用程序控制灯
28     while(1)
29     {
30         value = 0;
31         write(fd, &value, 4);
32         sleep(1);
33
34         value = 1;
35         write(fd, &value, 4);
36         sleep(1);
37     }
38
39
40     close(fd);
41
42     return 0;
43 }
测试:

执行app后,可以看到LED等以一秒的间隔亮灭