声明:这是转载的。
内容根据网上资料整理。
相关链接:
http://www.360doc.com/content/10/1118/16/2371584_70449913.shtml
http://www.iteye.com/topic/1121784
http://www.iteye.com/topic/295348
【正文】
一 注解优点?注解解决了什么问题,为什么要使用注解?
二 注解的来龙去脉(历史)
1 没有注解之前
- public class UserManagerImpl implements UserManager {
- private UserDao userDao;
- public void setUserDao(UserDao userDao) {
- this.userDao = userDao;
- }
- ...
- }
配置文件
- <bean id="userManagerImpl" class="com.kedacom.spring.annotation.service.UserManagerImpl">
- <property name="userDao" ref="userDao" />
- </bean>
- <bean id="userDao" class="com.kedacom.spring.annotation.persistence.UserDaoImpl">
- <property name="sessionFactory" ref="mySessionFactory" />
- </bean>
2 注解诞生之后
- public class UserManagerImpl implements UserManager {
- @Autowired
- private UserDao userDao;
- ...
- }
或者(对方法进行标注)
- public class UserManagerImpl implements UserManager {
- private UserDao userDao;
- @Autowired
- public void setUserDao(UserDao userDao) {
- this.userDao = userDao;
- }
- ...
- }
配置文件
- <bean id="userManagerImpl" class="com.kedacom.spring.annotation.service.UserManagerImpl" />
- <bean id="userDao" class="com.kedacom.spring.annotation.persistence.UserDaoImpl">
- <property name="sessionFactory" ref="mySessionFactory" />
- </bean>
@Autowired可以对成员变量、方法和构造函数进行标注,来完成自动装配的工作。以上两种不同实现方式中,@Autowired的标注位置不同,它们都会在Spring在初始化userManagerImpl这个bean时,自动装配userDao这个属性,区别是:第一种实现中,Spring会直接将UserDao类型的唯一一个bean赋值给userDao这个成员变量;第二种实现中,Spring会调用setUserDao方法来将UserDao类型的唯一一个bean装配到userDao这个属性。
要使@Autowired能够工作,还需要在配置文件中加入以下代码
- <bean class="org.springframework.beans.factory.annotation.AutowiredAnnotationBeanPostProcessor" />
可以看到确实是减少了代码和配置文件中的配置。
三 注解总体介绍
注解实现Bean配置主要用来进行如依赖注入、生命周期回调方法定义等,不能消除XML文件中的Bean元数据定义,且基于XML配置中的依赖注入的数据将覆盖基于注解配置中的依赖注入的数据。
Spring3的基于注解实现Bean依赖注入支持如下三种注解:
Spring自带依赖注入注解: Spring自带的一套依赖注入注解;
JSR-250注解:Java平台的公共注解,是Java EE 5规范之一,在JDK6中默认包含这些注解,从Spring2.5开始支持。
JSR-330注解:Java 依赖注入标准,Java EE 6规范之一,可能在加入到未来JDK版本,从Spring3开始支持;
JPA注解:用于注入持久化上下文和尸体管理器。
这三种类型的注解在Spring3中都支持,类似于注解事务支持,想要使用这些注解需要在Spring容器中开启注解驱动支持,即使用如下配置方式开启:
- <beans xmlns="http://www.springframework.org/schema/beans"
- xmlns:xsi="http://www.w3.org/2001/XMLSchema-instance"
- xmlns:context="http://www.springframework.org/schema/context"
- xsi:schemaLocation=" http://www.springframework.org/schema/beans
- http://www.springframework.org/schema/beans/spring-beans-3.0.xsd
- http://www.springframework.org/schema/context
- http://www.springframework.org/schema/context/spring-context-3.0.xsd">
- <context:annotation-config/>
- </beans>
这样就能使用注解驱动依赖注入了
Spring自带依赖注入注解
1 @Required:依赖检查;
2 @Autowired:自动装配2
自动装配,用于替代基于XML配置的自动装配
基于@Autowired的自动装配,默认是根据类型注入,可以用于构造器、字段、方法注入
3 @Value:注入SpEL表达式
用于注入SpEL表达式,可以放置在字段方法或参数上
@Value(value = "SpEL表达式")
@Value(value = "#{message}")
4 @Qualifier:限定描述符,用于细粒度选择候选者
@Qualifier限定描述符除了能根据名字进行注入,但能进行更细粒度的控制如何选择候选者
@Qualifier(value = "限定标识符")
JSR-250注解
1 @Resource:自动装配,默认根据类型装配,如果指定name属性将根据名字装配,可以使用如下方式来指定
@Resource(name = "标识符")
字段或setter方法
2 @PostConstruct和PreDestroy:通过注解指定初始化和销毁方法定义
JSR-330注解
1 @Inject:等价于默认的@Autowired,只是没有required属性
2 @Named:指定Bean名字,对应于Spring自带@Qualifier中的缺省的根据Bean名字注入情况
3 @Qualifier:只对应于Spring自带@Qualifier中的扩展@Qualifier限定描述符注解,即只能扩展使用,没有value属性
JPA注解
@PersistenceContext
@PersistenceUnit
用于注入EntityManagerFactory和EntityManager
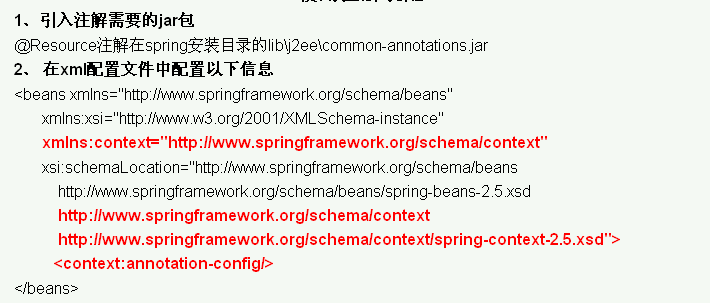
四 注解需要的jar包及配置
五 拓展:结合局部代码来说明注解
- @Autowired
- public void setUserDao(@Qualifier("userDao") UserDao userDao) {
- this.userDao = userDao;
- }
这样,Spring会找到id为userDao的bean进行装配。
2>可能不存在UserDao实例
- @Autowired(required = false)
- public void setUserDao(UserDao userDao) {
- this.userDao = userDao;
- }
3 @Resource(JSR-250标准注解,推荐使用它来代替Spring专有的@Autowired注解)
Spring 不但支持自己定义的@Autowired注解,还支持几个由JSR-250规范定义的注解,它们分别是@Resource、@PostConstruct以及@PreDestroy。
@Resource的作用相当于@Autowired,只不过@Autowired按byType自动注入,而@Resource默认按byName自动注入罢了。@Resource有两个属性是比较重要的,分别是name和type,Spring将@Resource注解的name属性解析为bean的名字,而type属性则解析为bean的类型。所以如果使用name属性,则使用byName的自动注入策略,而使用type属性时则使用byType自动注入策略。如果既不指定name也不指定type属性,这时将通过反射机制使用byName自动注入策略。
@Resource装配顺序
如果同时指定了name和type,则从Spring上下文中找到唯一匹配的bean进行装配,找不到则抛出异常
如果指定了name,则从上下文中查找名称(id)匹配的bean进行装配,找不到则抛出异常
如果指定了type,则从上下文中找到类型匹配的唯一bean进行装配,找不到或者找到多个,都会抛出异常
如果既没有指定name,又没有指定type,则自动按照byName方式进行装配(见2);如果没有匹配,则回退为一个原始类型(UserDao)进行匹配,如果匹配则自动装配;
在方法上加上注解@PostConstruct,这个方法就会在Bean初始化之后被Spring容器执行(注:Bean初始化包括,实例化Bean,并装配Bean的属性(依赖注入))。
它的一个典型的应用场景是,当你需要往Bean里注入一个其父类中定义的属性,而你又无法复写父类的属性或属性的setter方法时,如:
- public class UserDaoImpl extends HibernateDaoSupport implements UserDao {
- private SessionFactory mySessionFacotry;
- @Resource
- public void setMySessionFacotry(SessionFactory sessionFacotry) {
- this.mySessionFacotry = sessionFacotry;
- }
- @PostConstruct
- public void injectSessionFactory() {
- super.setSessionFactory(mySessionFacotry);
- }
- ...
- }
这里通过@PostConstruct,为UserDaoImpl的父类里定义的一个sessionFactory私有属性,注入了我们自己定义的sessionFactory(父类的setSessionFactory方法为final,不可复写),之后我们就可以通过调用super.getSessionFactory()来访问该属性了。
在方法上加上注解@PreDestroy,这个方法就会在Bean初始化之后被Spring容器执行。由于我们当前还没有需要用到它的场景,这里不不去演示。其用法同@PostConstruct。
Spring2.1添加了一个新的context的Schema命名空间,该命名空间对注释驱动、属性文件引入、加载期织入等功能提供了便捷的配置。我们知道注释本身是不会做任何事情的,它仅提供元数据信息。要使元数据信息真正起作用,必须让负责处理这些元数据的处理器工作起来。
- <beans xmlns="http://www.springframework.org/schema/beans" xmlns:xsi="http://www.w3.org/2001/XMLSchema-instance" xmlns:context="http://www.springframework.org/schema/context"
- xsi:schemaLocation="http://www.springframework.org/schema/beans
- http://www.springframework.org/schema/beans/spring-beans-2.5.xsd
- http://www.springframework.org/schema/context
- http://www.springframework.org/schema/context/spring-context-2.5.xsd">
- <context:annotation-config />
- </beans>
<context:annotationconfig />将隐式地向Spring容器注册AutowiredAnnotationBeanPostProcessor、CommonAnnotationBeanPostProcessor、 PersistenceAnnotationBeanPostProcessor以及RequiredAnnotationBeanPostProcessor这4个BeanPostProcessor。
以上我们介绍了通过@Autowired或@Resource来实现在Bean中自动注入的功能,下面我们将介绍如何注解Bean,从而从XML配置文件中完全移除Bean定义的配置。
只需要在对应的类上加上一个@Component注解,就将该类定义为一个Bean了:
- @Component
- public class UserDaoImpl extends HibernateDaoSupport implements UserDao {
- ...
- }
使用@Component注解定义的Bean,默认的名称(id)是小写开头的非限定类名。如这里定义的Bean名称就是userDaoImpl。你也可以指定Bean的名称:
@Component("userDao")
@Component是所有受Spring管理组件的通用形式,Spring还提供了更加细化的注解形式:@Repository、@Service、@Controller,它们分别对应存储层Bean,业务层Bean,和展示层Bean。目前版本(2.5)中,这些注解与@Component的语义是一样的,完全通用,在Spring以后的版本中可能会给它们追加更多的语义。所以,我们推荐使用@Repository、@Service、@Controller来替代@Component。
- <beans xmlns="http://www.springframework.org/schema/beans" xmlns:xsi="http://www.w3.org/2001/XMLSchema-instance" xmlns:context="http://www.springframework.org/schema/context"
- xsi:schemaLocation="http://www.springframework.org/schema/beans
- http://www.springframework.org/schema/beans/spring-beans-2.5.xsd
- http://www.springframework.org/schema/context
- http://www.springframework.org/schema/context/spring-context-2.5.xsd">
- <context:component-scan base-package="com.kedacom.ksoa" />
- </beans>
这里,所有通过<bean>元素定义Bean的配置内容已经被移除,仅需要添加一行<context:component-scan />配置就解决所有问题了——Spring XML配置文件得到了极致的简化(当然配置元数据还是需要的,只不过以注释形式存在罢了)。<context:component-scan />的base-package属性指定了需要扫描的类包,类包及其递归子包中所有的类都会被处理。
<context:component-scan />还允许定义过滤器将基包下的某些类纳入或排除。Spring支持以下4种类型的过滤方式:
过滤器类型 表达式范例 说明
注解 org.example.SomeAnnotation将所有使用SomeAnnotation注解的类过滤出来
类名指定 org.example.SomeClass过滤指定的类
正则表达式 com.kedacom.spring.annotation.web..*通过正则表达式过滤一些类
AspectJ表达式 org.example..*Service+通过AspectJ表达式过滤一些类
以正则表达式为例,我列举一个应用实例:
- <context:component-scan base-package="com.casheen.spring.annotation">
- <context:exclude-filter type="regex" expression="com.casheen.spring.annotation.web..*" />
- </context:component-scan>
- @Scope("session")
- @Component()
- public class UserSessionBean implements Serializable {
- ...
- }
六 一个完整的例子
为了加深印象,又增加了一个完整的例子。
例子来源
http://blog.csdn.net/pk490525/article/details/8096326
spring零配置(Annotation)学习笔记
本地例子:
AnnotationTest
本地有细小的改变
project用到的jar包

先上bean-config.xml
- <?xml version="1.0" encoding="UTF-8"?>
- <beans xmlns="http://www.springframework.org/schema/beans"
- xmlns:xsi="http://www.w3.org/2001/XMLSchema-instance"
- xmlns:context="http://www.springframework.org/schema/context"
- xsi:schemaLocation="http://www.springframework.org/schema/beans
- http://www.springframework.org/schema/beans/spring-beans-3.0.xsd
- http://www.springframework.org/schema/context
- http://www.springframework.org/schema/context/spring-context-3.0.xsd">
- <context:annotation-config/>
- <!-- action暂未用注解 -->
- <bean id="myAction" class="com.demo.annotation.action.MyAction" scope="prototype" />
- <!-- 注解测试 -->
- <context:component-scan base-package="com.demo.annotation" />
- </beans>
service 接口
- /**
- *
- * Annotation
- *
- */
- public interface TestService {
- /**
- * 注解测试
- * @return
- */
- public String getTestAnnotation();
- }
service实现类
- import org.springframework.stereotype.Service;
- import com.demo.annotation.dao.TestDao;
- import org.springframework.beans.factory.annotation.Autowired;
- import org.springframework.beans.factory.annotation.Qualifier;
- /**
- *
- * 注解测试
- *
- */
- @Service("testService")
- public class TestServiceImp implements TestService {
- /**
- * 自动装配
- */
- @Autowired
- @Qualifier("testDao")
- //@Resource(name="testDao"), 等价于<property ………… ref="testDao" />
- private TestDao testDao;
- public TestDao getTestDao() {
- return testDao;
- }
- public void setTestDao(TestDao testDao) {
- this.testDao = testDao;
- }
- @Override
- public String getTestAnnotation() {
- // TODO Auto-generated method stub
- return testDao.getTestDaoAnnotation();
- }
- }
dao接口
- /**
- * 测试注解
- *
- */
- public interface TestDao {
- /**
- * 得到dao层注解
- * @return
- */
- public String getTestDaoAnnotation();
- }
dao层实现类
- import org.springframework.stereotype.Repository;
- /**
- * 测试Annotation
- *
- */
- @Repository("testDao")
- public class TestDaoImpl implements TestDao {
- @Override
- public String getTestDaoAnnotation() {
- // TODO Auto-generated method stub
- return "This is testDao Annotation...";
- }
- }
Action类
- import javax.annotation.Resource;
- import com.demo.annotation.service.TestService;
- public class MyAction{
- @Resource(name="testService")
- private TestService testService;
- public String testAnnotation(){
- if(null == testService){
- System.out.println("Service is null!!");
- }
- String result = testService.getTestAnnotation();
- System.out.println(result);
- return "success";
- }
- public TestService getTestService() {
- return testService;
- }
- public void setTestService(TestService testService) {
- this.testService = testService;
- }
- }
测试类
- import org.springframework.context.ApplicationContext;
- import org.springframework.context.support.ClassPathXmlApplicationContext;
- import com.demo.annotation.action.MyAction;
- public class TestAnnotation {
- public static void main(String[] args) {
- ApplicationContext context = new ClassPathXmlApplicationContext("bean-config.xml");
- MyAction action = (MyAction)context.getBean("myAction");
- action.testAnnotation();
- }
- }
七 总结
Annotation的好处:
简化了xml文件
坏处:
1 spring一直宣称是无侵入的,annotation是否是侵入了?
2 很多类都是pojo的对象,引入annotation后还是pojo么?
3 增加了复杂度
spring官方的态度是两种让你混合着用。
最后:
推荐
http://snowolf.iteye.com/blog/577989
snowolf的Spring 注解学习手札 有代码有文字说明可运行可测试