一、HelloWorld
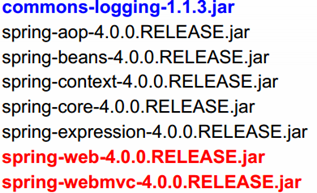
1.导入SpringMVC所需的jar包
2.配置web.xml
配置DispatcherServlet。DispatcherServlet默认加载/WEB-INF/<servletName-servlet>.xml 的Spring配置文件,启动Web层的Spring容器。可以通过contextConfigLocation初始化参数自定义配置文件的位置和名称。
web.xml
<?xml version="1.0" encoding="UTF-8"?>
<web-app version="3.0" xmlns="http://java.sun.com/xml/ns/javaee"
    xmlns:xsi="http://www.w3.org/2001/XMLSchema-instance"
    xsi:schemaLocation="http://java.sun.com/xml/ns/javaee
    http://java.sun.com/xml/ns/javaee/web-app_3_0.xsd">


    <!-- 配置DispatcherServlet -->
    <servlet>
        <servlet-name>dispatcherServlet</servlet-name>
        <servlet-class>org.springframework.web.servlet.DispatcherServlet</servlet-class>
        <!-- 配置 DispatcherServlet 的一个初始化参数: 配置 SpringMVC 配置文件的位置和名称 -->
        <init-param>
            <param-name>contextConfigLocation</param-name>
            <param-value>classpath:springmvc.xml</param-value>
        </init-param>
    </servlet>

    <servlet-mapping>
        <servlet-name>dispatcherServlet</servlet-name>
        <url-pattern>/</url-pattern>
    </servlet-mapping>

</web-app>
3.创建SpringMVC的配置文件
springmvc.xml
<?xml version="1.0" encoding="UTF-8"?>
<beans xmlns="http://www.springframework.org/schema/beans"
    xmlns:xsi="http://www.w3.org/2001/XMLSchema-instance"
    xmlns:context="http://www.springframework.org/schema/context"
    xmlns:mvc="http://www.springframework.org/schema/mvc"
    xsi:schemaLocation="http://www.springframework.org/schema/beans
                        http://www.springframework.org/schema/beans/spring-beans.xsd
                        http://www.springframework.org/schema/context
                        http://www.springframework.org/schema/context/spring-context.xsd
                        http://www.springframework.org/schema/mvc
                        http://www.springframework.org/schema/mvc/spring-mvc.xsd">

        <!-- 配置自动扫描的包 -->
        <context:component-scan base-package="com.kiwi"/>

        <!-- 配置视图解析器: 如何把handler方法返回值解析作为实际的物理视图-->
        <bean class="org.springframework.web.servlet.view.InternalResourceViewResolver">
            <property name="prefix" value="/WEB-INF/views/"/>
            <property name="suffix" value=".jsp"/>
        </bean>
</beans>
4.创建请求处理类
@Controller
public class HelloWorld{

	/*
	 * 1.使用@RequestMapping注解来映射请求的URL
	 * 2.返回值会通过视图解析器解析为实际的物理视图,对于InternalResourceViewResolver会做如下解析
	 *   prefix + returnVal + "suffix 会得到实际的物理视图,然后做转发操作
	 *   /WEB-INF/views/success.jsp
	 */
	@RequestMapping("/helloWorld")
	public String hello(){
		System.out.println("Hello World");
		return "success";
	}
}
index.jsp
<a href="helloWorld">Test</a>
二、使用@RequestMapping映射请求
1.@RequestMapping修饰类
(1)SpringMVC使用@RequestMapping注解为控制器指定可以处理哪些URL请求。
(2)@RequestMapping可以在类和方法处定义:
类定义处: 提供初步的请求映射信息,相当于WEB应用的根目录。
方法处: 提供细分映射信息,相当于类定义处URL,如果类定义未标注,相当于WEB根目录。
@Controller
@RequestMapping("/demo")
public class TestDemo{

	private static final String SUCCESS = "success";

	/*
	 * 1.@RequestMapping不仅可以修饰方法,还可以修饰类
	 */
	@RequestMapping("/test")
	public String test(){

		System.out.println("test()......");

		return SUCCESS;
	}
}
此时请求路径: http://localhost:8080/springmvc-01/demo/test
(1)类定义处@RequestMapping限定处理器类可以处理所有URI为"/demo"的请求,它相当于WEB容器的根目录。
(2)处理器可以定义多个方法来处理来之"/demo"的请求。
2.请求参数、请求方法、请求头
(1)@RequestMapping除了可以使用请求URL映射请求外,还可以使用请求方法、请求参数及请求头映射请求。
(2)value、method、params及headers分别表示请求URL、请求方法、请求参数、请求头。
(3)params和headers支持简单的表达式。
param1: 请求必须包含param1的请求参数。
!param1: 表示请求不能包含名为param1的请求参数。
param1 != value1: 请求包含名为param1的请求参数但是不能为value1。
	/*
	 * 1.请求方式必须是GET请求
	 * 2.请求参数必须带有"name"
	 * 3.eg: http://localhost:8080/springmvc-01/demo/method?name=Tom
	 */
	@RequestMapping(value="/method",method=RequestMethod.GET,params="name")
	public String testMethod(){

		return SUCCESS;
	}
3.匹配符
?: 匹配文件名中的一个字符。
*: 匹配文件名中的任意字符。
**: 匹配多层路径。
/a/*/b
匹配: /a/aaa/b、/a/bbb/b
/a/**/b
匹配: /a/b、/a/aaa/bbb/b
/a/b??
匹配: /a/baa、/a/bbb
4.@PathVariable映射URL绑定的占位符
通过@PathVariable可以将URL中站位符参数绑定到控制器处理方法的入参中。
	@RequestMapping(value = "/user/{userId}/role/{roleId}",method = RequestMethod.GET)
	public String getLogin(@PathVariable("userId") String userId,
						   @PathVariable("roleId") String roleId){
		System.out.println("User Id : " + userId);
		System.out.println("Role Id : " + roleId);
		return SUCCESS;
	}
http://localhost:8080/springmvc-01/demo/user/11/role/22
结果:
User Id : 11
Role Id : 22
5.使用@RequestParam绑定请求参数值
(1)在处理方法入参处使用@RequestParam可以把请求参数传递给请求方法。
(2)value: 参数名。
required: 是否必须,默认为true。表示请求参数必须包含对应的参数,不存在,将抛出异常。
	@RequestMapping("/param")
	public String testParam(@RequestParam(value="username",required=false) String username,
						  @RequestParam(value="password") String password){

		System.out.println("username: " + username);
		System.out.println("password: " + password);

		return SUCCESS;
	}
http://localhost:8080/springmvc-01/demo/param?username=Tom&password=123
结果:
username: Tom
password: 123
6.使用POJO对象绑定请求参数值
SpringMVC会按请求参数名和POJO属性名进行自动匹配,自动为该对象填充属性值,支持级联属性。
index.jsp
<form action="${pageContext.request.contextPath}/demo/test" method="post">
          username: <input type="text" name="username"/><br>
          password: <input type="password" name="password"/><br>
          province: <input type="text" name="address.province"/><br>
          city: <input type="text" name="address.city"/><br>

          <input type="submit" value="提交"/>
</form>
User.java
TestDemo.java
@Controller
@RequestMapping("/demo")
public class TestDemo{

	private static final String SUCCESS = "success";

	@RequestMapping("/test")
	public String testPOJO(User user){

		System.out.println(user);

		return SUCCESS;
	}

}
结果:
User [username=Tom, password=123, address=Address [province=BeiJing, city=Changping]]
7.使用Servlet API作为入参
可以接受以下类型的参数:
1.HttpServletRequest、2.HttpServletResponse、3.HttpSession、4.java.security.Principal
5.Locale、6.InputStream、7.OutputStream、8.Reader
	@RequestMapping("/test")
	public String testServlet(HttpServletRequest request){

		String username = request.getParameter("username");

		System.out.println(username);

		return SUCCESS;
	}
http://localhost:8080/springmvc-01/demo/test?username=Tom
结果:
Tom

