0、前言
sentinel的限流、降级功能强大,可以在控制面板中任意制定规则,然后推送到微服务中;
可以根据URL单独制定规则,也可以根据资源名批量制定规则;
需要注意的地方是:1、GITHUB文件在国外的亚马逊服务器已经彻底被墙,无法下载,只能想法找国内的分享,自求多福
2、控制面板制定的规则只保存在内存中,重启就会消失,需要配合其他方式实现持久化存储规则,这点在生产环境中需要注意
1、运行sentinel
sentinel只是一个JAR包,下载下来后,直接命令运行该JAR就行,默认的端口是8080,可以自己制定其他端口运行,如下指定8849端口运行:
java -Dserver.port=8849 -jar sentinel-dashboard-1.6.3.jar
2、项目集成
这里需要先搞清楚:
限流:就是请求多了,对请求进行定制的快速响应处理,应用在服务提供者本身;
降级:就是熔断了,再简单点说就相当于服务断开了、服务不可用了,服务崩溃了,
所以降级逻辑应该应用在消费者(调用者)那里,加在服务提供者本身是毫无意义的,因为服务已经断开了
一般我们在项目中:
1、限流和熔断都可以直接在网关统一处理,不需要在微服务本身做限流处理,
2、但在微服务调用其他微服务时,还是需要增加熔断处理的,这其实是两个层级API调用的熔断;
3、所以,一般情况下,网关spring cloud gateway 中做限流和一级熔断,在微服务内部调用时hystrix做二级熔断;
4、不是项目比较庞大,需要控制比较细致的话,sentinel其实比较鸡肋,用处不大,用hystrix更方便更实用,如果是大型电商,要对每个API都就精确细致控制,那可以考虑sentinel,否则,个人还是不建议使用的,使用以上组合更贴合实际;
2-1、限流
2-1-1、添加依赖
        <!-- 集成sentinel -->
        <dependency>
            <groupId>com.alibaba.cloud</groupId>
            <artifactId>spring-cloud-starter-alibaba-sentinel</artifactId>
            <version>2.0.1.RELEASE</version>
        </dependency>
2-1-2、添加配置
这里需要注意:项目集成sentinel,会占用一个端口开启http服务,用来发送心跳检测以检测健康状态,
sentinel控制台默认占用的是8719;集成的项目中,会在8719端口以后自动需找一个可用的端口,比如8720,8720不可用就会找8721,以此顺序往下找;
有些人直接在配置文件中指定该HTTP服务端口:如sentinel.port=8720;这种方式很不推荐,因为我们的系统包含很多服务,没个服务又会启动很多实例,如果要指定的话那那么多个实例都要一一配置,还要避免端口冲突,工作量大很繁琐,且容易混乱;
所以,不要认为指定该端口,让系统自动去找可用端口即可,并且我们在端口分配时,可以避开8700-8800这两个段的端口,应对大型集群,留给它预留好了,端口多的是
server:
  port: 8761
spring:
  application:
    name: nacos-user
  cloud:
    nacos:
      discovery:
        server-addr: 127.0.0.1:8848

    sentinel:
      transport:
        dashboard: localhost:8849
      eager: true
2-1-3、controller中增加限流
   在方法上增加@SentinelResource注解,
  value是资源名称,对应sentinel中指定的一个规则,多个方法可以使用同一个名称,也就是批量应用规则
  blockHandler是限流后执行的方法名;
   @RequestMapping("/hello")
    @SentinelResource(value = "userblock1",blockHandler = "BlockHello")  //sentinel限流
    public  String Hello()
    {
        return  ("hello world" +serviceUtil.getPort());
    }

    //-----------限流、降级的handler-----------------
    public  String BlockHello(BlockException exception)   //1、限流
    {
        return  ("少年,限流了 --Port:" +serviceUtil.getPort());
    }
    //---------------------------------------------
2-1-4、运行测试
1、运行程序,执行一次user/hello方法
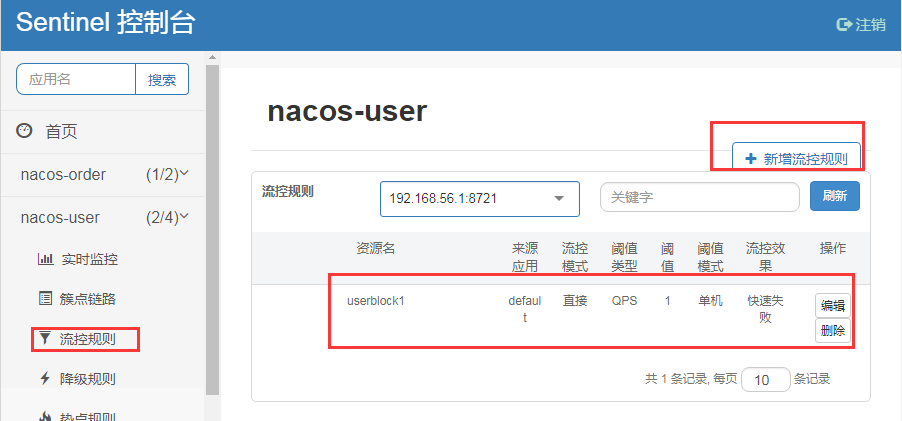
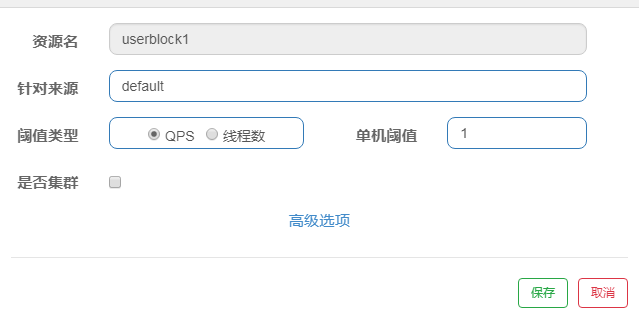
2、在sentinel控制面板中,增加userblock1的限流规则,再次运行/user/hello,就可以看到效果:

2-2、熔断降级(feign的方式)
2-2-1、添加依赖
        <!-- 集成sentinel -->
        <dependency>
            <groupId>com.alibaba.cloud</groupId>
            <artifactId>spring-cloud-starter-alibaba-sentinel</artifactId>
            <version>2.0.1.RELEASE</version>
        </dependency>

        <!-- 集成feign -->
        <dependency>
            <groupId>org.springframework.cloud</groupId>
            <artifactId>spring-cloud-starter-openfeign</artifactId>
        </dependency>
2-2-2、增加配置
server:
  port: 8765
spring:
  application:
    name: nacos-order
  cloud:
    nacos:
      discovery:
        server-addr: 127.0.0.1:8848
    sentinel:
      transport:
        dashboard: localhost:8849
      eager: true
feign:
  sentinel:
    enabled: true #打开sentinel对feign的支持
2-2-3、实现
增加feign接口
@FeignClient(name = "nacos-user",fallback = UserFallbackService.class)
public interface UserClient
{
    @RequestMapping("/user/hello")
    String hello();
}
增加实现类
@Component
public class UserFallbackService implements UserClient
{
    @Override
    public String hello()
    {
        String rt="";
        rt="少年,服务被降级停用了,等等再来吧!!";
        return  rt;
    }
}
controller注入使用
    @Autowired
    private UserClient userClient;

    @RequestMapping("/order2")
    public  String order2()
    {
        return userClient.hello();
    }
2-2-4、运行测试
启动order,不启动user,运行order/order2,可以看到运行结果

sentinel就是这么简单灵活, 持久化和集群处理后续再来探讨