前言
啦啦啦~本学期要开始学习Android开发啦~
博主在开始学习前是完完全全的小白,只有在平时完成老师要求的实验的过程中一步一步学习~从此篇博文起,博主将开始发布Android开发有关的博文,希望能在学习中和各位共同探讨,一起交流,共同进步~
话不多说,首先进入我们的正题~Android开发一基本UI界面设计——布局和组件(Android Studio的配置安装使用等在以后为各位补上~)
基础知识
Android的组件分为布局和控件。布局,就是让控件在里面按一定的次序排列好的一种组件,本身并不提供内容。控件,就是显示内容的组件,比如显示一张图片,显示文字等等。在Android中,共有五种布局方式,分别是:FrameLayout(框架布局),LinearLayout (线性布局),AbsoluteLayout(绝对布局),RelativeLayout(相对布局),TableLayout(表格布局)。
(1)FrameLayout 框架布局,放入其中的所有元素都被放置在最左上的区域,而且无法为这些元素指定一个确切的位置,下一个子元素会重叠覆盖上一个子元素,适合浏览单张图片。
(2)LinearLayout 线性布局,是应用程序中最常用的布局方式,主要提供控件水平或者垂直排列的模型,每个子组件都是以垂直或水平的方式来定位.(默认是垂直)
(3)AbsoluteLayout 绝对定位布局,采用坐标轴的方式定位组件,左上角是(0,0)点,往右x轴递增,往下Y轴递增,组件定位属性为android:layout_x 和 android:layout_y来确定坐标。
(4)RelativeLayout 相对布局,根据另外一个组件或是顶层父组件来确定下一个组件的位置。和CSS里面的类似。
(5)TableLayout 表格布局,类似Html里的Table.使用TableRow来布局,其中TableRow代表一行,TableRow的每一个视图组件代表一个单元格。
线性布局
在这其中,线性布局和相对布局是最常用的布局方式(本篇主要讲线性布局,相对布局在接下来的文章中会有具体叙述和应用~)
线性布局是程序中最常见的一种布局方式,简单来说,直着排,横着排都可以,还可以嵌套,正因为如此(方便且简单),此布局运用的非常多。
线性布局可以分为水平线性布局和垂直线性布局两种, 通过android:orientation属性可以设置线性布局的方向。
在线性布局中主要存在以下属性:
android:orientation 定义布局内的方向水平或垂直(horizontal/vertical )
android:layout_weight 子元素对未占用空间【水平或垂直】分配权重值,其值越小,权重越大。
android:layout_width - 宽(1.fill_parent: 父元素决定,2.wrap_content: 本身的内容决定)
android:layout_height - 高(3.高直接指定一个 px 值);
android:gravity - 内容的排列形式(常用 top, bottom, left, right, center,Left|center_)
在讲线性布局相关的组件前,我们先讲一下可以在线性布局中嵌套使用的另一种常用布局方式:
TableLayout
即表格布局,当需要布局内的组件像表格一样排列时,使用 TableLayout 比较方便。表格布局采用行、列 的形式来管理 UI 组件,TableLayout 并不需要明确地声明包含多少行、多少列,而是通过添加 TableRow、其他组件来控制表格的行数和列数。每次向 TableLayout 中添加一个 TableRow,该 TableRow 就是一个表格行,TableRow 也是容器,因此它也可以不断地添加其他组件,每添加一个子组件该表格就增加一列。
如果直接向 TableLayout 中添加组件,那么这个组件将直接占用一行。 在表格布局中,列的宽度由该列中最宽的那个单元格决定,整个表格布局的宽度则取决于父容器的宽度。(默认总是占满父容器本身)
三个重要的 xml 属性:
collapseColumns:设置需要被隐藏的列的列序号,多个列序号之间用逗号隔开;
shrinkColumns:设置允许被收缩的列序号,多个列序号之间用逗号隔开;
stretchColumns:设置允许被拉伸的列序号,多个列序号之间用逗号隔开。
注意,列序号从0开始计数。
现在正式讲一下线性布局中可能用到的组件:
TextView
用于显示文字内容的控件,通过设置 text 的值来显示要显示的内容,常用的属性有 textColor,用于设置文字的颜色;textSize,用于设置文字大小。示例:
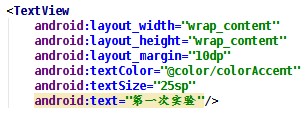
效果图:

关于@color/colorAccent 这种形式的资源引用后面会讲。
EditText
用于接受用户输入的输入框,常用属性除了和TextView相同的 textColor和 textSize之外,还有inputType,用于设置输入框中文本的类型,如果设置为textPassword,会使输入的文字变为小点(·); hint,用于设置当输入框为空时的提示内容。以一个密码输入框做示例:
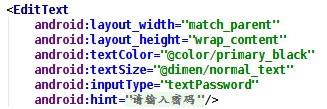
效果如下
未输入前:
输入之后:
ImageView
显示图片的控件,通过设置 src 来设置要显示的图片


sysu.jpg
关于 ImageView 的 src 和 background 属性的区别,自行查阅资料。
RadioButton 和 RadioGroup
RadioButton是单选按钮,一组单选按钮需要包括在一个RadioGroup中,并且需要对RadioGroup和其包括的每一个RadioButton都设置id,RadioButton才能正常工作。示例:
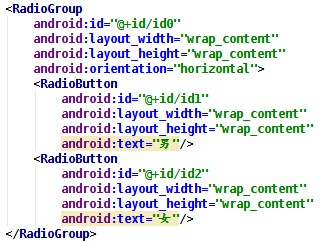
可通过设置 checked 属性来使某个 RadioButton 被选中。
组件的介绍就到这里,下面简单介绍以下几个重要的通用属性:
layout_width 和 layout_height
这两个属性分别指定所属组件的宽度和高度,属性值可以是具体的距离,如:20dp,更常见的是指定为 match_parent 或者 wrap_content,match_parent 指的是组件的宽度或高度与父组件的宽度或高度一致,如果组件没有父组件,那么组件的宽度或高度与屏幕的宽度或高度一致。wrap_content 指组件的宽度或高 度刚好可以包裹住组件内的子组件即可。
layout_gravity 和 gravity
这两个属性的基本属性值有五种:top、bottom、center、left、right,可以使用组合属性,如 left|bottom 表示左下角。区别在于 layout_gravity 用于指定设置该属性的组件相对于父组件的位置,gravity 用于指定设置该属性的组件下的子组件的位置。
layout_margin 和 padding
layout_margin 指定外边距,padding 指定内边距,这两个属性配合上四个方向还各有四个属性,如layout_marginTop,paddingTop等。
实验步骤
接下来我们来看一看本次实验的要求:
实现一个 Android 应用,界面呈现如下效果:
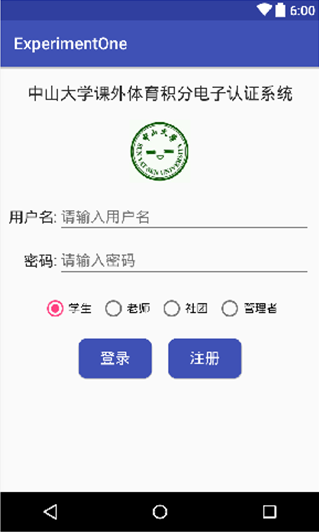
这里我们需要使用LinearLayout 即线性布局(布局内组件按线性排列的布局)。
运用android:orientation="vertical"将整体布局设置为纵向。使用TextView组件(用于显示文字内容的控件,通过设置 text的值来显示要显示的内容)显示标题信息,按照要求设置好文本属性,接着使用ImageView组件(显示图片的控件,通过设置 src来设置要显示的图片)将图片素材添加进去。
在添加输入框时我们需要使用TextView和EditText(用于接受用户输入的输入框)组件。在这里使用嵌套,使用两个横向的线性结构,将两行输入框设置好。将密码输入框的inputType属性设置为"textPassword",防止输入密码时可见。
在设置单选按钮时我们使用RadioButton和 RadioGroup组件(RadioButton是单选按钮,一组单选按钮需要包括在一个RadioGroup中,并且需要对RadioGroup和其包括的每一个 RadioButton都设置id,RadioButton才能正常工作),按照要求设置四个单选按钮将第一个按钮的checked属性设置为"true"。
主界面代码如下:
<?xml version="1.0" encoding="utf-8"?>
<LinearLayout xmlns:android="http://schemas.android.com/apk/res/android"
    android:layout_width="match_parent"
    android:layout_height="match_parent"
    android:background="@color/colorWhite"
    android:orientation="vertical">

    <TextView
        android:layout_width="wrap_content"
        android:layout_height="wrap_content"
        android:id="@+id/SYSU"
        android:layout_gravity="center"
        android:layout_marginTop="20dp"
        android:text="课外体育积分电子认证系统"
        android:textSize="20sp"
        android:textStyle="bold" />

    <ImageView
        android:layout_width="80dp"
        android:layout_height="80dp"
        android:id="@+id/Image"
        android:layout_gravity="center"
        android:layout_marginBottom="20dp"
        android:layout_marginTop="20dp"
        android:contentDescription="@string/app_name"
        android:src="@mipmap/sysu" />

    <TableLayout
        android:layout_width="match_parent"
        android:layout_height="wrap_content"
        android:stretchColumns="1"
        android:layout_marginRight="20dp"
        android:layout_marginLeft="20dp">
        <TableRow>
            <TextView
                android:layout_width="wrap_content"
                android:layout_height="wrap_content"
                android:id="@+id/username1"
                android:text="@string/username1"
                android:textSize="@dimen/etWordSp"/>
            <EditText
                android:layout_width="match_parent"
                android:layout_height="wrap_content"
                android:inputType="textPersonName"
                android:hint="@string/username2"
                android:id="@+id/editText"/>
        </TableRow>
        <TableRow
            android:layout_marginTop="10dp">
            <TextView
                android:layout_width="wrap_content"
                android:layout_height="wrap_content"
                android:id="@+id/password1"
                android:text="@string/password1"
                android:gravity="end"
                android:textSize="@dimen/etWordSp"/>
            <EditText
                android:layout_width="match_parent"
                android:layout_height="wrap_content"
                android:inputType="textPassword"
                android:hint="@string/password2"
                android:id="@+id/editText2"/>
        </TableRow>
    </TableLayout>

    <RadioGroup
        android:layout_width="wrap_content"
        android:layout_height="wrap_content"
        android:layout_gravity="center"
        android:layout_marginTop="10dp"
        android:orientation="horizontal">

        <RadioButton
            style="@style/radioButtonStyle"
            android:id="@+id/radio1"
            android:checked="true"
            android:text="@string/student" />

        <RadioButton
            style="@style/radioButtonStyle"
            android:id="@+id/radio2"
            android:text="@string/teacher" />

        <RadioButton
            style="@style/radioButtonStyle"
            android:id="@+id/radio3"
            android:text="@string/corporation" />

        <RadioButton
            android:layout_width="wrap_content"
            android:layout_height="wrap_content"
            android:id="@+id/radio4"
            android:text="@string/manager"
            android:textSize="@dimen/etWordSp" />

    </RadioGroup>

    <LinearLayout xmlns:android="http://schemas.android.com/apk/res/android"
        android:layout_width="wrap_content"
        android:layout_height="wrap_content"
        android:layout_gravity="center"
        android:layout_marginTop="20dp"
        android:orientation="horizontal">

        <Button
            style="@style/Button"
            android:layout_marginRight="5dp"
            android:text="@string/signIn" />

        <Button
            style="@style/Button"
            android:text="@string/register" />

    </LinearLayout>

</LinearLayout>
最后在设置按钮时,我们需要设置自定义背景边框来实现登录按钮的背景:

当需要将一个 button设置为圆角矩形时,光设置 button的属性是达不到效果的,需要定义一个背景边框来达到这个效果。这种自定义的背景边框定义在drawable文件夹下——在drawable文件夹下新建一个Drawable resource file,填写file name,然后把自动生成的 selector标签改为shape,shape下有多个属性,padding,radius,solid等等,按照教程 http://blog.csdn.net/sysukehan/article/details/52022307 将其中的属性设置好,在Button中设置background为@drawable/shape.xml来引用这个自定义的背景(android:background="@drawable/shape")。
<?xml version="1.0" encoding="utf-8"?>
<shape xmlns:android="http://schemas.android.com/apk/res/android"
    android:shape="rectangle" >

    <solid android:color="#3F51B5" />
    <corners android:radius="10dip" />
    <padding
        android:bottom="5dp"
        android:left="10dp"
        android:right="10dp"
        android:top="5dp" />
</shape>
此外,Android项目中不建议使用硬编码来使用资源,建议将各类资源定义在 res文件夹中的 values文件夹下,字符串资源定义在strings.xml中,颜色资源定义在colors.xml中,距离,字体大小资源定义在 dimens.xml中。图片资源例外,是存放在res文件夹中的mipmap文件夹下或者drawable文件夹下。style定义在 res/values/styles.xml文件中,也是一种资源。例如当多个TextView具有相同的 layout_height,layout_width,textSize,textColor设定时,如果每次都要把这些属性设定一次会很烦,而且如果全部需要修改的话(改变字体大小)也不方便,因此可以把这些属性统一定义为一个style,这样使用的时候只要直接引用这个style即可。在这里我们设置两个style,即radioButtonStyle和Button。
strings.xml
<resources>
    <string name="app_name">My Application1</string>
    <string name="action_settings">Settings</string>
    <string name="signIn">登录</string>
    <string name="register">注册</string>
    <string name="student">学生</string>
    <string name="teacher">老师</string>
    <string name="corporation">社团</string>
    <string name="manager">管理者</string>
    <string name="username1">用户名:</string>
    <string name="username2">请输入用户名</string>
    <string name="password1">密码:</string>
    <string name="password2">请输入密码</string>
</resources>
styles.xml
    <style name="radioButtonStyle">
        <item name="android:layout_width">wrap_content</item>
        <item name="android:layout_height">wrap_content</item>
        <item name="android:layout_marginRight">10dp</item>
        <item name="android:textSize">@dimen/etWordSp</item>
    </style>

    <style name="Button">
        <item name="android:layout_width">wrap_content</item>
        <item name="android:layout_height">wrap_content</item>
        <item name="android:textSize">@dimen/etWordSp</item>
        <item name="android:textColor">@color/colorWhite</item>
        <item name="android:background">@drawable/shape</item>
    </style>
关于资源的引用
Android 项目中不建议使用硬编码来使用资源,建议将各类资源定义在 res 文件夹中的 values 文件夹下, 字符串资源定义在 strings.xml 中,颜色资源定义在 colors.xml 中,距离、字体大小资源定义在 dimens.xml 中。图片资源例外,是存放在 res 文件夹中的 mipmap 文件夹下或者 drawable 文件夹下。给个示例看一下怎么定义:
colors.xml
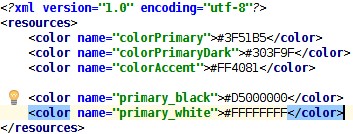
通过键值对来定义,使用的时候用@color/colorAccent 即可引用到对应资源,注意是@color 不是@colors,这里和文件名是不相同的。其它资源的引用也一样。
关于自定义 style
style 定义在 res/values/styles.xml 文件中,也是一种资源。例如当多个 TextView 具有相同的 layout_height,layout_width,textSize,textColor 设定时,如果每次都要把这些属性设定一次会很烦,而 且如果全部需要修改的话(改变字体大小)也不方便,因此可以把这些属性统一定义为一个 style,这样 使用的时候只要直接引用这个 style 即可。
定义 style 的方法(styles.xml ):

一个自定义 style 下包含多个键值对,引用的时候设置 style=“@style/my_edittext_style”即可,注意不要写成 android:style=“@style/my_edittext_style”。在引用 style 之后,还可以继续定义属性,如果有重复,以继续定义的属性为准。
如何在应用中显示布局
首先,需要在 res/layout 文件夹下写好布局文件

然后创建一个 java 文件

在该文件中将布局引入

然后在注册文件中注册,将该 Activity 设置为应用启动时第一个加载的 Activity

然后就可以运行了。
实验结果截图

源码下载
源码下载点击这里~
注
1、本实验实验环境:
操作系统 Windows 10
实验软件 Android Studio 2.2.1
虚拟设备:Nexus_5X
API:23
2、贴代码的时候由于插入代码框的大小问题,代码格式不太严整,望见谅~