参考demo https://github.com/yangstar/react-router-demo.git,如果觉得对你有帮助,请star一下~
-
路由配置
路由配置三要素:
- 一个包含this.props.children的父组件
- 一个子组件
- Route配置
进入和离开hook:
- onEnter(可做登录拦截)
- onLeave
配置方式
- jsx嵌套
- 原生route数组对象
-
路由匹配规则
-
跳转
- 正常跳转Link
- 点击表单,点击按钮跳转
方法一: browserHistory.push('url')
方法二:context对象(ps:es5与es6)
-
History :
一个 history 知道如何去监听浏览器地址栏的变化, 并解析这个 URL 转化 为 location 对象, 然后 router 使用它匹配到路由,最后正确地渲染对应的组 件
- browserHistory(推荐使用)
- hashHistory(不推荐使用)
-
默认路由IndexRoute 和 IndexLink
IndexLink适用于根路径跳转
-
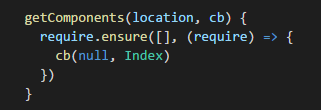
结合webpack使用
作用:代码拆分
代码对比

-
react-router传参
点击表单或按钮跳转
<form onSubmit={this.handleSubmit}>
  <input type="text" placeholder="userName"/>
  <input type="text" placeholder="repo"/>
  <button type="submit">Go</button>
</form>
第一种方法是使用browserHistory.push
import { browserHistory } from 'react-router'

// ...
  handleSubmit(event) {
    event.preventDefault()
    const userName = event.target.elements[0].value
    const repo = event.target.elements[1].value
    const path = `/repos/${userName}/${repo}`
    browserHistory.push(path)
  },
第二种方法是使用context对象
es5写法
export default React.createClass({

  // ask for `router` from context
  contextTypes: {
    router: React.PropTypes.object
  },

  handleSubmit(event) {
    // ...
    this.context.router.push(path)   // 无参数
    this.context.router.push({pathname: path, state: {}})   // 有参数
  },
})
es写法
import React from 'react';
// import PropTypes from 'prop-types' 或者单独引入prop-types
import { browserHistory  } from 'react-router'

class About extends React.Component{
    constructor(props, context) {
        super(props, context);

        this.handleSubmit = this.handleSubmit.bind(this)
    }
    handleSubmit () {
        // browserHistory.push('/');
        this.context.router.push('/')
    }

    render () {
        return (
            <div>
                <input type="button" value="提交" onClick={this.handleSubmit}/>
            </div>
        )
    }
}
About.contextTypes = {
    router: React.PropTypes.object
}
export default About
获取参数
// 获取参数
componentDidMount() {
  this.setState({
     params: this.props.location.state.params
  })
}
方法三
// 配置参数
<Route path="newDetail/:id" component={NewDetail}></Route>
// 获取参数
class NewDetail extends React.Component {
    constructor(props) {
        super(props);
    }

    render () {
        return (
            <div>
                {this.props.params.id}
            </div>
        )
    }
}
export default NewDetail