springboot 邮件服务
今天在看网上学习微服务的时候顺遍看到了一些关于springboot的文章,写的springboot拓展功能就顺遍学习了一下,接下来给大家分享一下springboot封装集成了邮件服务。
发送邮件应该是网站的必备拓展功能之一,注册验证,忘记密码或者是给用户发送营销信息。正常我们会用JavaMail相关api来写发送邮件的相关代码,但现在springboot提供了一套更简易使用的封装。
简易应用
1.gradle配置
compile('org.springframework.boot:spring-boot-starter-mail')
2.编写配置
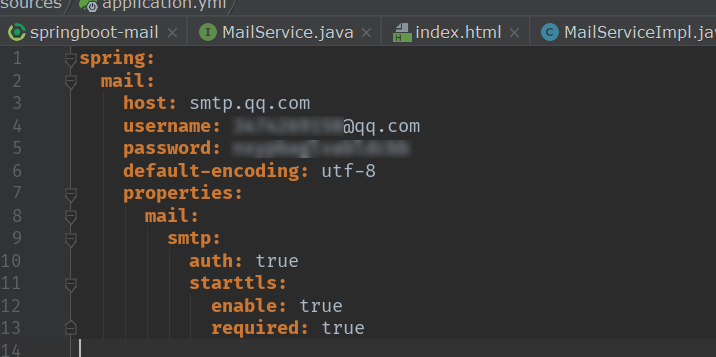
我这里用的是qq邮箱发送,使用qq邮箱必须qq邮箱中 设置 >> 账户 >> 把POP3/SMTP服务开启


如果用qq邮箱发送这里的password不是邮箱密码,是刚才开启POP3/SMTP服务时生成的链接字符
properties返回类型是一个Map类型,properties肯定对应的是一些拓展的参数,那个smtp一定是需要开启的
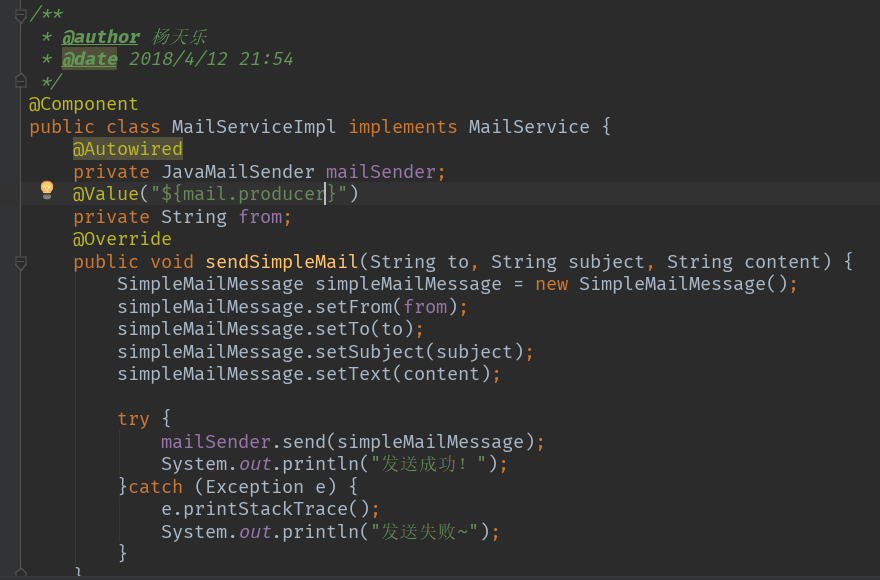
3.编码实现Text发送

from为发送者
to为接受者,可以理解为订阅者,这里可以传数组
subject为标题
content为内容
编码测试

4.编码实现HTML发送
@Override
    public void sendHtmlMail(String to, String subject, String content) {

        MimeMessage message = mailSender.createMimeMessage();

        try {
            //true表示需要创建一个multipart message
            MimeMessageHelper helper = new MimeMessageHelper(message, true);
            helper.setFrom(from);
            helper.setTo(to);
            helper.setSubject(subject);
            helper.setText(content, true);

            mailSender.send(message);
            System.out.println("发送成功~");
        } catch (MessagingException e) {
            e.printStackTrace();
            System.out.println("发送失败~");
        }
    }
HTML的发送需要借助MimeMessage,MimeMessageHelper的setTest方法提供是否开启html的重装方法。
5.编码实现发送附件
 @Override
    public void sendAttachmentsMail(String to, String subject, String content,String path) {
        MimeMessage message = mailSender.createMimeMessage();
        try {
            MimeMessageHelper helper = new MimeMessageHelper(message,true);
            helper.setFrom(from);
            helper.setTo(to);
            helper.setSubject(subject);
            helper.setText(content, true);
            FileSystemResource fileSystemResource = new FileSystemResource(new File(path));

            String fileName= path.substring(path.lastIndexOf(File.separator));
            helper.addAttachment(fileName,fileSystemResource);

            mailSender.send(message);
            System.out.println("发送成功!");
        }catch (Exception e){
            e.printStackTrace();
            System.out.println("发送失败!");
        }
    }
可以通过多个addAttachment方法发送多个附件,File.separator是用来分隔同一个路径字符串中的目录
6.编写实现模板发送
我们有时候收到的邮件就想一封信一样格式非常优雅,如果我们采用上面那种方式编写HTML字符硬性拼接的话起步很麻烦,所有对于这种需求,我们建议使用模板来处理。
这里采用的是Thymeleaf来演示
1.导入build.gradle
compile('org.springframework.boot:spring-boot-starter-thymeleaf')
2.在resources/templates新建index.html
<!DOCTYPE html>
<html lang="en" xmlns:th="http://www.thymeleaf.org">
<head>
    <meta charset="UTF-8"/>
    <title>Title</title>
</head>
<body>
请点击下面的链接来验证身份<br/>
<a href="#" th:href="@{ http://www.baidu.com/{id} }">激活账号</a>
</body>
</html>
3.解析模块发送
@Autowired
private TemplateEngine templateEngine;

@Test
public void contextLoadsFour(){
    Context context = new Context();
    context.setVariable("id","110");
    String content = templateEngine.process("index",context);
    mailService.sendHtmlMail("2752555817@qq.com","Hello",content);
}
process方法第一个参数对于页面逻辑视图名称