什么是Servlet?
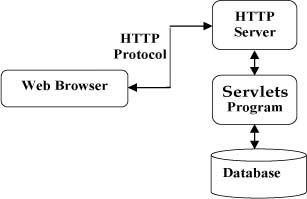
Servlet是运行在Web服务器或应用服务器上的程序,它是作为来自Web浏览器或其他HTTP客户端的请求和HTTP服务器上的数据库
或应用程序之间的中间层。
servlet架构:
Servlet的生命周期:
Servlet生命周期可被定义为从创建直到毁灭的整个过程。
1、Servlet通过调用init()方法进行初始化
2、Servlet调用service()方法来处理客户端的请求,Servlet容器在执行service方法之前加载Servlet。
3、Servlet通过调用destory()方法终止(结束)
最后,Servlet是由JVM的垃圾回收器进行垃圾回收的。
init方法只在第一次创建Servlet时调用一次
service方法是执行实际任务的主要方法。Servlet容器(即Web服务器)调用service()方法来处理客户端(浏览器)的请求,并把格式化
的响应写回给客户端。每次服务器接收到一个Servlet请求时,服务器会产生一个新的线程并调用服务。service()方法由容器调用,service()方法检查HTTP请求类型(GET、POST、PUT、DELETE等),service方法会在适当的时候调用doGet、doPost、doPut、doDelete等方法,所以,我们不用对service()方法做任何动作,您只需要根据来自客户端的请求类型来重写doGet或doPost即可。
destory方法只会被调用一次,在Servlet声明周期结束时被调用。在destory方法中可以关闭数据库连接、停止后台线程、把Cookie列表或点击计数器写入到磁盘,并执行其他类似的清理活动。
Servlet是服务HTTP请求并实现javax.servlet.Servlet接口的Java类。Web应用程序开发人员通常编写Servlet来扩展javax.servlet.http.HttpServlet,并实现Servlet接口的抽象类专门用来处理HTTP请求。
读取HTTP头的方法,如getSession,getParameter(String name)等,这些方法可在Servlet程序中读取HTTP头,通过HttpServlet对象可调用。
过滤器:
Servlet过滤器可以动态地拦截请求和响应,以变换或使用包含在请求或响应中的信息。
Servlet过滤器是可用于Servlet编程的Java类,可以实现以下目的:
1):在客户端的请求访问后端资源之前,拦截这些请求
2):在服务器的响应发送给客户端之前,处理这些响应。
如:身份验证过滤器、加密过滤器、日志记录和审核过滤器等。
过滤器通过Web部署描述符(web.xml)中XML标签来声明,然后映射到应用程序的web.xml中的Servlet名称或URL模式。当Web容器启动Web应用程序时,它会为在web.xml中的每一个过滤器创建一个实例。
Filter的执行顺序与在web.xml配置文件中的配置顺序一致,一般把Filter配置在所有的Servlet之前。
过滤器是一个实现了javax.servlet.Filter接口的Java类。javax.servlet.Filter接口定义了三个方法:
1):public void doFilter (ServletRequest, ServletResponse, FilterChain)
完成实际的过滤操作,当客户端请求的URL和过滤设置的URL匹配时,Servlet先调用过滤器的doFilter方法,FilterChain用于访问后续过滤器
2):public void init(FilterConfig filterConfig)
Web应用程序启动时,Web服务器将创建Filter的实例对象,并调用其init方法,读取web.xml配置,完成对象的初始化功能。因为filter对象只
会创建一次,所以init方法也只会执行一次。在filterConfig中可以获取配置信息
3):public void destroy()
Servlet容器在销毁过滤器实例前调用该方法,在该方法中释放Servlet过滤器占用的资源。
Servlet异常处理
当一个Servlet抛出一个异常时,Web容器在使用了exception元素的web.xml中搜索与抛出的异常类型相匹配的配置。因此必须在web.xml中使用error-page
元素来指定对特定异常或HTTP状态码作出相应的Servlet调用。如:
<servlet>
        <servlet-name>ErrorHandler</servlet-name>
        <servlet-class>com.runoob.test.ErrorHandler</servlet-class>
</servlet>
<!-- servlet mappings -->
<servlet-mapping>
        <servlet-name>ErrorHandler</servlet-name>
        <url-pattern>/TomcatTest/ErrorHandler</url-pattern>
</servlet-mapping>
<error-page>
    <error-code>404</error-code>
    <location>/TomcatTest/ErrorHandler</location>
</error-page>
<!-- 所有的异常的通用的错误处理程序 ,与上面的互斥-->
<error-page>
    <exception-type>java.lang.Throwable</exception-type >
    <location>/ErrorHandler</location>
</error-page>
Servlet四大域对象
1)、pageContext:作用域为page,页面执行期,只在当前页面有效
2)、request:是表示一个请求,只要发出一个请求就会创建一个request,它的作用域仅在当前请求中有效
3)、session:服务器为每一个会话创建一个Session对象,所以Session中的数据仅可供当前会话中所有的Servlet共享
4)、Application(ServletContext上下文):所有的用户都可以取得此信息,此信息在整个服务器端被保留。Application属性范围只要设置一次,则
所有的网页窗口都可以取得数据。ServletContext在服务器启动时创建,在服务器关闭时销毁,一个JavaWeb应用只创建一个ServletContext对象。
Session
一个Web服务器可以分配一个唯一的session会话ID(JSESSIONID)作为每个Web客户端的cookie,对于客户端的后续请求可以使用接收到的cookie来识别。(因为会有很多浏览器不支持cookie,所以不建议使用这种方式维持session会话)
HttpSession对象:Servlet提供了HttpSession接口,该接口提供了一种跨多个页面请求或访问用户以及存储有关用户信息的方式。Servlet 容器使用这个接口来创建一个 HTTP 客户端和 HTTP 服务器之间的 session 会话。会话持续一个指定的时间段,跨多个连接或页面请求。通过调用 HttpServletRequest 的公共方法 getSession() 来获取 HttpSession 对象
删除Session会话数据:
1)、移除一个特定的属性:removeAttribute(String name) 来删除与特定的键相关的值
2)、删除整个session会话:invalidate() 丢弃整个session会话
3)、设置session会话过期时间:setMaxInactiveInterval(int interval) 单独设置session会话超时(秒为单位),也可在web.xml中配置会话超时(分钟为单位)
Servlet3.0
Servlet3.0支持使用注解的方式取代之前在web.xml中的servlet、filter、listener的定义配置。
如:注册Servlet:
@WebServlet(name = "MyServlet", urlPatterns = {"/foo", "/bar"}, initParams = {@WebInitParam(name = "contextConfigLocation", value = "classpath*:/spring-mvc.xml"),
        @WebInitParam(name = "xxx", value = "xxx")})
public class MyServlet extends HttpServlet { @Override protected void doGet(HttpServletRequest req, HttpServletResponse resp) throws ServletException, IOException {
   super.doGet(req, resp);
 }
}
注册Filter:
@WebFilter(value = "/foo")
public class MyFilter implements Filter {
    @Override
    public void init(FilterConfig filterConfig) throws ServletException {}
    @Override
    public void doFilter(ServletRequest servletRequest, ServletResponse servletResponse, FilterChain filterChain) throws IOException, ServletException {}
    @Override
    public void destroy() {}
}
注册Listener:
@WebListener
public class MyListener implements ServletContextListener {
    @Override
    public void contextInitialized(ServletContextEvent servletContextEvent) {
        ServletContext sc=servletContextEvent.getServletContext();// 一个web应用一个ServletContext
     // 在这里可以动态往容器中添加Servlet、Filter、Listener等
} @Override public void contextDestroyed(ServletContextEvent servletContextEvent) { } }
也可以在项目启动时候添加手动Servlet、Filter、Listener等
package com.atguigu.servlet;

import java.util.EnumSet;
import java.util.Set;

import javax.servlet.DispatcherType;
import javax.servlet.FilterRegistration;
import javax.servlet.ServletContainerInitializer;
import javax.servlet.ServletContext;
import javax.servlet.ServletException;
import javax.servlet.ServletRegistration;
import javax.servlet.annotation.HandlesTypes;

import com.atguigu.service.HelloService;

//容器启动的时候会将@HandlesTypes指定的这个类型下面的子类(实现类,子接口等)传递过来;
//传入感兴趣的类型;
@HandlesTypes(value={HelloService.class})
public class MyServletContainerInitializer implements ServletContainerInitializer {

    /**
     * 应用启动的时候,会运行onStartup方法;
     *
     * Set<Class<?>> arg0:感兴趣的类型的所有子类型;
     * ServletContext arg1:代表当前Web应用的ServletContext;一个Web应用一个ServletContext;
     *
     * 1)、使用ServletContext注册Web组件(Servlet、Filter、Listener)
     * 2)、使用编码的方式,在项目启动的时候给ServletContext里面添加组件;
     *         必须在项目启动的时候来添加;
     *         1)、ServletContainerInitializer得到的ServletContext;
     *         2)、ServletContextListener得到的ServletContext;
     */
    @Override
    public void onStartup(Set<Class<?>> arg0, ServletContext sc) throws ServletException {
        // TODO Auto-generated method stub
        System.out.println("感兴趣的类型:");
        for (Class<?> claz : arg0) {
            System.out.println(claz);
        }
    // 使用ServletContext注册Servlet
    ServletRegistration.Dynamic servlet = sc.addServlet("myServlet", "com.yang.spbo.servlet.MyServlet");
    // Servlet映射关系
    servlet.addMapping("/foo");

    // 注册Listener
    sc.addListener(MyListener.class);

    // 注册Filter
    FilterRegistration.Dynamic filter=sc.addFilter("myFilter",new MyFilter());
    // Filter的映射
    filter.addMappingForUrlPatterns(EnumSet.of(DispatcherType.REQUEST),true,"/*");
 }
}
如果是SpringBoot项目需要启动类上加上@ServletComponentScan注解;或者在每个Servlet、Filter、Listener上加上@Component注解
Servlet3.0和SpringMVC整合
Web容器在启动的时候,会扫描每个jar包下的META-INF/services/javax.servlet.ServletContainerInitializer,并加载这个文件指定的类
而Spring web包下:
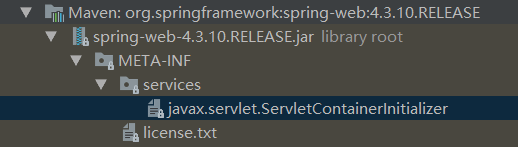
指定的类为:
org.springframework.web.SpringServletContainerInitializer
因此,在Web容器启动的时候会加载SpringServletContainerInitializer
SpringServletContainerInitializer:
package org.springframework.web;

import java.lang.reflect.Modifier;
import java.util.Iterator;
import java.util.LinkedList;
import java.util.List;
import java.util.Set;
import javax.servlet.ServletContainerInitializer;
import javax.servlet.ServletContext;
import javax.servlet.ServletException;
import javax.servlet.annotation.HandlesTypes;
import org.springframework.core.annotation.AnnotationAwareOrderComparator;

@HandlesTypes({WebApplicationInitializer.class})
public class SpringServletContainerInitializer implements ServletContainerInitializer {
    public SpringServletContainerInitializer() {
    }

    public void onStartup(Set<Class<?>> webAppInitializerClasses, ServletContext servletContext) throws ServletException {
        List<WebApplicationInitializer> initializers = new LinkedList();
        Iterator var4;
        if (webAppInitializerClasses != null) {
            var4 = webAppInitializerClasses.iterator();

            while(var4.hasNext()) {
                Class<?> waiClass = (Class)var4.next();
          // 如果组件不是接口也不是抽象类
                if (!waiClass.isInterface() && !Modifier.isAbstract(waiClass.getModifiers()) && WebApplicationInitializer.class.isAssignableFrom(waiClass)) {
                    try {
                        initializers.add((WebApplicationInitializer)waiClass.newInstance());
                    } catch (Throwable var7) {
                        throw new ServletException("Failed to instantiate WebApplicationInitializer class", var7);
                    }
                }
            }
        }

        if (initializers.isEmpty()) {
            servletContext.log("No Spring WebApplicationInitializer types detected on classpath");
        } else {
            servletContext.log(initializers.size() + " Spring WebApplicationInitializers detected on classpath");
            AnnotationAwareOrderComparator.sort(initializers);
            var4 = initializers.iterator();

            while(var4.hasNext()) {
                WebApplicationInitializer initializer = (WebApplicationInitializer)var4.next();
                initializer.onStartup(servletContext);
            }

        }
    }
}
SpringServletContainerInitializer 实现了ServletContainerInitializer ,并且指定了@HandlesTypes({WebApplicationInitializer.class}),因此在Web容器启动的时候会加载WebApplicationInitializer
接口下的所有组件,如果组件不是接口也不是抽象类,那么则为WebApplicationInitializer组件创建对象,并调用其onStartup方法。
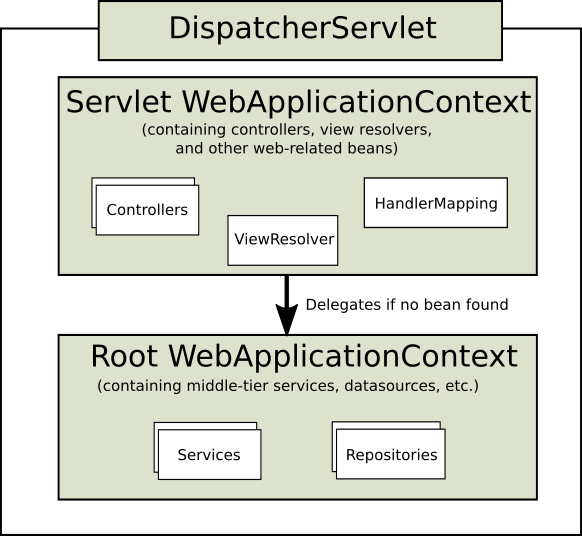
Spring 容器分层结构(父子容器):
WebApplicationInitializer接口的3个抽象子类:
1)、AbstractContextLoaderInitializer:
(1)在onStartup方法中创建根容器【createRootApplicationContext();】
2)、AbstractDispatcherServletInitializer:在onStartup方法中:
(1)创建一个web的ioc容器【createServletApplicationContext();】
(2)创建了DispatcherServlet【createDispatcherServlet();】
(3)将创建的DispatcherServlet添加到ServletContext中【Dynamic registration = servletContext.addServlet(servletName, dispatcherServlet);
registration.setLoadOnStartup(1);
registration.addMapping(this.getServletMappings());】
(4)【protected abstract String[] getServletMappings();】此方法由子类来实现
3)、AbstractAnnotationConfigDispatcherServletInitializer:【AbstractAnnotationConfigDispatcherServletInitializer extends AbstractDispatcherServletInitializer】
继承自2)中的AbstractDispatcherServletInitializer,是注解方式配置的DispatcherServlet初始化器
public abstract class AbstractAnnotationConfigDispatcherServletInitializer extends AbstractDispatcherServletInitializer {
    public AbstractAnnotationConfigDispatcherServletInitializer() {
    }
  // 创建根容器(只扫描Services和Repositories组件)
    protected WebApplicationContext createRootApplicationContext() {
    // 获取根配置文件(Spring配置文件),需要子类提供
        Class<?>[] configClasses = this.getRootConfigClasses();
        if (!ObjectUtils.isEmpty(configClasses)) {
            AnnotationConfigWebApplicationContext rootAppContext = new AnnotationConfigWebApplicationContext();
            rootAppContext.register(configClasses);
            return rootAppContext;
        } else {
            return null;
        }
    }
  // 创建Web的IOC容器(只扫描controller,ViewResolver,HandlerMapping组件)
    protected WebApplicationContext createServletApplicationContext() {
        AnnotationConfigWebApplicationContext servletAppContext = new AnnotationConfigWebApplicationContext();
    // 获取web配置类(Spring MVC配置文件),需要子类提供
        Class<?>[] configClasses = this.getServletConfigClasses();
        if (!ObjectUtils.isEmpty(configClasses)) {
            servletAppContext.register(configClasses);
        }

        return servletAppContext;
    }

    protected abstract Class<?>[] getRootConfigClasses();

    protected abstract Class<?>[] getServletConfigClasses();
}
因此,如果要以注解方式来启动SpringMVC;就自定义一个类继承AbstractAnnotationConfigDispatcherServletInitializer ,然后实现其抽象方法
指定配置文件信息。
若不使用注解的方式,原来的web.xml配置文件为:
<web-app>

    <listener>
        <listener-class>org.springframework.web.context.ContextLoaderListener</listener-class>
    </listener>

    <context-param>
        <param-name>contextConfigLocation</param-name>
        <param-value>classpath:spring/applicationContext-*.xml</param-value> // 即Spring根配置文件
    </context-param>

    <servlet>
        <servlet-name>app</servlet-name>
        <servlet-class>org.springframework.web.servlet.DispatcherServlet</servlet-class>
        <init-param>
            <param-name>contextConfigLocation</param-name>
            <param-value>classpath:spring/springmvc.xml</param-value> // 即Spring MVC配置文件
        </init-param>
        <load-on-startup>1</load-on-startup>
    </servlet>

    <servlet-mapping>
        <servlet-name>app</servlet-name>
        <url-pattern>/app/*</url-pattern>
    </servlet-mapping>

</web-app>
使用注解的方式,省略掉web.xml的自定义web应用启动类
//web容器启动的时候创建对象;调用方法来初始化容器以及前端控制器
public class MyWebApplicationInitializer extends AbstractAnnotationConfigDispatcherServletInitializer {

    //获取根容器的配置类;(Spring的配置文件)   父容器;
    @Override
    protected Class<?>[] getRootConfigClasses() {
        // TODO Auto-generated method stub
        return new Class<?>[]{RootConfig.class};
    }

    //获取web容器的配置类(SpringMVC配置文件)  子容器;
    @Override
    protected Class<?>[] getServletConfigClasses() {
        // TODO Auto-generated method stub
        return new Class<?>[]{AppConfig.class};
    }

    //获取DispatcherServlet的映射信息
    //  /:拦截所有请求(包括静态资源(xx.js,xx.png)),但是不包括*.jsp;
    //  /*:拦截所有请求;连*.jsp页面都拦截;jsp页面是tomcat的jsp引擎解析的;
    @Override
    protected String[] getServletMappings() {
        // TODO Auto-generated method stub
        return new String[]{"/"};
    }
}
至此,即将Spring容器以及前端控制器创建好了。
原来在使用xml配置方式的时候,会在springmvc.xml中配置以下信息
    <!--加载属性配置文件-->
    <context:property-placeholder ignore-unresolvable="false" location="classpath:spmbs.properties"/>
    <!-- 注解驱动,可以代替注解的处理器适配器的配置和处理器映射器的配置,默认还会加载很多其他配置比如:json转换器的配置-->
    <mvc:annotation-driven conversion-service="conversionService"></mvc:annotation-driven>
    <!-- 组件扫描,自动注入-->
    <context:component-scan base-package="cn.com.yang.modules"></context:component-scan>
    <!-- 视图解析器-->
    <bean class="org.springframework.web.servlet.view.InternalResourceViewResolver">
        <property name="viewClass" value="org.springframework.web.servlet.view.JstlView" />
        <property name="prefix" value="/WEB-INF/views/" />
        <property name="suffix" value=".jsp" />
    </bean>
    <!--对静态资源的访问,将无法映射到controller方法的path交给default-servlet-handler处理-->
    <mvc:default-servlet-handler/>
    <!--拦截器配置-->
    <mvc:interceptors>
        <!--多个拦截器顺序执行-->
        <mvc:interceptor>
            <mvc:mapping path="/**"/>
            <mvc:exclude-mapping path="/sys/login/**"/>
            <bean class="cn.com.yang.interceptor.LoginHandlerInterceptor"/>
        </mvc:interceptor>
        <mvc:interceptor>
            <!--/**拦截所有的url及其子url,/* 只拦截根url不能拦截子url-->
            <mvc:mapping path="/**"/>
            <bean class="cn.com.yang.interceptor.MyHandlerInterceptor1"/>
        </mvc:interceptor>
        <mvc:interceptor>
            <mvc:mapping path="/**"/>
            <bean class="cn.com.yang.interceptor.MyHandlerInterceptor2"/>
        </mvc:interceptor>
    </mvc:interceptors>
那么使用配置类的方式的话怎么配置这些信息呢?
使用@EnableWebMvc注解在mvc配置类上,开启注解驱动,相当于xml中的 <mvc:annotation-driven/>
让配置类实现WebMvcConfigurer接口,实现接口中的方法进行其他配置;也可以让配置类继承WebMvcConfigurerAdapter抽象类,其实现了WebMvcConfigurer接口,这样我们需要
哪些配置,重写抽象类中的方法即可
可参考Spring官方文档:https://docs.spring.io/spring/docs/5.2.0.BUILD-SNAPSHOT/spring-framework-reference/web.html#mvc-config-customize
如:
@Configuration
@EnableWebMvc // 相当于xml中的 <mvc:annotation-driven/>
public class AppConfig extends WebMvcConfigurerAdapter {
    /**
     * 视图解析器
     *
     * @param registry
     */
    @Override
    public void configureViewResolvers(ViewResolverRegistry registry) {
        registry.jsp("/WEB-INF/views", ".jsp");
    }

    /**
     * 静态资源访问,相当于<mvc:default-servlet-handler/>
     *
     * @param configurer
     */
    @Override
    public void configureDefaultServletHandling(DefaultServletHandlerConfigurer configurer) {
        configurer.enable();
    }

    /**
     * 拦截器
     *
     * @param registry
     */
    @Override
    public void addInterceptors(InterceptorRegistry registry) {
        registry.addInterceptor(new MyInterceptor()).addPathPatterns("/**").excludePathPatterns("/admin/**");
    }
}
SpringMVC实现异步处理:
@GetMapping("/quotes")
@ResponseBody
public DeferredResult<String> quotes() {
    DeferredResult<String> deferredResult = new DeferredResult<String>();
    // Save the deferredResult somewhere..
    return deferredResult;
}

// From some other thread...
deferredResult.setResult(data);
Controller返回一个DeferredResult,并将deferredResult对象保存到某处,如消息队列中,并将deferredResult返回,然后异步进行处理。此时,请求时阻塞的。当有其他线程处理完成之后
将deferredResult从队列中取出来然后设置result值时,则会响应给客户端。