官网解释说 tensorflow 读取数据有 3 种方式
1. feed:供给数据,每次迭代 临时 生成数据,喂给 模型
2. 从文件中读取:本文主讲
3. 预加载数据:定义常量或者变量来保存数据,仅适用小数据量
从文件读取有 3 大步骤
1. 生成读取器,不同类型的文件有对应的读取器
2. 把文件名列表生成队列
3. 用读取器的 read 方法读取队列中的文件
文件读取器
不同类型的文件对应不同的文件读取器,我们称为 reader对象;
该对象的 read 方法自动读取文件,并创建数据队列,输出key/文件名,value/文件内容;
reader = tf.TextLineReader()      ### 一行一行读取,适用于所有文本文件
reader = tf.TFRecordReader()      ### A Reader that outputs the records from a TFRecords file
reader = tf.WholeFileReader()     ### 一次读取整个文件,适用图片
生成文件名队列
生成文件名队列主要方法是 string_input_producer 和 slice_input_producer;
string_input_producer
把输入的 list 生成队列
def string_input_producer(string_tensor,
                          num_epochs=None,
                          shuffle=True,
                          seed=None,
                          capacity=32,
                          shared_name=None,
                          name=None,
                          cancel_op=None)
string_tensor:A 1-D string tensor with the strings to produce
num_epochs:回合数,表示 string_tensor 中每个元素的使用次数 注意:如果它不是None,则此函数创建本地计数器 epochs,需要使用local_variables_initializer()初始化局部变量
shuffle:每个回合中元素顺序是否打乱
seed:随机种子,取值为整数
capacity:队列容量
tf.train.start_queue_runners
注意,在调用tf.train.string_input_producer后,文件名并没有被真正加入文件名队列,而只是创建了一个空队列,此时如果直接计算,系统会陷入阻塞状态。
此时需要启动队列,就是调用tf.train.start_queue_runners
代码示例
filenames = ['f%s.csv'%i for i in range(5)]
file_queue1 = tf.train.string_input_producer(filenames, num_epochs=2, shuffle=True)     # 创建一个空的文件名队列
attrs = dir(file_queue1)        ### 可查看属性

sess = tf.Session()

print(sess.run(file_queue1.size()))        # 0  空的

sess.run(tf.local_variables_initializer())  # 不能是 tf.global_variables_initializer() 哦
tf.train.start_queue_runners(sess=sess)                 # 启动队列

print(sess.run(file_queue1.size()))        # 10         # 此处可以看到epochs的功能
slice_input_producer
基本同 string_input_producer
def slice_input_producer(tensor_list, num_epochs=None, shuffle=True, seed=None,
                         capacity=32, shared_name=None, name=None)
tensor_list:A list of `Tensor` objects
注意:也需要启动队列
代码示例1
filelist = ['2.png', '3.png']
getfile = tf.train.slice_input_producer([filelist], num_epochs=2, shuffle=False)   # 注意 filelist 必须加 [],此处filelist为list

with tf.Session() as sess:
    sess.run(tf.local_variables_initializer())      # must
    tf.train.start_queue_runners(sess=sess)         # must
    while 1:
        try:
            print(sess.run(getfile))
        except:
            break
# [b'2.png']
# [b'3.png']
# [b'2.png']
# [b'3.png']
注意,在使用中,传入的 list 需要另外加个[ ]
getfile 表示每次从队列中取一个元素,读取方式类似于 python 中的 queue
代码示例2
filelist2 = tf.convert_to_tensor(filelist)      # 转换成tensor
getfile2 = tf.train.slice_input_producer([filelist2], num_epochs=2, shuffle=True)    # filelist为tensor
with tf.Session() as sess:
    sess.run(tf.local_variables_initializer())      # must
    tf.train.start_queue_runners(sess=sess)         # must
    print(sess.run(getfile2))

# [b'3.png']
输入的 list 中每个元素为 tensor
读取文件
各种文件读取方法基本一致
csv
每次读取一行
########## 文件名队列 ##########
# xx2 有空值
filename_queue = tf.train.string_input_producer(["myfiles/xx1.csv", "myfiles/xx2.csv"], shuffle=False)

########## reader对象 (文件阅读器)##########
reader = tf.TextLineReader()

########## read 方法 ##########
key, value = reader.read(filename_queue)

# 为数据设定默认格式,如果出现空值,就替换为这种格式的默认值
# 注意格式必须一样,因为输出的格式是统一的,如下
# [array([ 4.      ,  0.      , 34.322323,  1.      ], dtype=float32)]
record_defaults = [[1.], [1.], [1.], [1.]]
col1, col2, col3, col4 = tf.decode_csv(value, record_defaults=record_defaults)      # decode_csv
features = tf.concat([[col1], [col2], [col3], [col4]], 0)

with tf.Session() as sess:
    coord = tf.train.Coordinator()
    threads = tf.train.start_queue_runners(coord=coord)     # 启动队列,相当于是启动了多个线程,并将coord传入每个线程

    for i in range(12):
        example = sess.run([features])
        print(example)

    coord.request_stop()    #
    coord.join(threads)     # 等待结束
文件阅读器每次从文件内读取一行,如果有空值,就根据默认格式自动填补,decode_csv 将读取内容解析成张量;
将上述代码与多线程 QueueRunner 代码对比,不难发现,其实 string_input_producer 生成的就是一个 QueueRunner; 【多线程机制】
图片
每次读取全部图片内容,不是一行一行
with tf.Session() as sess:
    filename = ['myfiles\2.png', 'myfiles\3.png']
    filename_queue = tf.train.string_input_producer(filename, shuffle=False, num_epochs=2)      ### 文件名队列

    reader = tf.WholeFileReader()       ### 文件读取器
    key, value = reader.read(filename_queue)   ### 读取文件

    tf.local_variables_initializer().run()
    threads = tf.train.start_queue_runners(sess=sess)   ### 启动队列

    i = 0
    while True:
        i += 1
        image_data = sess.run(value)
        with open('test_%d.jpg' % i, 'wb') as f:
            f.write(image_data)             # 获取图片数据并保存
TFrecords
这部分内容很多,参考我的博客
读取数据的多线程机制
tensorflow 读取数据都是多线程的;
多线程读取数据也是基于 Queue 的多线程编程;
主线程读取数据,然后计算,在读数据这部分有两个线程,一个线程读取文件名,生成文件名队列,另一个线程从文件名队列中获取文件名,并读取相应文件,生成数据队列。
图示如下
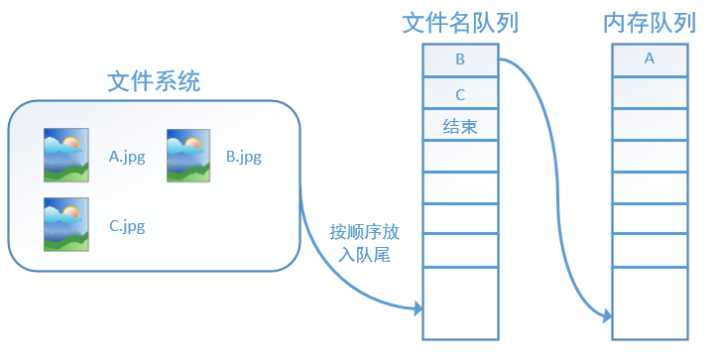
tensorflow 在队列中加入“结束”标记符,当读取线程检测到该标记符时,会抛出异常 OutOfRange,后续代码会捕捉该异常,从而结束线程
批量读取
images = ['wgb1', 'wgb2', 'wgb3']       # images, labels 元素类型必须一致
labels= ['1','2','3']

getfile3 = tf.train.slice_input_producer([images, labels], num_epochs=2, shuffle=True)
# 直接生成2x3个元素,每次取2个

file_batch = tf.train.batch([getfile3], batch_size=2, capacity=10)    # 每次执行getfile3两次,批量读取
# file_batch = tf.train.batch([getfile3], batch_size=2, capacity=1)   # 这个队列大小貌似没影响

## 随机取元素,此处因为slice_input_producer已经随机,所以无需shuffle_batch
# file_batch = tf.train.shuffle_batch()

with tf.Session() as sess:
    sess.run(tf.local_variables_initializer())
    tf.train.start_queue_runners(sess=sess)
    while 1:
        try:
            print(sess.run(file_batch))
        except:
            break

# [[b'wgb1' b'1']
#  [b'wgb2' b'2']]
# [[b'wgb3' b'3']
#  [b'wgb3' b'3']]
# [[b'wgb1' b'1']
#  [b'wgb2' b'2']]
1. tf.train.batch 实现了批量读取,相当于是执行了n次读取队列操作
2. 此处在队列中同时填入了两个list,在读取时,同时读取两个list中的同位置的元素,类似于 zip
3. slice_input_producer 直接生成 epochs个list
这两个方法都可以结合多线程来实现并发读取,方法类似于python中的多线程,具体可参考我的其他博客。
tf.train.batch
多次执行操作
tf.train.batch(
    tensors,
    batch_size,
    num_threads=1,
    capacity=32,
    enqueue_many=False,
    shapes=None,
    dynamic_pad=False,
    allow_smaller_final_batch=False,
    shared_name=None,
    name=None
)
参数解释:
Args:
tensors: The list or dictionary of tensors to enqueue.
batch_size: The new batch size pulled from the queue.
num_threads: The number of threads enqueuing tensors. The batching will be nondeterministic if num_threads > 1.
capacity: An integer. The maximum number of elements in the queue.

#进行shuffle的输入是否为单个tensor
enqueue_many: Whether each tensor in tensors is a single example.

shapes: (Optional) The shapes for each example. Defaults to the inferred shapes for tensors.
dynamic_pad: Boolean. Allow variable dimensions in input shapes. The given dimensions are padded upon dequeue so that tensors within a batch have the same shapes.
allow_smaller_final_batch: (Optional) Boolean. If True, allow the final batch to be smaller if there are insufficient items left in the queue.
shared_name: (Optional). If set, this queue will be shared under the given name across multiple sessions.
name: (Optional) A name for the operations.
实际用法见上例
参考资料:
https://blog.csdn.net/heiheiya/article/details/80967301 string_input_producer参数详解
https://blog.csdn.net/qq_30666517/article/details/79715045