tensorflow 中自带了很多图像处理的方法,基本都在 tf.image 模块中,虽然不如 opencv 强大,但也比较常用,这里做个记录。
图像编解码
1. 用 tf 的方法读取图片后,都需要进行编解码,才能在 tf 中继续处理;
2. tf 提供了各种类型图像的编解码:decode_gif,decode_png,decode_jepg,decode_image,encode_png 等待,用法类似
tf.image.decode_png(contents, channels=0, dtype=_dtypes.uint8, name=None):channels 指定通道数
大体处理过程是:读取--解码--转换成 np --喂给 sess
import tensorflow as tf
import matplotlib.pylab as plt

image = tf.gfile.FastGFile('pic/t4.png', 'rb').read()
print(type(image))      # <class 'bytes'>   格式显然不对,需要解码

image = tf.image.decode_png(image)  # 这里暂时没有指定channels
print(type(image))      # <class 'tensorflow.python.framework.ops.Tensor'>  解码完是 tensor,不能直接作为 sess.run 的输入


tf.InteractiveSession()

image = image.eval()
print(type(image))      # <class 'numpy.ndarray'>   转换成 np

print(image.shape)      # (620, 723, 4)  默认4个通道,不符合 tensorflow 的处理要求,在 decode_png 中可指定通道数为3,这里就变成3个通道了

print(image)            # 0-255 int

plt.imshow(image)
plt.show()
数据类型转换
很多图像的像素默认是int类型(如上例),但在 tf 中 float 更容易处理,而且 tf 很多函数输出默认是 float,在 imshow 时会发生错误。
tf.image.convert_image_dtype(image, dtype, saturate=False, name=None)
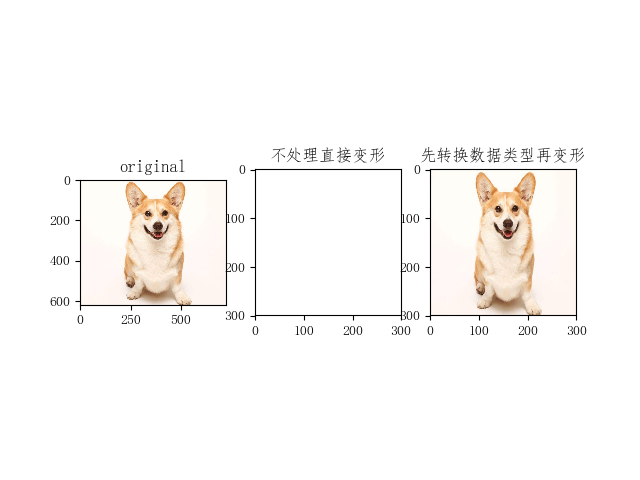
import matplotlib as mpl
import tensorflow as tf
import matplotlib.pylab as plt

mpl.rcParams['font.sans-serif']=['FangSong']        # 图片上显示中文

image = tf.gfile.FastGFile('pic/t4.png', 'rb').read()
image = tf.image.decode_png(image)

tf.InteractiveSession()

image1 = image.eval()
print(image1)           # 默认 0-255 int
# [[[255 247 245 255]
#   [255 248 245 255]


### 经过 tf 函数图像处理后,无法imshow,因为输出变成 0-255 float,imshow 只接受 0-1 float 和 0-255 int
image2 = tf.image.resize_images(image, [300, 300], method=0).eval()
print(image2)
# [[[255.   247.   245.   255.  ]
#   [254.   248.41 245.   255.  ]


### 需要进行 数据类型转换,可以指定转换类型
image3 = tf.image.convert_image_dtype(image, dtype=tf.float32)  # 这里指定转成 0-1 float
print(image3)   # Tensor("convert_image:0", shape=(?, ?, ?), dtype=float32)

image4 = tf.image.resize_images(image3, [300, 300], method=0).eval()
print(image4)
# [[[1.         0.9686275  0.9607844  1.        ]
#   [0.9960785  0.9741569  0.9607844  1.        ]

# imshow with RGB data ([0..1] for floats or [0..255] for integers).
plt.subplot(131); plt.imshow(image1); plt.title('original')
plt.subplot(132); plt.imshow(image2); plt.title('不处理直接变形')
plt.subplot(133); plt.imshow(image4); plt.title('先转换数据类型再变形')
plt.show()
输出
图像翻转
包括上下翻转、左右翻转、90度翻转,随机翻转,函数见代码
tf.image.random_flip_left_right:随机左右翻转,概率为0.5
tf.image.random_flip_up_down:随机上下翻转,概率为0.5
#!/usr/bin/python
# coding:utf-8
import matplotlib.pyplot as plt
import tensorflow as tf

sess = tf.InteractiveSession()

# 读取图像数据
img = tf.gfile.FastGFile('./pic/t4.png', 'rb').read()   # 默认读取是二进制,故必须进行解码
img_data = tf.image.decode_png(img)

# 将图像上下翻转
flipped0 = tf.image.flip_up_down(img_data)
flipped0 = tf.image.convert_image_dtype(flipped0, dtype=tf.float32)     # 本例中此句可有可无

# 将图像左右翻转
flipped1 = tf.image.flip_left_right(img_data)
flipped1 = tf.image.convert_image_dtype(flipped1, dtype=tf.uint8)

# 通过交换第一维和第二维来转置图像
flipped2 = tf.image.transpose_image(img_data)   # 也就是转90度,翻转是转180度

img_ori = img_data.eval()
print(img_ori.shape)        # (620, 723, 4)  4通道
print(img_ori)              # 0-255 int
plt.subplot(221); plt.imshow(img_ori); plt.title('original')
plt.subplot(222); plt.imshow(flipped0.eval()); plt.title('flip_up_down')
plt.subplot(223); plt.imshow(flipped1.eval()); plt.title('flip_left_right')
plt.subplot(224); plt.imshow(flipped2.eval()); plt.title('transpose_image')
plt.show()
输出

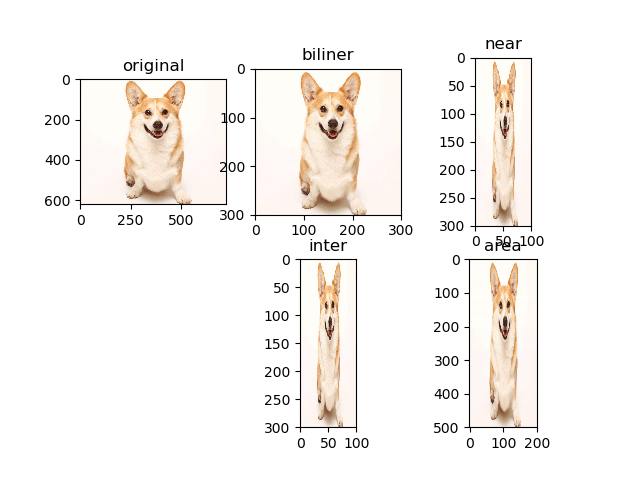
尺寸变换
tf.image.resize_images:输出为 float
resize_images(images,
                  size,
                  method=ResizeMethod.BILINEAR,
                  align_corners=False,
                  preserve_aspect_ratio=False)
methold 取值 决定 图像大小调整算法
0 - 双线性插值法(Bilinear interprolation)
1 - 最临近插值法 (Nearest neighbor interprolation)
2 - 双三次插值法 (Bicubic interprolation)
3 - 面积插值法 (Area interprolation)
import tensorflow as tf
import matplotlib.pylab as plt


image = tf.gfile.FastGFile('pic/t4.png', 'rb').read()
image = tf.image.decode_png(image, channels=3)              # 注意这里需要设定3通道,默认4通道
image = tf.image.convert_image_dtype(image, dtype=tf.float32)   # 这里变换是为了 imshow,转换成 0-1 float

image_in = tf.placeholder(dtype=tf.float32, shape=[None, None, 3])

image_new_biliner = tf.image.resize_images(image_in, size=[300, 300], method=0)    # method=tf.image.ResizeMethod.BILINEAR
image_new_near = tf.image.resize_images(image_in, size=[300, 100], method=1)       # method=tf.image.ResizeMethod.NEAREST_NEIGHBOR
image_new_inter = tf.image.resize_images(image_in, [300, 100], method=2)           # method=tf.image.ResizeMethod.BICUBIC
image_new_area = tf.image.resize_images(image_in, [500, 200], method=3)            # method=tf.image.ResizeMethod.AREA

with tf.Session() as sess:
    sess.run(tf.global_variables_initializer())
    image = sess.run(image)
    image1, image2, image3, image4 = sess.run([image_new_biliner, image_new_near, image_new_inter, image_new_area],
                                       feed_dict={image_in: image})
    # print(image1)         输出为 0-1 float
    plt.subplot(231); plt.imshow(image); plt.title('original')      # imshow with RGB data ([0..1] for floats or [0..255] for integers).
    plt.subplot(232); plt.imshow(image1); plt.title('biliner')
    plt.subplot(233); plt.imshow(image2); plt.title('near')
    plt.subplot(235); plt.imshow(image3); plt.title('inter')
    plt.subplot(236); plt.imshow(image4); plt.title('area')
    plt.show()
输出
图像裁剪
tf.image.crop_to_bounding_box(image, offset_height, offset_width, target_height, target_width):裁剪框裁剪
参数分别为:输入图像,裁剪起点纵坐标,裁剪起点横坐标,裁剪高度,裁剪宽度
输出为 float
import tensorflow as tf
import matplotlib.pyplot as plt


image = tf.gfile.FastGFile('pic/t4.png', 'rb').read()
image = tf.image.decode_png(image)
image = tf.image.convert_image_dtype(image, dtype=tf.float32)

image_in = tf.placeholder(dtype=tf.float32)     # 没有设定shape=[None, None, 3]

image_crop1 = tf.image.crop_to_bounding_box(image_in, 100, 50, 80, 80)
image_crop2 = tf.image.crop_to_bounding_box(image_in, 100, 50, 400, 300)
image_crop3 = tf.image.crop_to_bounding_box(image_in, 0, 0, 300, 300)

with tf.Session() as sess:
    sess.run(tf.global_variables_initializer())

    image = sess.run(image)
    image1, image2, image3 = sess.run([image_crop1, image_crop2, image_crop3], feed_dict={image_in: image})
    plt.subplot(221); plt.imshow(image); plt.title('original')
    plt.subplot(222); plt.imshow(image1); plt.title('crop1')
    plt.subplot(223); plt.imshow(image2); plt.title('crop2')
    plt.subplot(224); plt.imshow(image3); plt.title('crop3')
    plt.show()
输出

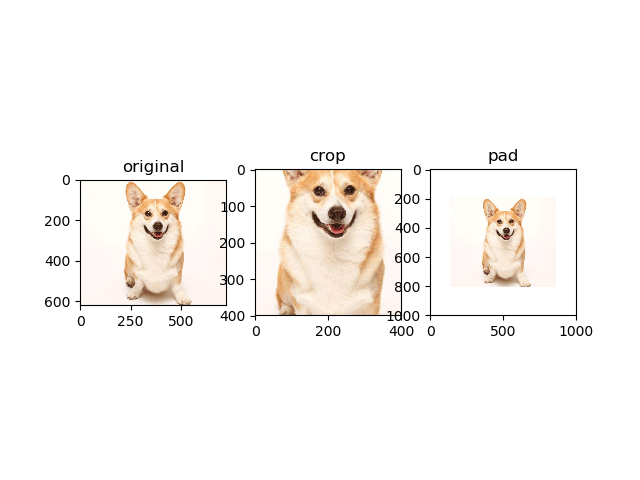
tf.image.resize_image_with_crop_pad(image, target_height, target_width):图像中心不变,将图像裁剪或填充至指定尺寸
import tensorflow as tf
import matplotlib.pylab as plt


image = tf.gfile.FastGFile('pic/t4.png', 'rb').read()
image = tf.image.decode_png(image)
image = tf.image.convert_image_dtype(image, dtype=tf.float32)

image_in = tf.placeholder(dtype=tf.float32)

crop = tf.image.resize_image_with_crop_or_pad(image_in, 400, 400)
pad = tf.image.resize_image_with_crop_or_pad(image_in, 1000, 1000)

with tf.Session() as sess:
    sess.run(tf.global_variables_initializer())

    image = sess.run(image)
    image1, image2 = sess.run([crop, pad], feed_dict={image_in: image})
    plt.subplot(131); plt.imshow(image); plt.title('original')
    plt.subplot(132); plt.imshow(image1); plt.title('crop')
    plt.subplot(133); plt.imshow(image2); plt.title('pad')
    plt.show()
输出
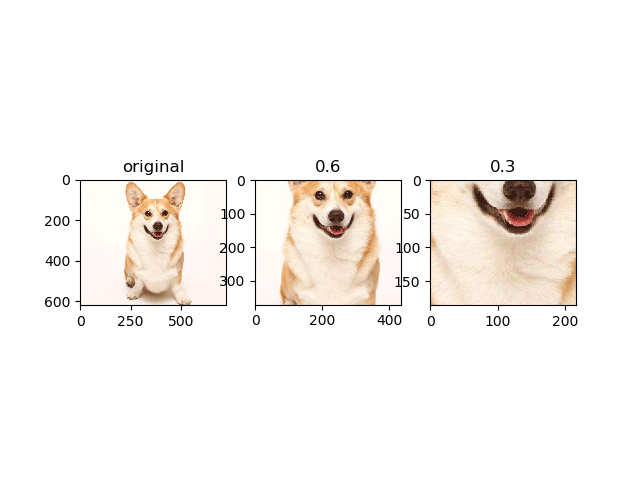
tf.image.central_crop(image, central_fraction):以图像中心为依据,按一定比例裁剪图像
import matplotlib.pyplot as plt
import tensorflow as tf

img = tf.gfile.FastGFile('pic/t4.png', 'rb').read()

with tf.Session() as sess:
    img_data = tf.image.decode_png(img)

    # 函数tf.image.central_crop可以通过比例调整图像的大小
    resized1 = tf.image.central_crop(img_data, 0.6)
    resized2 = tf.image.central_crop(img_data, 0.3)

    plt.subplot(131); plt.imshow(img_data.eval()); plt.title('original')
    plt.subplot(132); plt.imshow(resized1.eval()); plt.title('0.6')
    plt.subplot(133); plt.imshow(resized2.eval()); plt.title('0.3')
    plt.show()
输出
色彩变换
包括调整亮度、对比度、色相、饱和度、规范化,函数见代码
在指定范围内随机调整图像的 亮度/对比度/色相/饱和度
tf.image.random_brightness(img_data,max_delta)
tf.image.random_contrast(img_data, lower, upper)
tf.image.random_hue(img_data, max_delta)
tf.image.random_saturation(img_data, lower, upper)
随机调整这些属性,使训练得到的模型尽可能小的受到无关因素的影响.
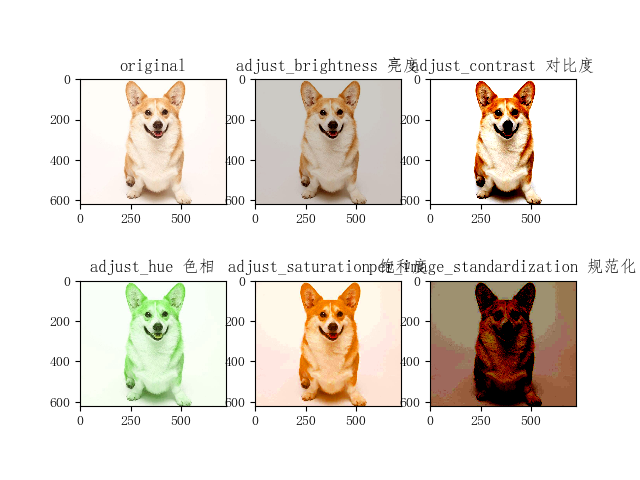
import matplotlib as mpl
import matplotlib.pyplot as plt
import tensorflow as tf

mpl.rcParams['font.sans-serif']=['FangSong']        # 图片上显示中文

# 读取图像数据
img = tf.gfile.FastGFile('pic/t4.png', 'rb').read()

with tf.Session() as sess:
    img_data = tf.image.decode_png(img, channels=3)

    adjusted0 = tf.image.adjust_brightness(img_data, -0.2)      # 将图像的亮度-0.2
    adjusted1 = tf.image.adjust_contrast(img_data, +3)          # 将图像的对比度+3
    adjusted2 = tf.image.adjust_hue(img_data, 0.2)              # 将图像的色相+0.2
    adjusted3 = tf.image.adjust_saturation(img_data, 3)         # 将图像的饱和度+3
    adjusted4 = tf.image.per_image_standardization(img_data)    # 将图像线性缩放为零均值和单位范数

    plt.subplot(231), plt.imshow(img_data.eval()), plt.title('original')
    plt.subplot(232), plt.imshow(adjusted0.eval()), plt.title('adjust_brightness 亮度')
    plt.subplot(233), plt.imshow(adjusted1.eval()), plt.title('adjust_contrast 对比度')
    plt.subplot(234), plt.imshow(adjusted2.eval()), plt.title('adjust_hue 色相')
    plt.subplot(235), plt.imshow(adjusted3.eval()), plt.title('adjust_saturation 饱和度')
    plt.subplot(236), plt.imshow(adjusted4.eval()), plt.title('per_image_standardization 规范化')

    plt.show()
输出
图像增强
随机图像变换经常用于图像增强
import tensorflow as tf
import os
import random

source_file = "./pic/"       #原始文件地址
target_file = "./pic2/"      #修改后的文件地址
num = 50                     #产生图片次数

if not os.path.exists(target_file):  #如果不存在target_file,则创造一个
    os.makedirs(target_file)

file_list = os.listdir(source_file)   #读取原始文件的路径

with tf.Session() as sess:
    for i in range(num):
        # 每次随机选一张
        a = random.randint(0, len(file_list)-1)          #随机数字区间
        image_raw_data = tf.gfile.FastGFile(source_file+file_list[a],"rb").read() # 读取图片
        print("正在处理:",file_list[a])

        image_data = tf.image.decode_jpeg(image_raw_data)

        # 增强方式
        image_data = tf.image.random_crop(image_data, [100, 100, 3])    #随机裁剪
        filpped_le_re = tf.image.random_flip_left_right(image_data)     #随机左右翻转
        filpped_up_down = tf.image.random_flip_up_down(image_data)      #随机上下翻转
        adjust = tf.image.random_brightness(filpped_up_down,0.4)        #随机调整亮度
        adjust = tf.image.random_contrast(adjust, lower=0.2, upper=1.8) #随机调整图像对比度

        image_data = tf.image.convert_image_dtype(adjust,dtype=tf.uint8)

        encode_data = tf.image.encode_jpeg(image_data)

        with tf.gfile.GFile(target_file+str(i)+"_enhance"+".jpeg","wb") as f:
            f.write(encode_data.eval())

print("图像增强完毕")
参考资料:
https://blog.csdn.net/xierhacker/article/details/72385422
https://blog.csdn.net/akadiao/article/details/78541763
https://www.cnblogs.com/Smnustudy/p/10704959.html#top