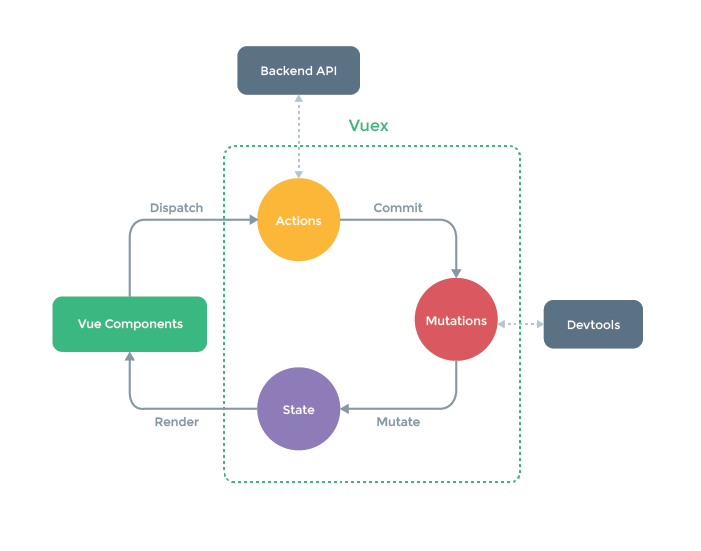
Vuex 是一个专为 Vue.js 应用程序开发的状态管理模式。它采用集中式存储管理应用的所有组件的状态,并以相应的规则保证状态以一种可预测的方式发生变化。
import Vue from 'vue'
import Vuex from 'vuex'
Vue.use(Vuex)
使用 Vuex 开发大型单页应用是非常合适的。如果的应用够简单,最好不要使用 Vuex。
Vuex 的特性:
-
Vuex 的状态存储是响应式的。当 Vue 组件从 store 中读取状态的时候,若 store 中的状态发生变化,那么相应的组件也会相应地得到高效更新。
-
你不能直接改变 store 中的状态。改变 store 中的状态的唯一途径就是显式地提交 (commit) mutation。
Store
Vuex 的状态存储是响应式的,从 store 实例中读取状态最简单的方法就是在计算属性中返回某个状态
每一个 Vuex 应用的核心就是 store(仓库)。“store”基本上就是一个容器,它包含着你的应用中大部分的状态 (state)。
        const store = new Vuex.Store({
          state: {
            count: 0
          },
          mutations: {
            increment (state) {
              state.count++
            }
          }
        })
可以通过 store.state 来获取状态对象,以及通过 store.commit 方法触发状态变更:
    store.commit('increment')
    console.log(store.state.count)
State
Vuex 使用单一状态树——是的,用一个对象就包含了全部的应用层级状态。组件可以通过 this.$store.state 来访问需要用到的数据状态。
Getter
Getter 可以认为是 store 的计算属性。就像计算属性一样,getter 的返回值会根据它的依赖被缓存起来,且只有当它的依赖值发生了改变才会被重新计算。在组件中可以通过 store.getter 来访问。
        const store = new Vuex.Store({
          state: {
            todos: [
              { id: 1, text: '...', done: true },
              { id: 2, text: '...', done: false }
            ]
          },
          getters: {
            doneTodos: state => {   //state 作为第一个参数
              return state.todos.filter(todo => todo.done)
            },
            doneTodosCount: (state, getters) => {   //其他的 getter 作为第二个参数
            return getters.doneTodos.length
            }
          }
        })
Mutation
更改 Vuex 的 store 中的状态的唯一方法是提交 mutation。每个 mutation 都有一个字符串的 事件类型 (type) 和 一个 回调函数 (handler)。这个回调函数就是我们实际进行状态更改的地方,并且它会接受 state 作为第一个参数
        const store = new Vuex.Store({
          state: {
            count: 1
          },
          mutations: {
            increment (state, payload) {
                state.count += payload.amount
            }
          }
        })
        store.commit('increment', {     //提交mutation的第一种方式
          amount: 10
        })
        store.commit({          //提交mutation的第二种方式
          type: 'increment',
          amount: 10
        })
mutation 使用注意事项:
-
最好提前在你的 store 中初始化好所有所需属性。
-
当需要在对象上添加新属性时,你应该
-
使用 Vue.set(obj, 'newProp', 123), 或者
-
以新对象替换老对象。例如,利用 stage-3 的对象展开运算符我们可以这样:state.obj = {
Mutation 必须是同步函数
Action
Action 类似于 mutation,不同在于:
-
Action 提交的是 mutation,而不是直接变更状态。
-
Action 可以包含任意异步操作。
Action 函数接受一个与 store 实例具有相同方法和属性的 context 对象,因此你可以调用 context.commit 提交一个 mutation,或者通过 context.state 和 context.getters 来获取 state 和 getters。
    const store = new Vuex.Store({
      state: {
        count: 0
      },
      mutations: {
        increment (state) {
          state.count++
        }
      },
      actions: {
        increment (context) {
          context.commit('increment')
        }
      }
    })
store.dispatch('increment')
Module
Vuex 允许我们将 store 分割成
onst moduleA = {
state: {
对于模块内部的 mutation 和 getter,接收的第一个参数是模块的局部状态对象。
对于模块内部的 action,局部状态通过 context.state 暴露出来,根节点状态则为 context.rootState
模块内部的 action、mutation 和 getter 默认是注册在全局命名空间的,但是通过添加 namespaced: true 的方式可以使其成为带命名空间的模块。
    modules: {
      foo: {
        namespaced: true,
        getters: {
          //  getter 的第一个参数 `state`
          //  getter 的第二个参数 `getters`
          //  getter 的第三个参数 `rootState`
          //  getter 的第四个参数 `rootGetters`
          someGetter (state, getters, rootState, rootGetters) {
            getters.someOtherGetter // -> 'foo/someOtherGetter'
            rootGetters.someOtherGetter // -> 'someOtherGetter'
          },
          someOtherGetter: state => { ... }
        },

        actions: {
          //  action 的第一个参数 `dispatch`
          //  action 的第二个参数 `commit`
          //  action 的第三个参数 `getters`
          //  action 的第四个参数 `rootGetters`
          someAction ({ dispatch, commit, getters, rootGetters }) {
            getters.someGetter // -> 'foo/someGetter'
            rootGetters.someGetter // -> 'someGetter'

            dispatch('someOtherAction') // -> 'foo/someOtherAction'
            dispatch('someOtherAction', null, { root: true }) // -> 'someOtherAction'

            commit('someMutation') // -> 'foo/someMutation'
            commit('someMutation', null, { root: true }) // -> 'someMutation'
          },
          someOtherAction (ctx, payload) { ... }
        }
      }
    }
模块动态注册
在 store 创建之后,你可以使用 store.registerModule 方法注册模块:
    // 注册模块 `myModule`
    store.registerModule('myModule', {
      // ...
    })
    // 注册嵌套模块 `nested/myModule`
    store.registerModule(['nested', 'myModule'], {
      // ...
    })