OS:
root@harbor:~# cat /etc/issue
Ubuntu 20.04.2 LTS
 l

root@harbor:~# uname -r
5.4.0-81-generic

IP分配:
172.168.33.201 harbor.ywx.net  k8s-deploy
172.168.33.202 haproxy01
172.168.33.203 haproxy02
172.168.33.204 ecd01
172.168.33.205 ecd02
172.168.33.206 ecd03
172.168.33.207 k8s-master01
172.168.33.208 k8s-master02
172.168.33.209 k8s-master03
172.168.33.210 k8s-node01
172.168.33.211 k8s-node02
172.168.33.212 k8s-node03

VIP:
172.168.33.50  api-server的VIP
172.168.33.51
172.168.33.52
172.168.33.53

Kubernetes: v1.21.5

root@k8s-master01:/usr/local/src# kubectl get nodes
NAME             STATUS                     ROLES    AGE     VERSION
172.168.33.207   Ready,SchedulingDisabled   master   7d23h   v1.21.5
172.168.33.208   Ready,SchedulingDisabled   master   7d23h   v1.21.5
172.168.33.209   Ready,SchedulingDisabled   master   7d23h   v1.21.5
172.168.33.210   Ready                      node     7d23h   v1.21.5
172.168.33.211   Ready                      node     7d23h   v1.21.5
172.168.33.212   Ready                      node     7d23h   v1.21.5
https://www.cnblogs.com/yaokaka/p/15308917.html
kubernetes集群升级:
https://www.cnblogs.com/yaokaka/p/15335719.html
etcd是CoreOS团队于2013年6月发起的开源项目,它的目标是构建一个高可用的分布式键值(key-value)数据库。etcd内部采用raft协议作为一致性算法,etcd基于Go语言实现。
3、etcd的特点
-
简单:安装配置简单,而且提供了HTTP API进行交互,使用也很简单
-
安全:支持SSL证书验证
-
快速:根据官方提供的benchmark数据,单实例支持每秒2k+读操作
-
可靠:采用raft算法,实现分布式系统数据的可用性和一致性
-
完全复制:集群中的每个节点都可以使⽤完整的存档
-
⾼可⽤性:Etcd可⽤于避免硬件的单点故障或⽹络问题
-
⼀致性:每次读取都会返回跨多主机的最新写⼊
4、etcd的客户端操作
etcd有多个不同的API访问版本,v1版本已经废弃,etcd v2 和 v3 本质上是共享同⼀套 raft 协议代码的两个独⽴的应⽤,接⼝不⼀样,存储不⼀样,数据互相隔离。也就是说如果从 Etcd v2 升级到 Etcd v3,原来v2 的数据还是只能⽤ v2 的接⼝访问,v3 的接⼝创建的数据也只能访问通过 v3 的接⼝访问。
etcd命令用法:
root@etcd01:~# ETCDCTL_API=3 etcdctl --help
NAME:
   etcdctl - A simple command line client for etcd.

USAGE:
   etcdctl [global options] command [command options] [arguments...]

VERSION:
   3.4.13

COMMANDS:
     backup          backup an etcd directory
     cluster-health  check the health of the etcd cluster
     mk              make a new key with a given value
     mkdir           make a new directory
     rm              remove a key or a directory
     rmdir           removes the key if it is an empty directory or a key-value pair
     get             retrieve the value of a key
     ls              retrieve a directory
     set             set the value of a key
     setdir          create a new directory or update an existing directory TTL
     update          update an existing key with a given value
     updatedir       update an existing directory
     watch           watch a key for changes
     exec-watch      watch a key for changes and exec an executable
     member          member add, remove and list subcommands
     user            user add, grant and revoke subcommands
     role            role add, grant and revoke subcommands
     auth            overall auth controls
     help, h         Shows a list of commands or help for one command

GLOBAL OPTIONS:
   --debug                          output cURL commands which can be used to reproduce the request
   --no-sync                        don't synchronize cluster information before sending request
   --output simple, -o simple       output response in the given format (simple, `extended` or `json`) (default: "simple")
   --discovery-srv value, -D value  domain name to query for SRV records describing cluster endpoints
   --insecure-discovery             accept insecure SRV records describing cluster endpoints
   --peers value, -C value          DEPRECATED - "--endpoints" should be used instead
   --endpoint value                 DEPRECATED - "--endpoints" should be used instead
   --endpoints value                a comma-delimited list of machine addresses in the cluster (default: "http://127.0.0.1:2379,http://127.0.0.1:4001")
   --cert-file value                identify HTTPS client using this SSL certificate file
   --key-file value                 identify HTTPS client using this SSL key file
   --ca-file value                  verify certificates of HTTPS-enabled servers using this CA bundle
   --username value, -u value       provide username[:password] and prompt if password is not supplied.
   --timeout value                  connection timeout per request (default: 2s)
   --total-timeout value            timeout for the command execution (except watch) (default: 5s)
   --help, -h                       show help
   --version, -v                    print the version
root@etcd01:~# ETCDCTL_API=2 etcdctl member --help
NAME:
   etcdctl member - member add, remove and list subcommands

USAGE:
   etcdctl member command [command options] [arguments...]

COMMANDS:
     list    enumerate existing cluster members
     add     add a new member to the etcd cluster
     remove  remove an existing member from the etcd cluster
     update  update an existing member in the etcd cluster

OPTIONS:
   --help, -h  show help


root@etcd01:~# ETCDCTL_API=3 etcdctl member --help
NAME:
    member - Membership related commands

USAGE:
    etcdctl member <subcommand> [flags]

API VERSION:
    3.4


COMMANDS:
    add    Adds a member into the cluster
    list    Lists all members in the cluster
    promote    Promotes a non-voting member in the cluster
    remove    Removes a member from the cluster
    update    Updates a member in the cluster

OPTIONS:
  -h, --help[=false]    help for member

GLOBAL OPTIONS:
      --cacert=""                verify certificates of TLS-enabled secure servers using this CA bundle
      --cert=""                    identify secure client using this TLS certificate file
      --command-timeout=5s            timeout for short running command (excluding dial timeout)
      --debug[=false]                enable client-side debug logging
      --dial-timeout=2s                dial timeout for client connections
  -d, --discovery-srv=""            domain name to query for SRV records describing cluster endpoints
      --discovery-srv-name=""            service name to query when using DNS discovery
      --endpoints=[127.0.0.1:2379]        gRPC endpoints
      --hex[=false]                print byte strings as hex encoded strings
      --insecure-discovery[=true]        accept insecure SRV records describing cluster endpoints
      --insecure-skip-tls-verify[=false]    skip server certificate verification (CAUTION: this option should be enabled only for testing purposes)
      --insecure-transport[=true]        disable transport security for client connections
      --keepalive-time=2s            keepalive time for client connections
      --keepalive-timeout=6s            keepalive timeout for client connections
      --key=""                    identify secure client using this TLS key file
      --password=""                password for authentication (if this option is used, --user option shouldn't include password)
      --user=""                    username[:password] for authentication (prompt if password is not supplied)
  -w, --write-out="simple"            set the output format (fields, json, protobuf, simple, table)
etcd集群成员的心跳信息
root@etcd01:~# export NODE_IPS="172.168.33.204 172.168.33.205 172.168.33.206"

root@etcd01:~# for ip in ${NODE_IPS}; do ETCDCTL_API=3 /usr/local/bin/etcdctl --endpoints=https://${ip}:2379 --cacert=/etc/kubernetes/ssl/ca.pem --cert=/etc/kubernetes/ssl/etcd.pem --key=/etc/kubernetes/ssl/etcd-key.pem endpoint health; done
https://172.168.33.204:2379 is healthy: successfully committed proposal: took = 14.611795ms
https://172.168.33.205:2379 is healthy: successfully committed proposal: took = 11.889947ms
https://172.168.33.206:2379 is healthy: successfully committed proposal: took = 12.589934ms
etcd集群的成员信息
root@etcd01:~# ETCDCTL_API=3 /usr/local/bin/etcdctl
--write-out=table member list
--endpoints=https://172.168.33.204:2379
--cacert=/etc/kubernetes/ssl/ca.pem
--cert=/etc/kubernetes/ssl/etcd.pem
--key=/etc/kubernetes/ssl/etcd-key.pem

显示etcd群集的详细信息
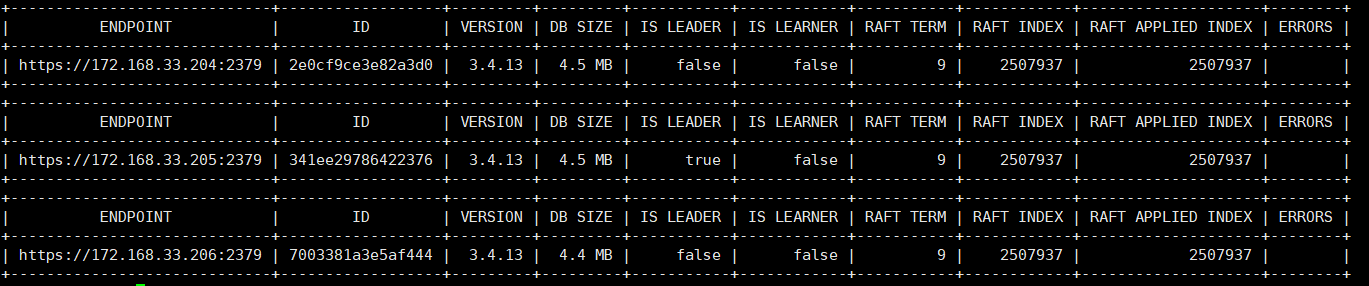
root@etcd01:~# export NODE_IPS="172.168.33.204 172.168.33.205 172.168.33.206"
root@etcd01:~# for ip in ${NODE_IPS}; do ETCDCTL_API=3 /usr/local/bin/etcdctl --write-out=table endpoint status --endpoints=https://${ip}:2379 --cacert=/etc/kubernetes/ssl/ca.pem --cert=/etc/kubernetes/ssl/etcd.pem --key=/etc/kubernetes/ssl/etcd-key.pem; done
#1、关闭etcd leader 172.168.33.205
root@etcd02:~# ip a | grep eth0
2: eth0: <BROADCAST,MULTICAST,UP,LOWER_UP> mtu 1500 qdisc fq_codel state UP group default qlen 1000
    inet 172.168.33.205/16 brd 172.168.255.255 scope global eth0
root@etcd02:~# reboot

#2、在其他的ercd
root@etcd01:~# export NODE_IPS="172.168.33.204 172.168.33.205 172.168.33.206"
root@etcd01:~#  for ip in ${NODE_IPS}; do ETCDCTL_API=3 /usr/local/bin/etcdctl --write-out=table endpoint status --endpoints=https://${ip}:2379 --cacert=/etc/kubernetes/ssl/ca.pem --cert=/etc/kubernetes/ssl/etcd.pem --key=/etc/kubernetes/ssl/etcd-key.pem; done

4.2查看etcd集群的数据信息
root@etcd01:~# ETCDCTL_API=3 etcdctl get / --prefix --keys-only  #以路径的⽅式所有key信息
......
/registry/services/endpoints/kubernetes-dashboard/kubernetes-dashboard

/registry/services/specs/default/kubernetes

/registry/services/specs/kube-system/kube-dns

/registry/services/specs/kubernetes-dashboard/dashboard-metrics-scraper

/registry/services/specs/kubernetes-dashboard/kubernetes-dashboard
root@etcd01:~# ETCDCTL_API=3 etcdctl get / --prefix --keys-only | grep pods
/registry/pods/kube-system/calico-kube-controllers-647f956d86-srt9s
/registry/pods/kube-system/calico-node-7f2kc
/registry/pods/kube-system/calico-node-ccv26
/registry/pods/kube-system/calico-node-kw499
/registry/pods/kube-system/calico-node-r4kvx
/registry/pods/kube-system/calico-node-rqm8f
/registry/pods/kube-system/calico-node-vjm2k
/registry/pods/kube-system/coredns-55d54f7cfb-74vh8
/registry/pods/kubernetes-dashboard/dashboard-metrics-scraper-856586f554-595fb
/registry/pods/kubernetes-dashboard/kubernetes-dashboard-79b875f7f8-5qzn4
#在kubernetes中查看pod信息
root@k8s-master01:~# kubectl get pods -A
NAMESPACE              NAME                                         READY   STATUS    RESTARTS   AGE
kube-system            calico-kube-controllers-647f956d86-srt9s     1/1     Running   0          42h
kube-system            calico-node-7f2kc                            1/1     Running   2          11d
kube-system            calico-node-ccv26                            1/1     Running   2          11d
kube-system            calico-node-kw499                            0/1     Running   1          6d
kube-system            calico-node-r4kvx                            1/1     Running   5          11d
kube-system            calico-node-rqm8f                            1/1     Running   2          11d
kube-system            calico-node-vjm2k                            1/1     Running   2          11d
kube-system            coredns-55d54f7cfb-74vh8                     1/1     Running   0          42h
kubernetes-dashboard   dashboard-metrics-scraper-856586f554-595fb   1/1     Running   0          42h
kubernetes-dashboard   kubernetes-dashboard-79b875f7f8-5qzn4        1/1     Running   1          42h
root@etcd01:~# ETCDCTL_API=3 etcdctl get / --prefix --keys-only | grep namespaces
/registry/namespaces/default
/registry/namespaces/kube-node-lease
/registry/namespaces/kube-public
/registry/namespaces/kube-system
/registry/namespaces/kubernetes-dashboard

#在kubernetes中查看namespaces信息
root@k8s-master01:~# kubectl get namespaces
NAME                   STATUS   AGE
default                Active   11d
kube-node-lease        Active   11d
kube-public            Active   11d
kube-system            Active   11d
kubernetes-dashboard   Active   10d
root@etcd01:~# ETCDCTL_API=3 etcdctl get / --prefix --keys-only | grep deployments
/registry/deployments/kube-system/calico-kube-controllers
/registry/deployments/kube-system/coredns
/registry/deployments/kubernetes-dashboard/dashboard-metrics-scraper
/registry/deployments/kubernetes-dashboard/kubernetes-dashboard

#在kubernetes中查看deployments
root@k8s-master01:~# kubectl get deployments -A
NAMESPACE              NAME                        READY   UP-TO-DATE   AVAILABLE   AGE
kube-system            calico-kube-controllers     1/1     1            1           11d
kube-system            coredns                     1/1     1            1           11d
kubernetes-dashboard   dashboard-metrics-scraper   1/1     1            1           10d
kubernetes-dashboard   kubernetes-dashboard        1/1     1            1           10d
root@etcd01:~# ETCDCTL_API=3 etcdctl get / --prefix --keys-only | grep calico
/calico/ipam/v2/assignment/ipv4/block/172.20.122.128-26
/calico/ipam/v2/assignment/ipv4/block/172.20.135.128-26
/calico/ipam/v2/assignment/ipv4/block/172.20.32.128-26
/calico/ipam/v2/assignment/ipv4/block/172.20.58.192-26
/calico/ipam/v2/assignment/ipv4/block/172.20.85.192-26
/calico/ipam/v2/handle/ipip-tunnel-addr-k8s-master01
/calico/ipam/v2/handle/ipip-tunnel-addr-k8s-master02
/calico/ipam/v2/handle/ipip-tunnel-addr-k8s-node01
/calico/ipam/v2/handle/ipip-tunnel-addr-k8s-node02
/calico/ipam/v2/handle/ipip-tunnel-addr-k8s-node03
/calico/ipam/v2/handle/k8s-pod-network.44820babdec34cd55e26d1f73bd1d62dbffc12cb48453380b9d37b8e27cacfbc
/calico/ipam/v2/handle/k8s-pod-network.5bf9b2f255631210515d4b6722cc317f0f81fdacf60f47f3746fbcde8a239c0d
/calico/ipam/v2/handle/k8s-pod-network.b33e81d8d1d9de9cd404d9de66c1615c4bcfcbe9d93fc92972f0fd79f6f0d983
/calico/ipam/v2/host/k8s-master01/ipv4/block/172.20.32.128-26
/calico/ipam/v2/host/k8s-master02/ipv4/block/172.20.122.128-26
/calico/ipam/v2/host/k8s-node01/ipv4/block/172.20.85.192-26
/calico/ipam/v2/host/k8s-node02/ipv4/block/172.20.58.192-26
/calico/ipam/v2/host/k8s-node03/ipv4/block/172.20.135.128-26
......
#查看namespaces中default的key
root@etcd01:~#  ETCDCTL_API=3 etcdctl get /registry/namespaces/default
/registry/namespaces/default
k8s

v1    Namespace

default"*$014daf97-460a-4bf1-8c45-7cd238da53532´Z&
ubernetes.io/metadata.namedefaultz{
kube-apiserverUpdatev´FieldsV1:I
G{"f:metadata":{"f:labels":{".":{},"f:kubernetes.io/metadata.name":{}}}}


kubernetes
Active"

#查看calico的key
root@etcd01:~# ETCDCTL_API=3 etcdctl get /calico/ipam/v2/assignment/ipv4/block/172.20.122.128-26
/calico/ipam/v2/assignment/ipv4/block/172.20.122.128-26
{"cidr":"172.20.122.128/26","affinity":"host:k8s-master02","allocations":[0,null,null,null,null,null,null,null,null,null,null,null,null,null,null,null,null,null,null,null,null,null,null,null,null,null,null,null,null,null,null,null,null,null,null,null,null,null,null,null,null,null,null,null,null,null,null,null,null,null,null,null,null,null,null,null,null,null,null,null,null,null,null,null],"unallocated":[1,2,3,4,5,6,7,8,9,10,11,12,13,14,15,16,17,18,19,20,21,22,23,24,25,26,27,28,29,30,31,32,33,34,35,36,37,38,39,40,41,42,43,44,45,46,47,48,49,50,51,52,53,54,55,56,57,58,59,60,61,62,63],"attributes":[{"handle_id":"ipip-tunnel-addr-k8s-master02","secondary":{"node":"k8s-master02","type":"ipipTunnelAddress"}}],"deleted":false}
root@etcd01:~# ETCDCTL_API=3 etcdctl get --keys-only --prefix /calico
/calico/ipam/v2/assignment/ipv4/block/172.20.122.128-26
/calico/ipam/v2/assignment/ipv4/block/172.20.135.128-26
/calico/ipam/v2/assignment/ipv4/block/172.20.32.128-26
/calico/ipam/v2/assignment/ipv4/block/172.20.58.192-26
/calico/ipam/v2/assignment/ipv4/block/172.20.85.192-26
/calico/ipam/v2/handle/ipip-tunnel-addr-k8s-master01
/calico/ipam/v2/handle/ipip-tunnel-addr-k8s-master02
/calico/ipam/v2/handle/ipip-tunnel-addr-k8s-node01
/calico/ipam/v2/handle/ipip-tunnel-addr-k8s-node02
/calico/ipam/v2/handle/ipip-tunnel-addr-k8s-node03
......
4.3.1添加数据
root@etcd01:~# ETCDCTL_API=3 /usr/local/bin/etcdctl put /name ywx
OK
#验证添加的数据
root@etcd01:~# ETCDCTL_API=3 /usr/local/bin/etcdctl get /name
/name
ywx
#改动数据,是重新上传新的数据来覆盖原数据
root@etcd01:~# ETCDCTL_API=3 /usr/local/bin/etcdctl get /name
/name
ywx

#把name的值该为kaka
root@etcd01:~# ETCDCTL_API=3 /usr/local/bin/etcdctl put /name kaka
OK

root@etcd01:~# ETCDCTL_API=3 /usr/local/bin/etcdctl get /name
/name
kaka
#删除name
root@etcd01:~# ETCDCTL_API=3 /usr/local/bin/etcdctl del /name
1
root@etcd01:~# ETCDCTL_API=3 /usr/local/bin/etcdctl get /name
root@etcd01:~#
1)接⼝通过grpc提供rpc接⼝,放弃了v2的http接⼝,优势是⻓连接效率提升明显,缺点是使⽤不如以前⽅便,尤其对不⽅便维护⻓连接的场景。
2)废弃了原来的⽬录结构,变成了纯粹的kv,⽤户可以通过前缀匹配模式模拟⽬录。
3)内存中不再保存value,同样的内存可以⽀持存储更多的key。
4)watch机制更稳定,基本上可以通过watch机制实现数据的完全同步。
5)提供了批量操作以及事务机制,⽤户可以通过批量事务请求来实现Etcd v2的CAS机制(批量事务⽀持if条件判断)。
在etcd02上监控一个name的key
root@etcd02:~# ETCDCTL_API=3 /usr/local/bin/etcdctl watch /name
在etcd01上修改name的key,在etcd02上验证
#添加一个name的值
root@etcd01:~# ETCDCTL_API=3 /usr/local/bin/etcdctl put /name ywx
OK

root@etcd02:~# ETCDCTL_API=3 /usr/local/bin/etcdctl watch /name
PUT
/name
ywx

#修改name的值
root@etcd01:~# ETCDCTL_API=3 /usr/local/bin/etcdctl put /name kaka
OK

root@etcd02:~# ETCDCTL_API=3 /usr/local/bin/etcdctl watch /name
PUT
/name
ywx
PUT
/name
kaka

#删除name
root@etcd01:~# ETCDCTL_API=3 /usr/local/bin/etcdctl del /name
1

root@etcd02:~# ETCDCTL_API=3 /usr/local/bin/etcdctl watch /name
PUT
/name
ywx
PUT
/name
kaka
DELETE
/name
4.5 etcd数据备份与恢复机制
4.5.1 etcd v2版本数据备份与恢复
#V2版本帮助信息:
root@k8s-etcd2:~# /usr/bin/etcdctl backup --help
NAME:
etcdctl backup - backup an etcd directory
USAGE:
etcdctl backup [command options]
OPTIONS:
--data-dir value Path to the etcd data dir #源数据⽬录
--wal-dir value Path to the etcd wal dir
--backup-dir value Path to the backup dir #备份⽬录
--backup-wal-dir value Path to the backup wal dir
#V2版本备份数据:
root@k8s-etcd2:~# ETCDCTL_API=2 etcdctl backup --data-dir /var/lib/etcd/ --backup-dir /opt/etcd_backup
2019-07-11 18:59:57.674432 I | wal: segmented wal file
/opt/etcd_backup/member/wal/0000000000000001-0000000000017183.wal is created

#V2版本恢复数据:
#恢复帮助信息:
root@k8s-etcd2:~# etcd --help | grep force
--force-new-cluster 'false'
force to create a new one-member cluster.

root@k8s-etcd2:~#etcd --data-dir=/var/lib/etcd/default.etcd --force-new-cluster &
root@k8s-etcd2:~# vim /etc/systemd/system/etcd.service
[Unit]
Description=Etcd Server
After=network.target
After=network-online.target
Wants=network-online.target
Documentation=https://github.com/coreos
[Service]
Type=notify
WorkingDirectory=/var/lib/etcd/
ExecStart=/usr/bin/etcd
--name=etcd2
.................................
--data-dir=/opt/etcd_backup -force-new-cluster #强制设置为为新集群
Restart=on-failure
RestartSec=5
LimitNOFILE=65536
[Install]
WantedBy=multi-user.target
数据备份
root@etcd01:~# ETCDCTL_API=3 /usr/local/bin/etcdctl snapshot save etcd-bak.db
数据恢复时需要对整个etcd集群的所有成员做恢复
第一步先停止业务及etcd
root@etcd01:~#systemctl stop etcd
root@etcd02:~#systemctl stop etcd
root@etcd03:~#systemctl stop etcd
第二步删除etcd的原数据目录
root@etcd01:~#rm -rf /var/lib/etcd
root@etcd02:~#rm -rf /var/lib/etcd
root@etcd03:~#rm -rf /var/lib/etcd
第三步在所有etcd成员上恢复数据
#恢复etcd01上的数据
root@etcd01:~#ETCDCTL_API=3 etcdctl snapshot restore /tmp/etcd-bak.db
--name etcd-172.168.33.204
--initial-cluster="etcd-172.168.33.204=https://172.168.33.204:2380,etcd-172.168.33.205=https://172.168.33.205:2380,etcd-172.168.33.206=https://172.168.33.206:2380"
--initial-cluster-token=etcd-cluster-0
--initial-advertise-peer-urls=https://172.168.33.204:2380
--data-dir=/var/lib/etcd
#只能将数据恢复到⼀个新的不存在的⽬录中,如果需要恢复到原目录,需要将原目录删除

#恢复etcd02上的数据
root@etcd02:~#ETCDCTL_API=3 etcdctl snapshot restore /tmp/etcd-bak.db
--name etcd-172.168.33.205
--initial-cluster="etcd-172.168.33.204=https://172.168.33.204:2380,etcd-172.168.33.205=https://172.168.33.205:2380,etcd-172.168.33.206=https://172.168.33.206:2380"
--initial-cluster-token=etcd-cluster-0
--initial-advertise-peer-urls=https://172.168.33.205:2380
--data-dir=/var/lib/etcd
#只能将数据恢复到⼀个新的不存在的⽬录中,如果需要恢复到原目录,需要将原目录删除

#恢复etcd03上的数据
root@etcd02:~#ETCDCTL_API=3 etcdctl snapshot restore /tmp/etcd-bak.db
--name etcd-172.168.33.206
--initial-cluster="etcd-172.168.33.204=https://172.168.33.204:2380,etcd-172.168.33.205=https://172.168.33.205:2380,etcd-172.168.33.206=https://172.168.33.206:2380"
--initial-cluster-token=etcd-cluster-0
--initial-advertise-peer-urls=https://172.168.33.206:2380
--data-dir=/var/lib/etcd
#只能将数据恢复到⼀个新的不存在的⽬录中,如果需要恢复到原目录,需要将原目录删除
注意:
#--name etcd-172.168.33.206
#--initial-cluster="etcd-172.168.33.204=https://172.168.33.204:2380,etcd-172.168.33.205=https://172.168.33.205:2380,etcd-172.168.33.206=https://172.168.33.206:2380"
#--initial-cluster-token=etcd-cluster-0
#--initial-advertise-peer-urls=https://172.168.33.206:2380
#--data-dir=/var/lib/etcd
上面的信息可以在下面的文件中查找
vim /etc/systemd/system/etcd.service
......
  --name=etcd-172.168.33.204
  --cert-file=/etc/kubernetes/ssl/etcd.pem
  --key-file=/etc/kubernetes/ssl/etcd-key.pem
  --peer-cert-file=/etc/kubernetes/ssl/etcd.pem
  --peer-key-file=/etc/kubernetes/ssl/etcd-key.pem
  --trusted-ca-file=/etc/kubernetes/ssl/ca.pem
  --peer-trusted-ca-file=/etc/kubernetes/ssl/ca.pem
  --initial-advertise-peer-urls=https://172.168.33.204:2380
  --listen-peer-urls=https://172.168.33.204:2380
  --listen-client-urls=https://172.168.33.204:2379,http://127.0.0.1:2379
  --advertise-client-urls=https://172.168.33.204:2379
  --initial-cluster-token=etcd-cluster-0
  --initial-cluster=etcd-172.168.33.204=https://172.168.33.204:2380,etcd-172.168.33.205=https://172.168.33.205:2380,etcd-172.168.33.206=https://172.168.33.206:2380
  --initial-cluster-state=new
  --data-dir=/var/lib/etcd
  --wal-dir=
  --snapshot-count=50000
  --auto-compaction-retention=1
  --auto-compaction-mode=periodic
  --max-request-bytes=10485760
  --quota-backend-bytes=8589934592
......
第四步重启etcd
root@etcd01:~#systemctl start etcd
root@etcd02:~#systemctl start etcd
root@etcd03:~#systemctl start etcd
第五步验证
root@etcd01:~# export NODE_IPS="172.168.33.204 172.168.33.205 172.168.33.206"
root@etcd01:~# for ip in ${NODE_IPS}; do ETCDCTL_API=3 /usr/local/bin/etcdctl --write-out=table endpoint status --endpoints=https://${ip}:2379 --cacert=/etc/kubernetes/ssl/ca.pem --cert=/etc/kubernetes/ssl/etcd.pem --key=/etc/kubernetes/ssl/etcd-key.pem; done

root@harbor:~# cd /etc/kubeasz/
root@harbor:/etc/kubeasz# ll playbooks/
total 92
drwxrwxr-x  2 root root 4096 Sep 29 16:28 ./
drwxrwxr-x 12 root root  225 Sep 17 20:53 ../
-rw-rw-r--  1 root root  448 Sep 29 16:02 01.prepare.yml
-rw-rw-r--  1 root root   58 Apr 26 10:02 02.etcd.yml
-rw-rw-r--  1 root root  209 Apr 26 10:02 03.runtime.yml
-rw-rw-r--  1 root root  482 Apr 26 10:02 04.kube-master.yml
-rw-rw-r--  1 root root  218 Apr 26 10:02 05.kube-node.yml
-rw-rw-r--  1 root root  408 Apr 26 10:02 06.network.yml
-rw-rw-r--  1 root root   77 Apr 26 10:02 07.cluster-addon.yml
-rw-rw-r--  1 root root   34 Apr 26 10:02 10.ex-lb.yml
-rw-rw-r--  1 root root 3893 Apr 26 10:02 11.harbor.yml
-rw-rw-r--  1 root root 1567 Apr 26 10:02 21.addetcd.yml
-rw-rw-r--  1 root root 1520 Apr 26 10:02 22.addnode.yml
-rw-rw-r--  1 root root 1050 Apr 26 10:02 23.addmaster.yml
-rw-rw-r--  1 root root 3344 Apr 26 10:02 31.deletcd.yml
-rw-rw-r--  1 root root 1566 Apr 26 10:02 32.delnode.yml
-rw-rw-r--  1 root root 1620 Apr 26 10:02 33.delmaster.yml
-rw-rw-r--  1 root root 1891 Apr 26 10:02 90.setup.yml
-rw-rw-r--  1 root root 1054 Apr 26 10:02 91.start.yml
-rw-rw-r--  1 root root  934 Apr 26 10:02 92.stop.yml
-rw-rw-r--  1 root root 1042 Apr 26 10:02 93.upgrade.yml
-rw-rw-r--  1 root root 1786 Apr 26 10:02 94.backup.yml
-rw-rw-r--  1 root root  999 Apr 26 10:02 95.restore.yml
-rw-rw-r--  1 root root  337 Apr 26 10:02 99.clean.yml


root@harbor:/etc/kubeasz# ./ezctl --help
Usage: ezctl COMMAND [args]
-------------------------------------------------------------------------------------
Cluster setups:
    list                     to list all of the managed clusters
    checkout    <cluster>            to switch default kubeconfig of the cluster
    new         <cluster>            to start a new k8s deploy with name 'cluster'
    setup       <cluster>  <step>    to setup a cluster, also supporting a step-by-step way
    start       <cluster>            to start all of the k8s services stopped by 'ezctl stop'
    stop        <cluster>            to stop all of the k8s services temporarily
    upgrade     <cluster>            to upgrade the k8s cluster
    destroy     <cluster>            to destroy the k8s cluster
    backup      <cluster>            to backup the cluster state (etcd snapshot)
    restore     <cluster>            to restore the cluster state from backups
    start-aio                     to quickly setup an all-in-one cluster with 'default' settings

Cluster ops:
    add-etcd    <cluster>  <ip>      to add a etcd-node to the etcd cluster
    add-master  <cluster>  <ip>      to add a master node to the k8s cluster
    add-node    <cluster>  <ip>      to add a work node to the k8s cluster
    del-etcd    <cluster>  <ip>      to delete a etcd-node from the etcd cluster
    del-master  <cluster>  <ip>      to delete a master node from the k8s cluster
    del-node    <cluster>  <ip>      to delete a work node from the k8s cluster

Extra operation:
    kcfg-adm    <cluster>  <args>    to manage client kubeconfig of the k8s cluster

Use "ezctl help <command>" for more information about a given command.

备份:
root@harbor:/etc/kubeasz# ./ezctl backup k8s-ywx
恢复:
root@harbor:/etc/kubeasz# ./ezctl restore k8s-ywx
root@harbor:/etc/kubeasz# ./ezctl --help
Usage: ezctl COMMAND [args]
-------------------------------------------------------------------------------------
Cluster setups:
    list                     to list all of the managed clusters
    checkout    <cluster>            to switch default kubeconfig of the cluster
    new         <cluster>            to start a new k8s deploy with name 'cluster'
    setup       <cluster>  <step>    to setup a cluster, also supporting a step-by-step way
    start       <cluster>            to start all of the k8s services stopped by 'ezctl stop'
    stop        <cluster>            to stop all of the k8s services temporarily
    upgrade     <cluster>            to upgrade the k8s cluster
    destroy     <cluster>            to destroy the k8s cluster
    backup      <cluster>            to backup the cluster state (etcd snapshot)
    restore     <cluster>            to restore the cluster state from backups
    start-aio                     to quickly setup an all-in-one cluster with 'default' settings

Cluster ops:
    add-etcd    <cluster>  <ip>      to add a etcd-node to the etcd cluster
    add-master  <cluster>  <ip>      to add a master node to the k8s cluster
    add-node    <cluster>  <ip>      to add a work node to the k8s cluster
    del-etcd    <cluster>  <ip>      to delete a etcd-node from the etcd cluster
    del-master  <cluster>  <ip>      to delete a master node from the k8s cluster
    del-node    <cluster>  <ip>      to delete a work node from the k8s cluster

Extra operation:
    kcfg-adm    <cluster>  <args>    to manage client kubeconfig of the k8s cluster

Use "ezctl help <command>" for more information about a given command.

#添加新的etcd节点
root@harbor:/etc/kubeasz# ./ezctl add-etcd k8s-ywx 172.168.33.200
#删除etcd节点
root@harbor:/etc/kubeasz# ./ezctl add-del k8s-ywx 172.168.33.200
1、恢复服务器系统
2、重新部署ETCD集群
3、停⽌kube-apiserver/controller-manager/scheduler/kubelet/kube-proxy
4、停⽌ETCD集群
5、各ETCD节点恢复同⼀份备份数据
6、启动各节点并验证ETCD集群
7、启动kube-apiserver/controller-manager/scheduler/kubelet/kube-proxy
8、验证k8s master状态及pod数据