一. 基础组件
1. Breadcrumb 面包屑
(1). 效果图
点击,首页,跳转到首页。

(2). 代码分享
通过 separator-class="el-icon-arrow-right"设置分隔符,通过to属性,进行路由跳转对象,同 vue-router 的 to

    <el-breadcrumb separator-class="el-icon-arrow-right">
      <el-breadcrumb-item :to="{ path: '/home' }">首页</el-breadcrumb-item>
      <el-breadcrumb-item>用户管理</el-breadcrumb-item>
      <el-breadcrumb-item>用户列表</el-breadcrumb-item>
    </el-breadcrumb>
2. Card卡片
这里采用Card最基本的用法,包裹即可。

<el-card >

</el-card>
3. Input 输入框
这里采用input标签作为搜索框,配合一个button作为右侧的搜索框图标。如下图:

使用了下面属性和事件,同时给搜索按钮添加了一个点击事件。


代码如下:

<el-input placeholder="请输入内容" v-model="queryInfo.query" clearable @clear="getUserList">
            <el-button slot="append" icon="el-icon-search" @click="getUserList"></el-button>
          </el-input>
PS: input中添加回车事件 @keyup.enter.native="xxx"
<el-input placeholder="请输入内容" v-model="queryInfo.query" clearable @clear="getGoodsList" @keyup.enter.native="getGoodsList">
4. Dialog对话框(重点)
(1). 如何控制表格的打开和关闭?
通过visible.sync属性来设置表格的打开和关闭,true表示显示,false表示隐藏,所以打开和关闭都是围绕这个属性来处理的。
  <el-dialog title="添加用户" :visible.sync="addDialogVisible" width="600px" @close="addDialogClosed">
      <!-- 内容主体区域 -->
      <el-form :model="addForm" :rules="addFormRules" ref="addFormRef" label-width="70px" size="small">

      </el-form>
      <!-- 底部区域 -->
      <span slot="footer" class="dialog-footer">
        <el-button @click="addDialogVisible = false">取 消</el-button>
        <el-button type="primary" @click="addUser">确 定</el-button>
      </span>
  </el-dialog>
剖析:
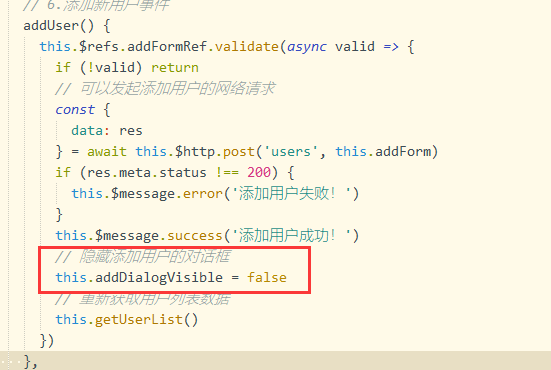
A. 点击取消按钮,将 addDialogVisible 设置为false,关闭。
B. 添加close方法,监听对话框关闭,用来重置form表单。
    // 5.监听添加用户对话框的关闭事件
      addDialogClosed() {
        // 表单重置
        this.$refs.addFormRef.resetFields()
      },
C. 确定按钮,走完业务后,也需要将addDialogVisible设置为false,关闭

(2). 如何控制弹框高度?
可以通过width属性直接设置宽度,但是不能直接设置高度,我们可以给dialog中的内容,比如form表单,外面再包裹一层div,设置这个div的高度即可。

(3). 其它
5. Switch开关
绑定v-model到一个Boolean类型的变量。可以使用active-color属性与inactive-color属性来设置开关的背景色,通过change事件监控变化。
下面代码是在表格中使用:
<el-table-column label="状态">
    <template slot-scope="scope">
       <el-switch v-model="scope.row.mg_state" @change="userStateChanged(scope.row)">
       </el-switch>
    </template>
</el-table-column>
6. Select选择器
用法:
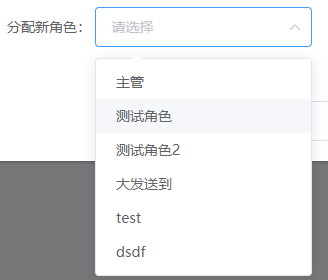
通过v-model绑定选中后的值,这个值对应的是option中的value,但是显示出来的是option中的label; clearable属性增加可删除标记,filterable开启搜索。
代码如下:
 <el-select v-model="selectedRoleId" placeholder="请选择" clearable filterable>
    <el-option v-for="item in rolesList" :key="item.id" :label="item.roleName" :value="item.id">
    </el-option>
 </el-select>
效果图:

7. MessageBox 弹框
(1). 导入和封装
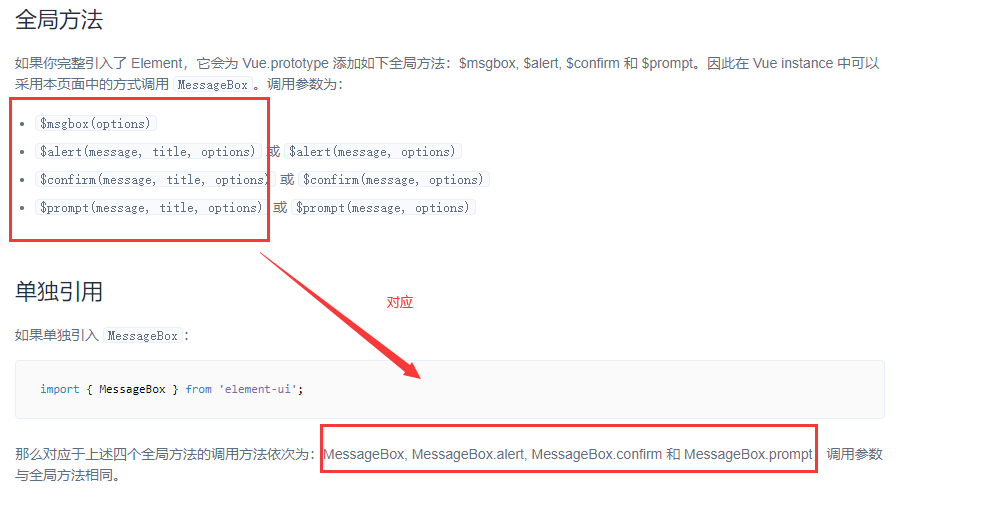
这里按需导入,和Message组件一样,不需要use挂载,参考官方的规范,进行简单的封装。
import { MessageBox } from 'element-ui';
// Message和MessageBox特殊,不需要use挂载(挂载会出问题)
Vue.prototype.$confirm = MessageBox.confirm

(2). 基本使用
A. 多次回调的写法
this.$confirm('此操作将永久删除该文件, 是否继续?', '提示', {
          confirmButtonText: '确定',
          cancelButtonText: '取消',
          type: 'warning'
        }).then(() => {
          this.$message({
            type: 'success',
            message: '删除成功!'
          });
        }).catch(() => {
          this.$message({
            type: 'info',
            message: '已取消删除'
          });
        });
B. 同步编程写法
const confirmResult = await this.$confirm('此操作将永久删除该用户, 是否继续?', '提示', {
          confirmButtonText: '确定',
          cancelButtonText: '取消',
          type: 'warning'
}).catch(err => err)
   // 如果用户确认删除,则返回值为字符串 confirm
   // 如果用户取消了删除,则返回值为字符串 cancel
   // console.log(confirmResult)
   if (confirmResult !== 'confirm') {
      return this.$message.info('已取消删除')
   }
//下面执行业务
8. Form表单
这里主要补充自定义验证规则,和之前章节汇总,详见:https://www.cnblogs.com/yaopengfei/p/14559280.html
9. Table表格
结合后续章节的展开列、分页、自适应等一起介绍。
二. 用户管理
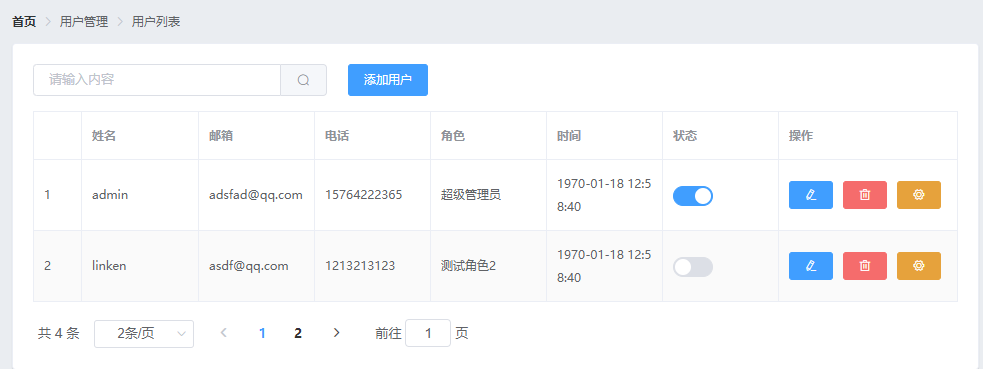
1. 页面效果


2. 代码分享

<template>
  <div>
    <!-- 一. 面包屑导航区域 -->
    <el-breadcrumb separator-class="el-icon-arrow-right">
      <el-breadcrumb-item :to="{ path: '/home' }">首页</el-breadcrumb-item>
      <el-breadcrumb-item>用户管理</el-breadcrumb-item>
      <el-breadcrumb-item>用户列表</el-breadcrumb-item>
    </el-breadcrumb>

    <!-- 二. 卡片视图区域 -->
    <el-card>

      <!-- 1.搜索与添加区域 -->
      <el-row :gutter="20">
        <el-col :span="8">
          <el-input size="small" placeholder="请输入内容" v-model="queryInfo.query" clearable @clear="getUserList">
            <el-button slot="append" icon="el-icon-search" @click="getUserList" size="small"></el-button>
          </el-input>
        </el-col>
        <el-col :span="4">
          <el-button type="primary" size="small" @click="addDialogVisible = true">添加用户</el-button>
        </el-col>
      </el-row>

      <!-- 2.用户列表区域 -->
      <el-table :data="userlist" border stripe>
        <el-table-column type="index"></el-table-column>
        <el-table-column label="姓名" prop="username"></el-table-column>
        <el-table-column label="邮箱" prop="email"></el-table-column>
        <el-table-column label="电话" prop="mobile"></el-table-column>
        <el-table-column label="角色" prop="role_name"></el-table-column>
        <el-table-column label="时间" prop="create_time">
          <template slot-scope="scope">
            {{scope.row.create_time | dateFormat}}
          </template>
        </el-table-column>
        <el-table-column label="状态">
          <template slot-scope="scope">
            <el-switch v-model="scope.row.mg_state" @change="userStateChanged(scope.row)">
            </el-switch>
          </template>
        </el-table-column>
        <el-table-column label="操作" width="180px">
          <template slot-scope="scope">
            <!-- 修改按钮 -->
            <el-button type="primary" icon="el-icon-edit" size="mini" @click="showEditDialog(scope.row.id)"></el-button>
            <!-- 删除按钮 -->
            <el-button type="danger" icon="el-icon-delete" size="mini" @click="removeUserById(scope.row.id)">
            </el-button>
            <!-- 分配角色按钮 -->
            <el-tooltip effect="dark" content="分配角色" placement="top" :enterable="false">
              <el-button type="warning" icon="el-icon-setting" size="mini" @click="setRole(scope.row)"></el-button>
            </el-tooltip>
          </template>
        </el-table-column>
      </el-table>

      <!-- 3 分页区域 -->
      <el-pagination @size-change="handleSizeChange" @current-change="handleCurrentChange"
        :current-page="queryInfo.pagenum" :page-sizes="[1, 2, 5, 10]" :page-size="queryInfo.pagesize"
        layout="total, sizes, prev, pager, next, jumper" :total="total">
      </el-pagination>

    </el-card>

    <!-- 三. 添加用户的对话框 -->
    <el-dialog title="添加用户" :visible.sync="addDialogVisible" width="600px" @close="addDialogClosed">
      <!-- 内容主体区域 -->
      <el-form :model="addForm" :rules="addFormRules" ref="addFormRef" label-width="70px" size="small">
        <el-form-item label="用户名" prop="username">
          <el-input v-model="addForm.username"></el-input>
        </el-form-item>
        <el-form-item label="密码" prop="password">
          <el-input v-model="addForm.password"></el-input>
        </el-form-item>
        <el-form-item label="邮箱" prop="email">
          <el-input v-model="addForm.email"></el-input>
        </el-form-item>
        <el-form-item label="手机" prop="mobile">
          <el-input v-model="addForm.mobile"></el-input>
        </el-form-item>
      </el-form>
      <!-- 底部区域 -->
      <span slot="footer" class="dialog-footer">
        <el-button @click="addDialogVisible = false">取 消</el-button>
        <el-button type="primary" @click="addUser">确 定</el-button>
      </span>
    </el-dialog>

    <!-- 四. 修改用户的对话框 -->
    <el-dialog title="修改用户" :visible.sync="editDialogVisible" width="600px" @close="editDialogClosed">
      <el-form :model="editForm" :rules="editFormRules" ref="editFormRef" label-width="70px" size="small">
        <el-form-item label="用户名">
          <el-input v-model="editForm.username" disabled></el-input>
        </el-form-item>
        <el-form-item label="邮箱" prop="email">
          <el-input v-model="editForm.email"></el-input>
        </el-form-item>
        <el-form-item label="手机" prop="mobile">
          <el-input v-model="editForm.mobile"></el-input>
        </el-form-item>
      </el-form>
      <span slot="footer" class="dialog-footer">
        <el-button @click="editDialogVisible = false">取 消</el-button>
        <el-button type="primary" @click="editUserInfo">确 定</el-button>
      </span>
    </el-dialog>

    <!-- 五.分配角色的对话框 -->
    <el-dialog title="分配角色" :visible.sync="setRoleDialogVisible" width="450px" @close="setRoleDialogClosed">
      <div>
        <p>当前的用户:{{userInfo.username}}</p>
        <p>当前的角色:{{userInfo.role_name}}</p>
        <p>分配新角色:
          <el-select v-model="selectedRoleId" placeholder="请选择" clearable filterable>
            <el-option v-for="item in rolesList" :key="item.id" :label="item.roleName" :value="item.id">
            </el-option>
          </el-select>
        </p>
      </div>
      <span slot="footer" class="dialog-footer">
        <el-button @click="setRoleDialogVisible = false">取 消</el-button>
        <el-button type="primary" @click="saveRoleInfo">确 定</el-button>
      </span>
    </el-dialog>

  </div>
</template>

<script>
  export default {
    data() {
      // 自定义验证邮箱的规则
      var checkEmail = (rule, value, cb) => {
        // 验证邮箱的正则表达式
        const regEmail = /^([a-zA-Z0-9_-])+@([a-zA-Z0-9_-])+(.[a-zA-Z0-9_-])+/
        if (regEmail.test(value)) {
          // 合法的邮箱
          return cb()
        }
        cb(new Error('请输入合法的邮箱'))
      }
      // 自定义验证手机号的规则
      var checkMobile = (rule, value, cb) => {
        // 验证手机号的正则表达式
        const regMobile = /^(0|86|17951)?(13[0-9]|15[012356789]|17[678]|18[0-9]|14[57])[0-9]{8}$/
        if (regMobile.test(value)) {
          return cb()
        }
        cb(new Error('请输入合法的手机号'))
      }

      return {
        // 获取用户列表的参数对象
        queryInfo: {
          query: '',
          // 当前的页数
          pagenum: 1,
          // 当前每页显示多少条数据
          pagesize: 2
        },
        // 表格数据集合
        userlist: [],
        total: 0,
        // 控制添加用户对话框的显示与隐藏
        addDialogVisible: false,
        // 添加用户的表单数据
        addForm: {
          username: '',
          password: '',
          email: '',
          mobile: ''
        },
        // 添加用户的验证规则对象
        addFormRules: {
          username: [{
              required: true,
              message: '请输入用户名',
              trigger: 'blur'
            },
            {
              min: 3,
              max: 10,
              message: '用户名的长度在3~10个字符之间',
              trigger: 'blur'
            }
          ],
          password: [{
              required: true,
              message: '请输入密码',
              trigger: 'blur'
            },
            {
              min: 6,
              max: 15,
              message: '用户名的长度在6~15个字符之间',
              trigger: 'blur'
            }
          ],
          email: [{
              required: true,
              message: '请输入邮箱',
              trigger: 'blur'
            },
            {
              validator: checkEmail,
              trigger: 'blur'
            }
          ],
          mobile: [{
              required: true,
              message: '请输入手机号',
              trigger: 'blur'
            },
            {
              validator: checkMobile,
              trigger: 'blur'
            }
          ]
        },
        // 控制修改用户对话框的显示与隐藏
        editDialogVisible: false,
        // 查询到的用户信息对象
        editForm: {},
        // 修改用户的验证规则对象
        editFormRules: {
          email: [{
              required: true,
              message: '请输入用户邮箱',
              trigger: 'blur'
            },
            {
              validator: checkEmail,
              trigger: 'blur'
            }
          ],
          mobile: [{
              required: true,
              message: '请输入用户手机',
              trigger: 'blur'
            },
            {
              validator: checkMobile,
              trigger: 'blur'
            }
          ]
        },
        // 控制分配角色对话框的显示与隐藏
        setRoleDialogVisible: false,
        // 需要被分配角色的用户信息
        userInfo: {},
        // 所有角色的数据列表
        rolesList: [],
        // 已选中的角色Id值
        selectedRoleId: ''
      }
    },
    created() {
      this.getUserList()
    },
    methods: {
      // 1.加载表格事件
      async getUserList() {
        const {
          data: res
        } = await this.$http.get('users', {
          params: this.queryInfo
        })
        if (res.meta.status !== 200) {
          return this.$message.error('获取用户列表失败!')
        }
        this.userlist = res.data.users
        this.total = res.data.total
        console.log(res)
      },
      // 2.监听 pagesize 改变的事件
      handleSizeChange(newSize) {
        this.queryInfo.pagesize = newSize
        this.getUserList()
      },
      // 3.监听 页码值 改变的事件
      handleCurrentChange(newPage) {
        console.log(newPage)
        this.queryInfo.pagenum = newPage
        this.getUserList()
      },
      // 4.监听 switch 开关状态的改变
      async userStateChanged(userinfo) {
        console.log(userinfo)
        const {
          data: res
        } = await this.$http.put(`users/${userinfo.id}/state/${userinfo.mg_state}`)
        if (res.meta.status !== 200) {
          userinfo.mg_state = !userinfo.mg_state
          return this.$message.error('更新用户状态失败!')
        }
        this.$message.success('更新用户状态成功!')
      },
      // 5.监听添加用户对话框的关闭事件
      addDialogClosed() {
        // 表单重置
        this.$refs.addFormRef.resetFields()
      },
      // 6.添加新用户事件
      addUser() {
        this.$refs.addFormRef.validate(async valid => {
          if (!valid) return
          // 可以发起添加用户的网络请求
          const {
            data: res
          } = await this.$http.post('users', this.addForm)
          if (res.meta.status !== 200) {
            this.$message.error('添加用户失败!')
          }
          this.$message.success('添加用户成功!')
          // 隐藏添加用户的对话框
          this.addDialogVisible = false
          // 重新获取用户列表数据
          this.getUserList()
        })
      },
      // 7.展示编辑用户的对话框
      async showEditDialog(id) {
        const {
          data: res
        } = await this.$http.get('users/' + id)
        if (res.meta.status !== 200) {
          return this.$message.error('查询用户信息失败!')
        }
        this.editForm = res.data
        this.editDialogVisible = true
      },
      // 8.监听修改用户对话框的关闭事件
      editDialogClosed() {
        this.$refs.editFormRef.resetFields()
      },
      // 9.修改用户信息并提交
      editUserInfo() {
        this.$refs.editFormRef.validate(async valid => {
          if (!valid) return
          // 发起修改用户信息的数据请求
          const {
            data: res
          } = await this.$http.put('users/' + this.editForm.id, {
            email: this.editForm.email,
            mobile: this.editForm.mobile
          })
          if (res.meta.status !== 200) {
            return this.$message.error('更新用户信息失败!')
          }
          // 关闭对话框
          this.editDialogVisible = false
          // 刷新数据列表
          this.getUserList()
          // 提示修改成功
          this.$message.success('更新用户信息成功!')
        })
      },
      // 10.根据Id删除对应的用户信息
      async removeUserById(id) {
        // 弹框询问用户是否删除数据
        const confirmResult = await this.$confirm('此操作将永久删除该用户, 是否继续?', '提示', {
          confirmButtonText: '确定',
          cancelButtonText: '取消',
          type: 'warning'
        }).catch(err => err)
        // 如果用户确认删除,则返回值为字符串 confirm
        // 如果用户取消了删除,则返回值为字符串 cancel
        // console.log(confirmResult)
        if (confirmResult !== 'confirm') {
          return this.$message.info('已取消删除')
        }
        const {
          data: res
        } = await this.$http.delete('users/' + id)
        if (res.meta.status !== 200) {
          return this.$message.error('删除用户失败!')
        }
        this.$message.success('删除用户成功!')
        this.getUserList()
      },
      // 11.显示分配角色的对话框
      async setRole(userInfo) {
        this.userInfo = userInfo
        // 在展示对话框之前,获取所有角色的列表
        const {
          data: res
        } = await this.$http.get('roles')
        if (res.meta.status !== 200) {
          return this.$message.error('获取角色列表失败!')
        }
        this.rolesList = res.data
        this.setRoleDialogVisible = true
      },
      // 12. 监听分配角色对话框的关闭事件
      setRoleDialogClosed() {
        this.selectedRoleId = ''
        this.userInfo = {}
      },
      // 13. 点击按钮,分配角色
      async saveRoleInfo() {
        if (!this.selectedRoleId) {
          return this.$message.error('请选择要分配的角色!')
        }
        const {
          data: res
        } = await this.$http.put(
          `users/${this.userInfo.id}/role`, {
            rid: this.selectedRoleId
          }
        )
        if (res.meta.status !== 200) {
          return this.$message.error('更新角色失败!')
        }
        this.$message.success('更新角色成功!')
        this.getUserList()
        this.setRoleDialogVisible = false
      }
    }
  }
</script>

<style lang="less" scoped>
  .x1 {}
</style>
!
- 作 者 : Yaopengfei(姚鹏飞)
- 博客地址 : http://www.cnblogs.com/yaopengfei/
- 声 明1 : 如有错误,欢迎讨论,请勿谩骂^_^。
- 声 明2 : 原创博客请在转载时保留原文链接或在文章开头加上本人博客地址,否则保留追究法律责任的权利。
