一. 基础组件
1. Cascader级联选择器
这里以省市区控件为例,效果如下图:

实现思路: 通过option绑定数据源,通过v-Model获取选中后的值即可。
数据代码和导入

实现代码
<el-cascader :options="cityData" v-model="addressForm.address1"></el-cascader>
2. Upload上传
(1). 效果图

(2). 代码剖析
<el-upload :action="uploadURL" :headers="headerObj" list-type="picture" :on-preview="handlePreview" :on-remove="handleRemove" :on-success="handleSuccess">
  <el-button size="small" type="primary">点击上传</el-button>
</el-upload>
① action属性:绑定上传地址。
uploadURL: 'http://127.0.0.1:8888/api/private/v1/upload',
② headers属性:设置上传的请求头部
headerObj: {
   Authorization: window.sessionStorage.getItem('token')
}
③ list-type="picture" :表示文件列表的类型为图片。
④ on-preview方法:点击图片的回调 (下面方法表示点击预览)
handlePreview (file) {
      console.log(file)
      this.previewPath = file.response.data.url
      this.previewVisible = true
}
⑤ on-remove方法:图片移除的回调 (从数组中删除该图片路径)
 handleRemove (file) {
      // console.log(file)
      // 1. 获取将要删除的图片的临时路径
      const filePath = file.response.data.tmp_path
      // 2. 从 pics 数组中,找到这个图片对应的索引值
      const i = this.addForm.pics.findIndex(x => x.pic === filePath)
      // 3. 调用数组的 splice 方法,把图片信息对象,从 pics 数组中移除
      this.addForm.pics.splice(i, 1)
      console.log(this.addForm)
    },
⑥ on-success方法:上传成功的回调 (将返回的图片路径加到数组中)
handleSuccess (response) {
      console.log(response)
      // 1. 拼接得到一个图片信息对象
      const picInfo = {
        pic: response.data.tmp_path
      }
      // 2. 将图片信息对象,push 到pics数组中
      this.addForm.pics.push(picInfo)
      console.log(this.addForm)
    }
3. alert警告
(1). 效果图

(2).代码分享
<el-alert show-icon title="注意:只允许为第三级分类设置相关参数!" type="warning" :closable="false"></el-alert>
4. TimeLine时间线
(1). 效果图

(2). 实现思路:遍历一下即可
      <!-- 时间线 -->
      <el-timeline>
        <el-timeline-item v-for="(activity, index) in progressInfo" :key="index" :timestamp="activity.time">
          {{activity.context}}
        </el-timeline-item>
      </el-timeline>
数据格式:数组即可。


 progressInfo: [{
        time: '2018-05-10 09:39:00',
        ftime: '2018-05-10 09:39:00',
        context: '已签收,感谢使用顺丰,期待再次为您服务',
        location: ''
      },
      {
        time: '2018-05-10 08:23:00',
        ftime: '2018-05-10 08:23:00',
        context: '[北京市]北京海淀育新小区营业点派件员 顺丰速运 95338正在为您派件',
        location: ''
      },
      {
        time: '2018-05-10 07:32:00',
        ftime: '2018-05-10 07:32:00',
        context: '快件到达 [北京海淀育新小区营业点]',
        location: ''
      },
      {
        time: '2018-05-10 02:03:00',
        ftime: '2018-05-10 02:03:00',
        context: '快件在[北京顺义集散中心]已装车,准备发往 [北京海淀育新小区营业点]',
        location: ''
      },
      {
        time: '2018-05-09 23:05:00',
        ftime: '2018-05-09 23:05:00',
        context: '快件到达 [北京顺义集散中心]',
        location: ''
      },
      {
        time: '2018-05-09 21:21:00',
        ftime: '2018-05-09 21:21:00',
        context: '快件在[北京宝胜营业点]已装车,准备发往 [北京顺义集散中心]',
        location: ''
      },
      {
        time: '2018-05-09 13:07:00',
        ftime: '2018-05-09 13:07:00',
        context: '顺丰速运 已收取快件',
        location: ''
      },
      {
        time: '2018-05-09 12:25:03',
        ftime: '2018-05-09 12:25:03',
        context: '卖家发货',
        location: ''
      },
      {
        time: '2018-05-09 12:22:24',
        ftime: '2018-05-09 12:22:24',
        context: '您的订单将由HLA(北京海淀区清河中街店)门店安排发货。',
        location: ''
      },
      {
        time: '2018-05-08 21:36:04',
        ftime: '2018-05-08 21:36:04',
        context: '商品已经下单',
        location: ''
      }
      ]
5. Steps步骤条
(1).效果图

(2).实现思路
   <el-steps :space="200" :active="activeIndex - 0" finish-status="success" align-center>
        <el-step title="基本信息"></el-step>
        <el-step title="商品参数"></el-step>
        <el-step title="商品属性"></el-step>
        <el-step title="商品图片"></el-step>
        <el-step title="商品内容"></el-step>
        <el-step title="完成"></el-step>
      </el-steps>
剖析:
①. active属性:设置当前激活步骤,0代表选中第一个,1代表选中第二个。(该选项的内容为number类型,activeIndex-0,可以将string类型的activeIndex转化为number类型)
②. space属性:每个 step 的间距
③. finish-status:设置结束步骤的状态。
④. align-center:居中对齐
6. Tab选项卡
(1).效果图
(2).代码剖析
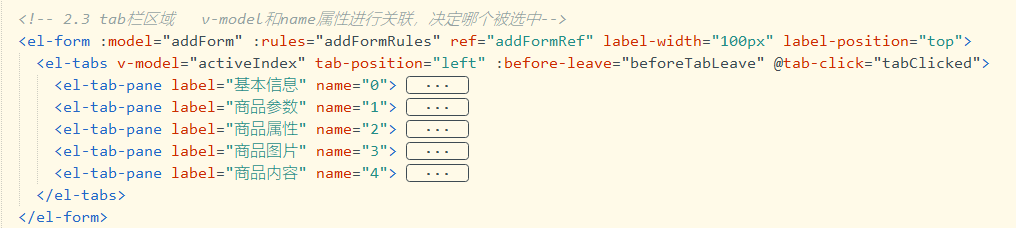
PS:用到form表单最好放到最外层包裹。
剖析:
① 如何绑定选中:通过外层的v-model和name属性关联,实现哪个子选项被选中。
② tab-position属性:选项卡的位置。
③ before-leave事件:切换标签的时候触发,比如可以在里面写 from的验证。她有两个参数,分别是原标的name和新标签的name。

④ tab-click事件:点击标签事件。
PS: Tab和Step关联
效果如下:

实现思路:
共同使用一个activeIndex参数即可,但是 tab需要的string,step需要的是number,所以需要 activeIndex-0,可以将string类型的activeIndex转化为number类型。
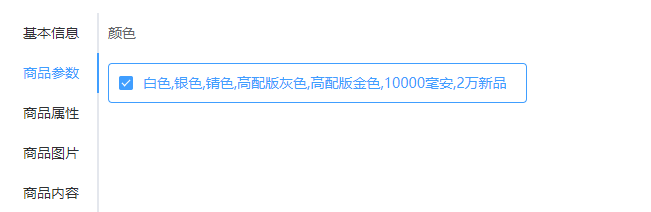
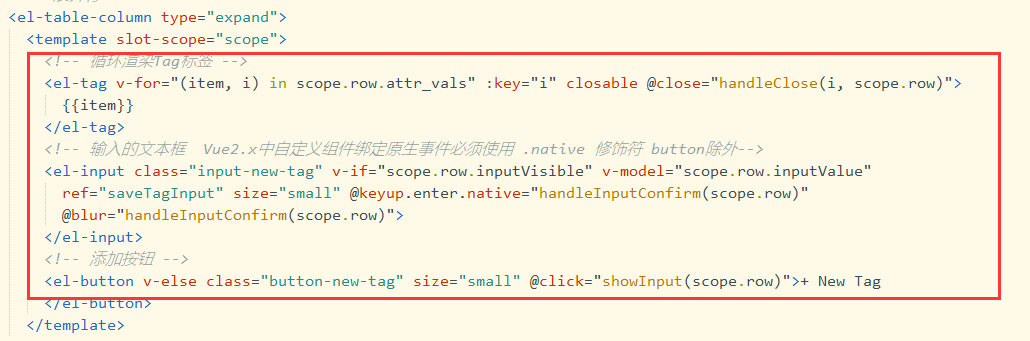
7. Tag+input标签切换
(1). 效果图


(2). 代码分享
二. 相关功能
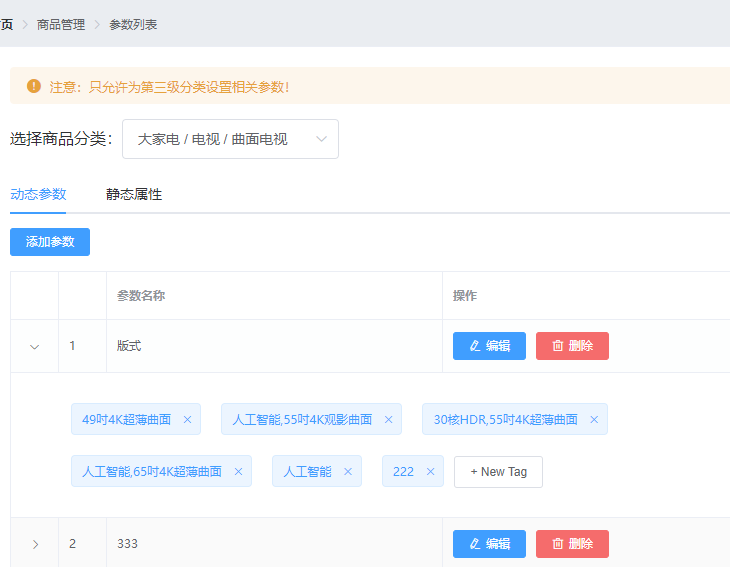
1. 效果图


2. 相关代码
参数管理
<template>
  <div>
    <!-- 一. 面包屑导航区域 -->
    <el-breadcrumb separator-class="el-icon-arrow-right">
      <el-breadcrumb-item :to="{ path: '/home' }">首页</el-breadcrumb-item>
      <el-breadcrumb-item>商品管理</el-breadcrumb-item>
      <el-breadcrumb-item>参数列表</el-breadcrumb-item>
    </el-breadcrumb>

    <!-- 二. 卡片视图区域 -->
    <el-card>
      <!-- 1.警告区域 -->
      <el-alert show-icon title="注意:只允许为第三级分类设置相关参数!" type="warning" :closable="false"></el-alert>

      <!-- 2. 选择商品分类区域 -->
      <el-row class="cat_opt">
        <el-col>
          <span>选择商品分类:</span>
          <!-- 选择商品分类的级联选择框  props为配置项-->
          <el-cascader v-model="selectedCateKeys" :options="catelist" :props="cateProps" @change="handleChange"
            clearable>
          </el-cascader>
        </el-col>
      </el-row>

      <!-- 3. tab 页签区域 -->
      <el-tabs v-model="activeName" @tab-click="handleTabClick">
        <!-- 3.1 添加动态参数的面板 -->
        <el-tab-pane label="动态参数" name="many">
          <!-- 添加参数的按钮 -->
          <el-button type="primary" size="mini" :disabled="isBtnDisabled" @click="addDialogVisible=true">添加参数
          </el-button>
          <!-- 动态参数表格 -->
          <el-table :data="manyTableData" border stripe>
            <!-- 展开行 -->
            <el-table-column type="expand">
              <template slot-scope="scope">
                <!-- 循环渲染Tag标签 -->
                <el-tag v-for="(item, i) in scope.row.attr_vals" :key="i" closable @close="handleClose(i, scope.row)">
                  {{item}}
                </el-tag>
                <!-- 输入的文本框  Vue2.x中自定义组件绑定原生事件必须使用 .native 修饰符 button除外-->
                <el-input class="input-new-tag" v-if="scope.row.inputVisible" v-model="scope.row.inputValue"
                  ref="saveTagInput" size="small" @keyup.enter.native="handleInputConfirm(scope.row)"
                  @blur="handleInputConfirm(scope.row)">
                </el-input>
                <!-- 添加按钮 -->
                <el-button v-else class="button-new-tag" size="small" @click="showInput(scope.row)">+ New Tag
                </el-button>
              </template>
            </el-table-column>
            <!-- 索引列 -->
            <el-table-column type="index"></el-table-column>
            <el-table-column label="参数名称" prop="attr_name"></el-table-column>
            <el-table-column label="操作">
              <template slot-scope="scope">
                <el-button size="mini" type="primary" icon="el-icon-edit" @click="showEditDialog(scope.row.attr_id)">编辑
                </el-button>
                <el-button size="mini" type="danger" icon="el-icon-delete" @click="removeParams(scope.row.attr_id)">删除
                </el-button>
              </template>
            </el-table-column>
          </el-table>
        </el-tab-pane>
        <!-- 3.2 添加静态属性的面板 -->
        <el-tab-pane label="静态属性" name="only">
          <!-- 添加属性的按钮 -->
          <el-button type="primary" size="mini" :disabled="isBtnDisabled" @click="addDialogVisible=true">添加属性
          </el-button>
          <!-- 静态属性表格 -->
          <el-table :data="onlyTableData" border stripe>
            <!-- 展开行 -->
            <el-table-column type="expand">
                <template slot-scope="scope">
                  <!-- 循环渲染Tag标签 -->
                  <el-tag v-for="(item, i) in scope.row.attr_vals" :key="i" closable @close="handleClose(i, scope.row)">
                    {{item}}
                  </el-tag>
                  <!-- 输入的文本框 -->
                  <el-input class="input-new-tag" v-if="scope.row.inputVisible" v-model="scope.row.inputValue"
                    ref="saveTagInput" size="small" @keyup.enter.native="handleInputConfirm(scope.row)"
                    @blur="handleInputConfirm(scope.row)">
                  </el-input>
                  <!-- 添加按钮 -->
                  <el-button v-else class="button-new-tag" size="small" @click="showInput(scope.row)">+ New Tag
                  </el-button>
                </template>
            </el-table-column>
            <!-- 索引列 -->
            <el-table-column type="index"></el-table-column>
            <el-table-column label="属性名称" prop="attr_name"></el-table-column>
            <el-table-column label="操作">
              <template slot-scope="scope">
                <el-button size="mini" type="primary" icon="el-icon-edit" @click="showEditDialog(scope.row.attr_id)">编辑
                </el-button>
                <el-button size="mini" type="danger" icon="el-icon-delete" @click="removeParams(scope.row.attr_id)">删除
                </el-button>
              </template>
            </el-table-column>
          </el-table>
        </el-tab-pane>
      </el-tabs>
    </el-card>

    <!-- 三. 添加参数的对话框 -->
    <el-dialog :title="'添加' + titleText" :visible.sync="addDialogVisible" width="500px" @close="addDialogClosed">
      <!-- 添加参数的对话框 -->
      <el-form :model="addForm" :rules="addFormRules" ref="addFormRef" label-width="100px">
        <el-form-item :label="titleText" prop="attr_name">
          <el-input v-model="addForm.attr_name"></el-input>
        </el-form-item>
      </el-form>
      <span slot="footer" class="dialog-footer">
        <el-button @click="addDialogVisible = false">取 消</el-button>
        <el-button type="primary" @click="addParams">确 定</el-button>
      </span>
    </el-dialog>

    <!-- 四. 修改参数的对话框 -->
    <el-dialog :title="'修改' + titleText" :visible.sync="editDialogVisible" width="500px" @close="editDialogClosed">
      <!-- 添加参数的对话框 -->
      <el-form :model="editForm" :rules="editFormRules" ref="editFormRef" label-width="100px">
        <el-form-item :label="titleText" prop="attr_name">
          <el-input v-model="editForm.attr_name"></el-input>
        </el-form-item>
      </el-form>
      <span slot="footer" class="dialog-footer">
        <el-button @click="editDialogVisible = false">取 消</el-button>
        <el-button type="primary" @click="editParams">确 定</el-button>
      </span>
    </el-dialog>
  </div>
</template>

<script>
export default {
  data () {
    return {
      // 商品分类数据
      catelist: [],
      // 级联选择框的配置项
      cateProps: {
        value: 'cat_id',
        label: 'cat_name',
        children: 'children',
        expandTrigger: 'hover'
      },
      // 级联选择框双向绑定到的数组
      selectedCateKeys: [],
      // 被激活的页签的名称
      activeName: 'many',
      // 动态参数的数据
      manyTableData: [],
      // 静态属性的数据
      onlyTableData: [],
      // 控制添加对话框的显示与隐藏
      addDialogVisible: false,
      // 添加参数的表单数据对象
      addForm: {
        attr_name: ''
      },
      // 添加表单的验证规则对象
      addFormRules: {
        attr_name: [{
          required: true,
          message: '请输入参数名称',
          trigger: 'blur'
        }]
      },
      // 控制修改对话框的显示与隐藏
      editDialogVisible: false,
      // 修改的表单数据对象
      editForm: {},
      // 修改表单的验证规则对象
      editFormRules: {
        attr_name: [{
          required: true,
          message: '请输入参数名称',
          trigger: 'blur'
        }]
      }
    }
  },
  created () {
    this.getCateList()
  },
  methods: {
    // 1.获取所有的商品分类列表
    async getCateList () {
      const {
        data: res
      } = await this.$http.get('categories')
      if (res.meta.status !== 200) {
        return this.$message.error('获取商品分类失败!')
      }
      this.catelist = res.data
      console.log(this.catelist)
    },
    // 2.级联选择框选中项变化,会触发这个函数
    handleChange () {
      this.getParamsData()
    },
    // 3.tab 页签点击事件的处理函数
    handleTabClick () {
      console.log(this.activeName)
      this.getParamsData()
    },
    // 4.获取参数的列表数据
    async getParamsData () {
      // 证明选中的不是三级分类,只有选择三级,下面的按钮才可以点击
      if (this.selectedCateKeys.length !== 3) {
        // 清空下拉框和表格数据
        this.selectedCateKeys = []
        this.manyTableData = []
        this.onlyTableData = []
        return
      }
      // 证明选中的是三级分类
      // console.log(this.selectedCateKeys)
      // 根据所选分类的Id,和当前所处的面板,获取对应的参数
      const { data: res } = await this.$http.get(`categories/${this.cateId}/attributes`, {
        params: {
          sel: this.activeName
        }
      })
      if (res.meta.status !== 200) {
        return this.$message.error('获取参数列表失败!')
      }
      console.log(res.data)
      // 处理展开后的数据标签
      res.data.forEach(item => {
        item.attr_vals = item.attr_vals ? item.attr_vals.split(' ') : []
        // 为每行展开动态添加两个字段inputVisible和inputValue
        // 控制文本框的显示与隐藏
        item.inputVisible = false
        // 文本框中输入的值
        item.inputValue = ''
      })
      if (this.activeName === 'many') {
        this.manyTableData = res.data
      } else {
        this.onlyTableData = res.data
      }
    },
    // 5. 监听添加对话框的关闭事件
    addDialogClosed () {
      this.$refs.addFormRef.resetFields()
    },
    // 6.点击按钮,添加参数
    addParams () {
      this.$refs.addFormRef.validate(async valid => {
        if (!valid) return
        const {
          data: res
        } = await this.$http.post(
            `categories/${this.cateId}/attributes`, {
              attr_name: this.addForm.attr_name,
              attr_sel: this.activeName
            }
        )
        if (res.meta.status !== 201) {
          return this.$message.error('添加参数失败!')
        }
        this.$message.success('添加参数成功!')
        this.addDialogVisible = false
        this.getParamsData()
      })
    },
    // 7.点击按钮,展示修改的对话框
    async showEditDialog (attr_id) {
      // 查询当前参数的信息
      const {
        data: res
      } = await this.$http.get(`categories/${this.cateId}/attributes/${attr_id}`, {
        params: {
          attr_sel: this.activeName
        }
      })
      if (res.meta.status !== 200) {
        return this.$message.error('获取参数信息失败!')
      }
      this.editForm = res.data
      this.editDialogVisible = true
    },
    // 8.重置修改的表单
    editDialogClosed () {
      this.$refs.editFormRef.resetFields()
    },
    // 9.点击按钮,修改参数信息
    editParams () {
      this.$refs.editFormRef.validate(async valid => {
        if (!valid) return
        const {
          data: res
        } = await this.$http.put(
            `categories/${this.cateId}/attributes/${this.editForm.attr_id}`, {
              attr_name: this.editForm.attr_name,
              attr_sel: this.activeName
            }
        )
        if (res.meta.status !== 200) {
          return this.$message.error('修改参数失败!')
        }
        this.$message.success('修改参数成功!')
        this.getParamsData()
        this.editDialogVisible = false
      })
    },
    // 10. 根据Id删除对应的参数项
    async removeParams (attr_id) {
      const confirmResult = await this.$confirm(
        '此操作将永久删除该参数, 是否继续?',
        '提示', {
          confirmButtonText: '确定',
          cancelButtonText: '取消',
          type: 'warning'
        }
      ).catch(err => err)
      // 用户取消了删除的操作
      if (confirmResult !== 'confirm') {
        return this.$message.info('已取消删除!')
      }
      // 删除的业务逻辑
      const {
        data: res
      } = await this.$http.delete(
          `categories/${this.cateId}/attributes/${attr_id}`
      )
      if (res.meta.status !== 200) {
        return this.$message.error('删除参数失败!')
      }
      this.$message.success('删除参数成功!')
      this.getParamsData()
    },
    // 11. 封装将对 attr_vals 的操作,保存到数据库
    async saveAttrVals (row) {
      // 需要发起请求,保存这次操作
      const {
        data: res
      } = await this.$http.put(
          `categories/${this.cateId}/attributes/${row.attr_id}`, {
            attr_name: row.attr_name,
            attr_sel: row.attr_sel,
            attr_vals: row.attr_vals.join(' ')
          }
      )
      if (res.meta.status !== 200) {
        return this.$message.error('修改参数项失败!')
      }
      this.$message.success('修改参数项成功!')
    },
    // 12.文本框失去焦点,或敲击 Enter 都会触发
    async handleInputConfirm (row) {
      if (row.inputValue.trim().length === 0) {
        row.inputValue = ''
        row.inputVisible = false
        return
      }
      // 如果没有return,则证明输入的内容,需要做后续处理
      row.attr_vals.push(row.inputValue.trim())
      row.inputValue = ''
      row.inputVisible = false
      // 需要发起请求,保存这次操作
      this.saveAttrVals(row)
    },
    // 13.点击按钮,展示文本输入框
    showInput (row) {
      row.inputVisible = true
      // 让文本框自动获得焦点
      // $nextTick 方法的作用,就是当页面上元素被重新渲染之后,才会指定回调函数中的代码
      this.$nextTick(_ => {
        this.$refs.saveTagInput.$refs.input.focus() // 固定写法
      })
    },
    // 14. 删除对应的参数可选项
    handleClose (i, row) {
      row.attr_vals.splice(i, 1)
      this.saveAttrVals(row)
    }
  },
  computed: {
    // 1.如果按钮需要被禁用,则返回true,否则返回false
    isBtnDisabled () {
      if (this.selectedCateKeys.length !== 3) {
        return true
      }
      return false
    },
    // 2.当前选中的三级分类的Id
    cateId () {
      if (this.selectedCateKeys.length === 3) {
        return this.selectedCateKeys[2]
      }
      return null
    },
    // 3.动态计算标题的文本
    titleText () {
      if (this.activeName === 'many') {
        return '动态参数'
      }
      return '静态属性'
    }
  }
}
</script>

<style lang="less" scoped>
  .cat_opt {
    margin: 15px 0;
  }

  .cat_opt {
    margin: 15px 0;
  }

  .el-tag {
    margin: 10px;
  }

  .input-new-tag {
    width: 120px;
  }
</style>
商品管理
<template>
  <div>
    <!-- 一. 面包屑导航区域 -->
    <el-breadcrumb separator-class="el-icon-arrow-right">
      <el-breadcrumb-item :to="{ path: '/home' }">首页</el-breadcrumb-item>
      <el-breadcrumb-item >商品管理</el-breadcrumb-item>
      <el-breadcrumb-item >商品列表</el-breadcrumb-item>
    </el-breadcrumb>

    <!-- 二. 卡片视图区域 -->
    <el-card>
      <!-- 2.1 搜索和添加区域 -->
      <el-row :gutter="20">
        <el-col :span="8">
          <el-input placeholder="请输入内容" v-model="queryInfo.query" clearable @clear="getGoodsList" @keyup.enter.native="getGoodsList">
            <el-button slot="append" icon="el-icon-search" @click="getGoodsList" >
            </el-button>
          </el-input>
        </el-col>
        <el-col :span="4">
          <el-button type="primary" @click="goAddpage">添加商品</el-button>
        </el-col>
      </el-row>

      <!-- 2.2 table表格区域 -->
      <el-table :data="goodslist" border stripe>
        <el-table-column type="index"></el-table-column>
        <el-table-column label="商品名称" prop="goods_name"></el-table-column>
        <el-table-column label="商品价格(元)" prop="goods_price" width="95px"></el-table-column>
        <el-table-column label="商品重量" prop="goods_weight" width="70px"></el-table-column>
        <el-table-column label="创建时间" prop="add_time" width="140px">
          <template slot-scope="scope">
            {{scope.row.add_time | dateFormat}}
          </template>
        </el-table-column>
        <el-table-column label="操作" width="130px">
          <template slot-scope="scope">
            <el-button type="primary" icon="el-icon-edit" size="mini"></el-button>
            <el-button type="danger" icon="el-icon-delete" size="mini" @click="removeById(scope.row.goods_id)">
            </el-button>
          </template>
        </el-table-column>
      </el-table>

      <!-- 2.3 分页区域 -->
      <el-pagination @size-change="handleSizeChange" @current-change="handleCurrentChange"
        :current-page="queryInfo.pagenum" :page-sizes="[5, 10, 15, 20]" :page-size="queryInfo.pagesize"
        layout="total, sizes, prev, pager, next, jumper" :total="total" background>
      </el-pagination>
    </el-card>
  </div>
</template>

<script>
export default {
  data () {
    return {
      // 查询参数对象
      queryInfo: {
        query: '',
        pagenum: 1,
        pagesize: 10
      },
      // 商品列表
      goodslist: [],
      // 总数据条数
      total: 0
    }
  },
  created () {
    this.getGoodsList()
  },
  methods: {
    // 1. 根据分页获取对应的商品列表
    async getGoodsList () {
      const {
        data: res
      } = await this.$http.get('goods', {
        params: this.queryInfo
      })
      if (res.meta.status !== 200) {
        return this.$message.error('获取商品列表失败!')
      }
      // this.$message.success('获取商品列表成功!');
      console.log(res.data)
      this.goodslist = res.data.goods
      this.total = res.data.total
    },
    // 2. 监听页码改变事件
    handleSizeChange (newSize) {
      this.queryInfo.pagesize = newSize
      this.getGoodsList()
    },
    // 3. 监听页数改变事件
    handleCurrentChange (newPage) {
      this.queryInfo.pagenum = newPage
      this.getGoodsList()
    },
    // 4. 删除商品事件
    async removeById (id) {
      const confirmResult = await this.$confirm(
        '此操作将永久删除该商品, 是否继续?',
        '提示', {
          confirmButtonText: '确定',
          cancelButtonText: '取消',
          type: 'warning'
        }).catch(err => err)
      if (confirmResult !== 'confirm') {
        // return this.$message.info('已经取消删除!');
        return
      }
      const {
        data: res
      } = await this.$http.delete(`goods/${id}`)
      if (res.meta.status !== 200) {
        return this.$message.error('删除失败!')
      }
      this.$message.success('删除成功!')
      this.getGoodsList()
    },
    // 5.添加页码跳转
    goAddpage () {
      this.$router.push('/goods/add')
    }
  }
}
</script>

<style lang="less" scoped>
</style>
订单管理
<template>
  <div>
    <!-- 一. 面包屑导航区域 -->
    <el-breadcrumb separator-class="el-icon-arrow-right">
      <el-breadcrumb-item :to="{ path: '/home' }">首页</el-breadcrumb-item>
      <el-breadcrumb-item>订单管理</el-breadcrumb-item>
      <el-breadcrumb-item>订单列表</el-breadcrumb-item>
    </el-breadcrumb>

    <!--二. 卡片视图区域 -->
    <el-card>
      <!-- 2.1 搜索区域 -->
      <el-row>
        <el-col :span="8">
          <el-input placeholder="请输入内容">
            <el-button slot="append" icon="el-icon-search"></el-button>
          </el-input>
        </el-col>
      </el-row>

      <!-- 2.2 订单列表数据  其中height和v-adaptive用来处理表格自适应屏幕的-->
      <el-table :data="orderlist" border stripe height="1" v-adaptive="{bottomOffset: 90}">
        <el-table-column type="index"></el-table-column>
        <el-table-column label="订单编号" prop="order_number"></el-table-column>
        <el-table-column label="订单价格" prop="order_price"></el-table-column>
        <el-table-column label="是否付款" prop="pay_status">
          <template slot-scope="scope">
            <el-tag type="success" v-if="scope.row.pay_status === '1'">已付款</el-tag>
            <el-tag type="danger" v-else>未付款</el-tag>
          </template>
        </el-table-column>
        <el-table-column label="是否发货" prop="is_send">
          <template slot-scope="scope">
            <template>
              {{scope.row.is_send}}
            </template>
          </template>
        </el-table-column>
        <el-table-column label="下单时间" prop="create_time">
          <template slot-scope="scope">
            {{scope.row.create_time | dateFormat}}
          </template>
        </el-table-column>
        <el-table-column label="操作">
          <template>
            <el-button size="mini" type="primary" icon="el-icon-edit" @click="showBox">省市区</el-button>
            <el-button size="mini" type="success" icon="el-icon-location" @click="showProgressBox">物流详情</el-button>
          </template>
        </el-table-column>
      </el-table>

      <!-- 2.3 分页区域 -->
      <el-pagination @size-change="handleSizeChange" @current-change="handleCurrentChange"
        :current-page="queryInfo.pagenum" :page-sizes="[5, 10, 15,20,25]" :page-size="queryInfo.pagesize"
        layout="total, sizes, prev, pager, next, jumper" :total="total">
      </el-pagination>

    </el-card>

    <!-- 三. 省市区对话框 -->
    <el-dialog title="修改地址" :visible.sync="addressVisible" width="600px" @close="addressDialogClosed">
      <el-form :model="addressForm" :rules="addressFormRules" ref="addressFormRef" label-width="100px">
        <el-form-item label="省市区/县" prop="address1">
          <el-cascader :options="cityData" v-model="addressForm.address1"></el-cascader>
        </el-form-item>
        <el-form-item label="详细地址" prop="address2">
          <el-input v-model="addressForm.address2"></el-input>
        </el-form-item>
      </el-form>
      <span slot="footer" class="dialog-footer">
        <el-button @click="addressVisible = false">取 消</el-button>
        <el-button type="primary" @click="addressVisible = false">确 定</el-button>
      </span>
    </el-dialog>

    <!-- 四. 展示物流进度的对话框 -->
    <el-dialog title="物流进度" :visible.sync="progressVisible" width="600px">
      <!-- 时间线 -->
      <el-timeline>
        <el-timeline-item v-for="(activity, index) in progressInfo" :key="index" :timestamp="activity.time">
          {{activity.context}}
        </el-timeline-item>
      </el-timeline>
    </el-dialog>
  </div>
</template>

<script>
// 导入省市区数据,然后需要在data中对外开放
import cityData from './citydata.js'
export default {
  data () {
    return {
      cityData,
      queryInfo: {
        query: '',
        pagenum: 1,
        pagesize: 10
      },
      total: 0,
      orderlist: [],
      addressVisible: false,
      addressForm: {
        address1: [],
        address2: ''
      },
      addressFormRules: {
        address1: [{
          required: true,
          message: '请选择省市区县',
          trigger: 'blur'
        }],
        address2: [{
          required: true,
          message: '请填写详细地址',
          trigger: 'blur'
        }]
      },
      progressVisible: false,
      progressInfo: [{
        time: '2018-05-10 09:39:00',
        ftime: '2018-05-10 09:39:00',
        context: '已签收,感谢使用顺丰,期待再次为您服务',
        location: ''
      },
      {
        time: '2018-05-10 08:23:00',
        ftime: '2018-05-10 08:23:00',
        context: '[北京市]北京海淀育新小区营业点派件员 顺丰速运 95338正在为您派件',
        location: ''
      },
      {
        time: '2018-05-10 07:32:00',
        ftime: '2018-05-10 07:32:00',
        context: '快件到达 [北京海淀育新小区营业点]',
        location: ''
      },
      {
        time: '2018-05-10 02:03:00',
        ftime: '2018-05-10 02:03:00',
        context: '快件在[北京顺义集散中心]已装车,准备发往 [北京海淀育新小区营业点]',
        location: ''
      },
      {
        time: '2018-05-09 23:05:00',
        ftime: '2018-05-09 23:05:00',
        context: '快件到达 [北京顺义集散中心]',
        location: ''
      },
      {
        time: '2018-05-09 21:21:00',
        ftime: '2018-05-09 21:21:00',
        context: '快件在[北京宝胜营业点]已装车,准备发往 [北京顺义集散中心]',
        location: ''
      },
      {
        time: '2018-05-09 13:07:00',
        ftime: '2018-05-09 13:07:00',
        context: '顺丰速运 已收取快件',
        location: ''
      },
      {
        time: '2018-05-09 12:25:03',
        ftime: '2018-05-09 12:25:03',
        context: '卖家发货',
        location: ''
      },
      {
        time: '2018-05-09 12:22:24',
        ftime: '2018-05-09 12:22:24',
        context: '您的订单将由HLA(北京海淀区清河中街店)门店安排发货。',
        location: ''
      },
      {
        time: '2018-05-08 21:36:04',
        ftime: '2018-05-08 21:36:04',
        context: '商品已经下单',
        location: ''
      }
      ]
    }
  },
  created () {
    this.getOrderList()
  },
  methods: {
    // 1.获取订单列表数据
    async getOrderList () {
      const {
        data: res
      } = await this.$http.get('orders', {
        params: this.queryInfo
      })
      if (res.meta.status !== 200) {
        return this.$message.error('获取订单列表失败!')
      }
      this.total = res.data.total
      this.orderlist = res.data.goods
    },
    // 2. 监控每页条数的变化
    handleSizeChange (newSize) {
      this.queryInfo.pagesize = newSize
      this.getOrderList()
    },
    // 3. 监控当前页数的变化
    handleCurrentChange (newPage) {
      this.queryInfo.pagenum = newPage
      this.getOrderList()
    },
    // 4. 展示省市区的对话框
    showBox () {
      this.addressVisible = true
    },
    // 5. 监控省市区对话框关闭事件
    addressDialogClosed () {
      this.$refs.addressFormRef.resetFields()
    },
    // 6. 显示物流详情对话框
    async showProgressBox () {
      this.progressVisible = true
    }
  }
}
</script>

<style lang="less" scoped>
  .el-cascader {
    width: 100%;
  }
</style>
!
- 作 者 : Yaopengfei(姚鹏飞)
- 博客地址 : http://www.cnblogs.com/yaopengfei/
- 声 明1 : 如有错误,欢迎讨论,请勿谩骂^_^。
- 声 明2 : 原创博客请在转载时保留原文链接或在文章开头加上本人博客地址,否则保留追究法律责任的权利。