一. SSM分层搭建
1. 项目拆分
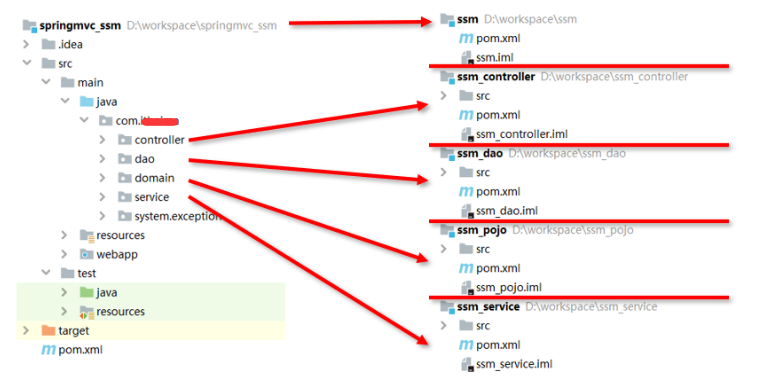
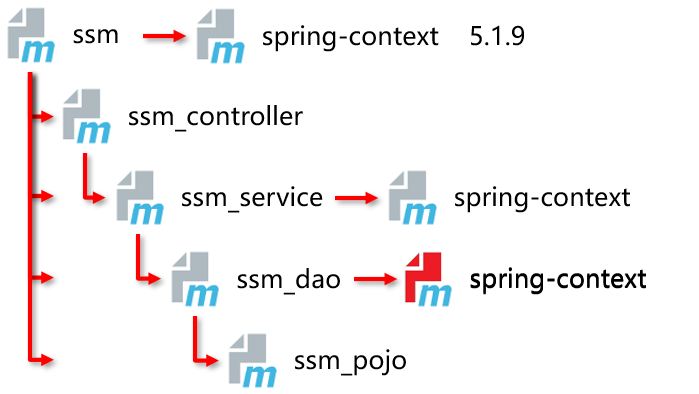
将单模块工程项目拆分成 ssm、ssm_controller、ssm_service、ssm_dao、ssm_pojo 多模块工程项目,如下图:
2. ssm父层
新建1个普通的maven项目,删除多余的文件夹,仅保留pom.xml,后续用于统一构建和管理。

3. ssm_pojo层
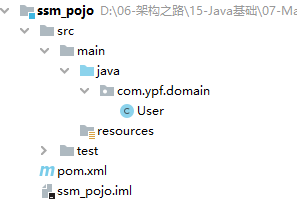
(1). 新建1个普通的maven项目ssm_pojo,该层主要用来存放实体类。
(2). 在com.ypf.domain下创建User实体类。
4. ssm_dao层
(1). 新建普通的maven项目ssm_dao,该模块为仓储层,主要用来存放 仓储接口、SQL映射的xml文件、db的相关配置和核心配置文件,如下图:

(2). pom文件中引入相关坐标:ssm_pojo资源、spring、spring整合mybatis、druid、pagehelper分页插件


  <dependencies>
        <!--导入资源文件pojo-->
        <dependency>
            <groupId>org.ypf</groupId>
            <artifactId>ssm_pojo</artifactId>
            <version>1.0-SNAPSHOT</version>
        </dependency>
        <!--spring环境-->
        <dependency>
            <groupId>org.springframework</groupId>
            <artifactId>spring-context</artifactId>
            <version>5.2.9.RELEASE</version>
        </dependency>
        <!-- Spring整合mybatis相关坐标-->
        <dependency>
            <groupId>mysql</groupId>
            <artifactId>mysql-connector-java</artifactId>
            <version>5.1.6</version>
            <scope>runtime</scope>
        </dependency>
        <dependency>
            <groupId>org.mybatis</groupId>
            <artifactId>mybatis</artifactId>
            <version>3.5.7</version>
        </dependency>
        <dependency>
            <groupId>org.springframework</groupId>
            <artifactId>spring-jdbc</artifactId>
            <version>5.2.9.RELEASE</version>
        </dependency>
        <dependency>
            <groupId>org.mybatis</groupId>
            <artifactId>mybatis-spring</artifactId>
            <version>2.0.6</version>
        </dependency>
        <!--第三方资源配置(阿里数据源方案Druid)-->
        <dependency>
            <groupId>com.alibaba</groupId>
            <artifactId>druid</artifactId>
            <version>1.2.6</version>
        </dependency>
        <!--分页插件坐标-->
        <dependency>
            <groupId>com.github.pagehelper</groupId>
            <artifactId>pagehelper</artifactId>
            <version>5.2.1</version>
        </dependency>
        <dependency>
            <groupId>com.github.jsqlparser</groupId>
            <artifactId>jsqlparser</artifactId>
            <version>4.1</version>
        </dependency>
    </dependencies>
注意:
需要先在ssm_pojo模块中运行install指令,将其安装到本地仓库里,然后再在ssm_dao中引入,然后运行compile编译。
(3). 在com.ypf.dao下新建UserDao仓储接口、UserDao.xml的Sql配置文件
UserDao接口
public interface UserDao {
    /**
     * 添加用户
     * @param user
     * @return
     */
    public boolean save(User user);

    /**
     * 修改用户
     * @param user
     * @return
     */
    public boolean update(User user);

    /**
     * 删除用户
     * @param uuid
     * @return
     */
    public boolean delete(Integer uuid);

    /**
     * 查询单个用户信息
     * @param uuid
     * @return
     */
    public User get(Integer uuid);

    /**
     * 查询全部用户信息
     * @return
     */
    public List<User> getAll();


    /**
     * 根据用户名密码查询个人信息
     * @param userName 用户名
     * @param password 密码信息
     * @return
     */
    //注意:数据层操作不要和业务层操作的名称混淆,通常数据层仅反映与数据库间的信息交换,不体现业务逻辑
    public User getByUserNameAndPassword(@Param("userName") String userName,@Param("password") String password);
}
UserDao.xml的SQL配置文件
<?xml version="1.0" encoding="UTF-8"?>
<!DOCTYPE mapper
        PUBLIC "-//mybatis.org//DTD Mapper 3.0//EN"
        "http://mybatis.org/dtd/mybatis-3-mapper.dtd">
<mapper namespace="com.ypf.dao.UserDao">

    <!--添加-->
    <insert id="save" parameterType="user">
        insert into user(userName,password,realName,gender,birthday)values(#{userName},#{password},#{realName},#{gender},#{birthday})
    </insert>

    <!--删除-->
    <delete id="delete" parameterType="int">
        delete from user where uuid = #{uuid}
    </delete>

    <!--修改-->
    <update id="update" parameterType="user">
        update user set userName=#{userName},password=#{password},realName=#{realName},gender=#{gender},birthday=#{birthday} where uuid=#{uuid}
    </update>

    <!--查询单个-->
    <select id="get" resultType="user" parameterType="int">
        select * from user where uuid = #{uuid}
    </select>

    <!--分页查询-->
    <select id="getAll" resultType="user">
        select * from user
    </select>

    <!--登录-->
    <select id="getByUserNameAndPassword" resultType="user" >
        select * from user where userName=#{userName} and password=#{password}
    </select>

</mapper>
(4). 新建 applicationContext-dao.xml核心配置文件 和 jdbc的配置文件
主要用来配置:开启bean的注解扫描、加载配置文件、数据源配置、整合Mybatis到Spring、整合分页插件、Sql文件扫描映射。
applicationContext-dao.xml
<?xml version="1.0" encoding="UTF-8"?>
<beans xmlns="http://www.springframework.org/schema/beans"
       xmlns:context="http://www.springframework.org/schema/context"
       xmlns:tx="http://www.springframework.org/schema/tx"
       xmlns:xsi="http://www.w3.org/2001/XMLSchema-instance"
       xsi:schemaLocation="http://www.springframework.org/schema/beans http://www.springframework.org/schema/beans/spring-beans.xsd
        http://www.springframework.org/schema/context http://www.springframework.org/schema/context/spring-context.xsd
        http://www.springframework.org/schema/tx http://www.springframework.org/schema/tx/spring-tx.xsd">


    <!--开启bean注解扫描-->
    <context:component-scan base-package="com.ypf"/>


    <!--加载properties文件-->
    <context:property-placeholder location="classpath*:jdbc.properties"/>

    <!--数据源-->
    <bean id="dataSource" class="com.alibaba.druid.pool.DruidDataSource">
        <property name="driverClassName" value="${jdbc.driver}"/>
        <property name="url" value="${jdbc.url}"/>
        <property name="username" value="${jdbc.username}"/>
        <property name="password" value="${jdbc.password}"/>
    </bean>

    <!--整合mybatis到spring中-->
    <bean class="org.mybatis.spring.SqlSessionFactoryBean">
        <property name="dataSource" ref="dataSource"/>
        <property name="typeAliasesPackage" value="com.ypf.domain"/>
        <!--分页插件-->
        <property name="plugins">
            <array>
                <bean class="com.github.pagehelper.PageInterceptor">
                    <property name="properties">
                        <props>
                            <prop key="helperDialect">mysql</prop>
                            <prop key="reasonable">true</prop>
                        </props>
                    </property>
                </bean>
            </array>
        </property>
    </bean>

    <!--mybatis xml的sql文件映射扫描-->
    <bean class="org.mybatis.spring.mapper.MapperScannerConfigurer">
        <property name="basePackage" value="com.ypf.dao"/>
    </bean>


</beans>
注:
该层中删掉了开启注解事务 和 事务管理器(后面放到service层中)
jdbc.properties
jdbc.driver=com.mysql.jdbc.Driver
jdbc.url=jdbc:mysql://xxx:3306/ssm?useUnicode=true&characterEncoding=utf8&rewriteBatchedStatements=true
jdbc.username=root
jdbc.password=xxx
5. ssm_service层
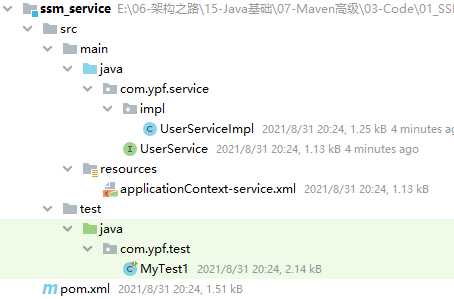
(1). 新建普通的maven项目ssm_service,该模块为业务层,主要用来编写业务接口、业务实现类、事务的配置。
(2). pom文件中引入相关坐标:ssm_dao、spring、spring整合Junit相关。(间接依赖ssm_pojo)
<?xml version="1.0" encoding="UTF-8"?>
<project xmlns="http://maven.apache.org/POM/4.0.0"
         xmlns:xsi="http://www.w3.org/2001/XMLSchema-instance"
         xsi:schemaLocation="http://maven.apache.org/POM/4.0.0 http://maven.apache.org/xsd/maven-4.0.0.xsd">
    <modelVersion>4.0.0</modelVersion>

    <groupId>org.ypf</groupId>
    <artifactId>ssm_service</artifactId>
    <version>1.0-SNAPSHOT</version>

    <properties>
        <project.build.sourceEncoding>UTF-8</project.build.sourceEncoding>
        <maven.compiler.source>11</maven.compiler.source>
        <maven.compiler.target>11</maven.compiler.target>
    </properties>

    <dependencies>

        <!--导入资源文件ssm_dao-->
        <dependency>
            <groupId>org.ypf</groupId>
            <artifactId>ssm_dao</artifactId>
            <version>1.0-SNAPSHOT</version>
        </dependency>

        <!--Spring 坐标-->
        <dependency>
            <groupId>org.springframework</groupId>
            <artifactId>spring-context</artifactId>
            <version>5.2.9.RELEASE</version>
        </dependency>
        <!-- Spring整合Junit -->
        <dependency>
            <groupId>junit</groupId>
            <artifactId>junit</artifactId>
            <version>4.13.2</version>
        </dependency>
        <dependency>
            <groupId>org.springframework</groupId>
            <artifactId>spring-test</artifactId>
            <version>5.2.9.RELEASE</version>
        </dependency>
    </dependencies>


</project>
注意:
需要先在ssm_dao模块中运行install指令,将其安装到本地仓库里,然后再在ssm_service中引入,然后运行compile编译。
(3). 新建核心配置文件applicationContext-service.xml,配置:开启bean扫描、开启注解式事务、事务管理器。
<?xml version="1.0" encoding="UTF-8"?>
<beans xmlns="http://www.springframework.org/schema/beans"
       xmlns:context="http://www.springframework.org/schema/context"
       xmlns:tx="http://www.springframework.org/schema/tx"
       xmlns:xsi="http://www.w3.org/2001/XMLSchema-instance"
       xsi:schemaLocation="http://www.springframework.org/schema/beans http://www.springframework.org/schema/beans/spring-beans.xsd
        http://www.springframework.org/schema/context http://www.springframework.org/schema/context/spring-context.xsd
        http://www.springframework.org/schema/tx http://www.springframework.org/schema/tx/spring-tx.xsd">


    <!--开启bean注解扫描-->
    <context:component-scan base-package="com.ypf"/>

    <!--开启注解式事务-->
    <tx:annotation-driven transaction-manager="txManager"/>

    <!--事务管理器   注:下面的dataSource变红,只是个语法检查,并不是错误-->
    <bean id="txManager" class="org.springframework.jdbc.datasource.DataSourceTransactionManager">
        <property name="dataSource" ref="dataSource"/>
    </bean>


</beans>
(4). 编写业务接口和业务实现类。
UserService(配置事务)
package com.ypf.service;

import com.github.pagehelper.PageInfo;
import com.ypf.domain.User;
import org.springframework.transaction.annotation.Transactional;

@Transactional(readOnly = true)
public interface UserService {
    /**
     * 添加用户
     * @param user
     * @return
     */
    @Transactional(readOnly = false)
    public boolean save(User user);

    /**
     * 修改用户
     * @param user
     * @return
     */
    @Transactional(readOnly = false)
    public boolean update(User user);

    /**
     * 删除用户
     * @param uuid
     * @return
     */
    @Transactional(readOnly = false)
    public boolean delete(Integer uuid);

    /**
     * 查询单个用户信息
     * @param uuid
     * @return
     */
    public User get(Integer uuid);

    /**
     * 查询全部用户信息
     * @return
     */
    public PageInfo<User> getAll(int page, int size);

    /**
     * 根据用户名密码进行登录
     * @param userName
     * @param password
     * @return
     */
    public User login(String userName,String password);
}
UserServiceImpl
package com.ypf.service.impl;

import com.github.pagehelper.PageHelper;
import com.github.pagehelper.PageInfo;
import com.ypf.dao.UserDao;
import com.ypf.domain.User;
import com.ypf.service.UserService;
import org.springframework.beans.factory.annotation.Autowired;
import org.springframework.stereotype.Service;

import java.util.List;

@Service //等价于@Component
public class UserServiceImpl implements UserService {

    @Autowired
    private UserDao userDao;

    @Override
    public boolean save(User user) {
        return userDao.save(user);
    }

    @Override
    public boolean update(User user) {
        return userDao.update(user);
    }

    @Override
    public boolean delete(Integer uuid) {
        return userDao.delete(uuid);
    }

    @Override
    public User get(Integer uuid) {
        return userDao.get(uuid);
    }

    @Override
    public PageInfo<User> getAll(int page, int size) {
        PageHelper.startPage(page,size);
        List<User> all = userDao.getAll();
        return new PageInfo<User>(all);
    }

    @Override
    public User login(String userName, String password) {
        return userDao.getByUserNameAndPassword(userName,password);
    }

}
(5). 基于Junit进行测试
需要依赖application-dao.xml和application-service.xml两个配置文件。
@RunWith(SpringJUnit4ClassRunner.class)
//注意下面测试的时候,必须要还要引入applicationContext-dao.xml
@ContextConfiguration(locations = {"classpath:applicationContext-service.xml","classpath:applicationContext-dao.xml"})
public class MyTest1 {

    @Autowired
    private UserService userService;

    @Test
    public void testSave(){
        User user = new User();
        user.setUserName("Jock1");
        user.setPassword("root1");
        user.setRealName("Jockme1");
        user.setGender(1);
        user.setBirthday(new Date(333333000000L));

        userService.save(user);
        System.out.println("运行成功。。。。。。。");
    }

    @Test
    public void testDelete(){
        User user = new User();
        userService.delete(1);
        System.out.println("运行成功。。。。。。。");
    }

    @Test
    public void testUpdate(){
        User user = new User();
        user.setUuid(1);
        user.setUserName("Jock2");
        user.setPassword("root2");
        user.setRealName("JockIsMe2");
        user.setGender(1);
        user.setBirthday(new Date(333333000000L));

        userService.update(user);
    }

    @Test
    public void testGet(){
        User user = userService.get(1);
        System.out.println(user);
    }

    @Test
    public void testGetAll(){
        PageInfo<User> all = userService.getAll(2, 2);
        System.out.println(all);
        System.out.println(all.getList().get(0));
        System.out.println(all.getList().get(1));
    }

    @Test
    public void testLogin(){
        User user = userService.login("Jockme", "root");
        System.out.println(user);
    }
}
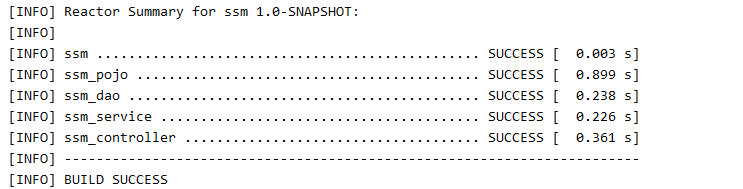
部分运行结果:

6. ssm_controller层
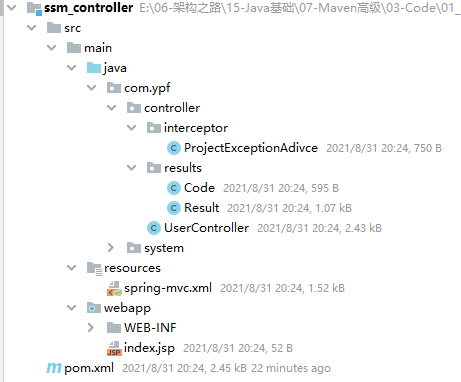
(1). 新建1个maven的web项目ssm_controller,该层主要对外提供业务接口
(2). pom文件中修改打包类型为war,引入相关坐标:ssm_service、springmvc、servlet、json相关坐标,配置tomcat7插件
<?xml version="1.0" encoding="UTF-8"?>

<project xmlns="http://maven.apache.org/POM/4.0.0" xmlns:xsi="http://www.w3.org/2001/XMLSchema-instance"
  xsi:schemaLocation="http://maven.apache.org/POM/4.0.0 http://maven.apache.org/xsd/maven-4.0.0.xsd">
  <modelVersion>4.0.0</modelVersion>

  <groupId>org.ypf</groupId>
  <artifactId>ssm_controller</artifactId>
  <version>1.0-SNAPSHOT</version>
  <packaging>war</packaging>

  <name>ssm_controller Maven Webapp</name>
  <!-- FIXME change it to the project's website -->
  <url>http://www.example.com</url>

  <properties>
    <project.build.sourceEncoding>UTF-8</project.build.sourceEncoding>
    <maven.compiler.source>11</maven.compiler.source>
    <maven.compiler.target>11</maven.compiler.target>
  </properties>

  <dependencies>
    <!--导入资源文件ssm_service-->
    <dependency>
      <groupId>org.ypf</groupId>
      <artifactId>ssm_service</artifactId>
      <version>1.0-SNAPSHOT</version>
    </dependency>
    <!--springmvc的坐标-->
    <dependency>
      <groupId>org.springframework</groupId>
      <artifactId>spring-webmvc</artifactId>
      <version>5.2.9.RELEASE</version>
    </dependency>
    <!--servlet 4.0规范-->
    <dependency>
      <groupId>javax.servlet</groupId>
      <artifactId>javax.servlet-api</artifactId>
      <version>4.0.1</version>
      <scope>provided</scope>
    </dependency>
    <!--json相关坐标3个  仅导入1个即可-->
    <dependency>
      <groupId>com.fasterxml.jackson.core</groupId>
      <artifactId>jackson-core</artifactId>
      <version>2.9.9</version>
    </dependency>
    <dependency>
      <groupId>com.fasterxml.jackson.core</groupId>
      <artifactId>jackson-databind</artifactId>
      <version>2.9.9</version>
    </dependency>
    <dependency>
      <groupId>com.fasterxml.jackson.core</groupId>
      <artifactId>jackson-annotations</artifactId>
      <version>2.9.9</version>
    </dependency>


  </dependencies>

  <build>
    <finalName>ssm_controller</finalName>
    <pluginManagement>
      <plugins>
        <plugin>
          <groupId>org.apache.tomcat.maven</groupId>
          <artifactId>tomcat7-maven-plugin</artifactId>
          <version>2.2</version>
          <configuration>
            <port>8888</port>
          </configuration>
        </plugin>
      </plugins>
    </pluginManagement>
  </build>


</project>
注意:
需要先在ssm_service模块中运行install指令,将其安装到本地仓库里,然后再在ssm_controller中引入,然后运行compile编译。
(3). 新增spring-mvc.xml核心配置文件,用来:扫描加载类、开启springmvc注解驱动、解决全局乱码问题。
<?xml version="1.0" encoding="UTF-8"?>
<beans xmlns="http://www.springframework.org/schema/beans"
       xmlns:context="http://www.springframework.org/schema/context"
       xmlns:mvc="http://www.springframework.org/schema/mvc"
       xmlns:xsi="http://www.w3.org/2001/XMLSchema-instance"
       xsi:schemaLocation="http://www.springframework.org/schema/beans http://www.springframework.org/schema/beans/spring-beans.xsd
        http://www.springframework.org/schema/mvc http://www.springframework.org/schema/mvc/spring-mvc.xsd
        http://www.springframework.org/schema/context http://www.springframework.org/schema/context/spring-context.xsd">


    <!-- 1.加载扫描类   -->
    <!--1.1 扫描加载所有的控制类-->
    <context:component-scan base-package="com.ypf.controller"/>

    <!--2开启springmvc注解驱动-->
    <mvc:annotation-driven>
        <!-- 全局解决中文乱码问题 -->
        <mvc:message-converters>
            <bean class="org.springframework.http.converter.json.MappingJackson2HttpMessageConverter"/>
            <bean class="org.springframework.http.converter.StringHttpMessageConverter">
                <property name="supportedMediaTypes">
                    <list>
                        <value>text/plain;charset=utf-8</value>
                        <value>text/html;charset=UTF-8</value>
                    </list>
                </property>
            </bean>
        </mvc:message-converters>
    </mvc:annotation-driven>

</beans>
(4). 配置web.xml核心文件
<?xml version="1.0" encoding="UTF-8"?>
<web-app xmlns="http://xmlns.jcp.org/xml/ns/javaee"
         xmlns:xsi="http://www.w3.org/2001/XMLSchema-instance"
         xsi:schemaLocation="http://xmlns.jcp.org/xml/ns/javaee
         http://xmlns.jcp.org/xml/ns/javaee/web-app_3_1.xsd"
         version="3.1">

  <!--加载核心文件 -->
  <!--通过 applicationContext-* 匹配所有配置文件-->
  <context-param>
    <param-name>contextConfigLocation</param-name>
    <param-value>classpath*:applicationContext-*.xml</param-value>
  </context-param>

  <!--启动服务器时,通过监听器加载spring运行环境-->
  <listener>
    <listener-class>org.springframework.web.context.ContextLoaderListener</listener-class>
  </listener>

  <!-- 请求模型 -->
  <servlet>
    <servlet-name>DispatcherServlet</servlet-name>
    <servlet-class>org.springframework.web.servlet.DispatcherServlet</servlet-class>
    <init-param>
      <param-name>contextConfigLocation</param-name>
      <param-value>classpath*:spring-mvc.xml</param-value>
    </init-param>
  </servlet>
  <servlet-mapping>
    <servlet-name>DispatcherServlet</servlet-name>
    <url-pattern>/</url-pattern>
  </servlet-mapping>

</web-app>
(5). 全局异常过滤器和返回结果,详见前一节
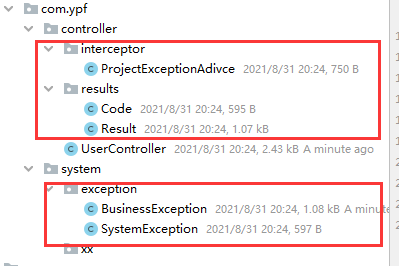
(6). 新增UserController,编写对外接口
package com.ypf.controller;

import com.github.pagehelper.PageInfo;
import com.ypf.controller.results.Code;
import com.ypf.controller.results.Result;
import com.ypf.domain.User;
import com.ypf.service.UserService;
import com.ypf.system.exception.BusinessException;
import org.springframework.beans.factory.annotation.Autowired;
import org.springframework.web.bind.annotation.*;

@RestController
@RequestMapping("/user")
public class UserController {

    @Autowired
    private UserService userService;

    @PostMapping
    public Result save(User user) {
        boolean flag = userService.save(user);
        return new Result(flag ? Code.SAVE_OK : Code.SAVE_ERROR);
    }

    @PutMapping
    public Result update(User user) {
        boolean flag = userService.update(user);
        return new Result(flag ? Code.UPDATE_OK : Code.UPDATE_ERROR);
    }

    @DeleteMapping("/{uuid}")
    public Result delete(@PathVariable Integer uuid) {
        boolean flag = userService.delete(uuid);
        return new Result(flag ? Code.DELETE_OK : Code.DELETE_ERROR);
    }

    @GetMapping("/{uuid}")
    //http://localhost:8888/ssm_controller/user/1
    public Result get(@PathVariable Integer uuid) {
        User user = userService.get(uuid);
        return new Result(null != user ? Code.GET_OK : Code.GET_ERROR, user);
    }

    @GetMapping("/{page}/{size}")
    //http://localhost:8888/ssm_controller/user/1/2
    public Result getAll(@PathVariable Integer page, @PathVariable Integer size) {
        PageInfo<User> all = userService.getAll(page, size);
        return new Result(null != all ? Code.GET_OK : Code.GET_ERROR, all);
    }


    @PostMapping("/login")
    public Result login(String userName, String password) {
        User user = userService.login(userName, password);
        return new Result(null != user ? Code.GET_OK : Code.GET_ERROR, user);
    }

    //测试全局异常处理器
    //http://localhost:8888/ssm_controller/user/getError/10
    @GetMapping("/getError/{uuid}")
    public Result getError(@PathVariable Integer uuid) {
        User user = userService.get(uuid);
        //模拟出现异常,使用条件控制,便于测试结果
        if (uuid == 10) throw new BusinessException("查询出错啦,请重试!", Code.GET_ERROR);
        return new Result(null != user ? Code.GET_OK : Code.GET_ERROR, user);
    }

}
二. 聚合和继承
1. 聚合
(1). 背景
多模块构建维护

(2). 作用
聚合用于快速构建maven工程,一次性构建多个项目/模块。
(3). 实操
A. 在ssm模块中修改打包类型为pom
    <!--定义该工程用于进行构建管理-->
    <packaging>pom</packaging>
B. 定义当前模块进行构建操作时关联的其他模块名称
   <!--管理的工程列表-->
    <modules>
        <!--具体的工程名称-->
        <module>../ssm_controller</module>
        <module>../ssm_service</module>
        <module>../ssm_dao</module>
        <module>../ssm_pojo</module>
    </modules>
C. 运行complise进行编译
2. 继承
(1). 作用
通过继承可以实现在子工程中沿用父工程中的配置。在子工程中定义依赖关系,无需声明依赖版本,版本参照父工程中依赖的版本。(如有特别需要,则在子工程中单独声明版本)
(2). 实操
A. 在ssm父工程中定义依赖包和依赖插件。
<?xml version="1.0" encoding="UTF-8"?>
<project xmlns="http://maven.apache.org/POM/4.0.0"
         xmlns:xsi="http://www.w3.org/2001/XMLSchema-instance"
         xsi:schemaLocation="http://maven.apache.org/POM/4.0.0 http://maven.apache.org/xsd/maven-4.0.0.xsd">
    <modelVersion>4.0.0</modelVersion>

    <groupId>org.ypf</groupId>
    <artifactId>ssm</artifactId>
    <version>1.0-SNAPSHOT</version>
    <!--定义该工程用于进行构建管理-->
    <packaging>pom</packaging>

    <!--管理的工程列表-->
    <modules>
        <!--具体的工程名称-->
        <module>../ssm_controller</module>
        <module>../ssm_service</module>
        <module>../ssm_dao</module>
        <module>../ssm_pojo</module>
    </modules>

    <properties>
        <project.build.sourceEncoding>UTF-8</project.build.sourceEncoding>
        <maven.compiler.source>11</maven.compiler.source>
        <maven.compiler.target>11</maven.compiler.target>
    </properties>

    <!--定义父工程的依赖包-->
    <dependencyManagement>
        <dependencies>
            <!--一. 项目自身的模块-->
            <dependency>
                <groupId>org.ypf</groupId>
                <artifactId>ssm_pojo</artifactId>
                <version>1.0-SNAPSHOT</version>
            </dependency>
            <dependency>
                <groupId>org.ypf</groupId>
                <artifactId>ssm_dao</artifactId>
                <version>1.0-SNAPSHOT</version>
            </dependency>
            <dependency>
                <groupId>org.ypf</groupId>
                <artifactId>ssm_service</artifactId>
                <version>1.0-SNAPSHOT</version>
            </dependency>
            <!--二. 第三方模块依赖-->
            <!--spring环境-->
            <dependency>
                <groupId>org.springframework</groupId>
                <artifactId>spring-context</artifactId>
                <version>5.2.9.RELEASE</version>
            </dependency>
            <!-- Spring整合Junit -->
            <dependency>
                <groupId>junit</groupId>
                <artifactId>junit</artifactId>
                <version>4.13.2</version>
            </dependency>
            <dependency>
                <groupId>org.springframework</groupId>
                <artifactId>spring-test</artifactId>
                <version>5.2.9.RELEASE</version>
            </dependency>
            <!-- Spring整合mybatis相关坐标-->
            <dependency>
                <groupId>mysql</groupId>
                <artifactId>mysql-connector-java</artifactId>
                <version>5.1.6</version>
                <scope>runtime</scope>
            </dependency>
            <dependency>
                <groupId>org.mybatis</groupId>
                <artifactId>mybatis</artifactId>
                <version>3.5.7</version>
            </dependency>
            <dependency>
                <groupId>org.springframework</groupId>
                <artifactId>spring-jdbc</artifactId>
                <version>5.2.9.RELEASE</version>
            </dependency>
            <dependency>
                <groupId>org.mybatis</groupId>
                <artifactId>mybatis-spring</artifactId>
                <version>2.0.6</version>
            </dependency>
            <!--第三方资源配置(阿里数据源方案Druid)-->
            <dependency>
                <groupId>com.alibaba</groupId>
                <artifactId>druid</artifactId>
                <version>1.2.6</version>
            </dependency>
            <!--分页插件坐标-->
            <dependency>
                <groupId>com.github.pagehelper</groupId>
                <artifactId>pagehelper</artifactId>
                <version>5.2.1</version>
            </dependency>
            <dependency>
                <groupId>com.github.jsqlparser</groupId>
                <artifactId>jsqlparser</artifactId>
                <version>4.1</version>
            </dependency>
            <!--springmvc的坐标-->
            <dependency>
                <groupId>org.springframework</groupId>
                <artifactId>spring-webmvc</artifactId>
                <version>5.2.9.RELEASE</version>
            </dependency>
            <!--servlet 4.0规范-->
            <dependency>
                <groupId>javax.servlet</groupId>
                <artifactId>javax.servlet-api</artifactId>
                <version>4.0.1</version>
                <scope>provided</scope>
            </dependency>
            <!--json相关坐标3个  仅导入1个即可-->
            <dependency>
                <groupId>com.fasterxml.jackson.core</groupId>
                <artifactId>jackson-core</artifactId>
                <version>2.9.9</version>
            </dependency>
            <dependency>
                <groupId>com.fasterxml.jackson.core</groupId>
                <artifactId>jackson-databind</artifactId>
                <version>2.9.9</version>
            </dependency>
            <dependency>
                <groupId>com.fasterxml.jackson.core</groupId>
                <artifactId>jackson-annotations</artifactId>
                <version>2.9.9</version>
            </dependency>


        </dependencies>
    </dependencyManagement>


    <!--定义父工程的插件-->
    <build>
        <pluginManagement>
            <plugins>
                <plugin>
                    <groupId>org.apache.tomcat.maven</groupId>
                    <artifactId>tomcat7-maven-plugin</artifactId>
                    <version>2.2</version>
                    <configuration>
                        <port>8888</port>
                    </configuration>
                </plugin>
            </plugins>
        </pluginManagement>
    </build>


</project>
B. 以ssm_controller层为例,编写继承用法
①定义父工程
  <!--定义父工程-->
  <parent>
    <groupId>org.ypf</groupId>
    <artifactId>ssm</artifactId>
    <version>1.0-SNAPSHOT</version>
    <!--填写父工程的pom文件-->
    <relativePath>../ssm/pom.xml</relativePath>
  </parent>
②修改项目自身信息
<!--项目自身信息-->
  <modelVersion>4.0.0</modelVersion>
  <artifactId>ssm_controller</artifactId>
  <packaging>war</packaging>
③继承依赖坐标
<dependencies>
    <!--导入资源文件ssm_service-->
    <dependency>
      <groupId>org.ypf</groupId>
      <artifactId>ssm_service</artifactId>
    </dependency>
    <!--springmvc的坐标-->
    <dependency>
      <groupId>org.springframework</groupId>
      <artifactId>spring-webmvc</artifactId>
    </dependency>
    <!--servlet 4.0规范-->
    <dependency>
      <groupId>javax.servlet</groupId>
      <artifactId>javax.servlet-api</artifactId>
      <scope>provided</scope>
    </dependency>
    <!--json相关坐标3个  仅导入1个即可-->
    <dependency>
      <groupId>com.fasterxml.jackson.core</groupId>
      <artifactId>jackson-core</artifactId>
    </dependency>
    <dependency>
      <groupId>com.fasterxml.jackson.core</groupId>
      <artifactId>jackson-databind</artifactId>
    </dependency>
    <dependency>
      <groupId>com.fasterxml.jackson.core</groupId>
      <artifactId>jackson-annotations</artifactId>
    </dependency>
  </dependencies>
④继承依赖插件
  <build>
    <finalName>ssm_controller</finalName>
    <pluginManagement>
      <plugins>
        <plugin>
          <groupId>org.apache.tomcat.maven</groupId>
          <artifactId>tomcat7-maven-plugin</artifactId>
        </plugin>
      </plugins>
    </pluginManagement>
  </build>
C. ssm_service层如下
<?xml version="1.0" encoding="UTF-8"?>
<project xmlns="http://maven.apache.org/POM/4.0.0"
         xmlns:xsi="http://www.w3.org/2001/XMLSchema-instance"
         xsi:schemaLocation="http://maven.apache.org/POM/4.0.0 http://maven.apache.org/xsd/maven-4.0.0.xsd">

    <!--定义父工程-->
    <parent>
        <groupId>org.ypf</groupId>
        <artifactId>ssm</artifactId>
        <version>1.0-SNAPSHOT</version>
        <!--填写父工程的pom文件-->
        <relativePath>../ssm/pom.xml</relativePath>
    </parent>

    <!--项目自身信息-->
    <modelVersion>4.0.0</modelVersion>
    <artifactId>ssm_service</artifactId>
    <packaging>jar</packaging>


    <properties>
        <project.build.sourceEncoding>UTF-8</project.build.sourceEncoding>
        <maven.compiler.source>11</maven.compiler.source>
        <maven.compiler.target>11</maven.compiler.target>
    </properties>

    <dependencies>
        <!--导入资源文件ssm_dao-->
        <dependency>
            <groupId>org.ypf</groupId>
            <artifactId>ssm_dao</artifactId>
        </dependency>

        <!--Spring 坐标-->
        <dependency>
            <groupId>org.springframework</groupId>
            <artifactId>spring-context</artifactId>
        </dependency>
        <!-- Spring整合Junit -->
        <dependency>
            <groupId>junit</groupId>
            <artifactId>junit</artifactId>
        </dependency>
        <dependency>
            <groupId>org.springframework</groupId>
            <artifactId>spring-test</artifactId>
        </dependency>
    </dependencies>


</project>
D. ssm_dao层如下
<?xml version="1.0" encoding="UTF-8"?>
<project xmlns="http://maven.apache.org/POM/4.0.0"
         xmlns:xsi="http://www.w3.org/2001/XMLSchema-instance"
         xsi:schemaLocation="http://maven.apache.org/POM/4.0.0 http://maven.apache.org/xsd/maven-4.0.0.xsd">


    <!--定义父工程-->
    <parent>
        <groupId>org.ypf</groupId>
        <artifactId>ssm</artifactId>
        <version>1.0-SNAPSHOT</version>
        <!--填写父工程的pom文件-->
        <relativePath>../ssm/pom.xml</relativePath>
    </parent>

    <!--项目自身信息-->
    <modelVersion>4.0.0</modelVersion>
    <artifactId>ssm_dao</artifactId>
    <packaging>jar</packaging>


    <properties>
        <project.build.sourceEncoding>UTF-8</project.build.sourceEncoding>
        <maven.compiler.source>11</maven.compiler.source>
        <maven.compiler.target>11</maven.compiler.target>
    </properties>

    <dependencies>
        <!--导入资源文件pojo-->
        <dependency>
            <groupId>org.ypf</groupId>
            <artifactId>ssm_pojo</artifactId>
        </dependency>
        <!--spring环境-->
        <dependency>
            <groupId>org.springframework</groupId>
            <artifactId>spring-context</artifactId>
        </dependency>
        <!-- Spring整合mybatis相关坐标-->
        <dependency>
            <groupId>mysql</groupId>
            <artifactId>mysql-connector-java</artifactId>
            <scope>runtime</scope>
        </dependency>
        <dependency>
            <groupId>org.mybatis</groupId>
            <artifactId>mybatis</artifactId>
        </dependency>
        <dependency>
            <groupId>org.springframework</groupId>
            <artifactId>spring-jdbc</artifactId>
        </dependency>
        <dependency>
            <groupId>org.mybatis</groupId>
            <artifactId>mybatis-spring</artifactId>
        </dependency>
        <!--第三方资源配置(阿里数据源方案Druid)-->
        <dependency>
            <groupId>com.alibaba</groupId>
            <artifactId>druid</artifactId>
        </dependency>
        <!--分页插件坐标-->
        <dependency>
            <groupId>com.github.pagehelper</groupId>
            <artifactId>pagehelper</artifactId>
        </dependency>
        <dependency>
            <groupId>com.github.jsqlparser</groupId>
            <artifactId>jsqlparser</artifactId>
        </dependency>
    </dependencies>


</project>
E. ssm_pojo层如下
<?xml version="1.0" encoding="UTF-8"?>
<project xmlns="http://maven.apache.org/POM/4.0.0"
         xmlns:xsi="http://www.w3.org/2001/XMLSchema-instance"
         xsi:schemaLocation="http://maven.apache.org/POM/4.0.0 http://maven.apache.org/xsd/maven-4.0.0.xsd">

    <!--定义父工程-->
    <parent>
        <groupId>org.ypf</groupId>
        <artifactId>ssm</artifactId>
        <version>1.0-SNAPSHOT</version>
        <!--填写父工程的pom文件-->
        <relativePath>../ssm/pom.xml</relativePath>
    </parent>

    <!--项目自身信息-->
    <modelVersion>4.0.0</modelVersion>
    <artifactId>ssm_pojo</artifactId>
    <packaging>jar</packaging>


    <properties>
        <project.build.sourceEncoding>UTF-8</project.build.sourceEncoding>
        <maven.compiler.source>11</maven.compiler.source>
        <maven.compiler.target>11</maven.compiler.target>
    </properties>


    <dependencies>


    </dependencies>

</project>
三. 属性、版本、资源配置、多环境、跳过测试
1. 属性配置
(1). 自定义属性
  <!--项目构建版本-->
    <properties>
        <project.build.sourceEncoding>UTF-8</project.build.sourceEncoding>
        <maven.compiler.source>11</maven.compiler.source>
        <maven.compiler.target>11</maven.compiler.target>

        <!--自定义属性-->
        <spring.version>5.2.9.RELEASE</spring.version>
        <junit.version>4.13.2</junit.version>
    </properties>
调用:
            <dependency>
                <groupId>org.springframework</groupId>
                <artifactId>spring-context</artifactId>
                <version>${spring.version}</version>
            </dependency>
            <!-- Spring整合Junit -->
            <dependency>
                <groupId>junit</groupId>
                <artifactId>junit</artifactId>
                <version>${junit.version}</version>
            </dependency>
(2). 内置属性
比如:
${basedir}
${version}
调用:
            <dependency>
                <groupId>org.ypf</groupId>
                <artifactId>ssm_pojo</artifactId>
                <!--version是maven的内置属性,就是顶部那个值-->
                <version>${version}</version>
            </dependency>
2. 版本说明
(1). 工程版本
-
-
项目开发过程中,为方便团队成员合作,解决模块间相互依赖和时时更新的问题,开发者对每个模块进行构建的时候,输出的临时性版本叫快照版本(测试阶段版本)
-
u快照版本会随着开发的进展不断更新
-
-
RELEASE(发布版本)
-
(2). 版本号约定
约定规范:
-
<主版本>.<次版本>.<增量版本>.<里程碑版本>
-
主版本:表示项目重大架构的变更,如:spring5相较于spring4的迭代
-
次版本:表示有较大的功能增加和变化,或者全面系统地修复漏洞
-
增量版本:表示有重大漏洞的修复
-
里程碑版本:表明一个版本的里程碑(版本内部)。这样的版本同下一个正式版本相比,相对来说不是很稳定,有待更多的测试
3. 资源配置
在任意模块中都可以加载ssm父模块中的pom.xml定义的属性。
自定义属性
<properties> <project.build.sourceEncoding>UTF-8</project.build.sourceEncoding> <maven.compiler.source>11</maven.compiler.source> <maven.compiler.target>11</maven.compiler.target> <!--自定义属性--> <spring.version>5.2.9.RELEASE</spring.version> <junit.version>4.13.2</junit.version> <!--在jdbc.properties中可以直接使用 --> <mydb.url>jdbc:mysql://47.92.111.18:3306/ssm?useUnicode=true&characterEncoding=utf8&rewriteBatchedStatements=true</mydb.url> </properties>
开启配置
       <!--配置资源文件对应的信息-->
        <resources>
            <resource>
                <!--设定配置文件对应的位置目录,支持使用属性动态设定路径-->
                <directory>${project.basedir}/src/main/resources</directory>
                <!--开启对配置文件的资源加载过滤-->
                <filtering>true</filtering>
            </resource>
        </resources>
        <!--配置测试资源文件对应的信息-->
        <testResources>
            <testResource>
                <directory>${project.basedir}/src/test/resources</directory>
                <filtering>true</filtering>
            </testResource>
        </testResources>
在ssm_dao中的jdbc.properties中调用
jdbc.driver=com.mysql.jdbc.Driver
jdbc.url=${mydb.url}
jdbc.username=root
jdbc.password=ypf123456
4. 多环境
<profiles> <!--定义具体的环境:生产环境--> <profile> <!--定义环境对应的唯一名称--> <id>pro_env</id> <!--定义环境中换用的属性值--> <properties> <mydb.url>jdbc:mysql://47.93.122.38:3306/ssm?useUnicode=true&characterEncoding=utf8&rewriteBatchedStatements=true</mydb.url> </properties> <!--设置默认启动--> <activation> <activeByDefault>false</activeByDefault> </activation> </profile> <!--定义具体的环境:开发环境--> <profile> <id>dep_env</id> <properties> <mydb.url>jdbc:mysql://47.92.123.111:3306/ssm?useUnicode=true&characterEncoding=utf8&rewriteBatchedStatements=true</mydb.url> </properties> <!--设置默认启动--> <activation> <activeByDefault>true</activeByDefault> </activation> </profile> </profiles>
5. 跳过测试

!
- 作 者 : Yaopengfei(姚鹏飞)
- 博客地址 : http://www.cnblogs.com/yaopengfei/
- 声 明1 : 如有错误,欢迎讨论,请勿谩骂^_^。
- 声 明2 : 原创博客请在转载时保留原文链接或在文章开头加上本人博客地址,否则保留追究法律责任的权利。