富文本编辑器 KindEditor
富文本编辑器,Rich Text Editor , 简称 RTE , 它提供类似于 Microsoft Word 的编辑功能。
常用的富文本编辑器:
KindEditor http://kindeditor.net/
UEditor http://ueditor.baidu.com/website/
CKEditor http://ckeditor.com/
基本使用
<!DOCTYPE html>
<html>
    <head>
        <title></title>
        <link rel="stylesheet" href="themes/default/default.css" />
        <script charset="utf-8" src="kindeditor-all.js"></script>
        <script charset="utf-8" src="lang/zh-CN.js"></script>
        <script>
            var editor;
            KindEditor.ready(function(K) {
                editor = K.create('textarea[name="content"]', {
                    allowFileManager : true,
                    items : [
                        'source', '|', 'undo', 'redo', '|', 'preview', 'print', 'template', 'code', 'cut', 'copy', 'paste',
                        'plainpaste', 'wordpaste', '|', 'justifyleft', 'justifycenter', 'justifyright',
                        'justifyfull', 'insertorderedlist', 'insertunorderedlist', 'indent', 'outdent', 'subscript',
                        'superscript', 'clearhtml', 'quickformat', 'selectall', '|', 'fullscreen', '/',
                        'formatblock', 'fontname', 'fontsize', '|', 'forecolor', 'hilitecolor', 'bold',
                        'italic', 'underline', 'strikethrough', 'lineheight', 'removeformat', '|', 'image', 'multiimage',
                        'flash', 'media', 'insertfile', 'table', 'hr', 'emoticons', 'baidumap', 'pagebreak',
                        'anchor', 'link', 'unlink', '|', 'about'
                    ]
                });
            });
        </script>
	<head/>
	<body>
		<form>
			<textarea name="content" style="800px;height:400px;">KindEditor</textarea>
		</form>
	</body>
</html>
工具栏中图片上传的表单 name 值为 imgFile
<input type="file" class="ke-upload-file" name="imgFile" tabindex="-1">
图片上传前后端接口,必须返回这样格式的 json 字符串,才会回调 afterUpload 属性指定的回调函数。
{"error":0, "url": "http://www.baidu.com/tupian.jpg"}
{"error":1, "message": "文件上传失败"}

upload_json.jsp 文件中的内容
obj.put("error", 0);
obj.put("url", saveUrl + newFileName);

obj.put("error", 1);
obj.put("message", message);
//前台使用 afterUpload 指定文件上传回调函数,可以接收3个参数,url data name 。
afterUpload: function() {
    // alert(url);
    // alert(data);
    // alert(name);
}
图片上传
请求参数 服务器响应数据 回调函数
- 请求参数
imgFile: 文件form名称
dir: 上传类型,分别为image、flash、media、file
POST参数
    imgFile: form 文件表单项的 name 属性值
    dir: 上传类型,分别为image、flash、media、file

返回格式(JSON)
原文:https://blog.csdn.net/a623982022/article/details/78883485

实例
http://localhost:9102/upload2.do?dir=image
Content-Type: multipart/form-data; boundary=----WebKitFormBoundaryAlzILycWoCrusx1z
- 服务器响应数据
//成功时
{
        "error" : 0,
        "url" : "http://www.example.com/path/to/file.ext"
}
//失败时
{
        "error" : 1,
        "message" : "错误信息"
}
-
回调函数
url表示上传成功时返回的文件url地址data服务器响应的json对象name上传类型,如:图片上传,多图片上传,文件上传。取值: image multiimage insertfile
注意:参数是按照位置给值的,如果回调只有一个参数,那么就表示 url , 如果回调有2个参数,那么依次表示 (url, data) , 如果回调有3个参数,那么依次表示 (url, data, name)
	var editor;
	KindEditor.ready(function(K) {
		editor = K.create('textarea[name="content"]', {
			allowFileManager : true,
			items:['fontname', 'fontsize', 'forecolor', 'hilitecolor', 'bold',
				'italic', 'underline', 'removeformat', 'justifyleft', 'justifycenter', 'justifyright',
				'insertorderedlist', 'insertunorderedlist', 'emoticons', 'image', 'multiimage', 'insertfile'
			],
			uploadJson: "../upload2.do",
			allowImageRemote: false,
			afterUpload: function(url, data, name) {
				alert(url);
				alert(data);
				alert(name);//如果是单张图片,则 name="image"
			}
		});
	});
单图片上传交互数据
前台的请求
http://localhost:9102/upload2.do?dir=image
Content-Type: multipart/form-data; boundary=----WebKitFormBoundaryAlzILycWoCrusx1z

后台的响应
{"error":0,"url":"http://192.168.25.133/group1/M00/00/00/wKgZhV0gazKAa_6GAAAItlg8JxI168.png"}
多图片上传
通过多次单图片上传实现,afterUpload 上传回调函数被调用多次。

单图片上传返回结果

文件上传后台程序
@RestController
public class UploadController {

    @Value("${FILE_SERVER_URL}")
    private String FILE_SERVER_URL;

    @RequestMapping("/upload")
    public Result upload(@RequestParam("imgFile") MultipartFile file){
        try {
            FastDFSClient fastDFSClient = new FastDFSClient("classpath:config/fdfs_client.conf");

            //获取扩展名
            String originalFilename = file.getOriginalFilename();
            String extName = originalFilename.substring(originalFilename.lastIndexOf('.') + 1);

            String fileId = fastDFSClient.uploadFile(file.getBytes(), extName);
            String url = FILE_SERVER_URL + fileId;

            return new Result(true, url);
        } catch (Exception e) {
            e.printStackTrace();
        }
        return new Result(false, "文件上传失败");
    }

    @RequestMapping("/upload2")
    public Map upload2(@RequestParam("imgFile") MultipartFile file){
        try {
            FastDFSClient fastDFSClient = new FastDFSClient("classpath:config/fdfs_client.conf");

            //获取扩展名
            String originalFilename = file.getOriginalFilename();
            String extName = originalFilename.substring(originalFilename.lastIndexOf('.') + 1);

            String fileId = fastDFSClient.uploadFile(file.getBytes(), extName);
            String url = FILE_SERVER_URL + fileId;

            Map map = new HashMap<>();
            map.put("error", 0);
            map.put("url", url);
            return map;
        } catch (Exception e) {
            e.printStackTrace();
        }

        Map map = new HashMap<>();
        map.put("error", 1);
        map.put("message", "文件上传失败");
        return map;
    }
}
文件上传
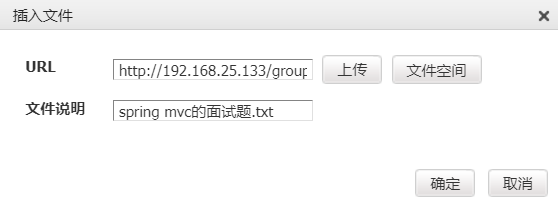
自动回显文件名 超链接的文本显示为原始文件名
配置 items 中的 insertfile
-
上传文件后,在 kindeditor 窗口中显示超链接的文本是原始文件名,而不是超链接的 url 地址。
方案:
KindEditor 4.1.10 (2013-11-23) 文件上传对话框中,可以通过文件说明,来指定超链接的文本。但是不会自动回显原来的上传文件名。
-
上传文件对话框中的文件说明如何自动回显文件名。
<!-- 上传文件对话框中,文件说明文本框 name 属性的值为 title -->
<input type="text" id="keTitle" class="ke-input-text" name="title" value="" style="160px;">
/*
insertfile.js 中文件上传的内置上传回调函数,如果没有出错,设置 url 输入框的值,然后调用用户定义的上传回调函数。
*/
afterUpload : function(data) {
    dialog.hideLoading();
    if (data.error === 0) {
        var url = data.url;
        if (formatUploadUrl) {
            url = K.formatUrl(url, 'absolute');
        }
        urlBox.val(url);
        if (self.afterUpload) {
            self.afterUpload.call(self, url, data, name);
        }
        alert(self.lang('uploadSuccess'));
    } else {
        alert(data.message);
    }
}
方案:
1. 修改服务器端程序,将原文件名添加到返回数据中。
Map map = new HashMap<>();
map.put("error", 0);
map.put("url", url);
map.put("filename", originalFilename);//将原文件名添加到返回数据中
return map;
- 文件上传回调函数中,设置文件说明表单项的值为原文件名。
方式一:在自定义文件上传回调函数中设置文件说明表单项的值为原文件名
分析发现,文件上传对话框中的文件说明表单项的 id 值为 keTitle,在自定义上传回调函数中获取文件说明元素,并设置它的值为原文件名。
var editor;
KindEditor.ready(function(K) {
    editor = K.create('textarea[name="content"]', {
        allowFileManager : true,
        items:[image','multiimage', 'insertfile'],
        uploadJson: "../upload2.do",
        allowImageRemote: false,
        allowFileUpload: true,
        //自定义上传回调函数,如果是上传文件,则设置文件说明为原文件名,原文件名的数据由服务器返回。
        afterUpload: function(url, data, name) {
            if(name === 'insertfile'){
                $("#keTitle").val(data.filename);
            }
            console.log(url);
            console.log(data);
            console.log(name);
		}
    );
});
成功自动回显文件名

方式二 修改 insertfile.js 文件,在插件的内置上传回调函数中,设置文件说明表单项的值。
// 修改 insertfile.js 文件, kindeditorkindeditor-4.1.10pluginsinsertfileinsertfile.js
var urlBox = K('[name="url"]', div),
    viewServerBtn = K('[name="viewServer"]', div),
    titleBox = K('[name="title"]', div);//文件说明表单项元素

if (allowFileUpload) {
    var uploadbutton = K.uploadbutton({
        button : K('.ke-upload-button', div)[0],
        fieldName : filePostName,
        url : K.addParam(uploadJson, 'dir=file'),
        extraParams : extraParams,
        afterUpload : function(data) {
            dialog.hideLoading();
            if (data.error === 0) {
                var url = data.url;
                if (formatUploadUrl) {
                    url = K.formatUrl(url, 'absolute');
                }
                urlBox.val(url);
                titleBox.val(data.filename);//设置文件说明表单项元素的值为原文件名,原文件名由服务器端返回。
                if (self.afterUpload) {
                    self.afterUpload.call(self, url, data, name);
                }
                alert(self.lang('uploadSuccess'));
            } else {
                alert(data.message);
            }
        },
        afterError : function(html) {
            dialog.hideLoading();
            self.errorDialog(html);
        }
    });
成功自动回显原文件名
