Gamma校正(C++、OpenCV实现)
1.作用:
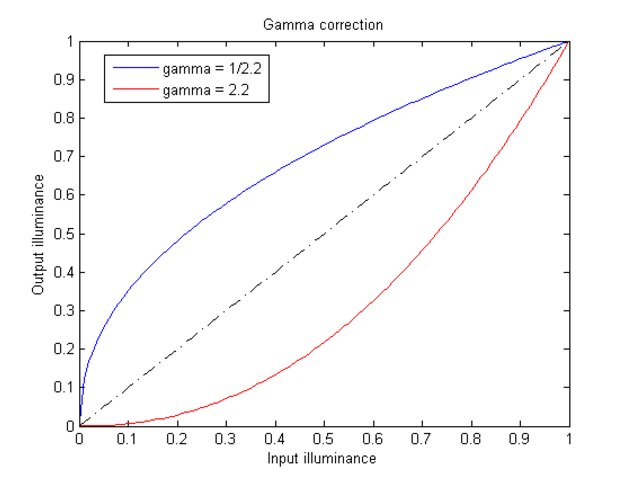
Gamma校正是对输入图像灰度值进行的非线性操作,使输出图像灰度值与输入图像灰度值呈指数关系:
伽玛校正由以下幂律表达式定义:

2.函数原型
1 void calcHist( const Mat* images, int nimages,
2                const int* channels, InputArray mask,
3                OutputArray hist, int dims, const int* histSize,
4                const float** ranges, bool uniform=true, bool accumulate=false );
5 //1.输入的图像数组   2.输入数组的个数             3.通道数              4.掩码                5.直方图
6 //6.直方图维度       7.直方图每个维度的尺寸数组   8.每一维数组的范围    9.直方图是否是均匀   10.累加标志
参数详解:
images:输入的图像的指针,可以是多幅图像,所有的图像必须有同样的深度(CV_8U or CV_32F)。同时一副图像可以有多个channes。
nimages:输入图像的个数
channels:需要统计直方图的第几通道。用来计算直方图的channes的数组。比如输入是2副图像,第一副图像有0,1,2共三个channel,第二幅图像只有0一个channel,那么输入就一共有4个channes,如果int channels[3] = {3, 2, 0},那么就表示是使用第二副图像的第一个通道和第一副图像的第2和第0个通道来计算直方图。
3.实现:
 1 void GetGammaCorrection(Mat& src, Mat& dst, const float fGamma)
 2 {
 3     unsigned char bin[256];
 4     for (int i = 0; i < 256; ++i)
 5     {
 6         bin[i] = saturate_cast<uchar>(pow((float)(i / 255.0), fGamma) * 255.0f);
 7     }
 8     dst = src.clone();
 9     const int channels = dst.channels();
10     switch (channels)
11     {
12     case 1:
13     {
14         MatIterator_<uchar> it, end;
15         for (it = dst.begin<uchar>(), end = dst.end<uchar>(); it != end; it++)
16             *it = bin[(*it)];
17         break;
18     }
19     case 3:
20     {
21         MatIterator_<Vec3b> it, end;
22         for (it = dst.begin<Vec3b>(), end = dst.end<Vec3b>(); it != end; it++)
23         {
24             (*it)[0] = bin[((*it)[0])];
25             (*it)[1] = bin[((*it)[1])];
26             (*it)[2] = bin[((*it)[2])];
27         }
28         break;
29     }
30     }
31 }
32
33 int main()
34 {
35     Mat image = imread("C:\Users\Administrator\Desktop\ir\2ir.bmp");
36     if (image.empty())
37     {
38         cout << "Error: Could not load image" << endl;
39         return 0;
40     }
41
42     Mat dst;
43     float fGamma = 1 / 2.0;
44     GetGammaCorrection(image, dst, fGamma);
45     imshow("Source Image", image);
46     imshow("Dst", dst);
47     std::string filename = "C:\Users\Administrator\Desktop\ir\dst2ir.bmp";
48     cv::imwrite(filename, dst);
49
50     cv::waitKey(0);
51
52     return 0;
53 }
4.效果
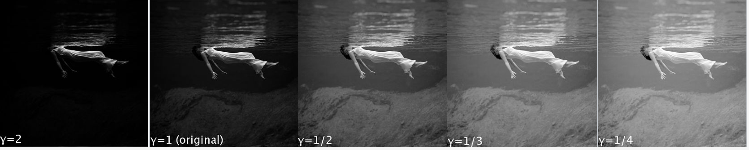
未经gamma校正和经过gamma校正保存图像信息如图:

能够观察到,未经gamma校正的情况下,低灰度时,有较大范围的灰度值被保存成同一个值,造成信息丢失;同一时候高灰度值时,非常多比較接近的灰度值却被保存成不同的值,造成空间浪费。经过gamma校正后,改善了存储的有效性和效率。