Execute ssh –V to check version.
Configure ssh daemon
- Open Cygwin command prompt
- Execute the following command
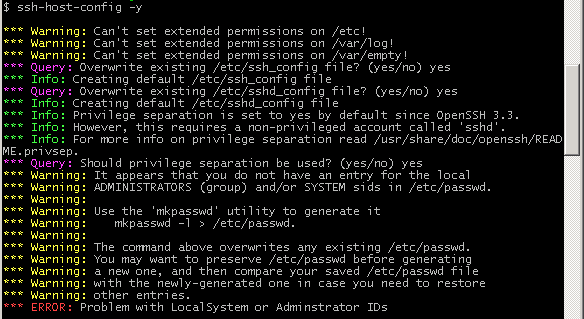
ssh-host-config
- When asked if privilege separation should be used, answer no.
- When asked if sshd should be installed as a service, answer yes.
- When asked about the value of CYGWIN environment variable enter ntsec.
- Here is the example session of this command, note that the input typed by the user is shown in pink and output from the system is shown in gray.

Example of using ssh-host-config
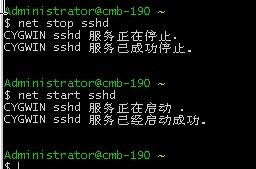
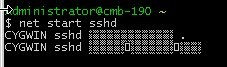
Start SSH daemon
- Find my computer icon either on your desktop or in the start-up menu, right-click on it and select Manage from the context menu.
- Open Services and Applications in the left-hand panel then select theServices item.
- Find the CYGWIN sshd item in the main section and right-click on it.
- Select Start from the context menu.

Start SSHD service - A small window should pop-up indicating the progress of the service start-up. After that window disappears the status of CYGWIN sshd service should change to Started.
Setup authorization keys
Eclipse plugins and hadoop scripts require ssh authentication to be performed through authorization keys rather than through passwords. To enable key based authorization you have to setup authorization keys. The following steps describe how to do it.
- Open cygwin command prompt
- Execute the following command to generate keys
ssh-keygen
- When prompted for filenames and pass phrases press ENTER to accept default values.
- After command has finished generating they key, enter the following command to change into your .ssh directory
cd ~/.ssh
- Check if the keys where indeed generated by executing the following command
ls -l
You should see two file id_rsa.pub and id_rsa with the recent creation dates. These files contain authorization keys.
- To register the new authorization keys enter the following command. Note that double brackets, they are very important.
cat id_rsa.pub >> authorized_keys
- Now check if the keys where set-up correctly by executing the following command
ssh localhost
Since it is a new ssh installation you warned that authenticity of the host could not be established and will be prompted whether you really want to connect, answer yes and press ENTER. You should see the cygwin prompt again, which means that you have successfully connected.
- Now execute the command again
ssh localhost
This time you should not be prompted for anything.

Setting up authorization keys
3. 创建用户组与密码,在cygwin的控制台中输入如下命令:
mkpasswd –cl > /etc/passwd
mkgroup --local > /etc/group
至此服务器的配置已经完成,可以基于用户与密码实现从远程登陆SSH服务器。
通过密码登陆SSH服务器
在cygwin的控制台输入如下命令:
ssh username@hostname
其中hostname为建立SSH服务器的计算机IP地址或机器名,username为用于登陆该计算机的用户名称,如果根据前面的服务器配置步骤,应当就是该计算现有的某个账户名称。
如果是所用的客户端计算机是第一次登陆SSH服务器,命令行中会提示“Are you sure you want to continue connecting (yes/no) ?”,只要输入yes即可,SSH服务器会自动将这次的登陆信息存储在/.ssh/known_host文件中。
接着屏幕中会提示输入登陆账户的密码,也就是ssh服务器中登陆账户的密码,当显示“Fanfare!!! You are successfully logged in to this server!!!”时,说明已经成功登陆到ssh服务器计算机内了,需要注意的是,此时在当前控制台内输入的命令都将在ssh服务器计算机里运行。
如果要退出登陆,只要在命令行中输入
exit
即可,屏幕中会显示“logout Connection to [hostname] closed.”
通过密钥登陆ssh服务器
1. 在客户端计算机上安装好包含openssh的cygwin;
2. 为客户端生成rsa密钥,在cygwin命令行中输入:
ssh-keygen –t rsa
对于提示输入密钥文件名或密钥的包含密码时都可以直接回车,从而将无密码保护的密钥保存在缺省文件中,两个密钥文件都保存在客户端当前用户的cygwin账户目录的/.ssh文件夹中,其中公钥的名称比私钥的名称只多一个pub后缀。
3. 将客户端的公钥上传到ssh服务器,这时可以通过前面已经成功的基于密码的方式完成文件的上传,即在客户端的cygwin命令行中输入如下命令:
cd ~/.ssh
scp id_rsa.pub username@hostname:~/.ssh/newkey
4. 在ssh服务器中将客户端的公钥添加到authorized_keys中,在服务器的cygwin命令行中输入如下命令:
cd ~/.ssh
ls (这时可以在目录中看到newkey文件)
cat newkey >> authorized_keys
rm newkey
chmod 600 authorized_keys (更改文件的属性)
5. 这时已经可以从客户端通过密钥对登陆到ssh服务器上了,只需在客户端的cygwin命令行中输入:
ssh username@hostname
在没有密码输入提示的情况下,应该可以看到“Ranfare!!! ……”,这说明已经成功登陆,如果在此时继续输入
whoami
可以看到在服务器上的登陆用户名。
需要注意的事情
1. 由于cygwin不能直接支持包含空格的文件路径,因此在cygwin中执行的应用尽量不要有包含空格的路径,如果一定要用,需要在空格前添加“/”来标注;
2. windows的账户一定要有密码,否则只能通过修改sshd_conf来允许无密码的账户登陆;
3. 默认的sshd服务不允许其与桌面进行交互,因此当通过ssh执行基于窗口的命令时,将无法看到创建的窗口,而只能在“任务管理器”中看到该进程已经被创建。为此,可通过进入“控制面板-管理工具-服务”窗口中打开“CYGWIN sshd”服务,在其弹出窗口的“登陆”属性页中选中“允许服务与桌面交互”复选框,如果此时在客户端输入
ssh username@host ‘notepad’
将可以看到对话框窗口能够正常弹出。
cygwin command for ssh:
Start sshd service
cygrunsrv -S ssh or cygrunsrv –start sshd or net start sshd
Stop sshd service
cygrunsrv –stop sshd or net stop sshd
Delete sshd service
cygrunsrv -R sshd or sc delete sshd
1、安装SSH
默认的Cygwin没有安装ssh,所以重新运行http://www.cygwin.com/setup.exe
在Select Packages的时候,在search输入ssh,选择openssh:The OpenSSH server and client programs
2、配置SSH服务(以管理员身份运行cygwin)
执行:ssh-host-config
Should privilege separation be used? yes
Do you want to install sshd as a service? yes
默认确认
Do you want to use a different name? no
Create new privileged user account 'cyg_server'? yes
输入密码
启动SSH服务:cygrunsrv -S sshd
3、生成SSH Key
ssh-keygen -t rsa(密码为空,路径默认)
cp .ssh/id_rsa.pub .ssh/authorized_keys
4、登陆测试
ssh localhost
The solution of “Connection closed by ::1” or “Connection closed by 127.0.0.1” when executed ssh localhost
问题描述:
在Win7下Cygwin中,使用ssh localhost命令,出现Connection closed by 127.0.0.1的问题。
在google上看到cygwin的一个官方mail问答。参考Installing the Cygwin SSH daemon 。问题关键就是一个特殊的权限问题,在SYSTEM账户下运行的sshd服务需要有改变user id的特权(关于权限的问题,在cygwin的/usr/share/doc/Cygwin/openssh.README 中已经说得很明确了:2003 Server has a funny new feature. When starting services under SYSTEM account, these services have nearly all user rights which SYSTEM holds...except for the "Create a token object" right, which is needed to allow public key authentication :-( )。所以事件日志会有seteuid的错误。
解决方案一:就是让cygwin帮你创建两个特殊用户sshd和cyg_server,其中sshd服务在cyg_server用户下运行,cyg_server有相应的权限(在/usr/share/doc/Cygwin/openssh.README 中也有说明)。
***** 关键的就是这两个用户都要创建。
在配置的时候注意一下几点:
1.当屏幕显示关于“privilege seperation”,输入yes后回车;
当屏幕显示关于“create local user sshd”,输入yes后回车;
*** Query: Should privilege separation be used? (yes/no) yes #输入yes
*** Info: Updating /etc/sshd_config file
*** Warning: The following functions require administrator privileges!
*** Query: Do you want to install sshd as a service?
*** Query: (Say "no" if it is already installed as a service) (yes/no) yes #输入yes
*** Info: Note that the CYGWIN variable must contain at least "ntsec"
*** Info: for sshd to be able to change user context without password.
*** Query: Enter the value of CYGWIN for the daemon: []
*** Info: On Windows Server 2003, Windows Vista, and above, the
设置的 cyg_server密码要记清楚,在win的服务里面用这个用户启动ssh服务,密码和这里设置的要一样
2. ssh-host-config重新配置
如果初始配置错误,大部分网上都建议全部删除再重新安装,但cygwin一旦安装很难完全卸载,只需要把ssh服务停止再重新执行这个命令,再把之前的覆盖掉就可以。
步骤:1.sc delete sshd
2.系统重启,就再配置就ok了
3.ssh-host-config关键最后两个输入
*** Info: This script plans to use 'cyg_server'.
*** Info: 'cyg_server' will only be used by registered services.
*** Query: Do you want to use a different name? (yes/no) no
*** Query: Create new privileged user account 'cyg_server'? (yes/no) yes
*** Info: Please enter a password for new user cyg_server. Please be sure
*** Info: that this password matches the password rules given on your system.
*** Info: Entering no password will exit the configuration.
*** Query: Please enter the password:
*** Query: Reenter:
解决方案二:
1、开始——运行——services.msc
2、右键CYGWIN sshd——属性——登录选项卡——选择“此账户”——浏览——高级——立即查找——选择你的账户名(必须为管理员权限)——输入密码(必须要有,空密码不接受)——确定。
3、重启CYGWIN sshd服务即可。
这样就以你的账户的名义启动了这个服务。而后ssh localhost成功。
Windows 平台下安装Cygwin后,sshd服务无法启动
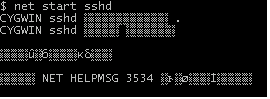
系统日志记录信息:
事件 ID ( 0 )的描述(在资源( sshd )中)无法找到。本地计算机可能没有必要的注册信息或消息 DLL 文件来从远程计算机显示消息。您可能可以使用 /AUXSOURCE= 标识来检索词描述;查看帮助和支持以了解详细信息。下列信息是事件的一部分: sshd: PID 7340: `sshd' service stopped, exit status: 255.
重新配置sshd服务
解决方案:
按上图配置命令的提示说明,需要执行mkpasswd 和 mkgroup重新生成权限信息
依次执行下面命令
$ mkpasswd -l > /etc/passwd
$ mkgroup -l > /etc/group
########## 如何解决启动过程中乱码问题,不支持中文 ###########
#######################################################
使用ls可以正常查看中文格式的文件名,但是在执行net start sshd的时候就出现以下情况:
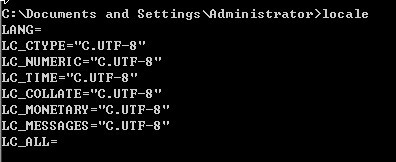
查看系统编码:
查看cygwin的编码:
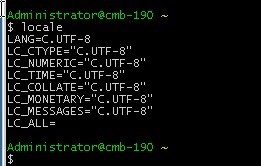
更改一下cygwin的编码格式就ok了~

再次启动就可以正常显示了: