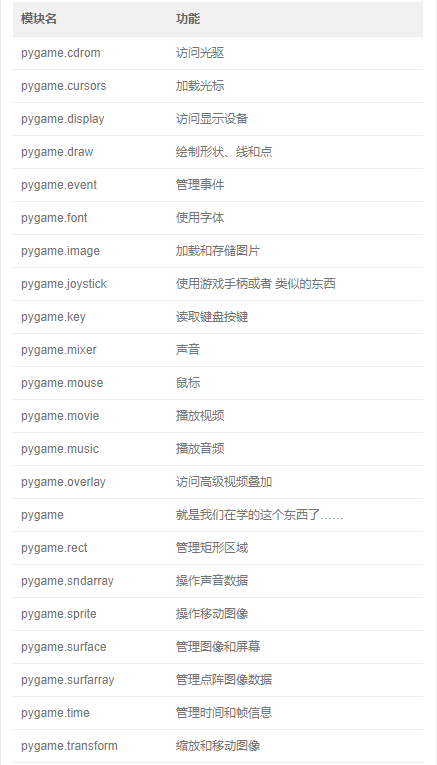
pygame模块概览

pygame的详细使用
- 初始化pygame
pygame.init()
- 创建窗口
# set_mode((width, height)),单位是像素
screen = pygame.display.set_mode((1200, 800))
-
设置填充颜色
颜色值(是由计算机的三原色组成–>红、绿、蓝),简称RGB。我们能使用的所有的颜色都可以通过RGB值来表示。
RGB值的表示方式:
a. (red值, green值, blue值)值都是数字:0-255。(255, 0, 0)–>红色;(255, 255, 255)–>白色
b.十六进制的RGB值。#ff0000 --> 红色;#000000 -->黑色;#00ff00 --> 绿色


# 设置填充颜色为灰色
screen.fill((230, 230, 230))
进行鼠标与窗口的互动
- 打开窗口的固定格式
import pygame

def main():
    # 初始化
    pygame.int=it()
    #创建窗口
    screen = pygame.display.set_mode((600, 400))

    pygame.display.flip()
- 与键盘鼠标相关的操作
## 所有与鼠标键盘相关的操作一定要放在循环里。


while True:
    # 获取事件
    for event in pygame.event.get():
        # 1.点关闭按钮对应的事件
        if event.type == pygame.QUIT:
            exit()

        # 2.鼠标按下对应的事件
        if event.type == pygame.MOUSEBUTTONDOWN:
            # 获取鼠标按下的坐标
            print(event.pos)
            print('鼠标按下')

        if event.type == pygame.MOUSEBUTTONUP:
            # 获取鼠标按下后弹起的坐标
            print(event.pos)
            print('鼠标按下弹起')

        if event.type == pygame.MOUSEMOTION:
            # 鼠标移动过程中对应的点的坐标
            # print(event.pos)
            # print('鼠标移动')
            pass

        # 3.键盘相关的事件
        if event.type == pygame.KEYDOWN:
            print(chr(event.key))
            print('键盘按钮按下'if chr(event.key) == 'ē':
                print('右')

        if event.type == pygame.KEYUP:
            print(chr(event.key))
            print('键盘按钮按下弹起来')

#这句话与模块首的main函数相对应,是用来测试这个模块是否被调用的。专业程序员一般都会写这个函数,用于对模块进行规范。
if __name__ == '__main__':
    main()
显示图片
- 显示图片的固定格式
import pygame
# 初始化
pygame.init()

# 创建窗口
screen = pygame.display.set_mode((600, 400))
print(type(screen))
screen.fill((255, 255, 255))
- 创建一个图片对象(surface)
image = pygame.image.load('images/ship.bmp')
- 获取图片大小
格式:(width, height) = 图片对象.get_size()


size = image.get_size()
print(size)
- 对图片进行缩放
将指定的图片,变成指定大小,返回一个新的图片对象。
格式:pygame.transform.scale(图片对象, (wigth, height))


image1 = pygame.transform.scale(image, (600, 400))
- 对图片进行旋转
格式:pygame.transform.rotozoom(图片对象, 旋转角度, 缩放倍数)


image3 = pygame.transform.rotozoom(image, 0, 2)
- 将图片对象添加到窗口对象中
格式:screen.blit(图片对象, 坐标)
坐标可以是图片对象的外接矩形


creen.blit(image3, (0, 0))
- 显示在屏幕上
# 不再是 pygame.display.flip()
pygame.display.update()
显示文字
- 创建文字对象
pygame.font.SysFont(系统字体名, 字体大小)
pygame.font.Font(字体文件路径, 字体大小)


font1 = pygame.font.SysFont('Times', 20)
font2 = pygame.font.Font('files/aa.ttf', 40)
- 根据文体创建文字对象
格式:font.render(文字, 是否平滑, 文字颜色)


title = '根据字体创建文字对象'
text = font.render(title, True, (255, 0, 0))
- 将文字对象添加到窗口上
screen.blit(text, (100, 0))
显示图形
- 画线
第一种:pygame.draw.line(外观对象, 线颜色, 起点, 终点, 线宽)
第二种:pygame.draw.lines(外观对象, 线颜色, 是否闭合, 点的列表, 线宽)
第三个参数:False --> 不闭合;True --> 闭合


pygame.draw.lines(screen, (255, 0, 0), True, [(300, 50), (150, 180), (200, 120), (330, 200)], 3)
- 画矩形
格式:pygame.draw.rect(外观对象, color, Rect, width)
Rect:位置及大小 --> (x, y, width, height)
width:为0就会填充矩形

pygame.draw.rect(screen, (0, 255, 0), (10, 10, 200, 150), 0)
- 画弧线
格式:pygame.draw.arc(外观对象, 颜色, 范围, 起始角度, 终止角度, 线宽


from math import pi
pygame.draw.arc(screen, (255, 255, 0), (10, 200, 200, 200), pi/2, pi, 3)
显示动态效果
import pygame

    def main():
        # 游戏初始化
        pygame.init()
        screen = pygame.display.set_mode((600, 400))
        screen.fill((255, 255, 255))
        pygame.display.flip()


        x = 100
        y = 100

        names = ['张三', '李四', '王五', '骆昊', '王海飞', '肖世荣']
        index = 0

        # 游戏循环
        while True:
            # 事件获取
            for event in pygame.event.get():
                if event.type == pygame.QUIT:
                    exit()


            pygame.time.delay(100)
            # screen.fill((255, 255, 255))
            pygame.draw.rect(screen, (255, 255, 0),(200, 200, 100, 50))
            # 获取文字
            font = pygame.font.Font('./files/aa.ttf', 30)
            text = font.render(names[index], True, (0, 0, 0))
            screen.blit(text, (200, 200))
            pygame.display.flip()

            # 获取下一个文字下标
            index += 1
            if index >= len(names):
                index = 0

    if __name__ == '__main__':
        main()
# 延迟操作

# delay(时间) ,时间单位是毫秒
pygame.time.delay(100)
# 覆盖之前画的内容
screen.fill((255, 255, 255))
# 画圆
pygame.draw.circle(screen, (0, 255, 0), (x, y), 50)
x += 5
y += 5
pygame.display.flip()
制作一个按钮
import pygame

    def creat_button(screen, bg_color, text_color):
        # 清空前面画的
        pygame.draw.rect(screen, (255, 255, 255), (100, 100, 150, 70))
        # 画矩形
        pygame.draw.rect(screen, bg_color,(100, 100, 150, 70))

        # 画文字
        font = pygame.font.Font('./files/aa.ttf', 30)
        text = font.render('开 始', True, text_color)
        screen.blit(text, (140, 120))

        pygame.display.flip()

    def main():
        # 游戏界面初始化
        pygame.init()
        screen = pygame.display.set_mode((600, 400))
        screen.fill((255, 255, 255))

        # 显示一个按钮
        creat_button(screen, (0, 255, 0), (100, 100, 100))

        pygame.display.flip()

        while True:
            # 获取事件
            for event in pygame.event.get():
                # 1.点关闭按钮对应的事件
                if event.type == pygame.QUIT:
                    exit()

                # 2.鼠标按下对应的事件(确定反应范围)
                if event.type == pygame.MOUSEBUTTONDOWN:
                    x, y = event.pos
                    if 100<x<100+150 and 100<y<100+70:
                        creat_button(screen, (0, 150, 0), (255, 0, 0))

                if event.type == pygame.MOUSEBUTTONUP:
                    creat_button(screen, (0, 255, 0), (100, 100, 100))

                if event.type == pygame.MOUSEMOTION:
                    # 鼠标移动过程中对应的点的坐标
                    # print(event.pos)
                    # print('鼠标移动')
                    pass


    if __name__ == '__main__':
        main()