asyncio库
参考文章
asyncio库是python3.4后引入的标准库,其中直接内置了对异步IO的支持,asyncio的编程模型就是一个消息循环,我们直接从asyncio中获取一个eventloop,然后把需要运行的协程扔到eventloop这个消息循环中,就实现了异步操作,下面是使用asyncio异步实现helloworld的过程(这是在async/await 语法糖没出来之前的写法,可能看起来有点复杂)
import asyncio

# 使用装饰器 将一个生成器变成协程
@asyncio.coroutine
def hello():
    print("hello world")
    # 这里的asyncio.sleep()就是在模拟IO操作
    r = yield from asyncio.sleep(1)
    print("hello again")

if __name__ == "__main__":
    #获取事件循环
    loop = asyncio.get_event_loop()
    #执行异步操作
    loop.run_until_complete(hello())
    #关闭事件池
    loop.close()
上面一段代码其实并没有进行异步操作,但是可以进行,我们向事件池中推入两个hello()封装的tasks列表,就是在进行异步操作了,
import asyncio
@asyncio.coroutine
def hello():
	print("hello world")
	r = yield from asyncio.sleep(1)
	print("hello again")

loop = asyncio.get_event_loop()
tasks = [hello(), hello()]
loop.run_until_complete(asyncio.wait(tasks))
loop.close()
这是执行结果
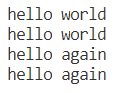
很明显,第二个hello函数没有等第一个函数返回hello again就开始返回hello world这说明我们的异步操作成功了
但是可以看到,上述关于封装成协程类的操作有一些复杂,在python3.5中引入了async/await这一语法糖,于是我们的代码可以简化为
import asyncio

async def hello():
	print("hello world")
	r = await asyncio.sleep(1)
	print("hello again")

loop = asyncio.get_event_loop()
tasks = [hello(), hello()]
loop.run_until_complete(asyncio.wait(tasks))
loop.close()