说到web前端框架,extjs绝对算是非常优秀的一个。
extjs中,两个方法很像,renderTo和applyTo,我在网上也搜了很多相关的内容,在这里举例为大家进行区分,欢迎大家交流指正。
主要区分内容:比较renderTo和applyTo在显示和渲染生成代码上的异同。
使用方法:使用嵌套的div层,分别用renderTo和applyTo方法进行渲染。
js代码:
<script type="text/javascript">
        Ext.onReady(function () {
            var button1 = new Ext.Button({
                renderTo: 'top',
                text: 'top'
            });
            var button2 = new Ext.Button({
                applyTo: 'center',
                text: 'center'
            });
            var button3 = new Ext.Button({
                applyTo: 'bottom1',
                text: 'bottom1'
            });
        })
    </script>
HTML代码:
<body>
    <div id="top" style=" background-color:red; 100px;height:100px; ">top</div>
    <div id="center" style=" background-color:Blue; 100px;height:100px; ">center</div>
    <div id="bottom" style=" background-color:Green; 100px;height:100px; " >bottom
        <div id="bottom1" style="background-color:Yellow; 60px;height:20px;">bottom1</div>
        <div id="bottom2" style="background-color:Orange;60px;height:20px;">bottom2</div>
    </div>
</body>
网页效果:
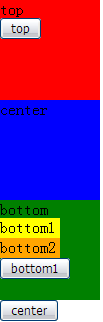
简单总结:
由生成的效果我们可以看出:
1.renderTo生成的控件,是在指定的节点下生成,并且顺序排列在此节点内所有的元素之后。
2.applyTo生成的控件,是在指定的节点的父节点下生成,并且顺序排列在此节点的父节点所有元素之后。
代码验证:
生成的页面代码:
<body class=" ext-safari" id="ext-gen13"> <div id="top" style=" background-color:red; 100px;height:100px; ">top <table border="0" cellpadding="0" cellspacing="0" class="x-btn-wrap x-btn" id="ext-comp-1001" style=" auto;"> <tbody> <tr> <td class="x-btn-left"><i> </i></td><td class="x-btn-center"> <em unselectable="on"><button class="x-btn-text" type="button" id="ext-gen7">top</button></em> </td><td class="x-btn-right"><i> </i></td> </tr> </tbody> </table> </div> <div id="center" style=" background-color:Blue; 100px;height:100px; ">center</div> <div id="bottom" style=" background-color:Green; 100px;height:100px; ">bottom <div id="bottom1" style="background-color:Yellow; 60px;height:20px;">bottom1</div> <div id="bottom2" style="background-color:Orange;60px;height:20px;">bottom2</div> <table border="0" cellpadding="0" cellspacing="0" class="x-btn-wrap x-btn" id="ext-comp-1003" style=" auto;"> <tbody> <tr> <td class="x-btn-left"><i> </i></td><td class="x-btn-center"> <em unselectable="on"><button class="x-btn-text" type="button" id="ext-gen22">bottom1</button></em> </td><td class="x-btn-right"><i> </i></td> </tr> </tbody> </table> </div> <table border="0" cellpadding="0" cellspacing="0" class="x-btn-wrap x-btn" id="ext-comp-1002" style=" auto;"> <tbody> <tr> <td class="x-btn-left"><i> </i></td><td class="x-btn-center"> <em unselectable="on"><button class="x-btn-text" type="button" id="ext-gen15">center</button></em> </td><td class="x-btn-right"><i> </i></td> </tr> </tbody> </table> </body>