一、Spring的相关配置
1.1 Bean元素
- class属性:被管理对象的完整类名
- name属性:给Bean起个名字,能重复,能使用特殊字符.后来属性
- id属性:给Bean起个名字,不能重复,不能使用特殊字符.早期属性
- scope属性
- singleton:默认值,单例对象.项目一启动就创建对象,而且容器只创建一次
- prototype:多例原型.被标识为多例的对象,每次在获得才会创建.每次创建都是新的对象(整合struts2时,ActionBean必须配置为多例的.)
- request(了解):web项目中,Spring创建一个Bean的对象,将对象存入到request域中。.对象与request生命周期一致.
- session(了解):web项目中,Spring创建一个Bean的对象,将对象存入到session域中。,对象与session生命周期一致.
- 生命周期属性(了解)
- init-method:指出初始化方法,spring会在对象创建之后立即调用
- destory-method:指出销毁方法,spring在关闭并销毁所有容器中的对象之前调用.
1.2 spring创建对象的方式
【方式一:无参数的构造方法】

spring容器启动后就创建User对象。如果对象中提供了带参构造,而没有提供无参构造,这样讲无法创建对象,程序会报错:
警告: Exception encountered during context initialization - cancelling refresh attempt: org.springframework.beans.factory.BeanCreationException: Error creating bean with name 'user' defined in class path resource [applicationContext.xml]: Instantiation of bean failed; nested exception is org.springframework.beans.BeanInstantiationException: Failed to instantiate [cn.itcast.domain.User]: No default constructor found; nested exception is java.lang.NoSuchMethodException: cn.itcast.domain.User.<init>()
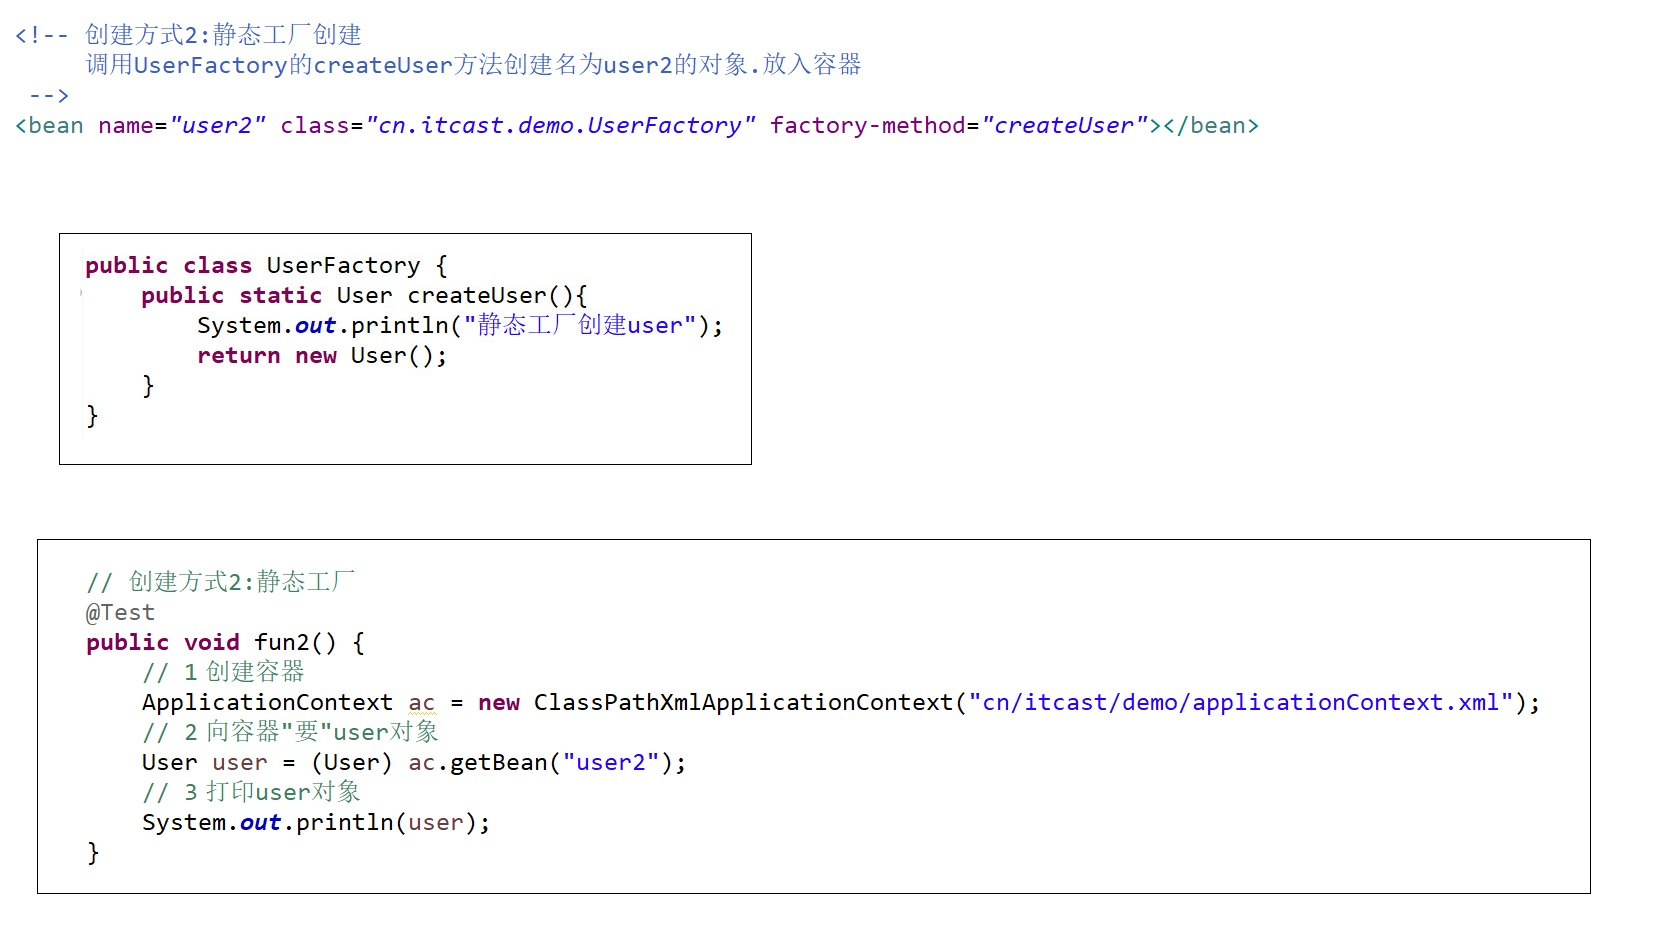
【方式二:静态工厂创建】(了解)
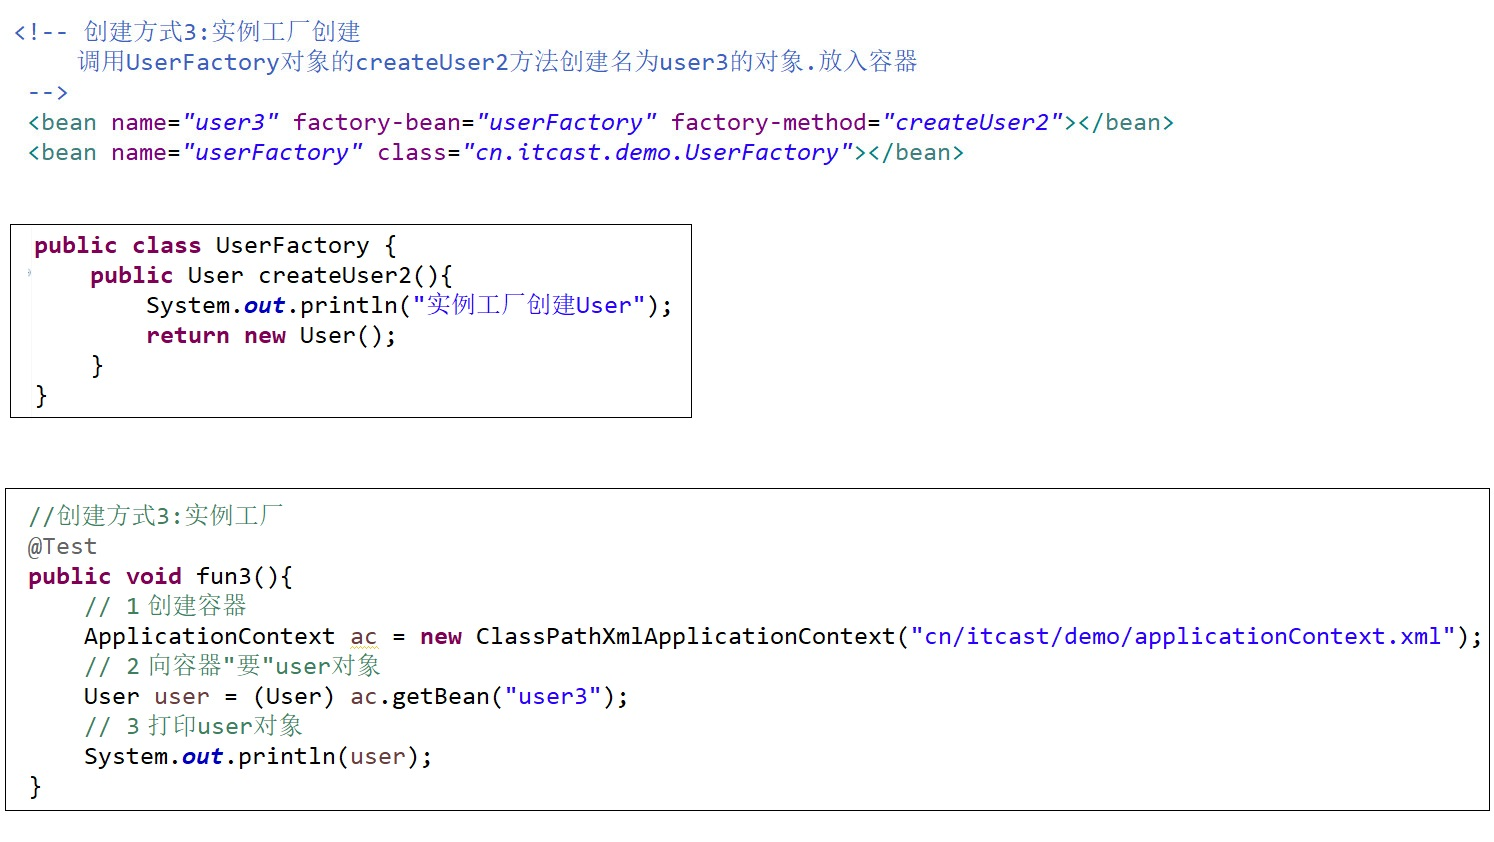
【方式三:实例工厂创建】(了解)
1.3 Spring的分模块配置
<!-- 导入其他spring配置文件 -->
<import resource="cn/itcast/demo/applicationContext.xml"/>
1.4 管理容器在项目中的生命周期
【让spring容器随项目的启动而创建,随项目的关闭而销毁】
在web.xml中配置
<!-- 可以让spring容器随项目的启动而创建,随项目的关闭而销毁 -->
<listener>
    <!-- 注意:引入此类前,要导入spring-web-4.2.4.RELEASE.jar -->
    <listener-class>org.springframework.web.context.ContextLoaderListener</listener-class>
</listener>
<!-- 指定加载spring配置文件的位置 -->
<context-param>
    <param-name>contextConfigLocation</param-name>
    <param-value>classpath:applicationContext.xml</param-value>
</context-param>
【在Action中获得容器中的Service对象】
  public String execute() throws Exception {
        // 获得spring容器=>从Application域获得即可
        // 1.获得servletContext对象
        ServletContext servletContext = ServletActionContext.getServletContext();
        // 2.从servletContext中获得applicationContext容器
        WebApplicationContext applicationContext = WebApplicationContextUtils.getWebApplicationContext(servletContext);
        // 3.从容器中获得CustomerService
        CustomerService service = (CustomerService)applicationContext.getBean("customerService");
        return NONE;
    }
错误示例:(这样会导致每次请求都会创建新的容器)
// 创建容器
ApplicationContext applicationContext = new ClassPathXmlApplicationContext("applicationContext.xml");
CustomerService service = (CustomerService)applicationContext.getBean("customerService");
二、属性注入
2.1 注入方式
【set方法注入】
<!-- set方式注入: -->
<bean  name="user" class="cn.itcast.bean.User" >
    <!--值类型注入: 为User对象中名为name的属性注入tom作为值 -->
    <property name="name" value="tom" ></property>
    <property name="age"  value="18" ></property>
    <!-- 引用类型注入: 为car属性注入下方配置的car对象 -->
    <property name="car"  ref="car" ></property>
</bean>

<!-- 将car对象配置到容器中 -->
<bean name="car" class="cn.itcast.bean.Car" >
    <property name="name" value="兰博基尼" ></property>
    <property name="color" value="黄色" ></property>
</bean>
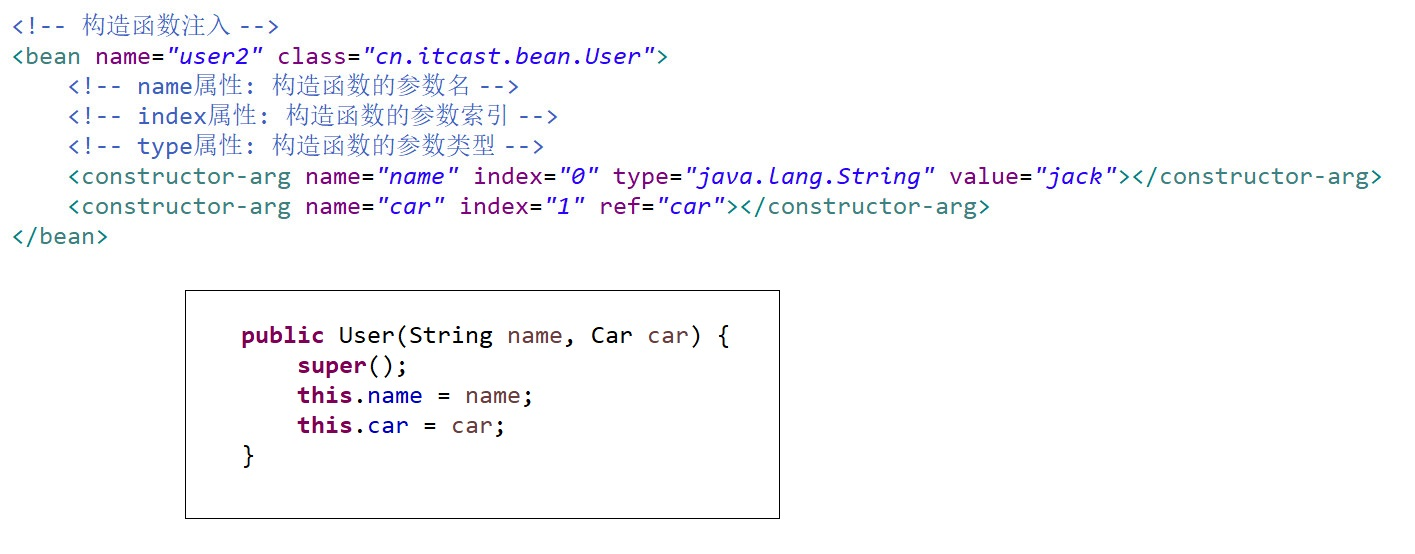
【构造函数注入】
【p名称空间注入】(了解)
<?xml version="1.0" encoding="UTF-8"?>
<beans xmlns:xsi="http://www.w3.org/2001/XMLSchema-instance"
        xmlns="http://www.springframework.org/schema/beans"
        xmlns:p="http://www.springframework.org/schema/p"
         xsi:schemaLocation="http://www.springframework.org/schema/beans http://www.springframework.org/schema/beans/spring-beans-4.2.xsd ">

<!-- p名称空间注入, 走set方法
    1.导入P名称空间  xmlns:p="http://www.springframework.org/schema/p"
    2.使用p:属性完成注入
        |-值类型: p:属性名="值"
        |-对象类型: p:属性名-ref="bean名称"
 -->
    <bean  name="user3" class="cn.itcast.bean.User" p:name="jack" p:age="20" p:car-ref="car"  >    </bean>
</beans>
【spel注入】(了解)
<!--
    spel注入: spring Expression Language sping表达式语言
 -->
<bean  name="user4" class="cn.itcast.bean.User" >
        <property name="name" value="#{user.name}" ></property>
        <property name="age" value="#{user3.age}" ></property>
        <property name="car" ref="car" ></property>
</bean>
2.2 复杂类型的注入
【数组】
<!-- 复杂类型注入 -->
<bean name="cb" class="cn.itcast.c_injection.CollectionBean" >
    <!-- 如果数组中只准备注入一个值(对象),直接使用value|ref即可
    <property name="arr" value="tom" ></property>
    -->
    <!-- array注入,多个元素注入 -->
    <property name="arr">
        <array>
            <value>tom</value>
            <value>jerry</value>
            <ref bean="user4" />
        </array>
    </property>
</bean>
【list】
<bean name="cb" class="cn.itcast.c_injection.CollectionBean" >
    <!-- 如果List中只准备注入一个值(对象),直接使用value|ref即可
    <property name="list" value="jack" ></property>-->
    <property name="list"  >
        <list>
            <value>jack</value>
            <value>rose</value>
            <ref bean="user3" />
        </list>
    </property>
</bean>
【map】
<bean name="cb" class="cn.itcast.c_injection.CollectionBean" >
    <!-- map类型注入 -->
    <property name="map"  >
        <map>
            <entry key="url" value="jdbc:mysql:///crm" ></entry>
            <entry key="user" value-ref="user4"  ></entry>
            <entry key-ref="user3" value-ref="user2"  ></entry>
        </map>
    </property>
</bean>
【Properties】
<!-- prperties 类型注入 -->
<property name="prop"  >
    <props>
        <prop key="driverClass">com.jdbc.mysql.Driver</prop>
        <prop key="userName">root</prop>
        <prop key="password">1234</prop>
    </props>
</property>
三、spring与Junit整合测试
首先要导入Junit测试包:![]()
测试代码如下:
// 帮我们创建容器
@RunWith(SpringJUnit4ClassRunner.class)
// 指定创建容器时使用哪个配置文件
@ContextConfiguration("classpath:applicationContext.xml")
public class Demo {
    // 将名为user的对象注入到user变量中
    @Resource(name="user")
    private User user;

    @Test
    public void fun1() throws Exception {
        // 1.创建容器对象
        // ApplicationContext applicationContext = new ClassPathXmlApplicationContext("applicationContext.xml");
        // 2.向容器"要"user对象
        // User user = (User) applicationContext.getBean("user");
        // 3.打印user对象
        System.out.println(user);
    }
}