问题
在调用WEBSERVICE时,可以使用wsdl2java生成java代码,调用接口,这种方法在接口固定的情况下是一种不错的选择,如果需要动态调用接口,那么这样就行不通了。
解决办法
1.直接构建soap包进行调用。
2.使用AXIS2包进行调用,下面代码就是使用的这种方式。
测试代码
package wsclient;

import javax.xml.namespace.QName;

import org.apache.axiom.om.OMAbstractFactory;
import org.apache.axiom.om.OMElement;
import org.apache.axiom.om.OMFactory;
import org.apache.axiom.om.OMNamespace;
import org.apache.axis2.AxisFault;
import org.apache.axis2.addressing.EndpointReference;
import org.apache.axis2.client.Options;
import org.apache.axis2.client.ServiceClient;

public class Demo {


    private static void axis2WebService() {
        try {
            String soapBindingAddress = "http://localhost/x5/service/helloWorld?wsdl";
            ServiceClient sender = new ServiceClient();
            EndpointReference endpointReference = new EndpointReference(soapBindingAddress);
            Options options = new Options();

            options.setTo(endpointReference);
            sender.setOptions(options);
            OMFactory fac = OMAbstractFactory.getOMFactory();
            // 这个和qname差不多,设置命名空间
            OMNamespace omNs = fac.createOMNamespace("http://impl.webservice.platform.hotent.com/",  "svc");
            OMElement data = fac.createOMElement("sayHello", omNs);
            // 对应参数的节点
            String[] strs = new String[] { "arg0" };
            // 参数值
            String[] val = new String[] { "zhangyg" };
            for (int i = 0; i < strs.length; i++) {
                QName qname=new QName(strs[i]);
                OMElement inner = fac.createOMElement(qname);
                inner.setText(val[i]);
                data.addChild(inner);
            }
            // 发送数据,返回结果
            OMElement result = sender.sendReceive(data);
            System.out.println(result.toString());
        } catch (AxisFault ex) {
            ex.printStackTrace();
        }

    }
    public static void main(String[] args) {
        axis2WebService();
    }
}
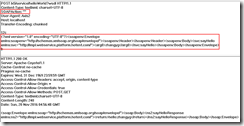
在测试的时候也遇到了不少问题,使用tcptrace 工具来监控发送和接收的soap包。
构建出和soapui一致的请求包。
我精简了一下jar包,以下是最少需要的jar包。
这些包来自AXIS2 1.7.4 包。

