出处:https://home.cnblogs.com/u/yhr520/
本文版权归作者和博客园共有,欢迎转载,但必须给出原文链接,并保留此段声明,否则保留追究法律责任的权利。
Java基于TCP协议的编程
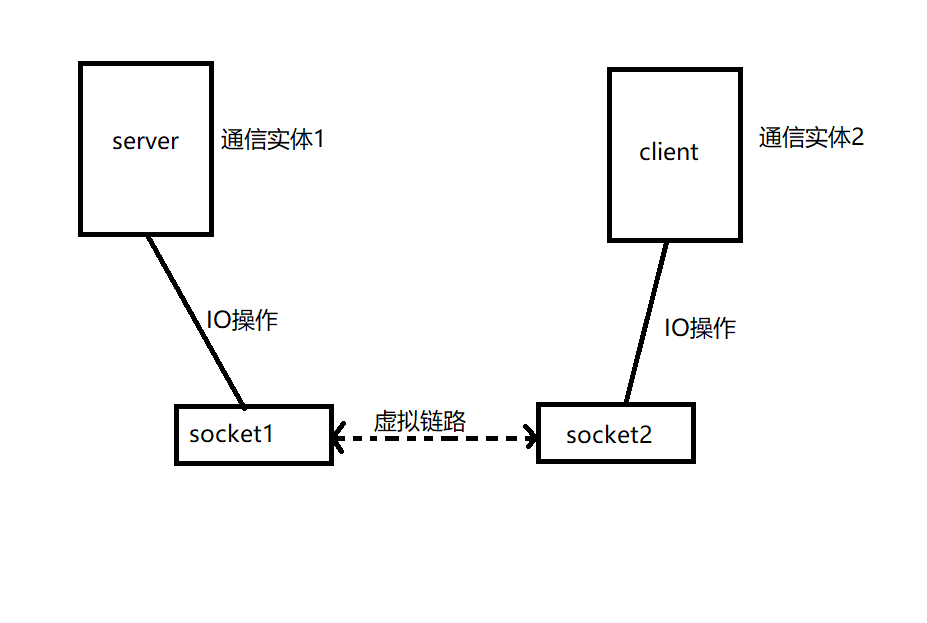
TCP/IP通信协议是一种可靠的网络协议,它在通信的两端各建立一个Socket,从而在通信的两端之间形成网络虚拟链路。一旦建立了虚拟的网络链路,两端的程序就可以通过虚拟链路进行通信。Java对基于TCP协议的网络通信提供了良好的封装,Java使用Socket对象来代表两端的通信端口,并通过Socket产生IO流来进行网络通信。
一、TCP协议基础
IP协议是Internet上使用的一个关键协议,它的全称是Internet Protocol,即Internet协议,通常简称IP协议。通过使用IP协议,从而使Internet成为一个允许连接不同类型的计算机和不同操作系统的网络。要使两台计算机彼此能进行通信,必须使两台计算机使用同一种“语言”,IP协议只保证计算机能发送和接收分组数据。IP协议负责将消息从一个主机传送到另一个主机,消息在传送的过程中被分割成一个个的小包。尽管计算机通过安装IP软件,保证了计算机之间可以发送和接收数据,但IP协议还不能解决数据分组在传输过程中可能出现的问题。因此,若要解决可能出现的问题,连上Internet的计算机还需要安装TCP协议来提供可靠并且无差错的通信服务。
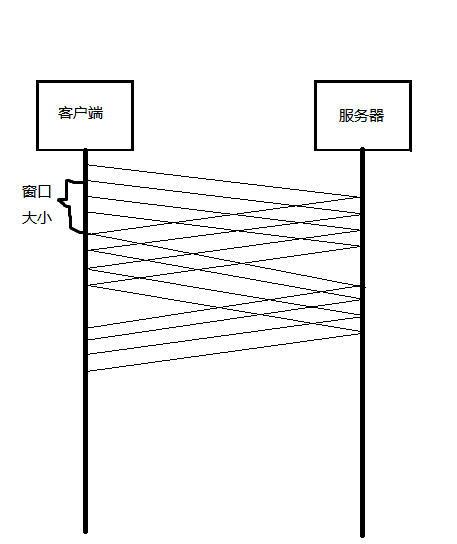
TCP协议被称作一种端对端协议。这是因为它对两台计算机之间的连接起了重要作用——当一台计算机需要与另一台远程计算机连接时,TCP协议会让它们建立一个连接:用于发送和接收数据的虚拟链路。TCP协议负责收集这些信息包,并将其按适当的次序放好传送,接收端收到后再将其正确地还原。TCP协议保证了数据包在传送中准确无误。TCP协议使用重发机制——当一个通信实体发送一个消息给另一个通信实体后,需要收到另一个通信实体的确认信息,如果没有收到另一个通信实体的确认信息,则会再次重发刚才发送的信息。通过这种重发机制,TCP协议向应用程序提供了可靠的通信连接,使它能够自动适应网上的各种变化。即使在Internet暂时出现堵塞的情况下,TCP也能够保证通信的可靠性。
下图显示了TCP协议控制两个通信实体互相通信:
综上所述,虽然IP和TCP这两个协议的功能不尽相同,也可以分开单独使用,但它们是在同一时期作为一个协议来设计的,并且在功能上也是互补的。只有两者结合起来,才能保证Internet在复杂的环境下正常运行。凡是要连接到Internet的计算机,都必须同时安装和使用这两个协议,因此在实际中常把这两个协议统称为TCP/IP协议。
二、Socket通信
2.1 使用ServerSocket创建TCP服务器端
在两个通信实体没有建立虚拟链路之前,必须有一个通信实体先做出“主动姿态”,主动接收来自其他通信实体的连接请求。Java中能接收其他通信实体连接请求的类是ServerSocket,ServerSocket对象用于监听来自客户端的Socket连接,如果没有连接,它将一直处于等待状态。ServerSocket包含一个监听来自客户端连接请求的方法。
Socket accept():如果接收到一个客户端Socket的请求连接,改方法将返回一个与客户端Socket对应的Socket;否则该方法将一直处于等待状态,线程也被阻塞
为了创建ServerSocket对象,ServerSocket类提供了如下几个构造器:
ServerSocket(int port)://用指定的端口port来创建一个ServerSocket。该端口应该有一个有效的端口整数值即0-65535
ServerSocket(int port,int backlog)://增加一个用来改变连接队列长度的参数backlog
ServerSocket(int port,int backlog,InetAddress localAddr)://在机器存在多个IP地址的情况下,允许通过localAddr参数来指定将ServerSocket绑定到指定的IP地址
当ServerSocket使用完毕后,应使用ServerSocket的close()方法来关闭该ServerSocket。
在通常情况下,服务器不应该只接收一个客户端请求,而应该不断地接收来自客户端的所有请求,所以Java程序通常会通过循环不断地调用ServerSocket的accept()方法。
ServerSocket ss = new ServerSocket(30000);
while(true){
    //每接收到Socket请求时服务器端也产生一个Socket
    Socket s =ss.accept();
    //使用Socket通信
}
//上面程序中创建ServerSocket没有指定IP地址,则该ServerSocket将会绑定到本机默认的IP地址
2.2 使用Socket进行通信
客户端通常可以使用Socket的构造器来连接到指定服务器,Socket通常可以使用如下两个构造器。
Socket(InetAddress/String remoteAddress,int port)://创建连接到指定远程主机、远程端口的Socket,该构造器没有指定本地地址、本地端口,默认使用本地主机的默认IP地址,默认使用系统动态分配的端口
Socket(InetAddress/String remoteAddress,int port,InetAddress localAddr,int localPort):://创建连接到指定远程主机、远程端口的Socket,并指定本地IP地址和本地端口,适用于本地主机有多个IP地址的情形。
上面两个构造器中指定远程主机时既可使用InetAddress来指定,也可直接使用String对象来指定,但程序通常使用String对象(如192.168.2.23)来指定远程IP地址。当本地主机只有一个IP地址时,使用第一个方法更为简单。
Socket s = new Socket("127.0.0.1",30000);
当客户端、服务器端产生了对应的Socket之后,就得到了如上面的图片所示的通信示意图,程序无须再区分服务器端、客户端,而是通过各自的Socket进行通信。Socket提供了如下两个方法来获取输入流和输出流:
InputStream getInputStream()://返回该Socket对象对应的输入流,让程序通过该输入流从Socket中取出数据。
OutputStream getOutputStream()://返回该Socket对象对应的输出流,让程序通过该输出流向Socket中输出数据。
例子:建立ServerSocket监听,并使用Socket获取输出流输出
Server
public class ServerTest {
    public static void main(String[] args) throws IOException {
        //创建一个ServerSocket用于监听客户端Socket的连接请求
        ServerSocket ss = new ServerSocket(30000);
        while(true){
            Socket s = ss.accept();
            PrintStream ps = new PrintStream(s.getOutputStream());
            ps.println("恭喜你接收到了服务器的信息");
            ps.close();
            s.close();
        }
    }
}
Client
public class ClientTest {
    public static void main(String[] args) throws IOException {
        Socket socket = new Socket("127.0.0.1",30000);
        BufferedReader br = new BufferedReader(new InputStreamReader(socket.getInputStream()));
        String line = br.readLine();
        System.out.println("来自服务器的数据:"+line);
        br.close();
        socket.close();
    }
}
在实际应用中,程序可能不想让执行网络连接、读取服务器数据的进程一直阻塞,而是希望当网络连接、读取操作超过合理时间之后,系统自动认为该操作失败,这个合理时间就是超时时长。Socket对象提供了一个setSoTimeout(int timeout)方法来设置超时时长。如下代码片段所示:
Socket s = new Socket("127.0.0.1",30000);
s.setSoTimeout(10000);
//让该SOcket连接到远程服务器,
s.connect(new InetAddress(host,port),10000);
当我们为Socket对象指定了超时时长之后,如果在使用Socket进行读、写操作完成之前超出了该时间限制,那么这些方法就会抛出SocketTimeoutException异常
2.3 加入多线程
实际应用中的客户端则可能需要和服务器端保持长时间通信,即服务器端需要不断地读取客户端数据,并向客户端写入数据;客户端也需要不断地读取服务器端数据,并向服务器端写入数据。当我们使用传统BufferedReader的readLine()方法读取数据时,在该方法成功返回之前,线程被阻塞,程序无法继续执行。考虑到这个原因,服务器端应该为每个Socket单独启动一个线程,每个线程负责与一个客户端进行通信。客户端读取服务器端数据的线程同样会被阻塞,所以系统应该单独启动一个线程,该线程专门负责读取服务器端数据。
现在考虑实现一个命令行界面的C/S聊天室应用,服务器端应该包含多个线程,每个Socket对应一个线程,该线程负责读取Socket对应输入流的数据(从客户端发送过来的数据),并将读到的数据向每个Socket输出流发送一次(将一个客户端发送的数据“广播”给其他客户端),因此需要在服务器端使用List来保存所有的Socket。
MyServer.java
public class MyServer {
    public static ArrayList<Socket> socketList= new ArrayList<>();

    public static void main(String[] args) throws IOException {
        ServerSocket serverSocket = new ServerSocket(30000);
        while (true){
            //下面这一行代码会一直阻塞等待别人的连接
            Socket socket = serverSocket.accept();
            socketList.add(socket);
            //每当客户端连接后启动一个ServerThread线程为该客户端服务
            new Thread(new ServerThread(socket)).start();
        }
    }
}
ServerThread.java
public class ServerThread implements Runnable {

    Socket s = null;

    BufferedReader br = null;

    public ServerThread(Socket socket) throws IOException {
        this.s =socket;
        br = new BufferedReader(new InputStreamReader(s.getInputStream()));
    }

    private String readFromClient(){
        try {
            return br.readLine();
        } catch (IOException e) {
            //如果捕获到异常,则表明该Socket对应的客户端已经关闭
            MyServer.socketList.remove(s);
            e.printStackTrace();
        }
        return null;
    }

    @Override
    public void run() {
        try {
            String content = null;
            while (( content=readFromClient() ) != null){
                for (Socket sk:MyServer.socketList) {
                    PrintStream ps =new PrintStream(sk.getOutputStream());
                    ps.println(content);
                }
            }
        } catch (IOException e) {
            e.printStackTrace();
        }
    }
}
MyClient.java
public class MyClient {
    public static void main(String[] args) throws IOException {
        Socket socket = new Socket("127.0.0.1",30000);
        //客户端启动ClientThread线程不断地读取来自服务器的数据
        new Thread(new ClientThread(socket)).start();
        //获取该Socket对用的输出流
        PrintStream ps = new PrintStream(socket.getOutputStream());
        String line = null;
        BufferedReader br = new BufferedReader(new InputStreamReader(System.in));
        while ((line=br.readLine())!= null){
            //将用户的键盘输入内容写入Socket对应的输出流
            ps.println(line);
        }
    }
}
ClientThread.java
public class ClientThread implements Runnable {
	//该线程负责处理的Socket
    private Socket socket;
	//该线程处理的Socket输入流
    BufferedReader br = null;

    public ClientThread(Socket socket) throws IOException {
        this.socket=socket;
        br= new BufferedReader(new InputStreamReader(socket.getInputStream()));
    }

    @Override
    public void run() {
        try {
            String content = null;
            while ((content=br.readLine())!=null){
                System.out.println(content);
            }

        }catch (Exception e){
            e.printStackTrace();
        }
    }
}
2.4 记录用户信息
上面程序虽然已经完成了粗略的通信功能,每个客户端可以看到其他客户端发送的信息,但无法知道是哪个客户端发送的信息,这是因为服务器端从未记录过用户信息,当客户端使用Socket连接到服务器端之后,程序只是使用socketList集合保存了服务器端对应生成的Socket,并没有保存该Socket关联的客户信息。
下面程序将考虑使用Map来保存用户状态信息,因为本程序将考虑实现私聊功能,也就是说,一个客户端可以将信息发送给另一个指定客户端。实际上所有的客户端只与服务器端连接,客户端之间并没有互相连接,也就是说,当一个客户端信息发送到服务器端之后,服务器端必须可以判断该信息到底是向所有用户发送,还是向指定用户发送,并需要知道向哪个用户发送。这里需要解决如下两个问题:
- 客户端发送来的信息必须有特殊的标识——让服务器端可以判断是公聊信息,还是私聊信息。
- 如果是私聊信息,客户端会发送该消息的目的用户(私聊对象)给服务器端,服务器端如何将该信息发送给该私聊对象。
为了解决第一个问题,我们可以让客户端在发送不同信息之前,先对这些信息进行适当处理,比如在内容前后添加一些特殊字符——我们把这种特殊字符称为协议字符。本例提供了一个CrazyitProtocol接口,该接口专门用于定义协议字符。
CrazyitProtocol.java
public interface CrazyitProtocol
{
    //定义协议字符串的长度
    int PROTOCOL_LEN = 2;
    //下面是一些协议字符串,服务器和客户端交换的信息
    //都应该在前、后添加这种特殊字符串。
    String MSG_ROUND = "§γ";
    String USER_ROUND = "∏∑";
    String LOGIN_SUCCESS = "1";
    String NAME_REP = "-1";
    String PRIVATE_ROUND = "★【";
    String SPLIT_SIGN = "※";
}
为了解决第二个问题,我们可以考虑使用一个Map来保存聊天室所有用户和对应Socket之间的映射关系——这样服务器端就可以根据用户名来找到对应的Socket。
但实际上本程序并未这么做,程序仅仅是用Map保存了聊天室所有用户名和对应输出流之间的映射关系,因为服务器端只要获取该用户名对应的输出流即可。服务器端提供了一个HashMap的子类,该类不允许value重复,并提供了根据value获取key,根据value删除key等方法。
CrazyitMap.java
package com.socket;

import java.util.HashMap;
import java.util.HashSet;
import java.util.Set;

//拓展HashMap类,CrazyitMap类要求value也不可重复
public class CrazyitMap<K,V> extends HashMap<K,V>{
    //跟据value来删除指定项
    public void removeByValue(Object value){
        for(Object key: keySet()){
           if (get(key)==value){
               remove(key);
               break;
           }
        }
    }

    //获取所有value组成的set集
    public Set<V> valueSet(){
        Set<V> result = new HashSet<V>();
        for (K key:keySet()) {
            result.add(get(key));
        }
        return result;
    }

    //跟据value查找key
    public K getKeyByValue(V value){
        for (K key:keySet()) {
            //如果指定key对应的value与被搜索的相同则返回对应的key
            if (get(key).equals(value)&&get(key)==value){
                return key;
            }
        }
        return null;
    }

    //重写hashMap的put方法,不允许value重复
    public V put(K key,V value){
        for (V val:valueSet()) {
            //如果指定value与试图放入集合的value相同,则抛出一个异常
            if (val.equals(value)&&val.hashCode()==value.hashCode()){
                throw new RuntimeException("不允许重复value");
            }
        }
        return super.put(key,value);
    }
}
服务器端的主类一样只是建立ServerSocket来监听来自客户端Socket的连接请求,但该程序增加了一些异常处理,可能看上去比上一节的程序稍微复杂一点。
Server.java
public class Server {
    private static final int SERVER_PORT=30000;

    //使用CrazyitMap对象来保存每个客户端名字和对应输出流的对应关系
    public static CrazyitMap<String,PrintStream> clients = new CrazyitMap<>();

    public void init(){
        try {
            ServerSocket serverSocket = new ServerSocket(SERVER_PORT);
            while (true){
                //下面这一行代码会一直阻塞等待别人的连接
                Socket socket = serverSocket.accept();
                //每当客户端连接后启动一个ServerThread线程为该客户端服务
                new Thread(new ServerThread(socket)).start();
            }

        }catch (Exception e){
            System.out.println("服务器启动失败,是否端口"+SERVER_PORT+"已被占用");
        }
    }

    public static void main(String[] args) throws IOException {
        Server server =new Server();
        server.init();

    }
}
ServerThread.java
public class ServerThread implements Runnable {

    private Socket socket;

    BufferedReader br = null;

    PrintStream ps =null;

    public ServerThread(Socket socket) throws IOException {
        this.socket =socket;
    }


    @Override
    public void run() {
        try {
            br=new BufferedReader(new InputStreamReader(socket.getInputStream()));
            ps =new PrintStream(socket.getOutputStream());
            String line = null;
            while (( line=br.readLine()) != null){
                //如果读到的行以CrazyProtocol.USER_ROUND开始,并以其结束,
                //则可以确定独到的是用户登录的用户名
                if (line.startsWith(CrazyitProtocol.USER_ROUND)&&line.endsWith(CrazyitProtocol.USER_ROUND)){
                    //得到真实消息
                    String userName = getRealMsg(line);
                    //如果用户名重复
                    if (Server.clients.containsKey(userName)){
                        System.out.println("重复");
                        ps.println(CrazyitProtocol.NAME_REP);
                    }else {
                        System.out.println("成功");
                        ps.println(CrazyitProtocol.LOGIN_SUCCESS);
                        Server.clients.put(userName,ps);
                    }
                }
                //如果读到的行以CrazyProtocol.PRIVATE_ROUND开始,并以其结束,
                //则可以确定是私聊信息,私聊信息只向特定的输出流发送
                else if(line.startsWith(CrazyitProtocol.PRIVATE_ROUND)&&line.endsWith(CrazyitProtocol.PRIVATE_ROUND)){
                    String userAndMsg=getRealMsg(line);
                    //以SPLIT_SIGN分割字符串,前半是私聊用户,后半是聊天信息
                    String user = userAndMsg.split(CrazyitProtocol.SPLIT_SIGN)[0];
                    String msg = userAndMsg.split(CrazyitProtocol.SPLIT_SIGN)[1];
                    //获取私聊用户对应的输出流,并发送私聊信息
                    Server.clients.get(user).println(Server.clients.getKeyByValue(ps)+"悄悄对你说:"+msg);
                }
                //公聊要向每个Socket发送
                else {
                    String msg =getRealMsg(line);
                    //遍历clients中的每个输出流
                    for (PrintStream cps:Server.clients.valueSet()) {
                        cps.println(Server.clients.getKeyByValue(ps)+"说:"+msg);
                    }
                }
            }
            //捕获到异常后,表明Socket对应的客户端已经出现了问题
            //所以程序将其对应的输出流从Map中删除
        } catch (IOException e) {
            Server.clients.removeByValue(ps);
            System.out.println(Server.clients.size());
        }

        try {
            if (br!=null){
                br.close();
            }
            if (ps!=null){
                ps.close();
            }if (socket!=null){
                socket.close();
            }
        } catch (IOException e) {
            e.printStackTrace();
        }
    }

    private String getRealMsg(String line) {
        return line.substring(CrazyitProtocol.PROTOCOL_LEN,line.length()-CrazyitProtocol.PROTOCOL_LEN);
    }

}
Client.java
public class Client {

    private static final int SERVER_PORT=30000;

    private Socket socket;

    private PrintStream ps;

    private BufferedReader brServer;

    private BufferedReader keyIn;

    public void init(){
        try{
            //初始化代表键盘的输入流
            keyIn=new BufferedReader(new InputStreamReader(System.in));
            //连接到服务器端
            socket=new Socket("127.0.0.1",SERVER_PORT);
            ps=new PrintStream(socket.getOutputStream());
            brServer = new BufferedReader(new InputStreamReader(socket.getInputStream()));
            String tip="";
            //采用循环不断地弹出对话框要求输入用户名
            while (true){
                String userName = JOptionPane.showInputDialog(tip+"输入用户名");
                //在用户输入的用户名前后增加协议字符串
                ps.println(CrazyitProtocol.USER_ROUND+userName+CrazyitProtocol.USER_ROUND);
                //读取服务器端的响应
                String result = brServer.readLine();
                //如果用户名重复,则开始下一次循环
                if (result.equals(CrazyitProtocol.NAME_REP)){
                    tip="用户名重复!重新输入";
                    continue;
                }
                //如果服务器端返回登陆成功,则循环结束
                if (result.equals(CrazyitProtocol.LOGIN_SUCCESS)){
                    break;
                }
            }
        } catch (UnknownHostException e) {
            System.out.println("找不到远程服务器,请确定服务器已经启动");
            closeRs();
            System.exit(1);
        }catch (IOException e){
            System.out.println("网络异常,请重新登录");
            closeRs();
            System.exit(1);
        }
        //以Socket对应的输入流启动ClientThread线程

    }
    public static void main(String[] args) throws IOException {

    }

    private void readAndSend(){
        try{
            String line = null;
            while ((line=keyIn.readLine()) !=null){
                //如果发送的信息中有冒号,且以/开头,则认为想发送私聊信息
                if (line.indexOf(":")>0&&line.startsWith("/")){
                    line=line.substring(1);
                    ps.println(CrazyitProtocol.PRIVATE_ROUND+line.split(":")[0]+CrazyitProtocol.PRIVATE_ROUND);
                }else {
                    ps.println(CrazyitProtocol.MSG_ROUND+line+CrazyitProtocol.MSG_ROUND);
                }
            }
        } catch (IOException e) {
            System.out.println("请重新登录");
            closeRs();
            e.printStackTrace();
        }
    }

    private void closeRs(){
        try{
            if (keyIn != null){
                ps.close();
            }
            if (brServer!= null){
                ps.close();
            }
            if (ps!= null){
                ps.close();
            }
            if (socket!= null){
                keyIn.close();
            }
        }catch (IOException e){
            e.printStackTrace();
        }
    }
}
ClientThread.java
public class ClientThread implements Runnable {
    //该线程处理的Socket输入流
    BufferedReader br = null;

    public ClientThread(BufferedReader br) throws IOException {
        this.br=br;
    }

    @Override
    public void run() {
        try {
            String content = null;
            while ((content=br.readLine())!=null){
                System.out.println(content);
                /*  本例仅打印了从服务器端独到的内容。实际上,可以更复杂
                *   如果我们希望客户端能看到聊天室的用户列表,则可以让服务器端在每次由用户登录、用户退出时
                *   将所有的用户列表信息都向客户端发送一遍,为了区分是聊天信息还是用户列表,
                *   服务器端也应该添加一定的协议字符串。
                * */
            }

        }catch (Exception e){
            e.printStackTrace();
        }finally {
            try {
                if (br!=null){
                    br.close();
                }
            } catch (IOException e) {
                e.printStackTrace();
            }
        }
    }
}
三、使用NIO实现非阻塞Socket通信
从JDK 1.4开始,Java提供了NIO API来开发高性能的网络服务器,前面介绍的网络通信程序是基于阻塞式API的——即当程序执行输入、输出操作后,在这些操作返回之前会一直阻塞该线程,所以服务器端必须为每个客户端都提供一个独立线程进行处理,当服务器端需要同时处理大量客户端时,这种做法会导致性能下降。使用NIO API则可以让服务器端使用一个或有限几个线程来同时处理连接到服务器端的所有客户端。
NIO编程
一、简介
java.nio全称java non-blocking IO,是指jdk提供的新的API,从1.4开始java提供了一系列改进输入输出的新特性,被统称为NIO(New IO)。新增了许多用于处理输入输出的类,这些类都放在java.nio包及子包下,并且对原java.io包中的很多类进行改写,新增了满足NIO的功能
NIO和BIO有着相同的目的和作用,但它们的实现方式完全不同,BIO是以流的方式处理数据,而NIO以块的方式处理,处理效率高很多。
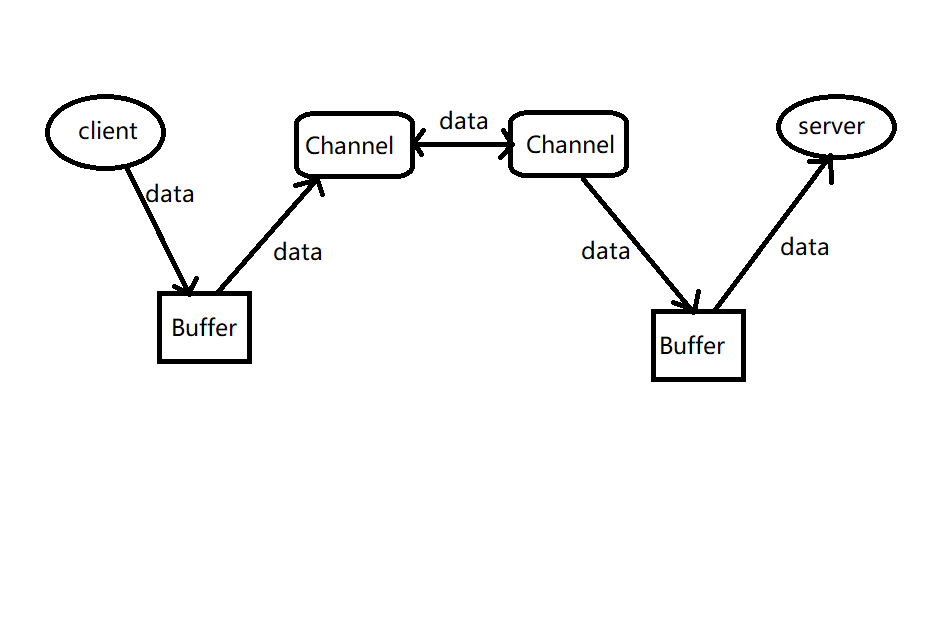
NIO有三大核心部分,Channel(通道),Buffer(缓冲区),Selector(选择器)。传统的BIO是基于字节流和字符流进行操作,而NIO基于CHannel和Buffer进行操作,数据综述从通道读取到缓冲区,或者从缓冲区写入到通道正。selector用于监听多个通道的时间,因此单个线程就可以监听多个客户端通道。
二、文件IO
2.1 概述和核心api
buffer:实际上就是一个容器,是一个特殊的数组,缓冲区对象内置了一些机制,能够跟踪和记录缓冲区的状态变化情况。Channel提供从文件、网络读取数据的渠道,但是读取和写入的数据必须经过buffer.
在nio中,buffer是一个顶层父类,他是一个抽象类,常用的buffer子类有:
- ByteBuffer,存储字节数据到缓冲区
- ShortBuffer,存储短整型数据到缓冲区
- CharBuffer,存储字符数据到缓冲区
- IntBuffer,存储整形数据到缓冲区
- LongBuffer,存储长整形数据到缓冲区
- ......
对于Java中的基本数据类型,都有一个BUffer类型与之对应。上面这些Buffer类,除了ByteBuffer之外,它们都采用相同或相似的方法来管理数据,只是各自管理的数据类型不同而已。这些Buffer类都没有提供构造器,通过使用如下方法来得到一个Buffer对象:
static XxxBuffer allocate(int capacity):
//创建一个容量为capacity的XxxBuffer对象
在Buffer中有三个概念:容量(capacity)、界限(limit)和位置(position)
容量:缓冲区的容量表示该Buffer的最大数据容量,缓冲区的容量不能为负,创建后不能改变。
界限:第一个不应该被读出或写入的缓冲区位置索引。也就是说,位于limit后的数据既不可被读也不可被写
位置:用于指明下一个可以被读出的或写入的缓冲区位置索引。当使用Buffer冲Channel中读取数据时,position的值刚好等于已经读到了多少数据。
开始时Buffer的position为0,limit为capacity,程序可通过put()方法向Buffer中放入一些数据(或者从Channel中获取一些数据),每放入一些数据,Buffer的position相应地向后移动一些位置。
当Buffer装入数据结束后,调用Buffer的flip()方法,该方法将limit设置为position所在位置,并将position设为0,这就使得Buffer的读写指针又移到了开始位置。也就是说,Buffer调用flip()方法之后,Buffer为输出数据做好准备;当Buffer输出数据结束后,Buffer调用clear()方法,clear()方法不是清空Buffer的数据,它仅仅将position置为0,将limit置为capacity,这样为再次向Buffer中装入数据做好准备。
除了flip()和clear()之外Buffer还包含以下一些方法:
int capacity():返回Buffer的capacity大小。
boolean hasRemaining():判断当前位置(position)和界限(limit)之间是否还有元素可供处理。
int limit():返回Buffer的界限(limit)的位置。
Buffer limit(int newLt):重新设置界限(limit)的值,并返回一个具有新的limit的缓冲区对象。
Buffer mark():设置Buffer的mark位置,它只能在0和位置(position)之间做mark。
int position():返回Buffer中的position值。
Buffer position(int newPs):设置Buffer的position,并返回position被修改后的Buffer对象。
int remaining():返回当前位置和界限(limit)之间的元素个数。
Buffer reset():将位置(position)转到mark所在的位置。
Buffer rewind():将位置(position)设置成0,取消设置的mark。
Buffer的所有子类还提供了两个重要的方法:put()和get()方法,用于向Buffer中放入数据和从Buffer中取出数据。当使用put()和get()方法放入、取出数据时,Buffer既支持对单个数据的访问,也支持对批量数据的访问(以数组作为参数)。
Channel:类似于BIO的stream。例如FileInputStream对象,用来建立到目标(文件,网络套接字,硬件设备)的一个连接,但是BIO是单向的,而NIO是双向的,既可以用来读也可以写。常见的Channel类有:FileChannel(用于文件读写)、DatagramChannel(用于UDP的读写)、ServerSocketChannel、SocketChannel(用于TCP的数据读写)。在文件IO中只介绍FileChannel。
FileChannel类主要用来对本地文件进行IO操作主要方法如下:
- public int read(ByteBuffer dst),从通道读取数据并放到缓冲区
- public int write(ByteBuffer src),把缓冲区的数据写入通道中
- public long transferFrom(ReadableByteChannel src,long position,long count),从目标通道中复制数据到当前通道
- public long transferTo(long position,long count,WritableByteChannel target),把数据从当前通道复制给目标通道
2.2 案例
向本地文件中写数据
    @Test
    public void test1() throws Exception{
        String str = "hello,nio,i am Loserfromlazy";
        FileOutputStream fileOutputStream = new FileOutputStream("E://obj.txt");
        FileChannel fileChannel = fileOutputStream.getChannel();
        ByteBuffer byteBuffer = ByteBuffer.allocate(1024);
        byteBuffer.put(str.getBytes());
        byteBuffer.flip();
        fileChannel.write(byteBuffer);
        fileOutputStream.close();
    }
NIO的通道是从输入流对象里通过getChannel方法获取的,该通道是双向的,既可以读又可以写。在网通道里写入数据之前,必须通过put方法把数据存入ByteBuffer中,然后通过通道的write方法写数据。在write之前需要调用flip方法反转缓冲区,把重置到初始位置,这样接下来写数据时才能把所有数据写到通道里
从本地文件中读数据
    @Test
    public void test2() throws Exception{
        File file = new File("E://obj.txt");
        FileInputStream inputStream = new FileInputStream(file);
        FileChannel fileChannel = inputStream.getChannel();
        ByteBuffer buffer = ByteBuffer.allocate((int) file.length());
        fileChannel.read(buffer);
        System.out.println(new String(buffer.array()));
        inputStream.close();
    }
复制文件
通过BIO
    @Test
    public void test3() throws Exception{
        FileInputStream is = new FileInputStream("E://temp/daddy.mp4");
        FileOutputStream os = new FileOutputStream("E://temp/da/daddy.mp4");
        byte []  bytes = new byte[1024];
        while (true){
            int res = is.read(bytes);
            if(res == -1){
                break;
            }
            os.write(bytes,0,res);
        }
        is.close();
        os.close();
    }
通过NIO
    @Test
    public void test4() throws Exception{
        FileInputStream is = new FileInputStream("E://temp/daddy.mp4");
        FileOutputStream os = new FileOutputStream("E://temp/da/daddy.mp4");
        FileChannel sourceFC = is.getChannel();
        FileChannel destFC = os.getChannel();
        destFC.transferFrom(sourceFC,0,sourceFC.size());
        sourceFC.close();
        destFC.close();
    }
三、网络IO
3.1 概述
上一部分文件IO用到的FileChannel并不支持非阻塞IO,NIO主要还是为了网络IO。java nio 的网络通道是非阻塞IO的实现,基于事件驱动。
在Java中编写Socket服务器,通常有以下几种模式:
- 一个客户端连接用一个线程,优点:程序编写简单。缺点:如果连接非常多,分配的线程也会非常多,服务器可能会因为资源耗尽而崩溃。
- 把每一个客户端连接交给一个拥有固定数量线程的连接池,优点:程序编写相对简单,可以处理大量的连接。缺点:线程的开销非常大,连接如果非常多,排队现象会比较严重。
- 使用Java的NIO,用非阻塞式IO方式处理。这种模式可以用一个线程,处理大量的客户端连接。
Java的NIO为非阻塞式Socket通信提供了如下几个特殊类。
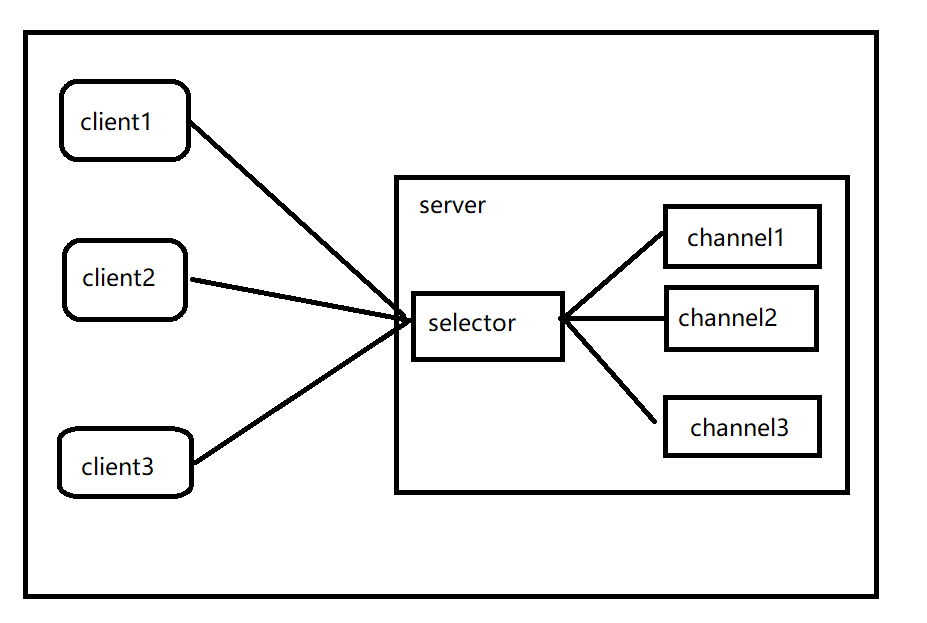
Selector:能够检测多个注册的通道上是否有事件发生,如果有事件发生,便获取事件然后对每个进行相应的处理。这样就可以只用一个单线程去管理多个通道,也就是管理多个连接。这样使得只有在连接真正有读写事件发生时,才会调用函数来进行读写,就大大减少了系统开销,并且不必为每个连接都创建一个线程,不用维护多个线程,并且避免了多线程之间的上下文切换导致的开销。
该类的常用方法:
public static Selector open()//得到一个选择器对象
public int select(long timeout)//监控所有注册的通道,当其中有IO操作可以进行时,将对应的SelectionKey加入到内部集合中并返回,参数用来设置超过时间
public Set<SelectionKey>selectedKeys()//从内部集合中得到所有的SelectionKey
SelectionKey:代表了Selector和网络通道的注册关系,一共四种:
- int OP_ACCEPT:有新的网络连接可以accept,值为16
- int OP_CONNECT:代表连接已经建立,值为8
- int OP_READ 和 int OP_WRITE:代表了读、写操作,值为1和4
该类的常用方法如下:
public abstract Selector selector()//得到与之关联的通道
public abstract SelectableChannel channel()//得到与之关联的通道
public final Object attachment()//得到与之关联的共享数据
public abstract SelectionKey interestOps(int ops)//设置或改变监听事件
public final boolean isAcceptable()//是否可以accept
public final boolean isReadable()//是否可以读
public final boolean isWritable()//是否可以写
ServerSocketChannel:用来在服务器端监听新的客户端Socket连接,常用方法如下:
public static ServerSocketChannel open()//得到一个ServerSocketChannel通道
public final ServerSocketChannel bind()//设置服务器端口号
public final SelectableChannel configureBlocking(bollean block)//设置阻塞或非阻塞模式,取值false表示采用非阻塞模式
public SocketChannel accept()//接受一个链接并返回这个连接的通道对象
public fianl SelectionKey register(Selector sel,int ops)//注册一个选择器并设置监听事件
SocketChannel:网络IO通道,具体负责进行读写操作。NIO总是把缓冲区的数据写入通道,或者把通道里的数据读到缓冲区,常用方法如下:
public static SocketChannel open()//得到一个SocketChannel通道
public final SelectableChannel configureBlocking(bollean block)//设置阻塞或者非阻塞模式,取值false表示采用非阻塞模式
public boolean connect(SocketAddress remote)//连接服务器
public boolean finishConnect()//如果上面的方法连接失败,则通过改方法完成连接操作
public int write(ByteBuffer src)//往通道里写数据
public int read(ByteBuffer src)//从通道里读数据
public final SelectionKey register(Selector sel,int ops,Object att)//注册一个选择器并设置监听事件,最后一个参数可以设置共享数据
public final void close()//关闭通道
3.2 案例
入门案例——非阻塞实现服务器端和客户端之间的数据通信
NIOServer.java
public class NioServer {

    public static void main(String[] args) throws IOException {
        //1.得到一个ServerSocketChannel对象
        ServerSocketChannel serverSocketChannel = ServerSocketChannel.open();
        //2.得到一个Selector对象
        Selector selector = Selector.open();
        //3.绑定一个端口号
        serverSocketChannel.bind(new InetSocketAddress(9999));
        //4.设置非阻塞方式
        serverSocketChannel.configureBlocking(false);
        //5. 把ServerSocketChannel对象注册给Selector对象
        serverSocketChannel.register(selector, SelectionKey.OP_ACCEPT);
        //6. 开始
        while(true){
            // 6.1 监控客户端
            if (selector.select(2000)==0){
                System.out.println("Server:没有客户端搭理我,我干别的活");
                continue;
            }
            //6.2 得到SelectionKey,判断通道里的事件
            Iterator <SelectionKey> keyiterator = selector.selectedKeys().iterator();
            while (keyiterator.hasNext()){
                SelectionKey key = keyiterator.next();
                if (key.isAcceptable()){//客户端连接请求事件
                    System.out.println("OP_ACCEPT");
                    SocketChannel socketChannel = serverSocketChannel.accept();
                    socketChannel.configureBlocking(false);
                    socketChannel.register(selector,SelectionKey.OP_READ, ByteBuffer.allocate(1024));
                }
                if (key.isReadable()) {//读取客户端事件
                    SocketChannel channel = (SocketChannel) key.channel();
                    ByteBuffer buffer = (ByteBuffer) key.attachment();
                    channel.read(buffer);
                    System.out.println("客户端发来数据:"+new String(buffer.array()));
                }
                //6.3 从集合中移除当前key防止重复处理
                keyiterator.remove();
            }
        }
    }
}
NIOClient.java
public class NioClient {
    public static void main(String[] args) throws IOException {
        //1.得到一个网络通道
        SocketChannel channel =SocketChannel.open();
        //2.设置非阻塞方式
        channel.configureBlocking(false);
        //3. 提供服务器端的IP地址和端口号
        InetSocketAddress address = new InetSocketAddress("127.0.0.1",9998);
        //4. 连接服务器端
        if (!channel.connect(address)){
            while (!channel.finishConnect()){//nio非阻塞的优势
                System.out.println("Client: 链接服务器的同时,干别的事");
            }
        }
        //5. 得到一个缓冲区并存入数据
        String msg = "hello Server";
        ByteBuffer writebuffer = ByteBuffer.wrap(msg.getBytes());
        //6. 发送数据
        channel.write(writebuffer);
        System.in.read();
    }
}
3.3 IO对比总结
IO通常分为几种,同步阻塞的BIO、同步非阻塞的NIO,异步非阻塞的AIO
- BIO适用于连接数目较小且固定的结构,这种方式对服务器资源要求较高,并发局限于应用中,JDK1.4以前的唯一选择,但程序直观简单易理解
- NIO适用于连接数目较多且比较短(轻操作)的架构,比如聊天服务器,并发局限于应用中,编程比较复杂
- AIO适用于连接数较多且连接比较长的架构,比如相册服务器,充分调用OS参与并发操作,编程比较复杂,JDK1.7开始支持
Netty学习
一、简介
1.1 netty
Netty is an asynchronous event-driven network application framework
for rapid development of maintainable high performance protocol servers & clients.Copy
Netty 是一个异步的、基于事件驱动的网络应用框架,用于快速开发可维护、高性能的网络服务器和客户端。它是由JBOSS提供的一个java开源框架,现为 Github上的独立项目。Netty提供异步的、事件驱动的网络应用程序框架和工具,用以快速开发高性能、高可靠性的网络服务器和客户端程序。
也就是说,Netty 是一个基于NIO的客户、服务器端的编程框架,使用Netty 可以确保你快速和简单的开发出一个网络应用,例如实现了某种协议的客户、服务端应用。Netty相当于简化和流线化了网络应用的编程开发过程,例如:基于TCP和UDP的socket服务开发。
“快速”和“简单”并不用产生维护性或性能上的问题。Netty 是一个吸收了多种协议(包括FTP、SMTP、HTTP等各种二进制文本协议)的实现经验,并经过相当精心设计的项目。最终,Netty 成功的找到了一种方式,在保证易于开发的同时还保证了其应用的性能,稳定性和伸缩性。
netty的异步还是基于多路复用的,并没有实现真正意义上的异步IO
1.2 BIO、NIO、AIO
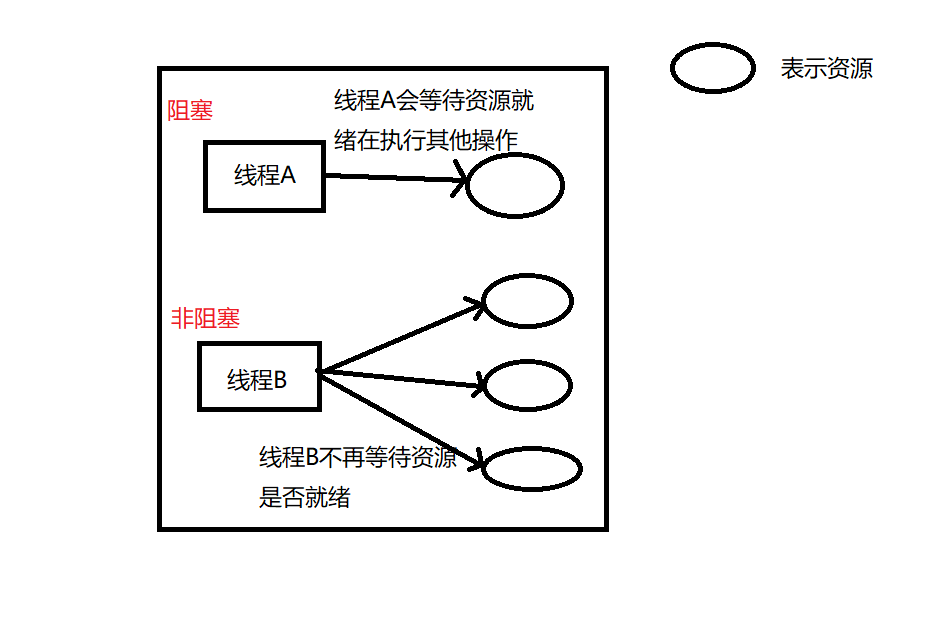
阻塞与非阻塞
主要指访问io的线程是否会阻塞
主要是线程访问资源,该资源是否准备就绪的一种处理方式
同步和异步
主要指的是数据的请求方式,同步和异步是指访问数据的一种机制

BIO
同步阻塞IO,Block IO,IO操作时会阻塞线程,并发处理能力低
Socket编程就是BIO,一个socket连接一个处理线程,阻塞的原因在于,操作系统允许的线程数量是有限的,多个socket申请与服务端建立连接时,服务端不能提供相应数量的处理线程,没有分配到处理线程的连接就会阻塞等待或被拒绝

NIO
同步非阻塞IO,None-Block IO
NIO是对BIO的改进,基于Reactor模型。我们知道,一个socket连接只有在特点时候才会发生数据传输IO操作,大部分时间这个“数据通道”是空闲的,但还是占用着线程。NIO作出的改进就是“一个请求一个线程”,在连接到服务端的众多socket中,只有需要进行IO操作的才能获取服务端的处理线程进行IO。这样就不会因为线程不够用而限制了socket的接入。
AIO
异步非阻塞IO
这种IO模型是由操作系统先完成了客户端请求处理再通知服务器去启动线程进行处理。AIO也称NIO2.0,在JDK7开始支持。
1.3 NettyReactor模型
单线程模型、多线程模型、主从多线程模型
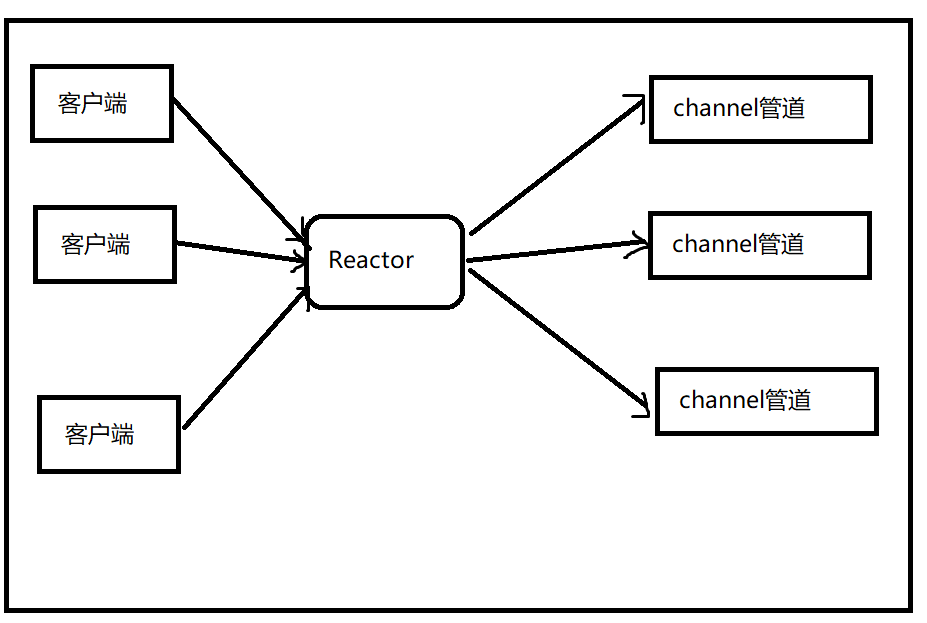
1.3.1 单线程模型
用户发起IO请求到Reactor线程,Ractor线程将用户的IO请求放入到通道,然后再进行后续处理,处理完成后,Reactor线程重新获得控制权,继续其他客户端的处理
服务器端用一个线程通过多路复用搞定所有的IO操作,包括读写连接
这种模型一个时间点只有一个任务在执行,这个任务执行完了,再去执行下一个任务。
1. 但单线程的Reactor模型每一个用户事件都在一个线程中执行:
2. 性能有极限,不能处理成百上千的事件
3. 当负荷达到一定程度时,性能将会下降
4. 某一个事件处理器发生故障,不能继续处理其他事件
1.3.2 多线程模型
Reactor多线程模型是由一组NIO线程来处理IO操作(之前是单个线程),所以在请求处理上会比上一中模型效率更高,可以处理更多的客户端请求。
服务器端采用一个线程专门处理客户端连接请求,采用一个线程池负责 IO 操作。在绝大多数场景下,该模型都能满足使用。
这种模式使用多个线程执行多个任务,任务可以同时执行
但是如果并发仍然很大,Reactor仍然无法处理大量的客户端请求
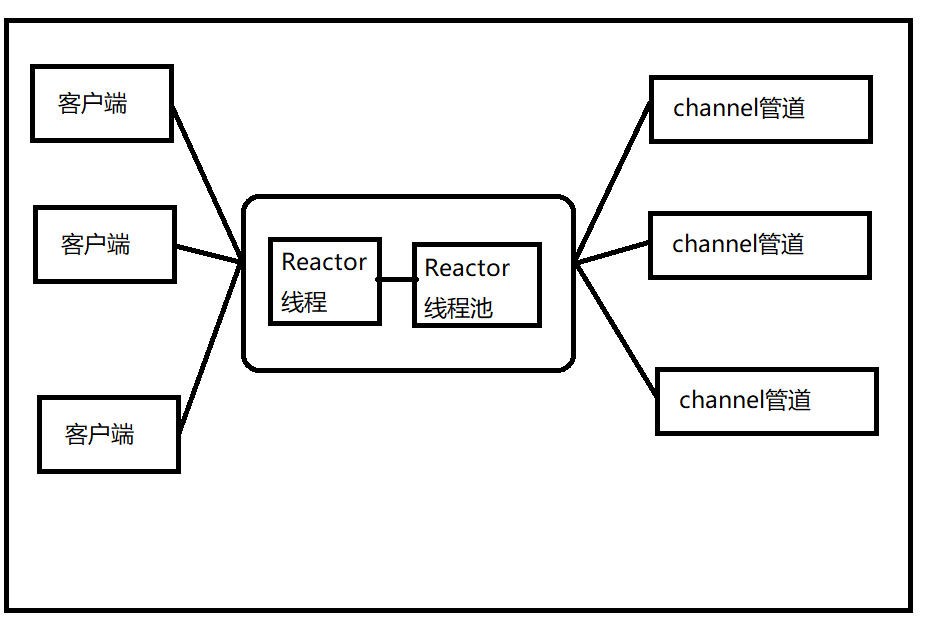
1.3.3 主从多线程模型
这种线程模型是Netty推荐使用的线程模型
这种模型适用于高并发场景,一组线程池接收请求,一组线程池处理IO。


类似于上面的线程池模型,Netty 抽象出两组线程池,BossGroup 专门负责接收客户端连接,WorkerGroup 专门负责网络读写操作。NioEventLoop 表示一个不断循环执行处理任务的线程,每个 NioEventLoop 都有一个 selector,用于监听绑定在其上的 socket 网络通道。NioEventLoop 内部采用串行化设计,从消息的读取->解码->处理->编码->发送,始终由 IO 线程 NioEventLoop 负责
一个NioEventLoopGroup包含多个NioEventLoop
每个NioEventLoop包含一个Selector,一个taskQueue
每个NioEventLoop的Selector上可以注册多个NioChannel
每一个NioChannel都会绑定唯一的NioEventLoop上
每个NioChannel都绑定一个自己的ChannelPipeline

BossGroup 线程维护 Selector,只关注 Accecpt
当接收到 Accept 事件,获取到对应的 SocketChannel,封装成 NIOScoketChannel 并注册到 Worker 线程(事件循环),并进行维护
当 Worker 线程监听到 Selector 中通道发生自己感兴趣的事件后,就进行处理(就由 handler),注意 handler 已经加入到通道
1.4 入门案例
服务器端代码
public class HelloServer {
    public static void main(String[] args) {
        // 1、启动器,负责装配netty组件,启动服务器
        new ServerBootstrap()
                // 2、创建 NioEventLoopGroup,可以简单理解为 线程池 + Selector
                .group(new NioEventLoopGroup())
                // 3、选择服务器的 ServerSocketChannel 实现
                .channel(NioServerSocketChannel.class)
                // 4、child 负责处理读写,该方法决定了 child 执行哪些操作
            	// ChannelInitializer 处理器(仅执行一次)
            	// 它的作用是待客户端SocketChannel建立连接后,执行initChannel以便添加更多的处理器
                .childHandler(new ChannelInitializer<NioSocketChannel>() {
                    @Override
                    protected void initChannel(NioSocketChannel nioSocketChannel) throws Exception {
                        // 5、SocketChannel的处理器,使用StringDecoder解码,ByteBuf=>String
                        nioSocketChannel.pipeline().addLast(new StringDecoder());
                        // 6、SocketChannel的业务处理,使用上一个处理器的处理结果
                        nioSocketChannel.pipeline().addLast(new ChannelInboundHandlerAdapter() {
                            @Override//读事件
                            public void channelRead(ChannelHandlerContext ctx, Object msg) throws Exception {
                                System.out.println(msg);
                            }
                        });
                    }
                    // 7、ServerSocketChannel绑定8080端口
                }).bind(8080);
    }
}
客户端代码
public class HelloClient {
    public static void main(String[] args) throws InterruptedException {
        new Bootstrap()
                .group(new NioEventLoopGroup())
                // 选择客户端 Socket 实现类,NioSocketChannel 表示基于 NIO 的客户端实现
                .channel(NioSocketChannel.class)
                // ChannelInitializer 处理器(仅执行一次)
                // 它的作用是待客户端SocketChannel建立连接后,执行initChannel以便添加更多的处理器
                .handler(new ChannelInitializer<Channel>() {
                    @Override
                    protected void initChannel(Channel channel) throws Exception {
                        // 消息会经过通道 handler 处理,这里是将 String => ByteBuf 编码发出
                        channel.pipeline().addLast(new StringEncoder());
                    }
                })
                // 连接服务器指定地址和端口
                .connect(new InetSocketAddress("localhost", 8080))
                // Netty 中很多方法都是异步的,如 connect
                // 这时需要使用 sync 方法等待 connect 建立连接完毕
                .sync()
                // 获取 channel 通道对象,可以进行数据读写操作
                .channel()
                // 写入消息并清空缓冲区
                .writeAndFlush("hello world");
    }
}
代码执行流程
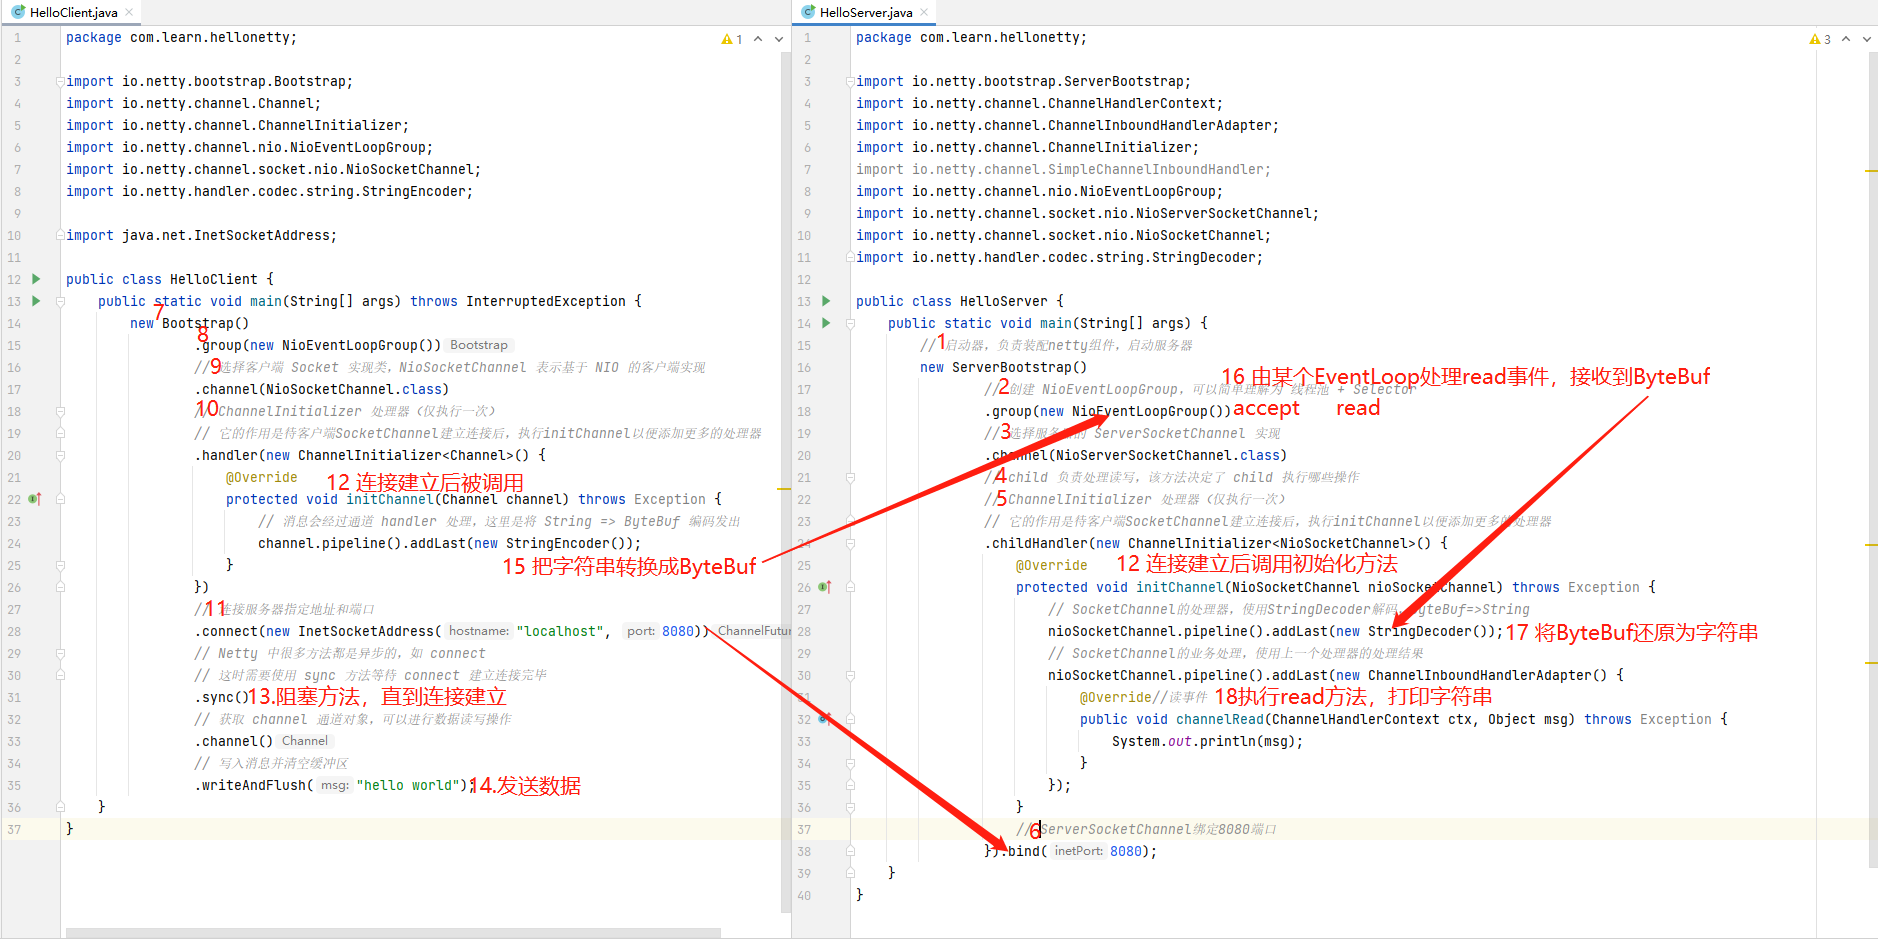
channel 可以理解为数据的通道
msg 理解为流动的数据,最开始输入是 ByteBuf,但经过 pipeline 中的各个 handler 加工,会变成其它类型对象,最后输出又变成 ByteBuf
handler 可以理解为数据的处理工序
工序有多道,
合在一起就是 pipeline(传递途径)
,pipeline 负责发布事件(读、读取完成…)传播给每个 handler, handler 对自己感兴趣的事件进行处理(重写了相应事件处理方法)
- pipeline 中有多个 handler,处理时会依次调用其中的 handler
handler 分 Inbound 和 Outbound 两类
- Inbound 入站
- Outbound 出站
eventLoop 可以理解为处理数据的工人
- eventLoop 可以管理多个 channel 的 io 操作,并且一旦 eventLoop 负责了某个 channel,就会将其与channel进行绑定,以后该 channel 中的 io 操作都由该 eventLoop 负责
- eventLoop 既可以执行 io 操作,也可以进行任务处理,每个 eventLoop 有自己的任务队列,队列里可以堆放多个 channel 的待处理任务,任务分为普通任务、定时任务
- eventLoop 按照 pipeline 顺序,依次按照 handler 的规划(代码)处理数据,可以为每个 handler 指定不同的 eventLoop
二、核心组件
2.1 EventLoop
事件循环对象
EventLoop 本质是一个单线程执行器(同时维护了一个 Selector),里面有 run 方法处理一个或多个 Channel 上源源不断的 io 事件
它的继承关系如下
- 继承自 j.u.c.ScheduledExecutorService 因此包含了线程池中所有的方法
- 继承自 netty 自己的 OrderedEventExecutor
- 提供了 boolean inEventLoop(Thread thread) 方法判断一个线程是否属于此 EventLoop
- 提供了 EventLoopGroup parent() 方法来看看自己属于哪个 EventLoopGroup
事件循环组 EventLoopGroup
EventLoopGroup 是一组 EventLoop,Channel 一般会调用 EventLoopGroup 的 register 方法来绑定其中一个 EventLoop,后续这个 Channel 上的 io 事件都由此 EventLoop 来处理(保证了 io 事件处理时的线程安全)
- 继承自 netty 自己的 EventExecutorGroup
- 实现了 Iterable 接口提供遍历 EventLoop 的能力
- 另有 next 方法获取集合中下一个 EventLoop
处理普通任务和定时任务
public class TestEventLoop {
    public static void main(String[] args) {
        // 创建拥有两个EventLoop的NioEventLoopGroup,对应两个线程
        EventLoopGroup group = new NioEventLoopGroup(2);
        // 通过next方法可以获得下一个 EventLoop
        System.out.println(group.next());
        System.out.println(group.next());

        // 通过EventLoop执行普通任务
        group.next().execute(()->{
            System.out.println(Thread.currentThread().getName() + " hello");
        });

        // 通过EventLoop执行定时任务
        //Runnable initialDelay初始延迟时间 period间隔时间
        group.next().scheduleAtFixedRate(()->{
            System.out.println(Thread.currentThread().getName() + " hello2");
        }, 0, 1, TimeUnit.SECONDS);

        // 优雅地关闭
        //group.shutdownGracefully();
    }
}
执行结果:
io.netty.channel.nio.NioEventLoop@75a1cd57
io.netty.channel.nio.NioEventLoop@3d012ddd
nioEventLoopGroup-2-1 hello
nioEventLoopGroup-2-2 hello123
nioEventLoopGroup-2-2 hello123
nioEventLoopGroup-2-2 hello123。。。每秒执行一次
处理IO任务
public class MyServer {
    public static void main(String[] args) {
        new ServerBootstrap()
                .group(new NioEventLoopGroup())
                .channel(NioServerSocketChannel.class)
                .childHandler(new ChannelInitializer<Channel>() {
                    @Override
                    protected void initChannel(Channel ch) throws Exception {
                        ChannelPipeline pipeline = ch.pipeline();
                        pipeline.addLast(new StringEncoder());
                        pipeline.addLast(new ChannelInboundHandlerAdapter(){
                            @Override
                            public void channelRead(ChannelHandlerContext ctx, Object msg) throws Exception {
                                ByteBuf buf = (ByteBuf) msg;
                                System.out.println(Thread.currentThread().getName() + " " + buf.toString(StandardCharsets.UTF_8));
                            }
                        });
                    }
                })
                .bind(8080);
    }
}
public class MyClient {
    public static void main(String[] args) throws IOException, InterruptedException {
        new Bootstrap()
                .group(new NioEventLoopGroup())
                .channel(NioSocketChannel.class)
                .handler(new ChannelInitializer<SocketChannel>() {
                    @Override
                    protected void initChannel(SocketChannel socketChannel) throws Exception {
                        socketChannel.pipeline().addLast(new StringEncoder());
                    }
                })
                .connect(new InetSocketAddress("localhost", 8080))
                .sync()
                .channel();
        // 此处打断点调试,调用 channel.writeAndFlush(...);
        System.in.read();
    }
}
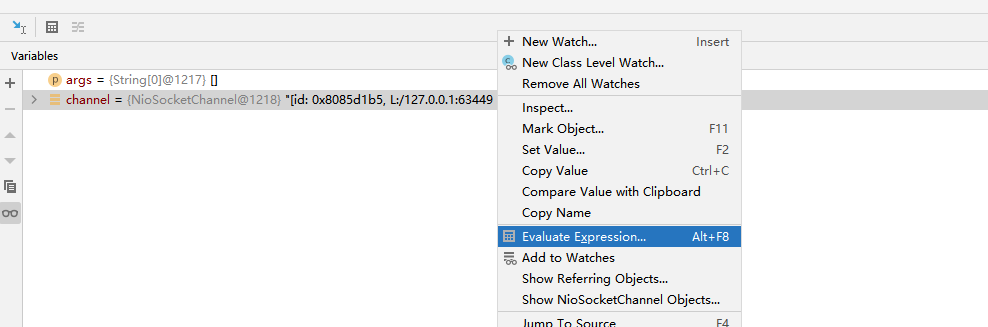
打断点方法如下:只暂停channel的线程,让其他线程继续运行
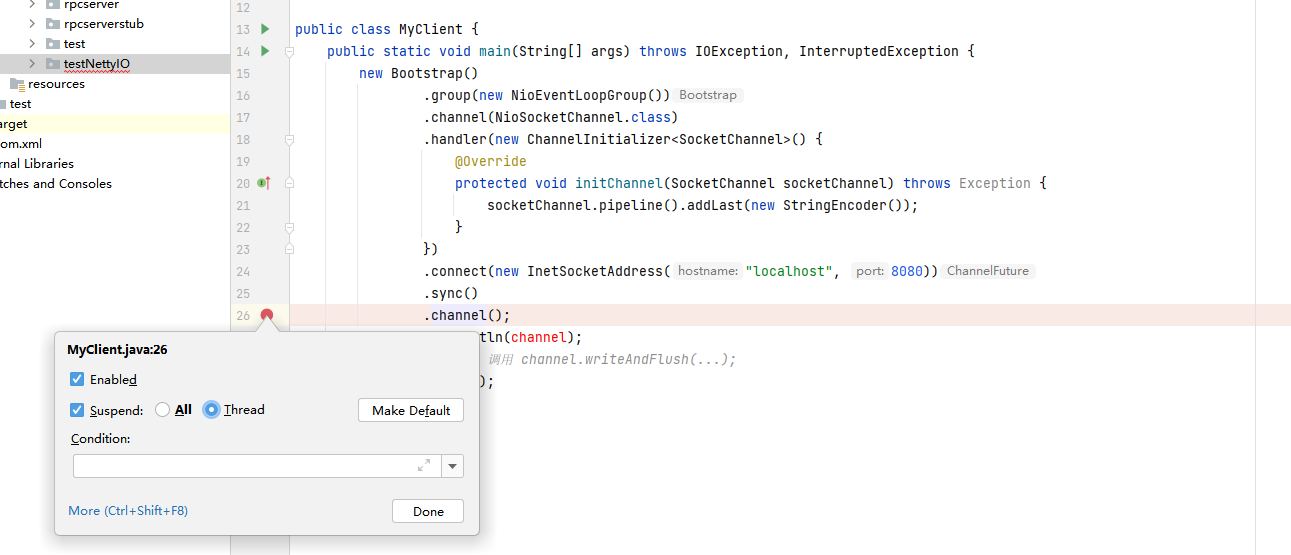
调试方法如下:选择channel的执行方法,执行writeAndFlush
分工:主从模型
将上面处理IO任务中的代码进行修改
public class MyServer {
    public static void main(String[] args) {
        new ServerBootstrap()
            //两个Group,分别为Boss 负责Accept事件,Worker 负责读写事件
                .group(new NioEventLoopGroup(),new NioEventLoopGroup());
        ........
    }
}
多客户端发送消息结果:
nioEventLoopGroup-3-2 222
nioEventLoopGroup-3-2 2222
nioEventLoopGroup-3-2 22222
nioEventLoopGroup-3-3 111
nioEventLoopGroup-3-3 111
nioEventLoopGroup-3-3 111
nioEventLoopGroup-3-3 1111
可以看出,一个EventLoop可以负责多个Channel,且EventLoop一旦与Channel绑定,则一直负责处理该Channel中的事件
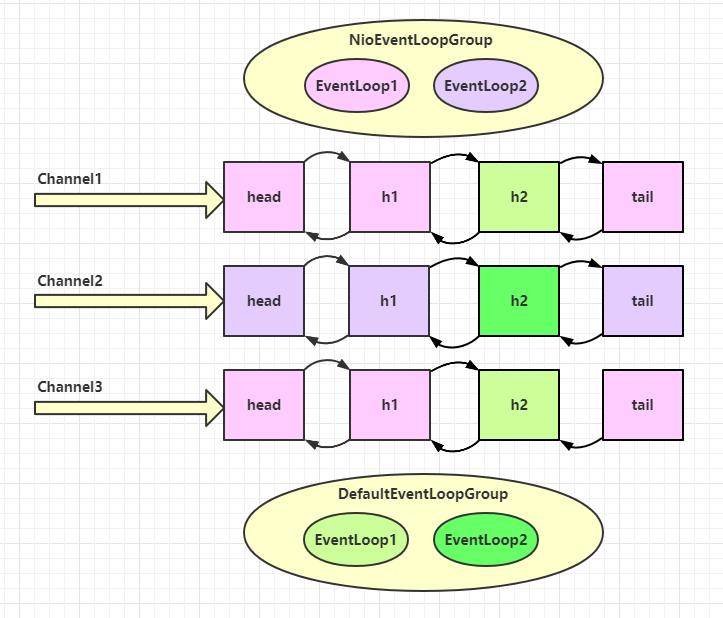
增加自定义EventLoopGroup
当有的任务需要较长的时间处理时,可以使用非NioEventLoopGroup,避免同一个NioEventLoop中的其他Channel在较长的时间内都无法得到处理
public class MyServer1 {
    public static void main(String[] args) {
        // 增加自定义的非NioEventLoopGroup
        EventLoopGroup group = new DefaultEventLoopGroup();

        new ServerBootstrap()
                .group(new NioEventLoopGroup(1), new NioEventLoopGroup(2))
                .channel(NioServerSocketChannel.class)
                .childHandler(new ChannelInitializer<SocketChannel>() {
                    @Override
                    protected void initChannel(SocketChannel socketChannel) throws Exception {
                        // 增加两个handler,第一个使用NioEventLoopGroup处理,第二个使用自定义EventLoopGroup处理
                        socketChannel.pipeline().addLast("nioHandler",new ChannelInboundHandlerAdapter() {
                                    @Override
                                    public void channelRead(ChannelHandlerContext ctx, Object msg) throws Exception {
                                        ByteBuf buf = (ByteBuf) msg;
                                        System.out.println(Thread.currentThread().getName() + " " + buf.toString(StandardCharsets.UTF_8));
                                        // 调用下一个handler
                                        ctx.fireChannelRead(msg);
                                    }
                                })
                                // 该handler绑定自定义的Group
                                .addLast(group, "myHandler", new ChannelInboundHandlerAdapter() {
                                    @Override
                                    public void channelRead(ChannelHandlerContext ctx, Object msg) throws Exception {
                                        ByteBuf buf = (ByteBuf) msg;
                                        System.out.println(Thread.currentThread().getName() + " " + buf.toString(StandardCharsets.UTF_8));
                                    }
                                });
                    }
                })
                .bind(8080);
    }
}
执行结果
nioEventLoopGroup-4-1 1
defaultEventLoopGroup-2-1 1
nioEventLoopGroup-4-2 2
defaultEventLoopGroup-2-2 2nioEventLoopGroup-4-1 3
defaultEventLoopGroup-2-3 3
nioEventLoopGroup-4-2 4
defaultEventLoopGroup-2-4 4
可以看出,客户端与服务器之间的事件,被nioEventLoopGroup和defaultEventLoopGroup分别处理
handler 执行中如何切换
关键代码 io.netty.channel.AbstractChannelHandlerContext#invokeChannelRead()
static void invokeChannelRead(final AbstractChannelHandlerContext next, Object msg) {
    final Object m = next.pipeline.touch(ObjectUtil.checkNotNull(msg, "msg"), next);
    // 下一个 handler 的事件循环是否与当前的事件循环是同一个线程
    EventExecutor executor = next.executor();//返回下一个handler的eventLoop

    // 是,直接调用
    if (executor.inEventLoop()) {//当前handler的线程是否和eventLoop是同一个线程
        next.invokeChannelRead(m);
    }
    // 不是,将要执行的代码作为任务提交给下一个事件循环处理(换人)
    else {
        executor.execute(new Runnable() {
            @Override
            public void run() {
                next.invokeChannelRead(m);
            }
        });
    }
}
- 如果两个 handler 绑定的是同一个线程(EventLoop),那么就直接调用
- 否则,把要调用的代码封装为一个任务对象,由下一个 handler 的线程来调用
2.2 Channel
channel 的主要方法
- close() 可以用来关闭 channel
- closeFuture() 用来处理 channel 的关闭
- sync 方法作用是同步等待 channel 关闭
- 而 addListener 方法是异步等待 channel 关闭
- pipeline() 方法添加处理器
- write() 方法将数据写入
- writeAndFlush() 方法将数据写入并刷出
2.2.1 ChannelFuture
这是之前的客户端代码
public static void main(String[] args) throws InterruptedException {
    new Bootstrap()
            .group(new NioEventLoopGroup())
            .channel(NioSocketChannel.class)
            .handler(new ChannelInitializer<Channel>() {
                @Override
                protected void initChannel(Channel channel) throws Exception {
                    channel.pipeline().addLast(new StringEncoder());
                }
            })
            .connect(new InetSocketAddress("localhost", 8080))
            .sync()
            .channel()
            .writeAndFlush("hello world");
}
现在进行修改
    ChannelFuture channelFuture = new Bootstrap()
            .group(new NioEventLoopGroup())
            .channel(NioSocketChannel.class)
            .handler(new ChannelInitializer<Channel>() {
                @Override
                protected void initChannel(Channel channel) throws Exception {
                    channel.pipeline().addLast(new StringEncoder());
                }
            })
            .connect(new InetSocketAddress("localhost", 8080));
    channelFuture.sync();
    Channel channel = channelFuture.channel();
    channel.writeAndFlush("hello world");
}
当把channelFuture.sync();代码注释掉之后服务器端无法接收到消息
原因:
connect方法是异步非阻塞的,main线程发起了调用,真正执行connect的是nio线程,当把sync注释掉之后无阻塞向下执行获取channel,并不能获取到正确的channel对象
将代码进行修改:
ChannelFuture channelFuture = new Bootstrap()
    .group(new NioEventLoopGroup())
    .channel(NioSocketChannel.class)
    .handler(new ChannelInitializer<Channel>() {
        @Override
        protected void initChannel(Channel ch) {
            ch.pipeline().addLast(new StringEncoder());
        }
    })
    .connect("127.0.0.1", 8080);

System.out.println(channelFuture.channel()); // 1
channelFuture.sync(); // 2
System.out.println(channelFuture.channel()); // 3
执行到1时,连接未建立,打印[id: 0xbd6733c4]
执行到2时,sync方法同步等待连接建立完成
执行到3时,连接肯定建立了,打印[id: 0xbd6733c4, L:/127.0.0.1:54908 - R:localhost/127.0.0.1:8080]
除了使用sync方法可以让异步操作同步之外,还可以使用回调的方式对上面进行修改代码如下:
System.out.println(channelFuture.channel());
channelFuture.addListener(future -> {
    System.out.println(channelFuture.channel());
    Channel channel = channelFuture.channel();
    channel.writeAndFlush("hello");
});
执行到 1 时,连接未建立,打印 [id: 0x749124ba]
ChannelFutureListener 会在连接建立时被调用(其中 operationComplete 方法),因此执行到 2 时,连接肯定建立了,打印 [id: 0x749124ba, L:/127.0.0.1:57351 - R:/127.0.0.1:8080]
2.2.2 CloseFuture
使用方法:
@Slf4j
public class CloseFutureClient {
    public static void main(String[] args) throws InterruptedException {

        NioEventLoopGroup group = new NioEventLoopGroup();
        ChannelFuture channelFuture = new Bootstrap()
                .group(group)
                .channel(NioSocketChannel.class)
                .handler(new ChannelInitializer<Channel>() {
                    @Override
                    protected void initChannel(Channel channel) throws Exception {
                        channel.pipeline().addLast(new LoggingHandler(LogLevel.DEBUG));
                        channel.pipeline().addLast(new StringEncoder());
                    }
                })
                .connect(new InetSocketAddress("localhost", 8080));
        Channel channel = channelFuture.sync().channel();
        log.info("{}",channel);
        new Thread(()->{
            Scanner scanner = new Scanner(System.in);
            while (true){
                String line = scanner.nextLine();
                if ("exit".equals(line)){
                    channel.close();
                    break;
                }else {
                    channel.writeAndFlush(line);
                }
            }
        }).start();

        //获取CloseFuture对象 同步方式
        ChannelFuture closeFuture = channel.closeFuture();
//        System.out.println("wait close....");
//        closeFuture.sync();
//        log.debug("处理关闭后的操作");
        //异步方式
        closeFuture.addListener(future -> {
            log.debug("处理关闭后的操作");
            group.shutdownGracefully();
        });
    }
}
异步的提升
为什么不在一个线程中执行建立连接执行关闭channel俄日是采用复杂的异步方式比如一个线程发起建立连接另一个线程去真正建立连接?
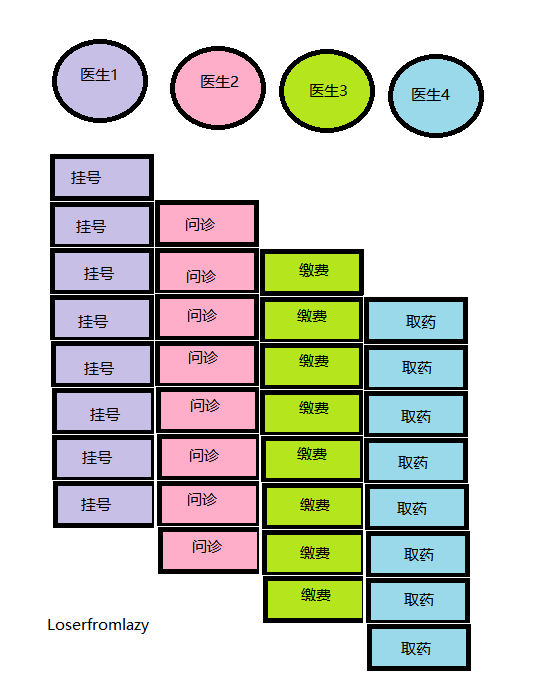
例子:4 个医生给人看病,每个病人花费 20 分钟,而且医生看病的过程中是以病人为单位的,一个病人看完了,才能看下一个病人。假设病人源源不断地来,可以计算一下 4 个医生一天工作 8 小时,处理的病人总数是:4 * 8 * 3 = 96
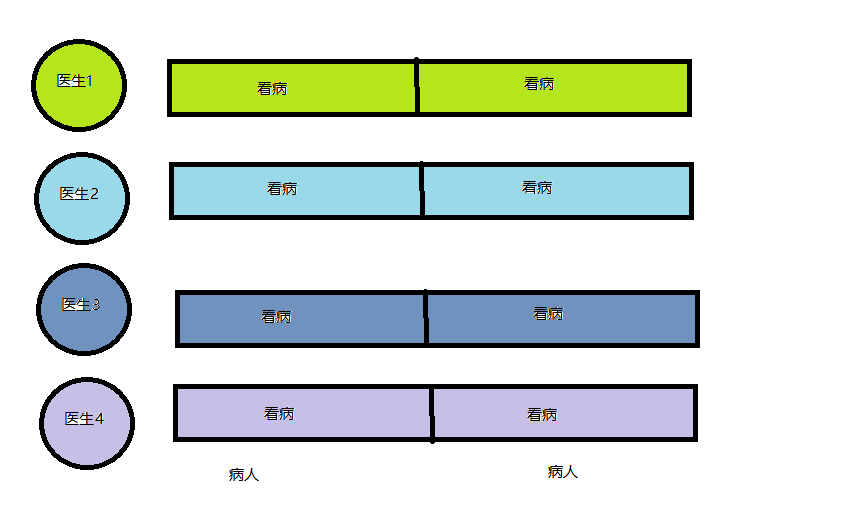
如果我们将看病分为四个步骤每个步骤五分钟:
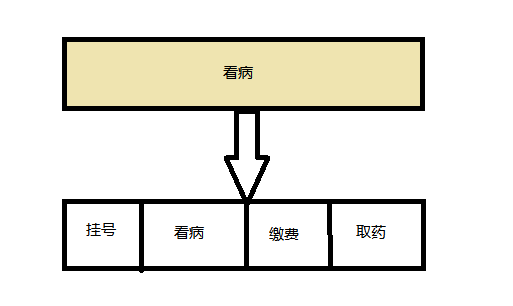
因此可以这样优化,每个医生负责一个部分,一开始需要等5-15分钟,但后续病人一直来就能满负荷工作,因此粗略计算处理能力提升了4*12*8=384,384/96=4效率是原来的4倍。
总结:
- 单线程没法异步提高效率,必须配合多线程、多核 cpu 才能发挥异步的优势
- 异步并没有缩短响应时间,反而有所增加,异步提升的是吞吐量
- 合理进行任务拆分,也是利用异步的关键
2.4 Future & Promise
在异步处理时,经常用到这两个接口
首先要说明 netty 中的 Future 与 jdk 中的 Future 同名,但是是两个接口,netty 的 Future 继承自 jdk 的 Future,而 Promise 又对 netty Future 进行了扩展
- jdk Future 只能同步等待任务结束(或成功、或失败)才能得到结果
- netty Future 可以同步等待任务结束得到结果,也可以异步方式得到结果,但都是要等任务结束
- netty Promise 不仅有 netty Future 的功能,而且脱离了任务独立存在,只作为两个线程间传递结果的容器
| 功能/名称 | jdk Future | netty Future | Promise |
|---|---|---|---|
| cancel | 取消任务 | - | - |
| isCanceled | 任务是否取消 | - | - |
| isDone | 任务是否完成,不能区分成功失败 | - | - |
| get | 获取任务结果,阻塞等待 | - | - |
| getNow | - | 获取任务结果,非阻塞,还未产生结果时返回 null | - |
| await | - | 等待任务结束,如果任务失败,不会抛异常,而是通过 isSuccess 判断 | - |
| sync | - | 等待任务结束,如果任务失败,抛出异常 | - |
| isSuccess | - | 判断任务是否成功 | - |
| cause | - | 获取失败信息,非阻塞,如果没有失败,返回null | - |
| addLinstener | - | 添加回调,异步接收结果 | - |
| setSuccess | - | - | 设置成功结果 |
| setFailure | - | - | 设置失败结果 |
jdk中的future
@Slf4j
public class TestJdkFuture {
    public static void main(String[] args) throws ExecutionException, InterruptedException {
        //线程池
        ExecutorService service = Executors.newFixedThreadPool(2);
        //提交任务
        Future<Integer> future = service.submit(new Callable<Integer>() {
            @Override
            public Integer call() throws Exception {
                log.debug("线程池中的线程计算");
                Thread.sleep(3000);
                return 50;
            }
        });
        //主线程通过future获取结果
        log.debug("主线程等待结果");
        //future.get()同步方法等待获取结果
        log.debug("结果是{}",future.get());

    }
}
netty的future
@Slf4j
public class TestNettyFuture {
    public static void main(String[] args) throws ExecutionException, InterruptedException {
        NioEventLoopGroup group = new NioEventLoopGroup();
        EventLoop eventLoop = group.next();
        Future<Integer> future = eventLoop.submit((Callable<Integer>) () -> {
            log.debug("执行计算");
            Thread.sleep(3000);
            return 80;
        });
        //同步方法等待获取结果
//        log.debug("主线程等待结果");
//        log.debug("结果是{}",future.get());
        //异步方法获取结果
        future.addListener(new GenericFutureListener<Future<? super Integer>>() {
            @Override
            public void operationComplete(Future<? super Integer> future) throws Exception {
                log.debug("结果是{}",future.getNow());
            }
        });
    }
}
netty的promise
@Slf4j
public class TestNettyPromise {
    public static void main(String[] args) throws ExecutionException, InterruptedException {
        EventLoop eventLoop = new NioEventLoopGroup().next();
        DefaultPromise<Integer> promise = new DefaultPromise<>(eventLoop);
        //设置回调,异步接收结果
        promise.addListener(future -> {
            // 这里的 future 就是上面的 promise
            log.debug("result {}", (promise.isSuccess() ? promise.getNow() : promise.cause()).toString());
        });

        new Thread(()->{
            //任意一个线程执行计算,计算完毕后向promise填充结果
            log.debug("开始计算...");
            try {
                Thread.sleep(3000);
                //int i = 1/0;
                promise.setSuccess(80);
            } catch (InterruptedException e) {
                promise.setFailure(e);
                e.printStackTrace();

            }

        }).start();

        //同步方法
//        log.debug("等待结果...");
//        log.debug("结果{}", promise.getNow()); // 还没有结果
//        promise.await(); // 与 sync 和 get 区别在于,不会抛异常
//        log.debug("result {}", (promise.isSuccess() ? promise.getNow() : promise.cause()).toString());
    }
}
2.5 Handler & Pipeline
ChannelHandler 用来处理 Channel 上的各种事件,分为入站、出站两种。所有 ChannelHandler 被连成一串,就是 Pipeline
- 入站处理器通常是 ChannelInboundHandlerAdapter 的子类,主要用来读取客户端数据,写回结果
- 出站处理器通常是 ChannelOutboundHandlerAdapter 的子类,主要对写回结果进行加工
打个比喻,每个 Channel 是一个产品的加工车间,Pipeline 是车间中的流水线,ChannelHandler 就是流水线上的各道工序,而后面要讲的 ByteBuf 是原材料,经过很多工序的加工:先经过一道道入站工序,再经过一道道出站工序最终变成产品
pipeline中handler的执行顺序:
有以下服务器端代码,启动服务器端后让客户端发送一条消息
@Slf4j
public class Server {
    public static void main(String[] args) {
        new ServerBootstrap()
                .group(new NioEventLoopGroup())
                .channel(NioServerSocketChannel.class)
                .childHandler(new ChannelInitializer<NioSocketChannel>() {
                    protected void initChannel(NioSocketChannel ch) {
                        //添加处理器 head --> h1 -> h2 -> h3 ->h4 -> h5 -> h6 -->tail
                        ch.pipeline().addLast(new ChannelInboundHandlerAdapter(){
                            @Override
                            public void channelRead(ChannelHandlerContext ctx, Object msg) {
                                log.debug("1");
                                ByteBuf buf = (ByteBuf) msg;
                                String name = buf.toString(Charset.defaultCharset());
                                ctx.fireChannelRead(name); // 1
                            }
                        });
                        ch.pipeline().addLast(new ChannelInboundHandlerAdapter(){
                            @Override
                            public void channelRead(ChannelHandlerContext ctx, Object msg) {
                                log.debug("2");
                                Student student = new Student();
                                student.setName(msg.toString());
                                ctx.fireChannelRead(student); // 2
                            }
                        });
                        ch.pipeline().addLast(new ChannelInboundHandlerAdapter(){
                            @Override
                            public void channelRead(ChannelHandlerContext ctx, Object msg) {
                                log.debug("3,结果是{},class:{}",msg,msg.getClass());
                                ctx.channel().writeAndFlush(ctx.alloc().buffer().writeBytes("server...".getBytes())); // 3
                            }
                        });
                        ch.pipeline().addLast(new ChannelOutboundHandlerAdapter(){
                            @Override
                            public void write(ChannelHandlerContext ctx, Object msg,
                                              ChannelPromise promise) {
                                log.debug("4");
                                ctx.write(msg, promise); // 4
                            }
                        });
                        ch.pipeline().addLast(new ChannelOutboundHandlerAdapter(){
                            @Override
                            public void write(ChannelHandlerContext ctx, Object msg,
                                              ChannelPromise promise) {
                                log.debug("5");
                                ctx.write(msg, promise); // 5
                            }
                        });
                        ch.pipeline().addLast(new ChannelOutboundHandlerAdapter(){
                            @Override
                            public void write(ChannelHandlerContext ctx, Object msg,
                                              ChannelPromise promise) {
                                log.debug("6");
                                ctx.write(msg, promise); // 6
                            }
                        });
                    }
                })
                .bind(8080);
    }
}
运行结果是:
11:28:59.053 [nioEventLoopGroup-2-2] DEBUG com.learn.handlerandpipeline.Server - 1
11:28:59.054 [nioEventLoopGroup-2-2] DEBUG com.learn.handlerandpipeline.Server - 2
11:28:59.054 [nioEventLoopGroup-2-2] DEBUG com.learn.handlerandpipeline.Server - 3,结果是com.learn.handlerandpipeline.Student@3b0418ac,class:class com.learn.handlerandpipeline.Student
11:28:59.055 [nioEventLoopGroup-2-2] DEBUG com.learn.handlerandpipeline.Server - 6
11:28:59.055 [nioEventLoopGroup-2-2] DEBUG com.learn.handlerandpipeline.Server - 5
11:28:59.055 [nioEventLoopGroup-2-2] DEBUG com.learn.handlerandpipeline.Server - 4
从结果可以得知入站处理器ChannelInboundHandlerAdapter 是按照addLast的顺序执行的,而出站处理器ChannelOutboundHandlerAdapter 是按照addLast逆序执行的。ChannelPipeline实际上是一个ChannelHandlerContext组成的双向链表。如下图:数字代表了处理顺序。
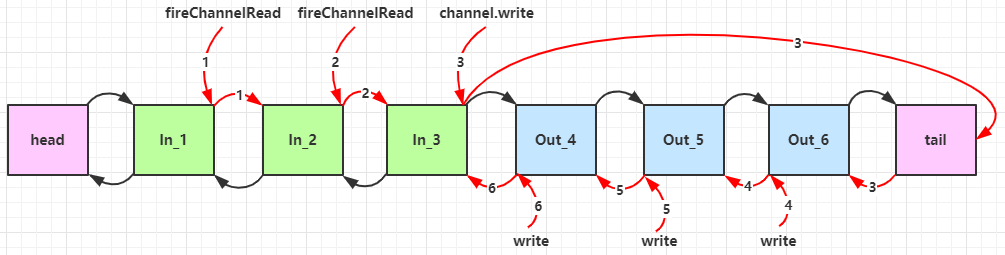
- 入站处理器中,ctx.fireChannelRead(msg) 是 调用下一个入站处理器
- 如果注释掉 1 处代码,则仅会打印 1
- 如果注释掉 2 处代码,则仅会打印 1 2
- 3 处的 ctx.channel().write(msg) 会 从尾部开始触发 后续出站处理器的执行
- 如果注释掉 3 处代码,则仅会打印 1 2 3
- 类似的,出站处理器中,ctx.write(msg, promise) 的调用也会 触发上一个出站处理器
- 如果注释掉 6 处代码,则仅会打印 1 2 3 6
- ctx.channel().write(msg) 和 ctx.write(msg)
- 都是触发出站处理器的执行
- ctx.channel().write(msg) 从尾部开始查找出站处理器
- ctx.write(msg) 是从当前节点找上一个出站处理器
- 3 处的 ctx.channel().write(msg) 如果改为 ctx.write(msg) 仅会打印 1 2 3,因为节点3 之前没有其它出站处理器了
- 6 处的 ctx.write(msg, promise) 如果改为 ctx.channel().write(msg) 会打印 1 2 3 6 6 6... 因为 ctx.channel().write() 是从尾部开始查找,结果又是节点6 自己
Handler中主要的生命周期
如下图
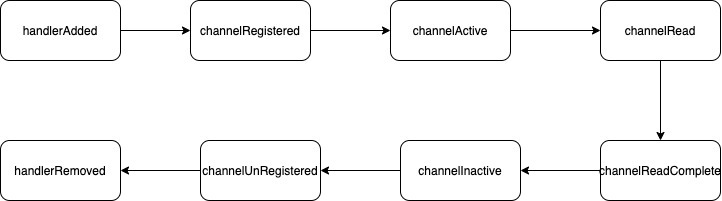
- handlerAdded: 新建立的连接会按照初始化策略,把handler添加到该channel的pipeline里面,也就是channel.pipeline.addLast(new LifeCycleInBoundHandler)执行完成后的回调;
- channelRegistered: 当该连接分配到具体的worker线程后,该回调会被调用。
- channelActive:channel的准备工作已经完成,所有的pipeline添加完成,并分配到具体的线上上,说明该channel准备就绪,可以使用了。
- channelRead:客户端向服务端发来数据,每次都会回调此方法,表示有数据可读;
- channelReadComplete:服务端每次读完一次完整的数据之后,回调该方法,表示数据读取完毕;
- channelInactive:当连接断开时,该回调会被调用,说明这时候底层的TCP连接已经被断开了。
- channelUnREgistered: 对应channelRegistered,当连接关闭后,释放绑定的workder线程;
- handlerRemoved: 对应handlerAdded,将handler从该channel的pipeline移除后的回调方法。
EmbeddedChannel
netty提供的针对ChannelHandler快速测试的类,用法如下:
public class TestEmbeddedChannel {
    public static void main(String[] args) {
        ChannelInboundHandlerAdapter h1 = new ChannelInboundHandlerAdapter(){
            @Override
            public void channelRead(ChannelHandlerContext ctx, Object msg) throws Exception {
                System.out.println(1);
                super.channelRead(ctx, msg);
            }
        };
        ChannelInboundHandlerAdapter h2 = new ChannelInboundHandlerAdapter(){
            @Override
            public void channelRead(ChannelHandlerContext ctx, Object msg) throws Exception {
                System.out.println(2);
                super.channelRead(ctx, msg);
            }
        };
        ChannelOutboundHandlerAdapter h3 = new ChannelOutboundHandlerAdapter(){
            @Override
            public void write(ChannelHandlerContext ctx, Object msg, ChannelPromise promise) throws Exception {
                System.out.println(3);
                super.write(ctx, msg, promise);
            }
        };
        ChannelOutboundHandlerAdapter h4 = new ChannelOutboundHandlerAdapter(){
            @Override
            public void write(ChannelHandlerContext ctx, Object msg, ChannelPromise promise) throws Exception {
                System.out.println(4);
                super.write(ctx, msg, promise);
            }
        };

        EmbeddedChannel channel = new EmbeddedChannel(h1,h2,h3,h4);
        channel.writeInbound(ByteBufAllocator.DEFAULT.buffer().writeBytes("123".getBytes(StandardCharsets.UTF_8)));
    }
}
2.6 ByteBuf
是对字节数据的封装
此2.6小节的log方式是自定义的
    private static void log(ByteBuf buffer) {
        int length = buffer.readableBytes();
        int rows = length / 16 + (length % 15 == 0 ? 0 : 1) + 4;
        StringBuilder buf = new StringBuilder(rows * 80 * 2)
                .append("read index:").append(buffer.readerIndex())
                .append(" write index:").append(buffer.writerIndex())
                .append(" capacity:").append(buffer.capacity())
                .append(NEWLINE);
        appendPrettyHexDump(buf, buffer);
        System.out.println(buf.toString());
    }
ByteBuf 优势
- 池化 - 可以重用池中 ByteBuf 实例,更节约内存,减少内存溢出的可能
- 读写指针分离,不需要像 ByteBuffer 一样切换读写模式
- 可以自动扩容
- 支持链式调用,使用更流畅
- 很多地方体现零拷贝,例如 slice、duplicate、CompositeByteBuf
创建ByteBuf
ByteBuf buf = ByteBufAllocator.DEFAULT.buffer(10);
Bytebuf buf = ctx.alloc().buffer(10);//建议使用,大部分场景shandler中
输出为
read index:0 write index:0 capacity:10
上述代码创建了一个默认的 ByteBuf(池化基于直接内存的 ByteBuf),初始容量是 10
可以使用下面的代码来创建池化基于堆的 ByteBuf
ByteBuf buffer = ByteBufAllocator.DEFAULT.heapBuffer(10);
也可以使用下面的代码来创建池化基于直接内存的 ByteBuf
ByteBuf buffer = ByteBufAllocator.DEFAULT.directBuffer(10);
- 直接内存创建和销毁的代价昂贵,但读写性能高(少一次内存复制),适合配合池化功能一起用
- 直接内存对 GC 压力小,因为这部分内存不受 JVM 垃圾回收的管理,但也要注意及时主动释放
池化和非池化
池化的最大意义在于可以重用 ByteBuf,优点有
- 没有池化,则每次都得创建新的 ByteBuf 实例,这个操作对直接内存代价昂贵,就算是堆内存,也会增加 GC 压力
- 有了池化,则可以重用池中 ByteBuf 实例,并且采用了与 jemalloc 类似的内存分配算法提升分配效率
- 高并发时,池化功能更节约内存,减少内存溢出的可能
池化功能是否开启,可以通过下面的系统环境变量来设置
-Dio.netty.allocator.type={unpooled|pooled}
上面设置命令在IDEA中的使用:在IDEA的VM option中添加
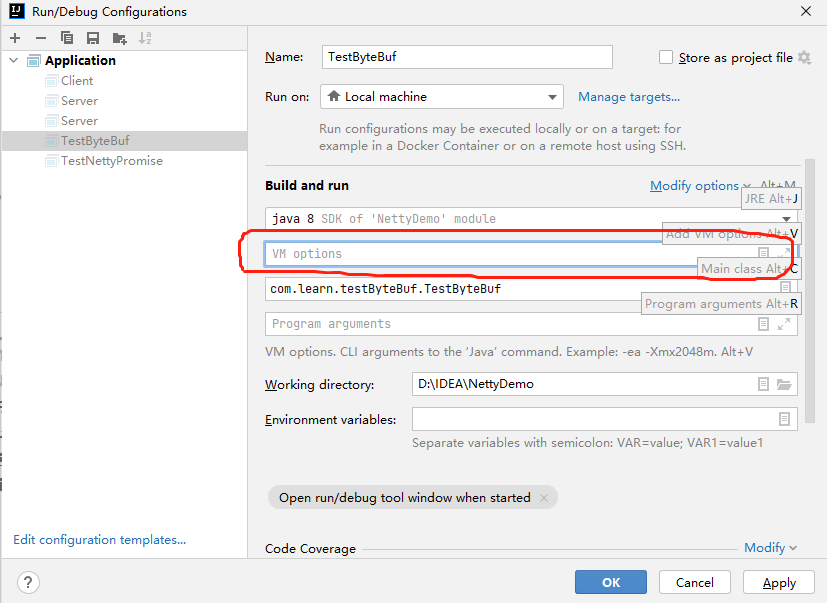
在IDEA的VMOption中设置
- 4.1 以后,非 Android 平台默认启用池化实现,Android 平台启用非池化实现
- 4.1 之前,池化功能还不成熟,默认是非池化实现
ByteBuf 由四部分组成

最开始读写指针都在 0 位置
2.6.1写入和扩容
写入方法:
注意
- 这些方法的未指明返回值的,其返回值都是 ByteBuf,意味着可以链式调用
- 网络传输,默认习惯是 Big Endian
| 方法签名 | 含义 | 备注 |
|---|---|---|
| writeBoolean(boolean value) | 写入 boolean 值 | 用一字节 01|00 代表 true|false |
| writeByte(int value) | 写入 byte 值 | |
| writeShort(int value) | 写入 short 值 | |
| writeInt(int value) | 写入 int 值 | Big Endian,即 0x250,写入后 00 00 02 50 |
| writeIntLE(int value) | 写入 int 值 | Little Endian,即 0x250,写入后 50 02 00 00 |
| writeLong(long value) | 写入 long 值 | |
| writeChar(int value) | 写入 char 值 | |
| writeFloat(float value) | 写入 float 值 | |
| writeDouble(double value) | 写入 double 值 | |
| writeBytes(ByteBuf src) | 写入 netty 的 ByteBuf | |
| writeBytes(byte[] src) | 写入 byte[] | |
| writeBytes(ByteBuffer src) | 写入 nio 的 ByteBuffer | |
| int writeCharSequence(CharSequence sequence, Charset charset) | 写入字符串 |
例子:
public static void main(String[] args) {
    ByteBuf buf = ByteBufAllocator.DEFAULT.buffer(10);
    buf.writeBytes(new byte[]{1,2,3,4});
    log(buf);
    buf.writeInt(5);
    log(buf);
}
输出结果
read index:0 write index:4 capacity:10
         +-------------------------------------------------+
         |  0  1  2  3  4  5  6  7  8  9  a  b  c  d  e  f |
+--------+-------------------------------------------------+----------------+
|00000000| 01 02 03 04                                     |....            |
+--------+-------------------------------------------------+----------------+
read index:0 write index:8 capacity:10
         +-------------------------------------------------+
         |  0  1  2  3  4  5  6  7  8  9  a  b  c  d  e  f |
+--------+-------------------------------------------------+----------------+
|00000000| 01 02 03 04 00 00 00 05                         |........        |
+--------+-------------------------------------------------+----------------+
可以看到先写入了四个字节然后写入了一个四字节的整形结果是八个字节
如果在写入一个in整数,容量就不够了,就会发生扩容。
buffer.writeInt(6);
log(buffer);
结果:
read index:0 write index:12 capacity:64
         +-------------------------------------------------+
         |  0  1  2  3  4  5  6  7  8  9  a  b  c  d  e  f |
+--------+-------------------------------------------------+----------------+
|00000000| 01 02 03 04 00 00 00 05 00 00 00 06             |............    |
+--------+-------------------------------------------------+----------------+
扩容规则是
- 如果写入后数据大小未超过 512,则选择下一个 16 的整数倍,例如写入后大小为 12 ,则扩容后 capacity 是 16
- 如果写入后数据大小超过 512,则选择下一个 2^n,例如写入后大小为 513,则扩容后 capacity 是 210=1024(29=512 已经不够了)
- 扩容不能超过 max capacity 会报错
2.6.2 读取
继续上面的代码,添加四次读取
System.out.println(buf.readByte());
System.out.println(buf.readByte());
System.out.println(buf.readByte());
System.out.println(buf.readByte());
log(buf);
结果
1
2
3
4
read index:4 write index:12 capacity:64
         +-------------------------------------------------+
         |  0  1  2  3  4  5  6  7  8  9  a  b  c  d  e  f |
+--------+-------------------------------------------------+----------------+
|00000000| 00 00 00 05 00 00 00 06                         |........        |
+--------+-------------------------------------------------+----------------+
读过的内容属于废弃部分,在读就只能读取未读取的部分
如果需要重复读取比如上面的整形数字5,则可以在读取前做一个标记
buf.markReaderIndex();
System.out.println(buf.readInt());
log(buf);
结果:
5
read index:8 write index:12 capacity:64
         +-------------------------------------------------+
         |  0  1  2  3  4  5  6  7  8  9  a  b  c  d  e  f |
+--------+-------------------------------------------------+----------------+
|00000000| 00 00 00 06                                     |....            |
+--------+-------------------------------------------------+----------------+
这时如果需要重复读取,则重置reset
buf.resetReaderIndex();
log(buf);
结果:
read index:4 write index:12 capacity:64
         +-------------------------------------------------+
         |  0  1  2  3  4  5  6  7  8  9  a  b  c  d  e  f |
+--------+-------------------------------------------------+----------------+
|00000000| 00 00 00 05 00 00 00 06                         |........        |
+--------+-------------------------------------------------+----------------+
或者是采用get开头的方法,这些方法不会改变读指针
2.6.3 内存释放 retain和release
由于 Netty 中有堆外内存的 ByteBuf 实现,堆外内存最好是手动来释放,而不是等 GC 垃圾回收。
- UnpooledHeapByteBuf 使用的是 JVM 内存,只需等 GC 回收内存即可
- UnpooledDirectByteBuf 使用的就是直接内存了,需要特殊的方法来回收内存
- PooledByteBuf 和它的子类使用了池化机制,需要更复杂的规则来回收内存
Netty 这里采用了引用计数法来控制回收内存,每个 ByteBuf 都实现了 ReferenceCounted 接口
- 每个 ByteBuf 对象的初始计数为 1
- 调用 release 方法计数减 1,如果计数为 0,ByteBuf 内存被回收
- 调用 retain 方法计数加 1,表示调用者没用完之前,其它 handler 即使调用了 release 也不会造成回收
- 当计数为 0 时,底层内存会被回收,这时即使 ByteBuf 对象还在,其各个方法均无法正常使用
基本规则是,谁是最后使用者,谁负责 release
- 起点,对于 NIO 实现来讲,在 io.netty.channel.nio.AbstractNioByteChannel.NioByteUnsafe#read 方法中首次创建 ByteBuf 放入 pipeline(line 163 pipeline.fireChannelRead(byteBuf))
- 入站 ByteBuf 处理原则
- 对原始 ByteBuf 不做处理,调用 ctx.fireChannelRead(msg) 向后传递,这时无须 release
- 将原始 ByteBuf 转换为其它类型的 Java 对象,这时 ByteBuf 就没用了,必须 release
- 如果不调用 ctx.fireChannelRead(msg) 向后传递,那么也必须 release
- 注意各种异常,如果 ByteBuf 没有成功传递到下一个 ChannelHandler,必须 release
- 假设消息一直向后传,那么 TailContext 会负责释放未处理消息(原始的 ByteBuf)
- 出站 ByteBuf 处理原则
- 出站消息最终都会转为 ByteBuf 输出,一直向前传,由 HeadContext flush 后 release
- 异常处理原则
- 有时候不清楚 ByteBuf 被引用了多少次,但又必须彻底释放,可以循环调用 release 直到返回 true
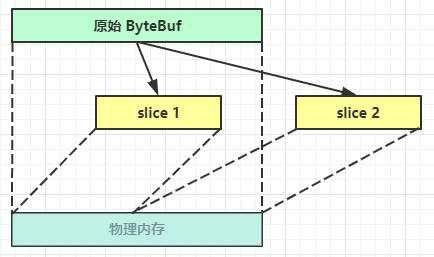
2.6.4 slice
【零拷贝】的体现之一,对原始 ByteBuf 进行切片成多个 ByteBuf,切片后的 ByteBuf 并没有发生内存复制,还是使用原始 ByteBuf 的内存,切片后的 ByteBuf 维护独立的 read,write 指针
示例:
public class TestSlice {
    public static void main(String[] args) {
        ByteBuf buf = ByteBufAllocator.DEFAULT.buffer(10);
        buf.writeBytes(new byte[]{1,2,3,4});
        System.out.println("buf");
        System.out.println(ByteBufUtil.prettyHexDump(buf));
        System.out.println("slice");
        ByteBuf slice = buf.slice();
        System.out.println(ByteBufUtil.prettyHexDump(slice));
        //slice.writeByte(5); //如果执行,会报 IndexOutOfBoundsException 异常
        buf.readByte();
        System.out.println("buf读一个字节对slice没有改变");
        System.out.println(ByteBufUtil.prettyHexDump(buf));
        System.out.println(ByteBufUtil.prettyHexDump(slice));
        System.out.println("slice的内容发生了改变则原始Bytebuf也会受影响");
        slice.setByte(1,8);
        System.out.println(ByteBufUtil.prettyHexDump(buf));
        System.out.println(ByteBufUtil.prettyHexDump(slice));
    }
}
结果:
buf
         +-------------------------------------------------+
         |  0  1  2  3  4  5  6  7  8  9  a  b  c  d  e  f |
+--------+-------------------------------------------------+----------------+
|00000000| 01 02 03 04                                     |....            |
+--------+-------------------------------------------------+----------------+
slice
         +-------------------------------------------------+
         |  0  1  2  3  4  5  6  7  8  9  a  b  c  d  e  f |
+--------+-------------------------------------------------+----------------+
|00000000| 01 02 03 04                                     |....            |
+--------+-------------------------------------------------+----------------+
buf读一个字节对slice没有改变
         +-------------------------------------------------+
         |  0  1  2  3  4  5  6  7  8  9  a  b  c  d  e  f |
+--------+-------------------------------------------------+----------------+
|00000000| 02 03 04                                        |...             |
+--------+-------------------------------------------------+----------------+
         +-------------------------------------------------+
         |  0  1  2  3  4  5  6  7  8  9  a  b  c  d  e  f |
+--------+-------------------------------------------------+----------------+
|00000000| 01 02 03 04                                     |....            |
+--------+-------------------------------------------------+----------------+
slice的内容发生了改变则原始Bytebuf也会受影响
         +-------------------------------------------------+
         |  0  1  2  3  4  5  6  7  8  9  a  b  c  d  e  f |
+--------+-------------------------------------------------+----------------+
|00000000| 08 03 04                                        |...             |
+--------+-------------------------------------------------+----------------+
         +-------------------------------------------------+
         |  0  1  2  3  4  5  6  7  8  9  a  b  c  d  e  f |
+--------+-------------------------------------------------+----------------+
|00000000| 01 08 03 04                                     |....            |
+--------+-------------------------------------------------+----------------+
注意,切片后不能追加write,因为max capacity被固定到这个区间的大小
如果原始Bytebuf再次读操作,此时的slice不受影响,因为他有独立的读写指针但如果slice的内容发生了改变则原始Bytebuf也会受影响,因为底层是同一块内存。
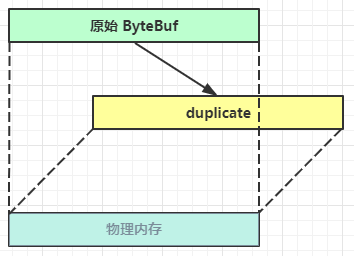
2.6.5 duplicate
【零拷贝】的体现之一,就好比截取了原始 ByteBuf 所有内容,并且没有 max capacity 的限制,也是与原始 ByteBuf 使用同一块底层内存,只是读写指针是独立的
2.6.6 copy
copy方法会将底层内存数据进行深拷贝,因此无论读写,都与原始 ByteBuf 无关。
源码注释:
Returns a copy of this buffer's readable bytes. Modifying the content of the returned buffer or this buffer does not affect each other at all. This method is identical to buf.copy(buf.readerIndex(), buf.readableBytes()). This method does not modify readerIndex or writerIndex of this buffer.
2.6.7 CompositeByteBuf
【零拷贝】的体现之一,可以将多个 ByteBuf 合并为一个逻辑上的 ByteBuf,避免拷贝
CompositeByteBuf 是一个组合的 ByteBuf,它内部维护了一个 Component 数组,每个 Component 管理一个 ByteBuf,记录了这个 ByteBuf 相对于整体偏移量等信息,代表着整体中某一段的数据。
- 优点,对外是一个虚拟视图,组合这些 ByteBuf 不会产生内存复制
- 缺点,复杂了很多,多次操作会带来性能的损耗
例子:
public class TestCompositeByteBuf {
    public static void main(String[] args) {
        ByteBuf buf1 = ByteBufAllocator.DEFAULT.buffer(5);
        buf1.writeBytes(new byte[]{1, 2, 3, 4, 5});
        ByteBuf buf2 = ByteBufAllocator.DEFAULT.buffer(5);
        buf2.writeBytes(new byte[]{6, 7, 8, 9, 10});
        System.out.println(ByteBufUtil.prettyHexDump(buf1));
        System.out.println(ByteBufUtil.prettyHexDump(buf2));
        //方法一
//        ByteBuf buf3 = ByteBufAllocator.DEFAULT
//                .buffer(buf1.readableBytes()+buf2.readableBytes());
//        buf3.writeBytes(buf1);
//        buf3.writeBytes(buf2);
//        System.out.println(ByteBufUtil.prettyHexDump(buf3));
        //方法2
        CompositeByteBuf buf4 = ByteBufAllocator.DEFAULT.compositeBuffer();
        // true 表示增加新的 ByteBuf 自动递增 write index, 否则 write index 会始终为 0
        buf4.addComponents(true, buf1, buf2);
        System.out.println(ByteBufUtil.prettyHexDump(buf4));
    }
}
结果:
         +-------------------------------------------------+
         |  0  1  2  3  4  5  6  7  8  9  a  b  c  d  e  f |
+--------+-------------------------------------------------+----------------+
|00000000| 01 02 03 04 05                                  |.....           |
+--------+-------------------------------------------------+----------------+
         +-------------------------------------------------+
         |  0  1  2  3  4  5  6  7  8  9  a  b  c  d  e  f |
+--------+-------------------------------------------------+----------------+
|00000000| 06 07 08 09 0a                                  |.....           |
+--------+-------------------------------------------------+----------------+
         +-------------------------------------------------+
         |  0  1  2  3  4  5  6  7  8  9  a  b  c  d  e  f |
+--------+-------------------------------------------------+----------------+
|00000000| 01 02 03 04 05 06 07 08 09 0a                   |..........      |
+--------+-------------------------------------------------+----------------+
2.7 Unpooled类
netty提供了一个专门操作缓冲区,及netty的数据容器的工具类,提供了非池化的 ByteBuf 创建、组合、复制等操作。常用方法:
public static ByteBuf copiedBuffer(CharSequence string,Charset charset)
public static ByteBuf wrappedBuffer(ByteBuf... buffers)
三、Netty的粘包和半包
3.1 粘包、拆包现象复现
客户端分别发送了两条数据包d1和d2给服务端,由于服务端一次读取到的字节数是不确定的,故可能存在4种情况:
- 服务端分两次读取到了独立的数据包,分别是d1和d2,没有粘包和拆包
- 服务端一次接收了两个数据包,d1和d2粘合在一起,成为TCP粘包
- 如果d2de1数据包较大,服务端分两次读取到了两个数据包,第一次读取到了完成的d1和d2的一部分,第二次读取到了d2包的剩余部分,成为TCP拆包
- 如果d1,d2的数据包都很大,服务端分多次才能将d1和d2包接收完全,期间发生多次拆包。
编写服务器端代码
@Slf4j
public class Server {
    void start(){
        NioEventLoopGroup bossGroup = new NioEventLoopGroup();
        NioEventLoopGroup workerGroup = new NioEventLoopGroup();
        try {
            ServerBootstrap bootstrap = new ServerBootstrap()
                    .group(bossGroup, workerGroup)
                    .channel(NioServerSocketChannel.class)
                    .childHandler(new ChannelInitializer<SocketChannel>() {
                        @Override
                        protected void initChannel(SocketChannel ch) throws Exception {
                            ch.pipeline().addLast(new LoggingHandler(LogLevel.DEBUG));
                            ch.pipeline().addLast(new ChannelInboundHandlerAdapter() {

                                @Override
                                public void channelActive(ChannelHandlerContext ctx) throws Exception {
                                    log.debug("channel connected {}", ctx.channel());
                                    super.channelActive(ctx);
                                }

                                @Override
                                public void channelInactive(ChannelHandlerContext ctx) throws Exception {
                                    log.debug("channel connected {}", ctx.channel());
                                    super.channelInactive(ctx);
                                }
                            });
                        }
                    });
            ChannelFuture channelFuture = bootstrap.bind(8080);
            log.debug("{} binging...",channelFuture.channel());
            channelFuture.sync();
            log.debug("{} binded",channelFuture.channel());
            channelFuture.channel().closeFuture().sync();
        }catch (Exception e){
            e.printStackTrace();
        }finally {
            bossGroup.shutdownGracefully();
            workerGroup.shutdownGracefully();
            log.debug("stop");
        }

    }

    public static void main(String[] args) {
        new Server().start();
    }
}
客户端代码
@Slf4j
public class Client {
    public static void main(String[] args) {
        NioEventLoopGroup group = new NioEventLoopGroup();
        try {
            Bootstrap bootstrap = new Bootstrap()
                    .group(group)
                    .channel(NioSocketChannel.class)
                    .handler(new ChannelInitializer<SocketChannel>() {
                        @Override
                        protected void initChannel(SocketChannel ch) throws Exception {
                            ch.pipeline().addLast(new ChannelInboundHandlerAdapter() {
                                @Override
                                public void channelActive(ChannelHandlerContext ctx) throws Exception {
                                    log.debug("sending...");
                                    Random random = new Random();
                                    for (int i = 0; i < 10; i++) {
                                        ByteBuf buf = ctx.alloc().buffer();
                                        buf.writeBytes(new byte[]{0, 1, 2, 3, 4, 5, 6, 7, 8, 9, 10, 11, 12, 13, 14, 15});
                                        ctx.writeAndFlush(buf);
                                    }
                                    super.channelActive(ctx);
                                }
                            });
                        }
                    });
            ChannelFuture channelFuture = bootstrap.connect("localhost", 8080);
            channelFuture.sync();
            channelFuture.channel().closeFuture().sync();
        }catch (Exception e){
            e.printStackTrace();
        }finally {
            group.shutdownGracefully();
        }
    }
}
结果
13:31:52.851 [main] DEBUG com.learn.AllPackageAndHalfPackage.Server - [id: 0xf209f976] binging...
13:31:52.857 [main] DEBUG com.learn.AllPackageAndHalfPackage.Server - [id: 0xf209f976, L:/0:0:0:0:0:0:0:0:8080] binded
13:31:57.668 [nioEventLoopGroup-3-1] DEBUG io.netty.handler.logging.LoggingHandler - [id: 0x5d357c65, L:/127.0.0.1:8080 - R:/127.0.0.1:50455] REGISTERED
13:31:57.668 [nioEventLoopGroup-3-1] DEBUG io.netty.handler.logging.LoggingHandler - [id: 0x5d357c65, L:/127.0.0.1:8080 - R:/127.0.0.1:50455] ACTIVE
13:31:57.668 [nioEventLoopGroup-3-1] DEBUG com.learn.AllPackageAndHalfPackage.Server - channel connected [id: 0x5d357c65, L:/127.0.0.1:8080 - R:/127.0.0.1:50455]
13:31:57.678 [nioEventLoopGroup-3-1] DEBUG io.netty.util.Recycler - -Dio.netty.recycler.maxCapacityPerThread: 32768
13:31:57.678 [nioEventLoopGroup-3-1] DEBUG io.netty.util.Recycler - -Dio.netty.recycler.maxSharedCapacityFactor: 2
13:31:57.678 [nioEventLoopGroup-3-1] DEBUG io.netty.util.Recycler - -Dio.netty.recycler.linkCapacity: 16
13:31:57.678 [nioEventLoopGroup-3-1] DEBUG io.netty.util.Recycler - -Dio.netty.recycler.ratio: 8
13:31:57.683 [nioEventLoopGroup-3-1] DEBUG io.netty.buffer.AbstractByteBuf - -Dio.netty.buffer.bytebuf.checkAccessible: true
13:31:57.683 [nioEventLoopGroup-3-1] DEBUG io.netty.util.ResourceLeakDetectorFactory - Loaded default ResourceLeakDetector: io.netty.util.ResourceLeakDetector@30393488
13:31:57.686 [nioEventLoopGroup-3-1] DEBUG io.netty.handler.logging.LoggingHandler - [id: 0x5d357c65, L:/127.0.0.1:8080 - R:/127.0.0.1:50455] READ: 160B
         +-------------------------------------------------+
         |  0  1  2  3  4  5  6  7  8  9  a  b  c  d  e  f |
+--------+-------------------------------------------------+----------------+
|00000000| 00 01 02 03 04 05 06 07 08 09 0a 0b 0c 0d 0e 0f |................|
|00000010| 00 01 02 03 04 05 06 07 08 09 0a 0b 0c 0d 0e 0f |................|
|00000020| 00 01 02 03 04 05 06 07 08 09 0a 0b 0c 0d 0e 0f |................|
|00000030| 00 01 02 03 04 05 06 07 08 09 0a 0b 0c 0d 0e 0f |................|
|00000040| 00 01 02 03 04 05 06 07 08 09 0a 0b 0c 0d 0e 0f |................|
|00000050| 00 01 02 03 04 05 06 07 08 09 0a 0b 0c 0d 0e 0f |................|
|00000060| 00 01 02 03 04 05 06 07 08 09 0a 0b 0c 0d 0e 0f |................|
|00000070| 00 01 02 03 04 05 06 07 08 09 0a 0b 0c 0d 0e 0f |................|
|00000080| 00 01 02 03 04 05 06 07 08 09 0a 0b 0c 0d 0e 0f |................|
|00000090| 00 01 02 03 04 05 06 07 08 09 0a 0b 0c 0d 0e 0f |................|
+--------+-------------------------------------------------+----------------+
13:31:57.686 [nioEventLoopGroup-3-1] DEBUG io.netty.channel.DefaultChannelPipeline - Discarded inbound message PooledUnsafeDirectByteBuf(ridx: 0, widx: 160, cap: 1024) that reached at the tail of the pipeline. Please check your pipeline configuration.
13:31:57.686 [nioEventLoopGroup-3-1] DEBUG io.netty.handler.logging.LoggingHandler - [id: 0x5d357c65, L:/127.0.0.1:8080 - R:/127.0.0.1:50455] READ COMPLETE
由输出结果可见,服务器端一次接受了160个字节,而不是接受十次,这就是粘包现象
如果我们将服务器端的接收缓冲区变小,
在上面的服务器端代码的启动助手中加入一条设置
.option(ChannelOption.SO_RCVBUF,10)
结果:
13:44:11.849 [nioEventLoopGroup-3-1] DEBUG io.netty.handler.logging.LoggingHandler - [id: 0x396fef57, L:/127.0.0.1:8080 - R:/127.0.0.1:50708] READ: 36B
         +-------------------------------------------------+
         |  0  1  2  3  4  5  6  7  8  9  a  b  c  d  e  f |
+--------+-------------------------------------------------+----------------+
|00000000| 00 01 02 03 04 05 06 07 08 09 0a 0b 0c 0d 0e 0f |................|
|00000010| 00 01 02 03 04 05 06 07 08 09 0a 0b 0c 0d 0e 0f |................|
|00000020| 00 01 02 03                                     |....            |
+--------+-------------------------------------------------+----------------+
13:44:11.849 [nioEventLoopGroup-3-1] DEBUG io.netty.channel.DefaultChannelPipeline - Discarded inbound message PooledUnsafeDirectByteBuf(ridx: 0, widx: 36, cap: 1024) that reached at the tail of the pipeline. Please check your pipeline configuration.
13:44:11.849 [nioEventLoopGroup-3-1] DEBUG io.netty.handler.logging.LoggingHandler - [id: 0x396fef57, L:/127.0.0.1:8080 - R:/127.0.0.1:50708] READ COMPLETE
13:44:11.849 [nioEventLoopGroup-3-1] DEBUG io.netty.handler.logging.LoggingHandler - [id: 0x396fef57, L:/127.0.0.1:8080 - R:/127.0.0.1:50708] READ: 50B
         +-------------------------------------------------+
         |  0  1  2  3  4  5  6  7  8  9  a  b  c  d  e  f |
+--------+-------------------------------------------------+----------------+
|00000000| 04 05 06 07 08 09 0a 0b 0c 0d 0e 0f 00 01 02 03 |................|
|00000010| 04 05 06 07 08 09 0a 0b 0c 0d 0e 0f 00 01 02 03 |................|
|00000020| 04 05 06 07 08 09 0a 0b 0c 0d 0e 0f 00 01 02 03 |................|
|00000030| 04 05                                           |..              |
+--------+-------------------------------------------------+----------------+
13:44:11.849 [nioEventLoopGroup-3-1] DEBUG io.netty.channel.DefaultChannelPipeline - Discarded inbound message PooledUnsafeDirectByteBuf(ridx: 0, widx: 50, cap: 1024) that reached at the tail of the pipeline. Please check your pipeline configuration.
13:44:11.849 [nioEventLoopGroup-3-1] DEBUG io.netty.handler.logging.LoggingHandler - [id: 0x396fef57, L:/127.0.0.1:8080 - R:/127.0.0.1:50708] READ COMPLETE
13:44:11.849 [nioEventLoopGroup-3-1] DEBUG io.netty.handler.logging.LoggingHandler - [id: 0x396fef57, L:/127.0.0.1:8080 - R:/127.0.0.1:50708] READ: 50B
         +-------------------------------------------------+
         |  0  1  2  3  4  5  6  7  8  9  a  b  c  d  e  f |
+--------+-------------------------------------------------+----------------+
|00000000| 06 07 08 09 0a 0b 0c 0d 0e 0f 00 01 02 03 04 05 |................|
|00000010| 06 07 08 09 0a 0b 0c 0d 0e 0f 00 01 02 03 04 05 |................|
|00000020| 06 07 08 09 0a 0b 0c 0d 0e 0f 00 01 02 03 04 05 |................|
|00000030| 06 07                                           |..              |
+--------+-------------------------------------------------+----------------+
13:44:11.849 [nioEventLoopGroup-3-1] DEBUG io.netty.channel.DefaultChannelPipeline - Discarded inbound message PooledUnsafeDirectByteBuf(ridx: 0, widx: 50, cap: 512) that reached at the tail of the pipeline. Please check your pipeline configuration.
13:44:11.850 [nioEventLoopGroup-3-1] DEBUG io.netty.handler.logging.LoggingHandler - [id: 0x396fef57, L:/127.0.0.1:8080 - R:/127.0.0.1:50708] READ COMPLETE
13:44:11.850 [nioEventLoopGroup-3-1] DEBUG io.netty.handler.logging.LoggingHandler - [id: 0x396fef57, L:/127.0.0.1:8080 - R:/127.0.0.1:50708] READ: 24B
         +-------------------------------------------------+
         |  0  1  2  3  4  5  6  7  8  9  a  b  c  d  e  f |
+--------+-------------------------------------------------+----------------+
|00000000| 08 09 0a 0b 0c 0d 0e 0f 00 01 02 03 04 05 06 07 |................|
|00000010| 08 09 0a 0b 0c 0d 0e 0f                         |........        |
+--------+-------------------------------------------------+----------------+
13:44:11.850 [nioEventLoopGroup-3-1] DEBUG io.netty.channel.DefaultChannelPipeline - Discarded inbound message PooledUnsafeDirectByteBuf(ridx: 0, widx: 24, cap: 512) that reached at the tail of the pipeline. Please check your pipeline configuration.
13:44:11.850 [nioEventLoopGroup-3-1] DEBUG io.netty.handler.logging.LoggingHandler - [id: 0x396fef57, L:/127.0.0.1:8080 - R:/127.0.0.1:50708] READ COMPLETE
我们会看到比较明显的粘包拆包现象。
serverBootstrap.option(ChannelOption.SO_RCVBUF, 10) 影响的底层接收缓冲区(即滑动窗口)大小,仅决定了 netty 读取的最小单位,netty 实际每次读取的一般是它的整数倍
3.2 现象分析
粘包现象:发送 abc def,接收abcdef
原因:
- 应用层:接收方ByteBuf设置过大,netty默认为1024
- tcp滑动窗口。假设发送方 256 bytes 表示一个完整报文,但由于接收方处理不及时且窗口大小足够大,这 256 bytes 字节就会缓冲在接收方的滑动窗口中,当滑动窗口中缓冲了多个报文就会粘包
- Nagle算法,会造成粘包
Nagle 算法
- 即使发送一个字节,也需要加入 tcp 头和 ip 头,也就是总字节数会使用 41 bytes,非常不经济。因此为了提高网络利用率,tcp 希望尽可能发送足够大的数据,这就是 Nagle 算法产生的缘由
- 该算法是指发送端即使还有应该发送的数据,但如果这部分数据很少的话,则进行延迟发送
- 如果 SO_SNDBUF 的数据达到 MSS,则需要发送
- 如果 SO_SNDBUF 中含有 FIN(表示需要连接关闭)这时将剩余数据发送,再关闭
- 如果 TCP_NODELAY = true,则需要发送
- 已发送的数据都收到 ack 时,则需要发送
- 上述条件不满足,但发生超时(一般为 200ms)则需要发送
- 除上述情况,延迟发送
半包现象:发送abcdef,接收abc def
原因:
- 应用层:接收方ByteBuf小于实际发送的数据量
- 滑动窗口:假设接收方的窗口只剩了 128 bytes,发送方的报文大小是 256 bytes,这时放不下了,只能先发送前 128 bytes,等待 ack 后才能发送剩余部分,这就造成了半包
- MSS限制:当发送的数据超过MSS限制后,会将数据切分发送,会造成半包
本质是TCP是流式协议,消息无边界。
滑动窗口
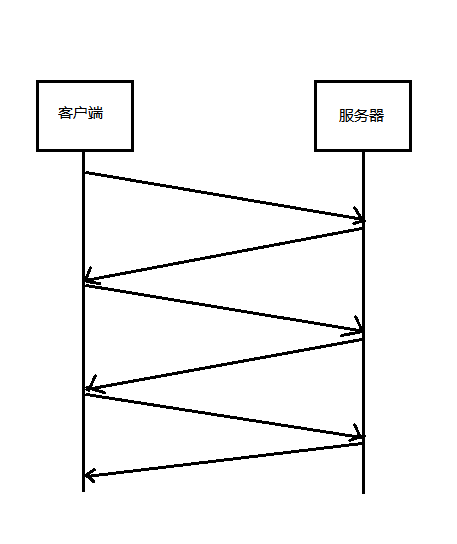
TCP 以一个段(segment)为单位,每发送一个段就需要进行一次确认应答(ack)处理,但如果这么做,缺点是包的往返时间越长性能就越差
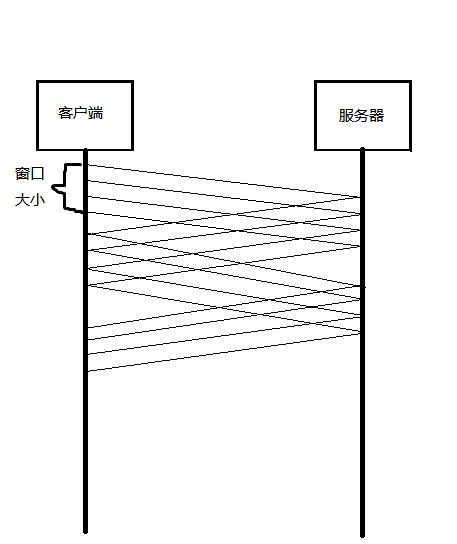
为了解决此问题,引入了窗口概念,窗口大小即决定了无需等待应答而可以继续发送的数据最大值
窗口实际就起到一个缓冲区的作用,同时也能起到流量控制的作用
- 窗口内的数据才允许被发送,当应答未到达前,窗口必须停止滑动
- 如果连接的数据 ack 回来了,窗口就可以向前滑动,如下图
- 接收方也会维护一个窗口,只有落在窗口内的数据才能允许接收
MSS 限制
- 链路层对一次能够发送的最大数据有限制,这个限制称之为 MTU(maximum transmission unit),不同的链路设备的 MTU 值也有所不同,例如
- 以太网的 MTU 是 1500
- FDDI(光纤分布式数据接口)的 MTU 是 4352
- 本地回环地址的 MTU 是 65535 - 本地测试不走网卡
- MSS 是最大段长度(maximum segment size),它是 MTU 刨去 tcp 头和 ip 头后剩余能够作为数据传输的字节数
- ipv4 tcp 头占用 20 bytes,ip 头占用 20 bytes,因此以太网 MSS 的值为 1500 - 40 = 1460
- TCP 在传递大量数据时,会按照 MSS 大小将数据进行分割发送
- MSS 的值在三次握手时通知对方自己 MSS 的值,然后在两者之间选择一个小值作为 MSS
3.3 粘包和拆包解决方案
-
业内的解决方案
由于底层的TCP无法理解上层的业务数据,所以在底层是无法保证数据包不被拆分和重组的,这个问题只能通过上层的应用协议栈设计来解决,根据主流协议的解决方案,分为以下:
- 消息长度固定,累计读取到长度和定长LEN的报文后,就认为读取到一个完整的信息
- 将换行符作为消息结束符
- 将特殊的分隔符作为消息的结束标志,回车换行符就是一种特殊的结束分隔符
- 通过在消息头中定义长度字段来标识消息的总长度
-
Netty中的解决方案
netty提供了四种解码器,分别:
- 固定长度的拆包器FIxedLengthFrameDecoder,每个应用层数据包都拆分成固定长度的大小
- 行拆包器LineBasedFrameDecoder,每个应用层数据包,都以换行符作为分隔符,进行分割拆分。
- 分隔符拆包器DelimiterBasedFrameDecoder,每个应用层数据包,都通过自定义的分隔符,进行分割拆分。
- 基于数据包长度的拆包器LengthFieldBasedFrameDecoder,将应用层数据包的长度,作为接收端应用层数据包的拆分依据。按照应用层数据包的大小拆包
四、自定义RPC
4.1 分布式网络通信
在分布式服务框架中,一个最基础的要求就是远程服务通讯,在Java领域有很多技术,比如RMI、Hessian、SOAP、ESB、JMS。
然而要实现网络机器的通讯,首先还是得了解计算机网络通信的基本原理,从底层层面看,网络通信主要是将流从一台计算机传输到另一台计算机,基于传输协议和网络IO来实现。传输协议比较出名的有tcp,UDP等,这些都是在基于Socket概念上为某类应用场景而扩展出的传输协议。如下图:
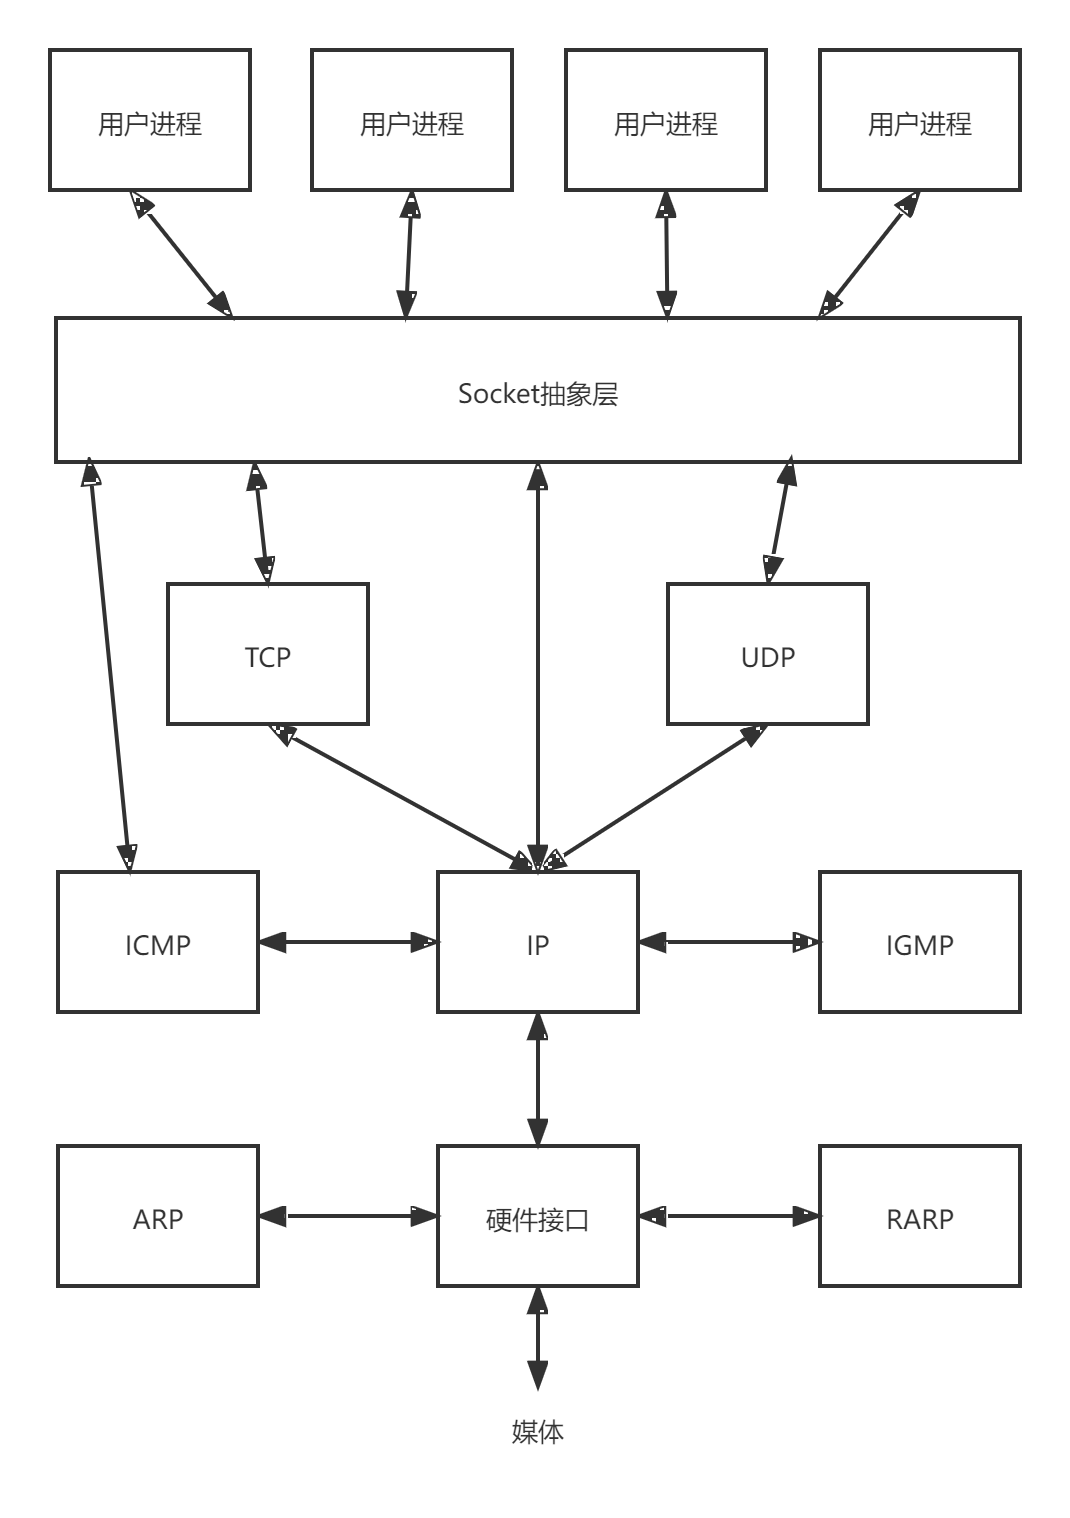
网络IO,主要有BIO、NIO、AIO,所有的分布式应用都基于这个原理
什么是RPC
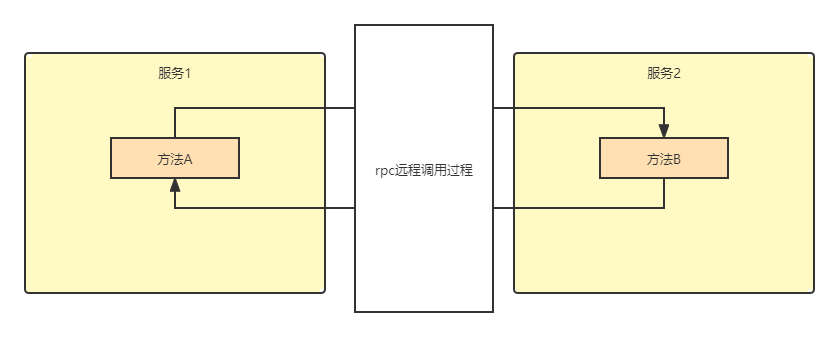
RPC全称为remote procedure call,即远程过程调用。借助RPC可以做到像本地调用一样调用远程服务,是一种进程间的通信方式。
比如有AB两台服务器,A服务器上的应用想调用B服务器上的应用提供的方法,由于两个应用不在一个内存空间,不能直接调用,所以需要网络来表达调用的语义和传达调用的数据。如下图:
rpc指的是整个网络远程调用过程。
一个完整的RPC架构包含四个核心组件,分别是Client,ClientStub,Server,ServerClub
- Client,客户端,服务的调用方
- Server,服务端,服务提供者
- Client Stub,存放服务端的地址消息。再将客户端的请求参数打包成网络消息,然后通过网络远程发送给服务方
- Server Stub,接收客户端发送过来的消息,将消息解包,并调用本地的方法
在java中RPC框架比较多,常见的有Hessian、gRPC、Dubbo 等,其实对 于RPC框架而言,核心模块就是通讯和序列化
4.2 Netty实现RPC框架
需求:
dubbo底层使用了Netty作为网络通讯框架,要求用Netty实现一个简单的RPC框架,消费者和提供服务者约定接口和协议,消费者远程调用提供者的服务。具体需求是客户端远程带调用服务端提供根据ID查询user对象的方法。
4.2.1 公用接口
public interface IUserService {
    User getById(Integer id);
}
实体类
@Data
public class User {
    private int id;
    private String name;
}
请求和返回对象略
4.2.2 服务端实现
定义注解
@Target(ElementType.TYPE)
@Retention(RetentionPolicy.RUNTIME)
public @interface RpcService {
}
服务类
@Service
public class RpcServer implements DisposableBean {

    private NioEventLoopGroup bossGroup;
    private NioEventLoopGroup workerGroup;

    @Autowired
    RpcServerHandler rpcServerHandler;

    public void startServer(String ip, Integer port) {
        try {
            bossGroup =new NioEventLoopGroup();
            workerGroup = new NioEventLoopGroup();
            ServerBootstrap serverBootstrap = new ServerBootstrap();
            serverBootstrap
                    .group(bossGroup,workerGroup)
                    .channel(NioServerSocketChannel.class)
                    .childHandler(new ChannelInitializer<SocketChannel>() {
                        @Override
                        protected void initChannel(SocketChannel ch) throws Exception {
                            ChannelPipeline pipeline = ch.pipeline();
                            //添加解码器
                            pipeline.addLast(new StringDecoder());
                            pipeline.addLast(new StringEncoder());
                            //业务处理类
                            pipeline.addLast(rpcServerHandler);
                        }
                    });
            ChannelFuture sync = serverBootstrap.bind(ip, port).sync();
            System.out.println("服务端启动成功");
            sync.channel().closeFuture().sync();
        } catch (InterruptedException e) {
            e.printStackTrace();
        }finally {
            if (bossGroup!=null){
                bossGroup.shutdownGracefully();
            }
            if (bossGroup!=null){
                bossGroup.shutdownGracefully();
            }
        }
    }

    /**
     * @Author Yuhaoran
     * @Description 此方法   可以在容器销毁时执行
     * @Date 2021/10/23 15:42
     **/
    @Override
    public void destroy() throws Exception {
        if (bossGroup!=null){
            bossGroup.shutdownGracefully();
        }
        if (bossGroup!=null){
            bossGroup.shutdownGracefully();
        }
    }
}
服务端业务处理类
@Component
@ChannelHandler.Sharable
public class RpcServerHandler extends SimpleChannelInboundHandler implements ApplicationContextAware {

    private static final Map SERVICE_INSTANCE_MAP = new ConcurrentHashMap();

    @Override
    protected void channelRead0(ChannelHandlerContext ctx, Object msg) throws Exception {
        //将msg转换成RpcRequest
        RpcRequest rpcRequest = JSON.parseObject(msg.toString(), RpcRequest.class);
        RpcResponse rpcResponse = new RpcResponse();
        rpcResponse.setRequestId(rpcRequest.getRequestId());
        try {
            //业务处理
            rpcResponse.setResult(handler(rpcRequest));
        }catch (Exception e){
            e.printStackTrace();
            rpcResponse.setError(e.getMessage());
        }
        ctx.writeAndFlush(JSON.toJSONString(rpcResponse));
    }
    /**
     * @Author Yuhaoran
     * @Description 业务处理逻辑
     * @param rpcRequest
     * @return java.lang.Object
     * @Date 2021/10/23 16:15
     **/
    private Object handler(RpcRequest rpcRequest) throws InvocationTargetException {
        //从缓存中获取bean
        String className = rpcRequest.getClassName();
        Object serviceBean = SERVICE_INSTANCE_MAP.get(className);
        if (serviceBean == null){
            throw new RuntimeException("根据BeanName找不到服务,BeanName="+className);
        }
        Class<?> clazz = serviceBean.getClass();
        String methodName = rpcRequest.getMethodName();
        Class<?>[] parameterTypes = rpcRequest.getParameterTypes();
        Object[] parameters = rpcRequest.getParameters();
        //反射调用方法 CGLIB
        FastClass fastClass = FastClass.create(clazz);
        FastMethod method = fastClass.getMethod(methodName,parameterTypes);
        return method.invoke(serviceBean,parameters);
    }


    @Override
    public void setApplicationContext(ApplicationContext applicationContext) throws BeansException {
        //找到标有RpcService注解的全部bean
        Map<String, Object> serviceMap = applicationContext.getBeansWithAnnotation(RpcService.class);
        if (serviceMap != null && serviceMap.size() > 0) {
            Set<Map.Entry<String, Object>> entries = serviceMap.entrySet();
                entries.forEach(item -> {
                    Object serviceBean = item.getValue();
                    if (serviceBean.getClass().getInterfaces().length ==0){
                        throw new RuntimeException("服务必须实现接口");
                    }
                    //默认 约定 取第一个接口作为缓存Bean的名称
                    String name = serviceBean.getClass().getInterfaces()[0].getName();
                    SERVICE_INSTANCE_MAP.put(name,serviceBean);
                });
        }
    }
}
4.2.3 客户端实现
客户端代码
public class RpcClient {

    private EventLoopGroup group;

    private Channel channel;

    private String ip;

    private int port;

    private RpcClientHandler rpcClientHandler = new RpcClientHandler();

    private ExecutorService executorService = Executors.newCachedThreadPool();

    public RpcClient(String ip, int port) {
        this.ip = ip;
        this.port = port;
        initClient();
    }

    /**
     * 初始化方法连接客户端
     *
     * @author Yuhaoran
     * @date 2021/10/26 18:33
     */
    public void initClient() {
        try {
            group = new NioEventLoopGroup();
            Bootstrap bootstrap = new Bootstrap();
            bootstrap
                    .group(group)
                    .channel(NioSocketChannel.class)
                    .option(ChannelOption.SO_KEEPALIVE, Boolean.TRUE)
                    .option(ChannelOption.SO_TIMEOUT, 3000)
                    .handler(new ChannelInitializer<SocketChannel>() {
                        @Override
                        protected void initChannel(SocketChannel ch) throws Exception {
                            ChannelPipeline pipeline = ch.pipeline();
                            pipeline.addLast(new StringDecoder());
                            pipeline.addLast(new StringEncoder());
                            //客户端处理类
                            pipeline.addLast(rpcClientHandler);
                        }
                    });
            channel = bootstrap.connect(ip, port).sync().channel();
        } catch (Exception e) {
            e.printStackTrace();
            if (channel != null) {
                channel.close();
            }
            if (group != null) {
                group.shutdownGracefully();
            }
        }
    }
    /**
     * 给调用者主动关闭的方法
     * @author Yuhaoran
     * @date 2021/10/26 18:41
     */
    public void close(){
        if (channel != null) {
            channel.close();
        }
        if (group != null) {
            group.shutdownGracefully();
        }
    }
    /**
     * 提供消息发送的方法
     * @author Yuhaoran
     * @date 2021/10/26 18:42
     */
    public Object send(String msg) throws ExecutionException, InterruptedException {
        this.rpcClientHandler.setRequestMsg(msg);
        Future submit = executorService.submit(rpcClientHandler);
        return submit.get();
    }

}
客户端业务处理器
public class RpcClientHandler extends SimpleChannelInboundHandler implements Callable {

    ChannelHandlerContext ctx;

    String requestMsg;

    String responseMsg;


    public void setRequestMsg(String requestMsg) {
        this.requestMsg = requestMsg;
    }

    @Override
    protected synchronized void channelRead0(ChannelHandlerContext ctx, Object msg) throws Exception {
        responseMsg = (String) msg;
        //唤醒等待的线程
        notify();
    }

    @Override
    public void channelActive(ChannelHandlerContext ctx) throws Exception {
        this.ctx=ctx;
    }

    /**
     * 发送消息到服务端
     *
     * @author Yuhaoran
     * @date 2021/10/26 18:44
     */
    @Override
    public synchronized Object call() throws Exception {
        ctx.writeAndFlush(requestMsg);
        wait();
        return responseMsg;
    }
}
客户端代理
public class RpcClientProxy {
    public static Object createProxy(Class serviceClass){
        return Proxy.newProxyInstance(Thread.currentThread().getContextClassLoader()
                , new Class[]{serviceClass}, (proxy, method, args) -> {
                    //封装request请求对象
                    RpcRequest request = new RpcRequest();
                    request.setRequestId(UUID.randomUUID().toString());
                    request.setClassName(method.getDeclaringClass().getName());
                    request.setParameterTypes(method.getParameterTypes());
                    request.setParameters(args);
                    request.setMethodName(method.getName());
                    //创建RpcClient
                    RpcClient rpcClient = new RpcClient("127.0.0.1",8899);
                    try {
                        Object responseMsg = rpcClient.send(JSON.toJSONString(request));
                        RpcResponse rpcResponse = JSON.parseObject(responseMsg.toString(), RpcResponse.class);
                        if (rpcResponse.getError()!=null){
                            throw new RuntimeException(rpcResponse.getError());
                        }
                        Object result = rpcResponse.getResult();
                        return JSON.parseObject(result.toString(), method.getReturnType());
                    }catch (Exception e){
                        throw e;
                    }finally {
                        rpcClient.close();
                    }

                });

    }
}