1.MyBatis-Plus入门开发及配置
1.1.MyBatis-Plus简介
MyBatis-Plus(简称 MP)是一个 MyBatis的增强工具,在 MyBatis 的基础上只做增强不做改变,为简化开发、提高效率而生。
MyBatis-Plus易于学习,官网提供了基于SpringBoot的中文文档,社区活跃,版本迭代快速。
MyBatis-Plus官方文档:https://baomidou.com/guide/,可作为日常开发文档及特性学习。
1.2.基于SpringBoot项目集成MyBatis-Plus
可以基于IDEA的Spring Initializr进行SpringBoot项目的创建,或者移步至Boot官网构建一个简单的web starter项目:https://start.spring.io/
①导入MyBatis-Plus相关的依赖包、数据库驱动、lombok插件包:
pom.xml 文件配置
<dependencies>
    <!--数据库驱动-->
    <dependency>
        <groupId>mysql</groupId>
        <artifactId>mysql-connector-java</artifactId>
    </dependency>
    <!--lombok-->
    <dependency>
        <groupId>org.projectlombok</groupId>
        <artifactId>lombok</artifactId>
    </dependency>
    <!--mybatis-plus:版本3.0.5-->
    <dependency>
        <groupId>com.baomidou</groupId>
        <artifactId>mybatis-plus-boot-starter</artifactId>
        <version>3.0.5</version>
    </dependency>

    <dependency>
        <groupId>org.springframework.boot</groupId>
        <artifactId>spring-boot-starter-web</artifactId>
    </dependency>
    <dependency>
        <groupId>org.springframework.boot</groupId>
        <artifactId>spring-boot-starter-test</artifactId>
        <scope>test</scope>
    </dependency>
    <dependency>
        <groupId>junit</groupId>
        <artifactId>junit</artifactId>
        <scope>test</scope>
    </dependency>
</dependencies>
②配置数据库驱动、日志级别
application.properties配置
# mysql5 驱动不同,默认驱动:com.mysql.jdbc.Driver
spring.datasource.username=root
spring.datasource.password=admin
spring.datasource.url=jdbc:mysql://localhost:3306/mybatisplus_0312?useSSL=false&useUnicode=true&characterEncoding=utf-8&serverTimezone=GMT%2B8
#mysql8 驱动不同:com.mysql.cj.jdbc.Driver、需要增加时区的配置:serverTimezone=GMT%2B8,mysql8的驱动向下兼容mysql5
spring.datasource.driver-class-name=com.mysql.cj.jdbc.Driver

#配置日志
mybatis-plus.configuration.log-impl=org.apache.ibatis.logging.stdout.StdOutImpl
1.3.入门Hello World进行数据库操作
基于官网示例来构建数据库表单及POJO数据类:https://baomidou.com/guide/quick-start.html#初始化工程
MybatisPlusApplication启动类:
@SpringBootApplication
//配置Mapper接口类扫描
@MapperScan("com.fengye.mapper")
//配置Spring Bean注解扫描
@ComponentScan(basePackages = "com.fengye.mapper")
public class MybatisPlusApplication {
    public static void main(String[] args) {
        SpringApplication.run(MybatisPlusApplication.class, args);
    }
}
UserMapper类:
@Repository //持久层注解,表示该类交给Springboot管理
public interface UserMapper extends BaseMapper<User> {
}
User类:
@Data
public class User {
    private Long id;
    private String name;
    private Integer age;
    private String email;
}
基础CRUD操作:
@SpringBootTest
class MybatisPlusApplicationTests {

    @Autowired  //需要配置SpringBoot包扫描,否则此处使用@Autowired会报警告
    //@Resource
    private UserMapper userMapper;

    @Test
    void testSelect() {
        System.out.println(("----- selectAll method test ------"));
        List<User> userList = userMapper.selectList(null);
        Assert.assertEquals(5, userList.size());
        userList.forEach(System.out::println);
    }

    @Test
    void testInsert(){
        System.out.println("----- insert method test ------");
        User user = new User();
        user.setName("枫夜爱学习");
        user.setAge(20);
        user.setEmail("241337663@qq.com");
        int insertId = userMapper.insert(user);
        System.out.println(insertId);
    }

    @Test
    void testUpdate(){
        System.out.println("----- update method test ------");
        User user = new User();
        user.setId(1370382950972436481L);
        user.setName("苞米豆最爱");
        user.setAge(4);
        user.setEmail("baomidou@github.com");
        int updateId = userMapper.updateById(user);
        System.out.println(updateId);
        System.out.println(user);
    }

    @Test
    void testDelete(){
        System.out.println("----- delete method test ------");
        int deleteId = userMapper.deleteById(1370386235364118529L);
        System.out.println(deleteId);
    }
}
1.3.主键生成策略配置
主键生成策略:
使用@TableId(type = IdType.AUTO,value = "id") ,value属性值当实体类字段名和数据库一致时可以不写,这里的value指的是数据库字段名称,type的类型有以下几种:
public enum IdType {
    AUTO(0),   //Id自增操作
    NONE(1),  //未设置主键
    INPUT(2),  //手动输入,需要自己setID值
    ID_WORKER(3),  //默认的全局唯一id
    UUID(4),   //全局唯一id  uuid
    ID_WORKER_STR(5);  //ID_WORKER的字符串表示法
    ...
}
目前MyBatis-Plus官方文档建议的id主键设置为:@TableId(type = IdType.INPUT)
1.4.自动填充
自动填充功能可以实现针对某个POJO类中的一些时间字段值进行自定义填充策略(非基于数据库表设置timestamp默认根据时间戳更新),实现自动插入和更新操作:
①首先需要在POJO类上需要自动填充的字段上增加@TableField(fill = FieldFill.INSERT)、@TableField(fill = FieldFill.INSERT_UPDATE)注解:
@Data
public class User {
    //设置主键为需要自己填入设置
    @TableId(type = IdType.INPUT)
    private Long id;
    private String name;
    private Integer age;
    private String email;
    //当创建数据库该字段时,自动执行创建该字段的默认值
    @TableField(fill = FieldFill.INSERT, value = "create_time")
    private Date createTime;
    //当数据库该字段发生创建与更新操作时,自动去填充数据值
    @TableField(fill = FieldFill.INSERT_UPDATE, value = "update_time")
    private Date updateTime;
}
②自定义实现类MyMetaObjectHandler实现MetaObjectHandler接口,覆写insertFill与updateFill方法:
@Slf4j
@Component
public class MyMetaObjectHandler implements MetaObjectHandler {
    //插入时的填充策略
    @Override
    public void insertFill(MetaObject metaObject) {
        log.info("start insert fill ....");
        /**
         *  官网推荐--起始版本 3.3.0(推荐使用),本项目使用3.0.5版本
        this.strictInsertFill(metaObject,"createTime", LocalDateTime.class,LocalDateTime.now());
        this.strictUpdateFill(metaObject,"updateTime",LocalDateTime.class,LocalDateTime.now());
         */
        this.setFieldValByName("createTime", new Date(), metaObject);
        this.setFieldValByName("updateTime",new Date(), metaObject);
    }

    //更新时的填充策略
    @Override
    public void updateFill(MetaObject metaObject) {
        log.info("start update fill ....");
        /**
         *  官方推荐-- 起始版本 3.3.0(推荐),本项目使用3.0.5版本
         * this.strictUpdateFill(metaObject, "updateTime", LocalDateTime.class, LocalDateTime.now()); // 起始版本 3.3.0(推荐)
         */
        this.setFieldValByName("updateTime", new Date(), metaObject);
    }
}
2.核心功能
2.1.批量查询
// 测试批量查询
@Test
public void testSelectByBatchId(){
    List<User> users = userMapper.selectBatchIds(Arrays.asList(1, 2, 3));
    users.forEach(System.out::println);
}
2.2.分页查询
①需要在配置类中注册分页插件注解:
//注册分页插件
 @Bean
 public PaginationInterceptor paginationInterceptor() {
     PaginationInterceptor paginationInterceptor = new PaginationInterceptor();
     // 设置请求的页面大于最大页后操作, true调回到首页,false 继续请求  默认false
     paginationInterceptor.setOverflow(false);
     return paginationInterceptor;
}
②测试分页插件效果:
@Test
 public void testPageHelper(){
     //参数:当前页;页面大小
     Page<User> page = new Page<>(1, 2);
     userMapper.selectPage(page, null);
     List<User> records = page.getRecords();
     records.forEach(System.out::println);
     System.out.println("当前页是:" + page.getCurrent());
     System.out.println("每页显示多少条数:" + page.getSize());
     System.out.println("总页数是:" + page.getTotal());
 }
2.3.逻辑删除
所谓逻辑删除,在数据库中并不是真正的删除数据的记录,而是通过一个变量来设置数据为失效状态(deleted = 0 => deleted = 1)。使用场景:管理员登录系统查看回收站被“删除数据”。
在MybatisPlus中,给我们提供logicSqlInjector
逻辑删除主要实现步骤:
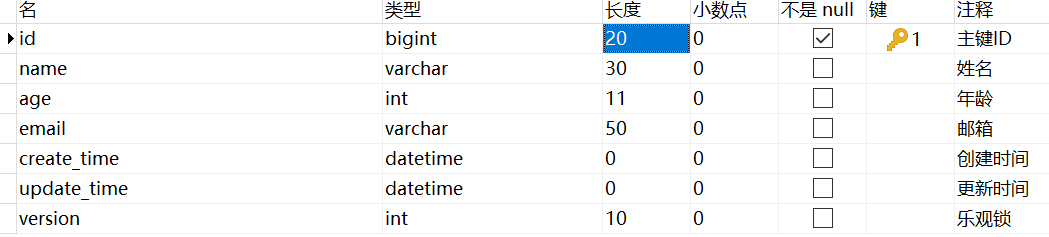
①在数据库中增加逻辑删除字段deleted:
![]()
②实体类User中增加属性字段,并添加@TableLogic注解:
@TableLogic  //逻辑删除
private Integer deleted;
③注册逻辑删除组件:
 //注册逻辑删除插件
@Bean
public ISqlInjector sqlInjector(){
    return new LogicSqlInjector();
}
④在application.properties中配置逻辑删除:
#配置逻辑删除
mybatis-plus.global-config.db-config.logic-delete-value=1
mybatis-plus.global-config.db-config.logic-not-delete-value=0
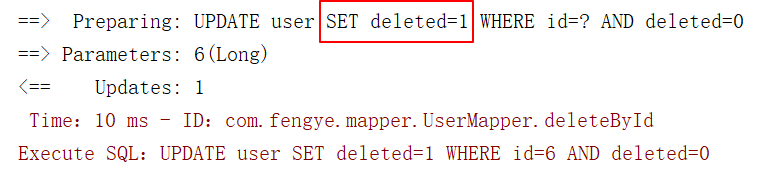
执行测试Sql分析可以看到,实际逻辑删除并没有删除,而是通过修改deleted状态为1,数据仍可以保存在数据库中:
2.4.条件构造器Wapper
条件构造器就是Wrapper,就是一个封装查询条件对象,让开发者自由的定义查询条件,主要用于sql的拼接,排序或者实体参数等;
在实际使用中需要注意:
使用的参数是数据库字段名称,不是Java类属性名
条件构造器的查询方法有很多,可以封装出比较复杂的查询语句块,这里罗列一些重要常用的查询方法,更多详细请查询官网地址:
https://mp.baomidou.com/guide/wrapper.html#abstractwrapper
Wrapper分类:
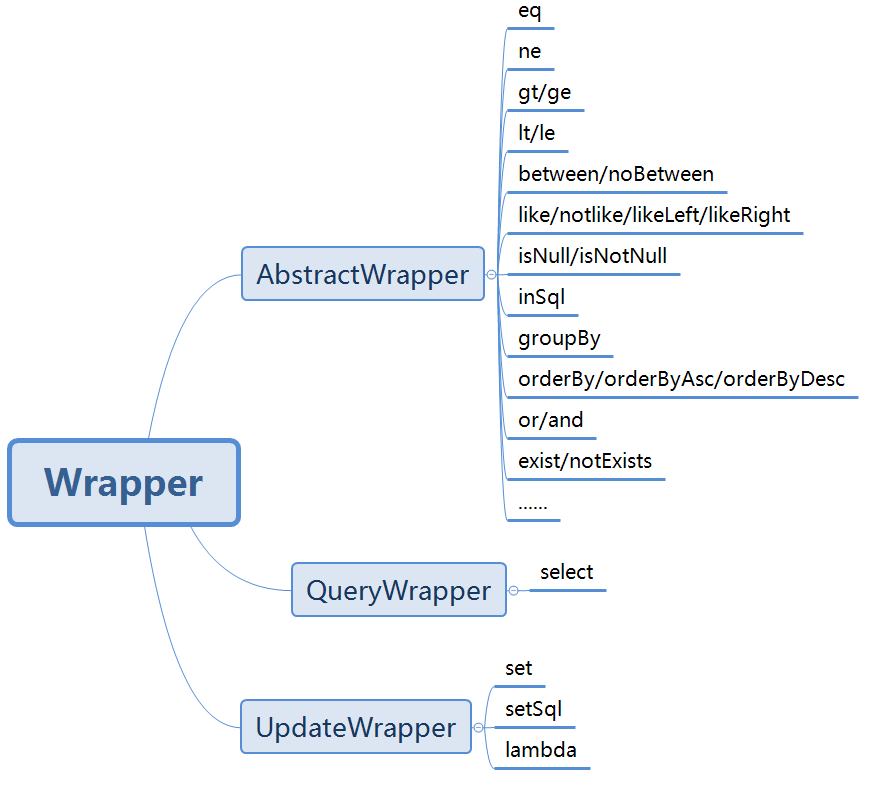
测试如下:
    // isNotNull:非空查询
    // ge:>= 判断查询
    @Test
    public void testQueryWrapper(){
        //查询name不为空、并且邮箱不为空、并且年龄大于等于12
        QueryWrapper<User> queryWrapper = new QueryWrapper<>();
        queryWrapper
                .isNotNull("name")
                .isNotNull("email")
                .ge("age", 21);
        List<User> users = userMapper.selectList(queryWrapper);
        users.forEach(System.out::println);
    }

    // eq:用于单个查询where name = 'xxx'
    @Test
    public void testQueryOne(){
        //查询姓名为Sandy的用户
        QueryWrapper<User> queryWrapper = new QueryWrapper<>();
        queryWrapper.eq("name", "Sandy");
        User selectOne = userMapper.selectOne(queryWrapper);
        System.out.println(selectOne);
    }

    //between:介于...之间
    @Test
    public void testQueryBetween(){
        //查询年龄在20 - 30岁之间的用户
        QueryWrapper<User> queryWrapper = new QueryWrapper<>();
        queryWrapper.between("age", 25, 30);
        List<User> userList = userMapper.selectList(queryWrapper);
        userList.forEach(System.out::println);
    }

    //notLike、likeRight、likeLeft
    @Test
    public void testQueryLike(){
        //查询姓名中不包含字母'e'并且邮箱以't'开头的
        QueryWrapper<User> queryWrapper = new QueryWrapper<>();
        queryWrapper
                .notLike("name", 'e')
                .likeRight("email", 't');
        List<User> userList = userMapper.selectList(queryWrapper);
        userList.forEach(System.out::println);
    }

    //inSql:表示in 查询id IN ( select id from user where id < 3 )
    @Test
    public void testInSql(){
        //查询姓名中不包含字母'e'并且邮箱以't'开头的
        QueryWrapper<User> queryWrapper = new QueryWrapper<>();
        queryWrapper.inSql("id", "select id from user where id < 3");

        List<Object> objects = userMapper.selectObjs(queryWrapper);
        objects.forEach(System.out::println);
    }

    @Test
    public void testOrderBy(){
        //查询user按年龄排序
        QueryWrapper<User> queryWrapper = new QueryWrapper<>();
        queryWrapper.orderByDesc("age");
        List<User> userList = userMapper.selectList(queryWrapper);
        userList.forEach(System.out::println);
    }
3.插件扩展
3.1.乐观锁插件
当我们在开发中,有时需要判断,当我们更新一条数据库记录时,希望这条记录没有被别人更新,这个时候就可以使用乐观锁插件。
乐观锁的实现方式:
- 取出记录时,获取当前的version;
- 更新时,带上这个version;
- 执行更新时,set version = new version where version = oldversion;
- 如果version不对,就更新失败
具体实现步骤如下:
①数据库新增乐观锁字段version,设置默认值为1:
②在实体类User中新增version字段:
@Version //乐观锁Version注解
private Integer version;
③注册乐观锁主键:
//开启事务
@EnableTransactionManagement
@Configuration //声明此类是配置类
public class MyBatisplusConfig {
    // 注册乐观锁插件
    @Bean
    public OptimisticLockerInterceptor optimisticLockerInterceptor() {
        return new OptimisticLockerInterceptor();
    }
}
④测试单线程多线程情况乐观锁是否执行更新update成功:
// 测试乐观锁单线程执行成功
@Test
public void testOptimisticLocker(){
    // 1、查询用户信息
    User user = userMapper.selectById(1L);
    // 2、修改用户信息
    user.setName("fengye");
    user.setEmail("241337663@qq.com");
    // 3、执行更新操作
    userMapper.updateById(user);
}

// 测试乐观锁失败!多线程下
@Test
public void testOptimisticLocker2(){
    // 线程 1
    User user = userMapper.selectById(1L);
    user.setName("fengye111");
    user.setEmail("241337663@qq.com");
    // 模拟另外一个线程执行了插队操作
    User user2 = userMapper.selectById(1L);
    user2.setName("fengye222");
    user2.setEmail("241337663@qq.com");
    userMapper.updateById(user2);
    userMapper.updateById(user); // 如果没有乐观锁就会覆盖插队线程的值!
}
3.2.性能分析插件
MyBatis-Plus提供的性能分析插件可以作为性能分析拦截器,用于输出每条SQL语句及其执行时间。可以在开发测试时定量分析慢查询的SQL语句,用于后期优化分析。
具体使用步骤:
①在MyBatis-PlusConfig类中配置SQL性能分析插件:
/**
  * SQL执行效率插件
  */
 @Bean
 @Profile({"dev","test"})// 设置 dev test 环境开启,保证我们的效率
 public PerformanceInterceptor performanceInterceptor() {
     PerformanceInterceptor performanceInterceptor = new PerformanceInterceptor();
     performanceInterceptor.setMaxTime(100); // ms设置sql执行的最大时间为100ms,如果超过了则不执行
     performanceInterceptor.setFormat(true); // 是否格式化代码
     return performanceInterceptor;
 }
②配置插件运行环境为dev:
#设置开发环境为dev
spring.profiles.active=dev
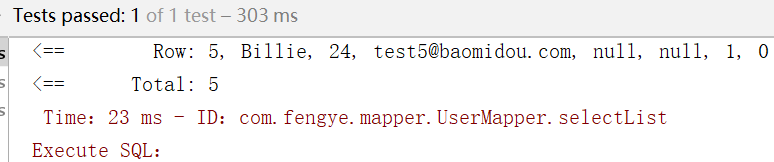
③执行测试,可以看到sql已经format及实际执行sql语句的消耗时间:
 @Test
 public void testPerformance(){
     // 查询全部用户
     List<User> users = userMapper.selectList(null);
     users.forEach(System.out::println);
 }
3.3.代码生成器
AutoGenerator 是 MyBatis-Plus 的代码生成器,通过 AutoGenerator 可以快速生成 Entity、Mapper、Mapper XML、Service、Controller 等各个模块的代码,极大的提升了开发效率。
具体使用步骤如下:
①使用代码生成器(Mybatis-Plus3.1.1版本以下)需要添加velocity模板、Swagger配置:
 <!--添加velocity模板-->
 <dependency>
     <groupId>org.apache.velocity</groupId>
     <artifactId>velocity-engine-core</artifactId>
     <version>2.3</version>
     </dependency>
     <!--Swagger配置-->
     <dependency>
        <groupId>com.spring4all</groupId>
        <artifactId>spring-boot-starter-swagger</artifactId>
        <version>1.5.1.RELEASE</version>
        <scope>provided</scope>
 </dependency>
②编写自动生成器类:
public class AutoGeneratorUtil {
    public static void main(String[] args) {
        AutoGenerator mpg = new AutoGenerator();
       // 策略配置
        // 1、全局配置
        GlobalConfig gc = new GlobalConfig();
        String projectPath = System.getProperty("user.dir");
        gc.setActiveRecord(true);  //是否开启AR模式
        gc.setAuthor("fengye");
        gc.setOutputDir(projectPath+"/src/main/java");
        gc.setOpen(false);
        gc.setFileOverride(false); // 是否覆盖
        gc.setServiceName("%sService"); // 设置生成的services接口的名字的首字母是否为I
        //gc.setIdType(IdType.ID_WORKER);
        //gc.setDateType(DateType.ONLY_DATE);
        gc.setSwagger2(true);
        mpg.setGlobalConfig(gc);
        //2、设置数据源
        DataSourceConfig dsc = new DataSourceConfig();
        dsc.setDriverName("com.mysql.cj.jdbc.Driver");
        dsc.setUrl("jdbc:mysql://localhost:3306/mybatisplus_0312?useSSL=false&useUnicode=true&characterEncoding=utf-8&serverTimezone=GMT%2B8");
        dsc.setUsername("root");
        dsc.setPassword("admin");
        dsc.setDbType(DbType.MYSQL);
        mpg.setDataSource(dsc);
        //3、包的配置
        PackageConfig pc = new PackageConfig();
        pc.setModuleName("test");
        pc.setParent("com.fengye");
        pc.setEntity("entity");
        pc.setMapper("mapper");
        //设置xml文件与mapper目录同级
        pc.setXml("mapper");
        pc.setService("service");
        pc.setController("controller");
        mpg.setPackageInfo(pc);
        //4、策略配置
        StrategyConfig strategy = new StrategyConfig();
        //设置要映射的表名,支持多张表以逗号隔开
        strategy.setInclude("user", "t_dept", "t_employee");
        strategy.setNaming(NamingStrategy.underline_to_camel);
        strategy.setColumnNaming(NamingStrategy.underline_to_camel);
        strategy.setEntityLombokModel(true); //使用lombok注解
        strategy.setRestControllerStyle(true);  //Restful风格
        strategy.setLogicDeleteFieldName("deleted");  //逻辑删除名称
        //5、自动填充配置
        TableFill gmtCreate = new TableFill("gmt_create", FieldFill.INSERT);
        TableFill gmtModified = new TableFill("gmt_modified", FieldFill.INSERT_UPDATE);
        ArrayList<TableFill> tableFills = new ArrayList<>();
        tableFills.add(gmtCreate);
        tableFills.add(gmtModified);
        strategy.setTableFillList(tableFills);
        //6、乐观锁
        strategy.setVersionFieldName("version");strategy.setRestControllerStyle(true);
        strategy.setControllerMappingHyphenStyle(true); //设置映射地址支持下划线 localhost:8080/hello_id_2
     //7、表前缀、生成表对应的PoJo时去掉前缀t
     strategy.setTablePrefix("t_");
        mpg.setStrategy(strategy); mpg.execute(); } }
本博客写作参考文档相关:
https://baomidou.com/guide/
http://luokangyuan.com/mybatisplusxue-xi-bi-ji/
https://www.bilibili.com/video/BV17E411N7KN?p=16&spm_id_from=pageDriver
示例代码已上传至Github地址:
https://github.com/devyf/JavaWorkSpace/tree/master/mybatis_plus/mybatis_plus_quickstart