1.SpringBoot整合JDBCTemplate
1.1.导入jdbc相关依赖包
主要的依赖包:
<dependency>
    <groupId>org.springframework.boot</groupId>
    <artifactId>spring-boot-starter-jdbc</artifactId>
</dependency>

<dependency>
    <groupId>mysql</groupId>
    <artifactId>mysql-connector-java</artifactId>
    <scope>runtime</scope>
</dependency>

<!--实现web页面接口调用-->
<dependency>
    <groupId>org.springframework.boot</groupId>
    <artifactId>spring-boot-starter-web</artifactId>
</dependency>
1.2.yaml配置数据源
application.yml用于连接jdbc数据库操作数据源配置,这里是最简化的配置:
spring:
  datasource:
    username: root
    password: admin
    #假如时区报错,增加时区配置serverTimezone=UTC,以及编码配置
    url: jdbc:mysql://localhost:3306/mybatis02_0322?serverTimezone=UTC&useUnicode=true&characterEncoding=utf-8
    driver-class-name: com.mysql.cj.jdbc.Driver
实际开发过程中基本上会与Druid、C3P0整合,下面也给出了整合Druid数据源相关的配置,所以这里一并放上完整的application.yml配置:


spring:
  datasource:
    username: root
    password: admin
    #假如时区报错,增加时区配置serverTimezone=UTC
    url: jdbc:mysql://localhost:3306/mybatis02_0322?serverTimezone=UTC&useUnicode=true&characterEncoding=utf-8
    driver-class-name: com.mysql.cj.jdbc.Driver
    type: com.alibaba.druid.pool.DruidDataSource

    #springboot 默认是不注入这些属性值的,需要自己绑定
    #druid 数据源专有配置
    initialSize: 5
    minIdle: 5
    maxActive: 20
    maxWait: 60000
    timeBetweenEvictionRunsMillis: 60000
    minEvictableIdleTimeMillis: 300000
    validationQuery: SELECT 1 FROM DUAL
    testWhileIdle: true
    testOnBorrow: false
    testOnReturn: false
    poolPreparedStatements: true

    #配置监控统计拦截的filters,stat:监控统计、log4j:日志记录、wall:防止sql注入
    #如果允许时报错:java.lang.ClassNotFoundException:org.apache.log4j.Priority
    #则导入 log4j 依赖即可,maven地址:https://mvnrepository.com/artifact/log4j/log4j
    filters: stat,wall,log4j
    maxPoolPreparedStatementPerConnectionSize: 20
    useGlobalDataSourceStat: true
    connectionProperties: druid.stat.mergeSql=true;druid.stat.slowSqlMillis=500
最后测试一下数据库连接访问是否成功:
@SpringBootTest
class SpringbootDataApplicationTests {
    @Autowired
    private DataSource dataSource;

    @Test
    void testConnection() throws SQLException {
        System.out.println(dataSource.getClass());
        Connection connection = dataSource.getConnection();
        System.out.println(connection);
    }
}
打印成功,显示获取到了数据源信息:
![]()
1.3.界面访问接口测试
@RestController
public class JDBCController {
    @Autowired
    private JdbcTemplate jdbcTemplate;

    @RequestMapping("/queryList")
    public List<Map<String, Object>> query() {
        String sql = "select * from user";
        List<Map<String, Object>> queryForList = jdbcTemplate.queryForList(sql);
        return queryForList;
    }

    @RequestMapping("/addUser")
    public String AddUser(){
        String sql = "insert into mybatis02_0322.user(id, username, password) values(4, '李磊', '654321')";
        int update = jdbcTemplate.update(sql);
        return "AddUser Ok";
    }

    @RequestMapping("/update/{id}")
    public String update(@PathVariable("id") Integer id){
        String sql = "update mybatis02_0322.user set username = ?, password = ? where id = " + id;
        Object[] objects = new Object[2];
        objects[0] = "测试哈哈哈111";
        objects[1] = "32321";
        int update = jdbcTemplate.update(sql, objects);
        return "updateUser Ok";
    }

    @RequestMapping("/delete/{id}")
    public String delete(@PathVariable("id") Integer id){
        String sql = "delete from mybatis02_0322.user where id = " + id;
        int update = jdbcTemplate.update(sql);
        return "delete Ok";
    }
}
这里对应接口请求页面进行请求测试即可,后台数据库层面进行验证,比较简单,这里就不一一细说,对应可以去看我的源码。
2.SpringBoot整合DruidDataSource
2.1.Druid简介
Druid是阿里巴巴开源平台上一个数据库连接池实现,它结合了C3P0、DBCP、PROXOOL等DB池的优秀实践,同时加入了日志监控。
Druid可以很好地监控DB池连接和Sql的执行情况,是天生针对监控的DB连接池。
SpringBoot2.0以上默认使用Hikari数据源,可以说HiKari和Druid都是当前Java Web上开源的优秀数据源。
2.2.导入Druid相关依赖
对应pom.xml文件:
<!--整合alibaba druid数据源-->
<dependency>
    <groupId>com.alibaba</groupId>
    <artifactId>druid</artifactId>
    <version>1.2.3</version>
</dependency>
<!--导入log4j日志包-->
<dependency>
    <groupId>log4j</groupId>
    <artifactId>log4j</artifactId>
    <version>1.2.17</version>
</dependency>
2.3.配置Druid并使用监控页面
①编写DruidConfig类,启用后台监控功能Bean以及过滤器Bean:
@Configuration
public class DruidConfig {

    @ConfigurationProperties(prefix = "spring.datasource")
    @Bean
    public DataSource druidDataSource(){
        return new DruidDataSource();
    }

    //后台监控功能
    @Bean
    public ServletRegistrationBean statViewServlet(){
        ServletRegistrationBean<StatViewServlet> bean = new ServletRegistrationBean<>(new StatViewServlet(), "/druid/*");
        //后台需要有人登陆,账号密码配置
        HashMap<String, String> initParameters = new HashMap<>();
        initParameters.put("loginUsername", "admin");  //登陆key,是固定的  loginUsername loginPassword
        initParameters.put("loginPassword", "123456");
        //允许谁可以访问
        initParameters.put("allow", "");
        //禁止谁可以访问   initParameters.put("fengye", "192.168.1.10");
        bean.setInitParameters(initParameters);     //设置初始化参数

        return bean;
    }

    //过滤器
    @Bean
    public FilterRegistrationBean webStatFilter(){
        FilterRegistrationBean<Filter> bean = new FilterRegistrationBean<>();
        bean.setFilter(new WebStatFilter());

        HashMap<String, String> initParameters = new HashMap<>();
        //这些不进行统计
        initParameters.put("exclusions", "*.js,*.css,/druid/*");
        bean.setInitParameters(initParameters);

        return bean;
    }
}
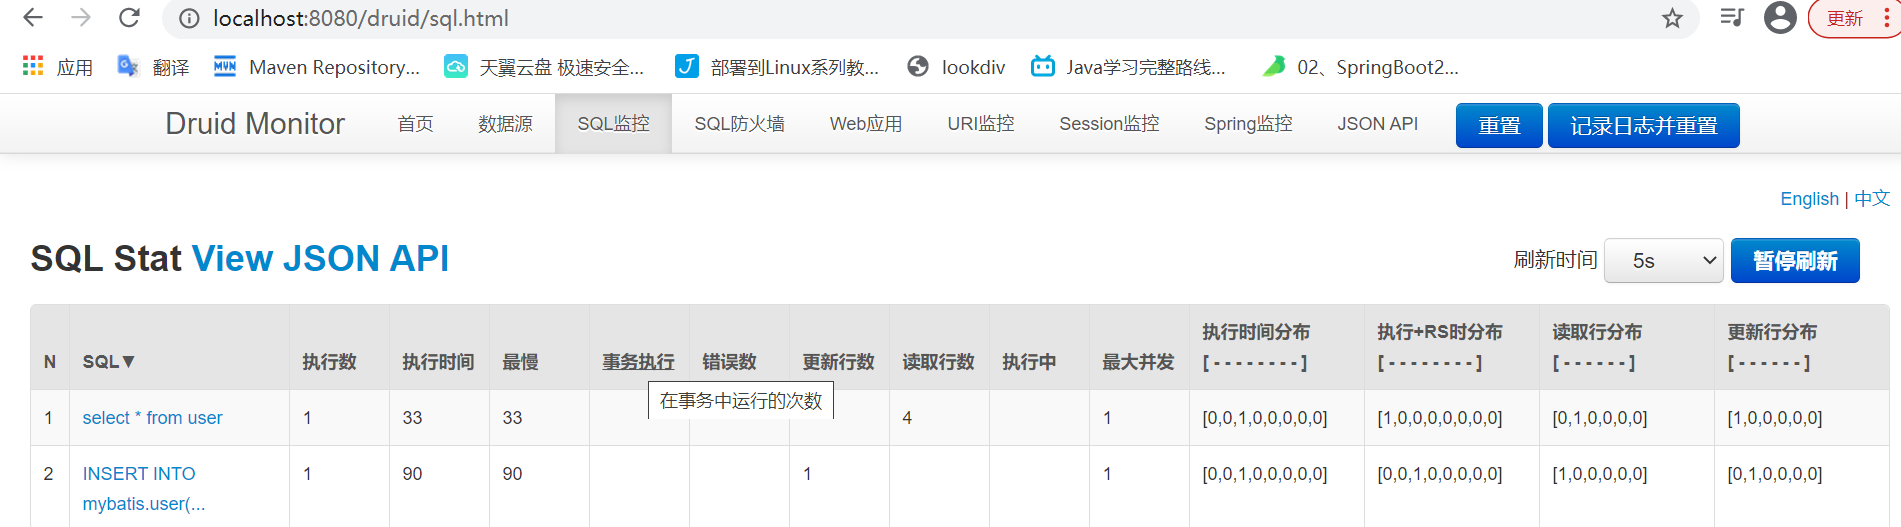
②启动页面访问Druid并测试请求访问sql:
本博客写作参考文档相关:
https://docs.spring.io/spring-boot/docs/current/reference/htmlsingle/#using-boot-starter
https://www.yuque.com/atguigu/springboot/aob431#wtNk1
Spring Boot 2 学习笔记(上):https://blog.csdn.net/u011863024/article/details/113667634
Spring Boot 2 学习笔记(下):
https://blog.csdn.net/u011863024/article/details/113667946
示例代码已上传至Github地址:
https://github.com/devyf/SpringBoot_Study