目录
- 变换的类型
- 主要代码说明
- 代码展示
- 密度聚类
- 层次聚类
增加训练数据, 则能够提升算法的准确率, 因为这样可以避免过拟合, 而避免了过拟合你就可以增大你的网络结构了。 当训练数据有限的时候, 可以通过一些变换来从已有的训练数据集中生成一些新的数据, 来扩大训练数据。 数据增强的方法有:
一、变换的类型
1.1、水平翻转

1.2、随机裁剪
如原始图像大小为256*256, 随机裁剪出一些图像224*224的图像。 如下图, 红色方框内为随机裁剪出的224*224的图片。 AlexNet 训练时, 对左上、 右上、 左下、 右下、 中间做了5次裁剪, 然后翻转, 得到10张裁剪的图片。 防止大网络过拟合(under ubstantial overfitting)

1.3、fancy PCA
在训练集像素值的RGB颜色空间进行PCA, 得到RGB空间的3个主方向向量,3个特征值, p1,p2, p3, λ1, λ2, λ3. 对每幅图像的每个像素加上如下的变化: 其中:αi是满足均值为0,方差为0.1的随机变量

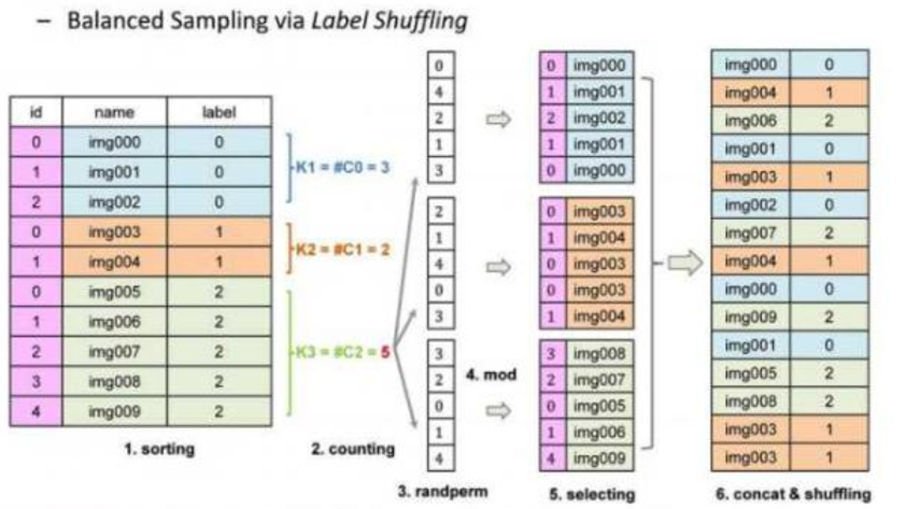
1.4、样本不均衡
样本不均衡即有些类别图像特别多, 有些特别少。 类别不平衡数据的处理: Label shuffle。
1.5、其他
平移变换;
旋转/仿射变换;
高斯噪声、 模糊处理
对颜色的数据增强: 图像亮度、 饱和度、 对比度变化。
1.6、训练和测试要协调
- 在训练的时候, 我们通常都需要做数据增强, 在测试的时候, 我们通常很少去做数据增强。 这其中似乎有些不协调, 因为你训练和测试之间有些不一致。 实验发现, 训练的最后几个迭代, 移除数据增强, 和传统一样测试, 可以提升一点性能。
- 如果训练的时候一直使用尺度和长宽比增强数据增强, 在测试的时候也同样做这个变化, 随机取32个裁剪图片来测试, 也可以在最后的模型上提升一点性能。
- 就是多尺度的训练, 多尺度的测试。
- 训练过程的中间结果, 加入做测试, 可以一定程度上降低过拟合。
二、主要代码说明
2.1 图像数据转换为像素点的数据 - tf.image.decode_png
image_tensor = tf.image.decode_png(contents=file_contents, channels=3)
返回对象: [height, width, num_channels], 如果是gif图像返回[num_frames, height, width, num_channels]
- height: 图片的高度的像素大小、水平宽度的像素大小 、num_channels: 图像的通道数,也就是API中的channels的值
- num_frames: 因为gif的图像是一个动态图像,可以将每一个动的画面看成一个静态图像,num_frames相当于在这个gif图像中有多少个静态图像
- 参数channels:可选值:0 1 3 4,默认为0, 一般使用0 1 3,不建议使用4
0:使用图像的默认通道,也就是图像是几通道的就使用几通道
1:使用灰度级别的图像数据作为返回值(只有一个通道:黑白)
3:使用RGB三通道读取数据
4:使用RGBA四通道读取数据(R:红色,G:绿色,B:蓝色,A:透明度)
2.2 改变图像大小 - tf.image.resize_images
resize_image_tensor = tf.image.resize_images(images=image_tensor, size=(200, 200),
method=tf.image.ResizeMethod.NEAREST_NEIGHBOR)
- API返回值和images格式一样,唯一区别是height和width变化为给定的值
- images: 给定需要进行大小转换的图像对应的tensor对象,格式为:[height, width, num_channels]或者[batch, height, width, num_channels]
- ResizeMethod的三种参数:
BILINEAR = 0 线性插值,默认
NEAREST_NEIGHBOR = 1 最近邻插值,失真最小
BICUBIC = 2 三次插值
AREA = 3 面积插值
2.3 图片的剪切&填充
resize_image_with_crop_or_pad
图片重置大小,通过图片的剪切或者填充(从中间开始计算新图片的大小)
crop_or_pad_image_tensor = tf.image.resize_image_with_crop_or_pad(image_tensor, 200, 200)
central_crop
中间等比例剪切
central_crop_image_tensor = tf.image.central_crop(image_tensor, central_fraction=0.2)
pad_to_bounding_box
填充数据(给定位置开始填充)offset_height=400, offset_width=490,表示偏移初始位置
pad_to_bounding_box_image_tensor = tf.image.pad_to_bounding_box(image_tensor, offset_height=400, offset_width=490,target_height=1000, target_width=1000)
crop_to_bounding_box
剪切数据(给定位置开始剪切)
crop_to_bounding_box_image_tensor = tf.image.crop_to_bounding_box(image_tensor, offset_height=10, offset_width=40,target_height=200, target_width=300)
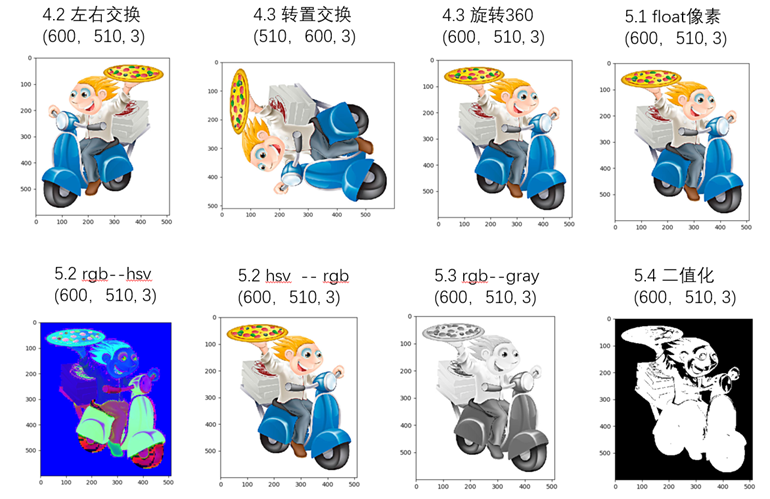
2.4、旋转
# 上下交换
tf.image.flip_up_down(image_tensor)
# 左右交换
tf.image.flip_left_right(image_tensor)
# 转置
tf.image.transpose_image(image_tensor)
# 旋转(90度、180度、270度....)# k*90度旋转,逆时针旋转
tf.image.rot90(image_tensor, k=4)
2.5 颜色空间的转换(rgb、hsv、gray)
颜色空间的转换必须讲image的值转换为float32类型,不能使用unit8类型
float32_image_tensor = tf.image.convert_image_dtype(image_tensor, dtype=tf.float32)
# rgb -> hsv(h: 图像的色彩/色度,s:图像的饱和度,v:图像的亮度)
hsv_image_tensor = tf.image.rgb_to_hsv(float32_image_tensor)
# hsv -> rgb
rgb_image_tensor = tf.image.hsv_to_rgb(hsv_image_tensor)
# rgb -> gray
gray_image_tensor = tf.image.rgb_to_grayscale(rgb_image_tensor)
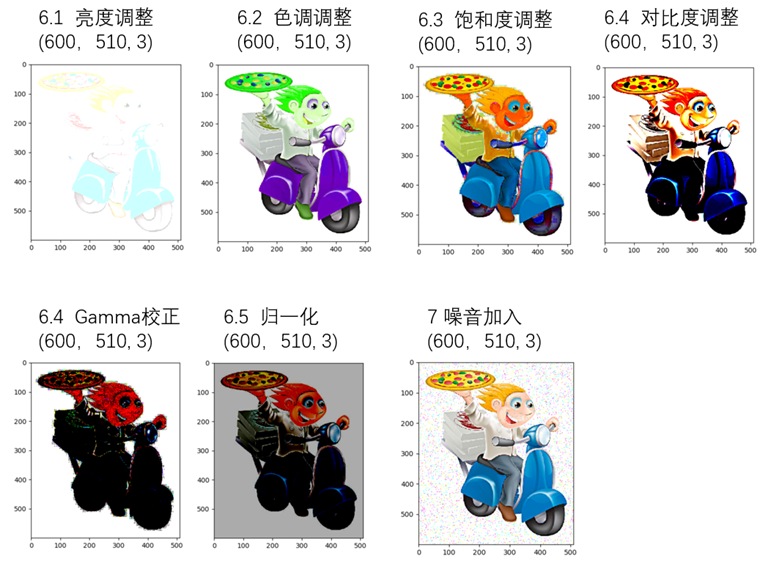
2.6 图像的调整
tf.image.adjust_brightness
亮度调整
adjust_brightness_image_tensor = tf.image.adjust_brightness(image=image_tensor, delta=0.8)
- image: RGB图像信息,设置为float类型和unit8类型的效果不一样,一般建议设置为float类型
- delta: 取值范围(-1,1)之间的float类型的值,表示对于亮度的减弱或者增强的系数值
- 底层执行:rgb -> hsv -> h,s,v*delta -> rgb
tf.image.adjust_hue
色调调整
adjust_hue_image_tensor = tf.image.adjust_hue(image_tensor, delta=-0.8)
参数和上面一样
tf.image.adjust_saturation
饱和度调整
adjust_saturation_image_tensor = tf.image.adjust_saturation(image_tensor, saturation_factor=20)
参数和上面一样
image.adjust_contrast
对比度调整,公式:(x-mean) * contrast_factor + mean
adjust_contrast_image_tensor = tf.image.adjust_contrast(image_tensor, contrast_factor=10)
tf.image.adjust_gamma
图像的gamma校正
adjust_gamma_image_tensor = tf.image.adjust_gamma(float32_image_tensor, gamma=100)
images: 要求必须是float类型的数据
gamma:任意值,Oup = In * Gamma
tf.image.per_image_standardization
图像的归一化(x-mean)/adjusted_sttdev, adjusted_sttdev=max(stddev, 1.0/sqrt(image.NumElements()))
per_image_standardization_image_tensor = tf.image.per_image_standardization(image_tensor)
2.7、噪音数据的加入
noisy_image_tensor = image_tensor + tf.cast(5 * tf.random_normal(shape=[600, 510, 3], mean=0, stddev=0.1), tf.uint8)
三、代码展示
    1 	# -- encoding:utf-8 --
    2 	"""
    3 	图像处理的Python库:OpenCV、PIL、matplotlib、tensorflow等
    4 	"""
    5 	import numpy as np
    6 	import matplotlib.pyplot as plt
    7 	import tensorflow as tf
    8 	# 打印numpy的数组对象的时候,中间不省略
    9 	np.set_printoptions(threshold=np.inf)
   10 	def show_image_tensor(image_tensor):
   11 	    # 要求:使用交互式会话
   12 	    # 获取图像tensor对象对应的image对象,image对象时一个[h,w,c]
   13 	    # print(image_tensor)
   14 	    image = image_tensor.eval()
   15 	    # print(image)
   16 	    print("图像大小为:{}".format(image.shape))
   17 	    if len(image.shape) == 3 and image.shape[2] == 1:
   18 	        # 黑白图像
   19 	        plt.imshow(image[:, :, 0], cmap='Greys_r')
   20 	        plt.show()
   21 	    elif len(image.shape) == 3:
   22 	        # 彩色图像
   23 	        plt.imshow(image)
   24 	        plt.show()
   25 	# 1. 交互式会话启动
   26 	sess = tf.InteractiveSession()
   27 	image_path = 'data/xiaoren.png'
   28 	# 一、图像格式的转换
   29 	# 读取数据
   30 	file_contents = tf.read_file(image_path)
   31 	#图像数据转换为像素点的数据,返回对象: [height, width, num_channels], 如果是gif图像返回[num_frames, height, width, num_channels]
   32 	image_tensor = tf.image.decode_png(contents=file_contents, channels=3)
   33 	show_image_tensor(image_tensor)
   34 	# 二、图像大小重置
   35 	# images: 给定需要进行大小转换的图像对应的tensor对象,格式为:[height, width, num_channels]或者[batch, height, width, num_channels]
   36 	# API返回值和images格式一样,唯一区别是height和width变化为给定的值
   37 	resize_image_tensor = tf.image.resize_images(images=image_tensor, size=(200, 200),
   38 	                                             method=tf.image.ResizeMethod.NEAREST_NEIGHBOR)
   39 	show_image_tensor(resize_image_tensor)
   40 	# 三、图片的剪切&填充
   41 	# 3.1 图片重置大小,通过图片的剪切或者填充(从中间开始计算新图片的大小)
   42 	crop_or_pad_image_tensor = tf.image.resize_image_with_crop_or_pad(image_tensor, 200, 200)
   43 	show_image_tensor(crop_or_pad_image_tensor)
   44 	# 3.2 中间等比例剪切
   45 	central_crop_image_tensor = tf.image.central_crop(image_tensor, central_fraction=0.2)
   46 	show_image_tensor(central_crop_image_tensor)
   47 	# 3.3 填充数据(给定位置开始填充)
   48 	pad_to_bounding_box_image_tensor = tf.image.pad_to_bounding_box(image_tensor, offset_height=400, offset_width=490,
   49 	                                                                target_height=1000,
   50 	                                                                target_width=1000)
   51 	show_image_tensor(pad_to_bounding_box_image_tensor)
   52 	# 3.4 剪切数据(给定位置开始剪切)
   53 	crop_to_bounding_box_image_tensor = tf.image.crop_to_bounding_box(image_tensor, offset_height=10, offset_width=40,
   54 	                                                                  target_height=200, target_width=300)
   55 	show_image_tensor(crop_to_bounding_box_image_tensor)
   56 	#四、旋转
   57 	# 上下交换
   58 	flip_up_down_image_tensor = tf.image.flip_up_down(image_tensor)
   59 	show_image_tensor(flip_up_down_image_tensor)
   60 	# 左右交换
   61 	flip_left_right_image_tensor = tf.image.flip_left_right(image_tensor)
   62 	show_image_tensor(flip_left_right_image_tensor)
   63 	# 转置
   64 	transpose_image_tensor = tf.image.transpose_image(image_tensor)
   65 	show_image_tensor(transpose_image_tensor)
   66 	# 旋转(90度、180度、270度....)
   67 	# k*90度旋转,逆时针旋转
   68 	k_rot90_image_tensor = tf.image.rot90(image_tensor, k=4)
   69 	show_image_tensor(k_rot90_image_tensor)
   70 	#  五、颜色空间的转换(rgb、hsv、gray)
   71 	# 颜色空间的转换必须讲image的值转换为float32类型,不能使用unit8类型
   72 	float32_image_tensor = tf.image.convert_image_dtype(image_tensor, dtype=tf.float32)
   73 	show_image_tensor(float32_image_tensor)
   74 	# rgb -> hsv(h: 图像的色彩/色度,s:图像的饱和度,v:图像的亮度)
   75 	hsv_image_tensor = tf.image.rgb_to_hsv(float32_image_tensor)
   76 	show_image_tensor(hsv_image_tensor)
   77 	# hsv -> rgb
   78 	rgb_image_tensor = tf.image.hsv_to_rgb(hsv_image_tensor)
   79 	show_image_tensor(rgb_image_tensor)
   80 	# rgb -> gray
   81 	gray_image_tensor = tf.image.rgb_to_grayscale(rgb_image_tensor)
   82 	show_image_tensor(gray_image_tensor)
   83 	# 可以从颜色空间中提取图像的轮廓信息(图像的二值化)
   84 	a = gray_image_tensor
   85 	b = tf.less_equal(a, 0.9)
   86 	# 0是黑,1是白
   87 	# condition?true:false
   88 	# condition、x、y格式必须一模一样,当condition中的值为true的之后,返回x对应位置的值,否则返回y对应位置的值
   89 	# 对于a中所有大于0.9的像素值,设置为0
   90 	c = tf.where(condition=b, x=a, y=a - a)
   91 	# 对于a中所有小于等于0.9的像素值,设置为1
   92 	d = tf.where(condition=b, x=c - c + 1, y=c)
   93 	show_image_tensor(d)
   94 	# 六、图像的调整
   95 	# 亮度调整
   96 	# image: RGB图像信息,设置为float类型和unit8类型的效果不一样,一般建议设置为float类型
   97 	# delta: 取值范围(-1,1)之间的float类型的值,表示对于亮度的减弱或者增强的系数值
   98 	# 底层执行:rgb -> hsv -> h,s,v*delta -> rgb
   99 	adjust_brightness_image_tensor = tf.image.adjust_brightness(image=image_tensor, delta=0.8)
  100 	show_image_tensor(adjust_brightness_image_tensor)
  101 	# 色调调整
  102 	# image: RGB图像信息,设置为float类型和unit8类型的效果不一样,一般建议设置为float类型
  103 	# delta: 取值范围(-1,1)之间的float类型的值,表示对于色调的减弱或者增强的系数值
  104 	# 底层执行:rgb -> hsv -> h*delta,s,v -> rgb
  105 	adjust_hue_image_tensor = tf.image.adjust_hue(image_tensor, delta=-0.8)
  106 	show_image_tensor(adjust_hue_image_tensor)
  107 	# 饱和度调整
  108 	# image: RGB图像信息,设置为float类型和unit8类型的效果不一样,一般建议设置为float类型
  109 	# saturation_factor: 一个float类型的值,表示对于饱和度的减弱或者增强的系数值,饱和因子
  110 	# 底层执行:rgb -> hsv -> h,s*saturation_factor,v -> rgb
  111 	adjust_saturation_image_tensor = tf.image.adjust_saturation(image_tensor, saturation_factor=20)
  112 	show_image_tensor(adjust_saturation_image_tensor)
  113
  114 	# 对比度调整,公式:(x-mean) * contrast_factor + mean
  115 	adjust_contrast_image_tensor = tf.image.adjust_contrast(image_tensor, contrast_factor=10)
  116 	show_image_tensor(adjust_contrast_image_tensor)
  117 	# 图像的gamma校正
  118 	# images: 要求必须是float类型的数据
  119 	# gamma:任意值,Oup = In * Gamma
  120 	adjust_gamma_image_tensor = tf.image.adjust_gamma(float32_image_tensor, gamma=100)
  121 	show_image_tensor(adjust_gamma_image_tensor)
  122 	# 图像的归一化(x-mean)/adjusted_sttdev, adjusted_sttdev=max(stddev, 1.0/sqrt(image.NumElements()))
  123 	per_image_standardization_image_tensor = tf.image.per_image_standardization(image_tensor)
  124 	show_image_tensor(per_image_standardization_image_tensor)
  125 	# 七、噪音数据的加入
  126 	noisy_image_tensor = image_tensor + tf.cast(5 * tf.random_normal(shape=[600, 510, 3], mean=0, stddev=0.1), tf.uint8)
  127 	show_image_tensor(noisy_image_tensor)
结果:原本是单个图片的,本人做了下汇总,如下所示: