![]()
上一篇博文介绍了Spring中缓存注解@Cacheable @CacheEvit @CachePut的基本使用,接下来我们将看一下更高级一点的知识点
- key生成策略
- 超时时间指定
I. 项目环境
1. 项目依赖
本项目借助SpringBoot 2.2.1.RELEASE + maven 3.5.3 + IDEA + redis5.0进行开发
开一个web服务用于测试
<dependencies>
    <dependency>
        <groupId>org.springframework.boot</groupId>
        <artifactId>spring-boot-starter-web</artifactId>
    </dependency>
    <dependency>
        <groupId>org.springframework.boot</groupId>
        <artifactId>spring-boot-starter-data-redis</artifactId>
    </dependency>
</dependencies>
II. 扩展知识点
1. key生成策略
对于@Cacheable注解,有两个参数用于组装缓存的key
- cacheNames/value: 类似于缓存前缀
- key: SpEL表达式,通常根据传参来生成最终的缓存key
默认的redisKey = cacheNames::key (注意中间的两个冒号)
如
/**
 * 没有指定key时,采用默认策略 {@link org.springframework.cache.interceptor.SimpleKeyGenerator } 生成key
 * <p>
 * 对应的key为: k1::id
 * value --> 等同于 cacheNames
 * @param id
 * @return
 */
@Cacheable(value = "k1")
public String key1(int id) {
    return "defaultKey:" + id;
}
缓存key默认采用SimpleKeyGenerator来生成,比如上面的调用,如果id=1, 那么对应的缓存key为 k1::1
如果没有参数,或者多个参数呢?
/**
 * redis_key :  k2::SimpleKey[]
 *
 * @return
 */
@Cacheable(value = "k0")
public String key0() {
    return "key0";
}

/**
 * redis_key :  k2::SimpleKey[id,id2]
 *
 * @param id
 * @param id2
 * @return
 */
@Cacheable(value = "k2")
public String key2(Integer id, Integer id2) {
    return "key1" + id + "_" + id2;
}


@Cacheable(value = "k3")
public String key3(Map map) {
    return "key3" + map;
}
然后写一个测试case
@RestController
@RequestMapping(path = "extend")
public class ExtendRest {
    @Autowired
    private RedisTemplate redisTemplate;

    @Autowired
    private ExtendDemo extendDemo;

    @GetMapping(path = "default")
    public Map<String, Object> key(int id) {
        Map<String, Object> res = new HashMap<>();
        res.put("key0", extendDemo.key0());
        res.put("key1", extendDemo.key1(id));
        res.put("key2", extendDemo.key2(id, id));
        res.put("key3", extendDemo.key3(res));

        // 这里将缓存key都捞出来
        Set<String> keys = (Set<String>) redisTemplate.execute((RedisCallback<Set<String>>) connection -> {
            Set<byte[]> sets = connection.keys("k*".getBytes());
            Set<String> ans = new HashSet<>();
            for (byte[] b : sets) {
                ans.add(new String(b));
            }
            return ans;
        });

        res.put("keys", keys);
        return res;
    }
}
访问之后,输出结果如下
{
    "key1": "defaultKey:1",
    "key2": "key11_1",
    "key0": "key0",
    "key3": "key3{key1=defaultKey:1, key2=key11_1, key0=key0}",
    "keys": [
        "k2::SimpleKey [1,1]",
        "k1::1",
        "k3::{key1=defaultKey:1, key2=key11_1, key0=key0}",
        "k0::SimpleKey []"
    ]
}
小结一下
- 单参数:
cacheNames::arg - 无参数:
cacheNames::SimpleKey [], 后面使用SimpleKey []来补齐 - 多参数:
cacheNames::SimpleKey [arg1, arg2...] - 非基础对象:
cacheNames::obj.toString()
2. 自定义key生成策略
如果希望使用自定义的key生成策略,只需继承KeyGenerator,并声明为一个bean
@Component("selfKeyGenerate")
public static class SelfKeyGenerate implements KeyGenerator {
    @Override
    public Object generate(Object target, Method method, Object... params) {
        return target.getClass().getSimpleName() + "#" + method.getName() + "(" + JSON.toJSONString(params) + ")";
    }
}
然后在使用的地方,利用注解中的keyGenerator来指定key生成策略
/**
 * 对应的redisKey 为: get  vv::ExtendDemo#selfKey([id])
 *
 * @param id
 * @return
 */
@Cacheable(value = "vv", keyGenerator = "selfKeyGenerate")
public String selfKey(int id) {
    return "selfKey:" + id + " --> " + UUID.randomUUID().toString();
}
测试用例
@GetMapping(path = "self")
public Map<String, Object> self(int id) {
    Map<String, Object> res = new HashMap<>();
    res.put("self", extendDemo.selfKey(id));
    Set<String> keys = (Set<String>) redisTemplate.execute((RedisCallback<Set<String>>) connection -> {
        Set<byte[]> sets = connection.keys("vv*".getBytes());
        Set<String> ans = new HashSet<>();
        for (byte[] b : sets) {
            ans.add(new String(b));
        }
        return ans;
    });
    res.put("keys", keys);
    return res;
}
缓存key放在了返回结果的keys中,输出如下,和预期的一致
{
    "keys": [
        "vv::ExtendDemo#selfKey([1])"
    ],
    "self": "selfKey:1 --> f5f8aa2a-0823-42ee-99ec-2c40fb0b9338"
}
3. 缓存失效时间
以上所有的缓存都没有设置失效时间,实际的业务场景中,不设置失效时间的场景有;但更多的都需要设置一个ttl,对于Spring的缓存注解,原生没有额外提供一个指定ttl的配置,如果我们希望指定ttl,可以通过RedisCacheManager来完成
private RedisCacheConfiguration getRedisCacheConfigurationWithTtl(Integer seconds) {
    // 设置 json 序列化
    Jackson2JsonRedisSerializer<Object> jackson2JsonRedisSerializer = new Jackson2JsonRedisSerializer<>(Object.class);
    ObjectMapper om = new ObjectMapper();
    om.setVisibility(PropertyAccessor.ALL, JsonAutoDetect.Visibility.ANY);
    jackson2JsonRedisSerializer.setObjectMapper(om);

    RedisCacheConfiguration redisCacheConfiguration = RedisCacheConfiguration.defaultCacheConfig();
    redisCacheConfiguration = redisCacheConfiguration.serializeValuesWith(
            RedisSerializationContext.SerializationPair.fromSerializer(jackson2JsonRedisSerializer)).
            // 设置过期时间
            entryTtl(Duration.ofSeconds(seconds));

    return redisCacheConfiguration;
}
上面是一个设置RedisCacheConfiguration的方法,其中有两个点
- 序列化方式:采用json对缓存内容进行序列化
- 失效时间:根据传参来设置失效时间
如果希望针对特定的key进行定制化的配置的话,可以如下操作
private Map<String, RedisCacheConfiguration> getRedisCacheConfigurationMap() {
    Map<String, RedisCacheConfiguration> redisCacheConfigurationMap = new HashMap<>(8);
    // 自定义设置缓存时间
    // 这个k0 表示的是缓存注解中的 cacheNames/value
    redisCacheConfigurationMap.put("k0", this.getRedisCacheConfigurationWithTtl(60 * 60));
    return redisCacheConfigurationMap;
}
最后就是定义我们需要的RedisCacheManager
@Bean
public RedisCacheManager cacheManager(RedisConnectionFactory redisConnectionFactory) {
    return new RedisCacheManager(
            RedisCacheWriter.nonLockingRedisCacheWriter(redisConnectionFactory),
            // 默认策略,未配置的 key 会使用这个
            this.getRedisCacheConfigurationWithTtl(60),
            // 指定 key 策略
            this.getRedisCacheConfigurationMap()
    );
}
在前面的测试case基础上,添加返回ttl的信息
private Object getTtl(String key) {
    return redisTemplate.execute(new RedisCallback() {
        @Override
        public Object doInRedis(RedisConnection connection) throws DataAccessException {
            return connection.ttl(key.getBytes());
        }
    });
}

@GetMapping(path = "default")
public Map<String, Object> key(int id) {
    Map<String, Object> res = new HashMap<>();
    res.put("key0", extendDemo.key0());
    res.put("key1", extendDemo.key1(id));
    res.put("key2", extendDemo.key2(id, id));
    res.put("key3", extendDemo.key3(res));

    Set<String> keys = (Set<String>) redisTemplate.execute((RedisCallback<Set<String>>) connection -> {
        Set<byte[]> sets = connection.keys("k*".getBytes());
        Set<String> ans = new HashSet<>();
        for (byte[] b : sets) {
            ans.add(new String(b));
        }
        return ans;
    });

    res.put("keys", keys);

    Map<String, Object> ttl = new HashMap<>(8);
    for (String key : keys) {
        ttl.put(key, getTtl(key));
    }
    res.put("ttl", ttl);
    return res;
}
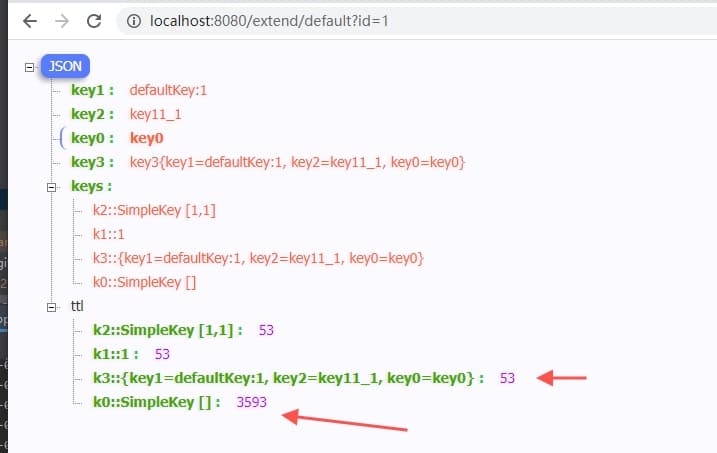
返回结果如下,注意返回的ttl失效时间
4. 自定义失效时间扩展
虽然上面可以实现失效时间指定,但是用起来依然不是很爽,要么是全局设置为统一的失效时间;要么就是在代码里面硬编码指定,失效时间与缓存定义的地方隔离,这就很不直观了
接下来介绍一种,直接在注解中,设置失效时间的case
如下面的使用case
/**
 * 通过自定义的RedisCacheManager, 对value进行解析,=后面的表示失效时间
 * @param key
 * @return
 */
@Cacheable(value = "ttl=30")
public String ttl(String key) {
    return "k_" + key;
}
自定义的策略如下:
- value中,等号左边的为cacheName, 等号右边的为失效时间
要实现这个逻辑,可以扩展一个自定义的RedisCacheManager,如
public class TtlRedisCacheManager extends RedisCacheManager {
    public TtlRedisCacheManager(RedisCacheWriter cacheWriter, RedisCacheConfiguration defaultCacheConfiguration) {
        super(cacheWriter, defaultCacheConfiguration);
    }

    @Override
    protected RedisCache createRedisCache(String name, RedisCacheConfiguration cacheConfig) {
        String[] cells = StringUtils.delimitedListToStringArray(name, "=");
        name = cells[0];
        if (cells.length > 1) {
            long ttl = Long.parseLong(cells[1]);
            // 根据传参设置缓存失效时间
            cacheConfig = cacheConfig.entryTtl(Duration.ofSeconds(ttl));
        }
        return super.createRedisCache(name, cacheConfig);
    }
}
重写createRedisCache逻辑, 根据name解析出失效时间;
注册使用方式与上面一致,声明为Spring的bean对象
@Primary
@Bean
public RedisCacheManager ttlCacheManager(RedisConnectionFactory redisConnectionFactory) {
    return new TtlRedisCacheManager(RedisCacheWriter.lockingRedisCacheWriter(redisConnectionFactory),
            // 默认缓存配置
            this.getRedisCacheConfigurationWithTtl(60));
}
测试case如下
@GetMapping(path = "ttl")
public Map ttl(String k) {
    Map<String, Object> res = new HashMap<>();
    res.put("execute", extendDemo.ttl(k));
    res.put("ttl", getTtl("ttl::" + k));
    return res;
}
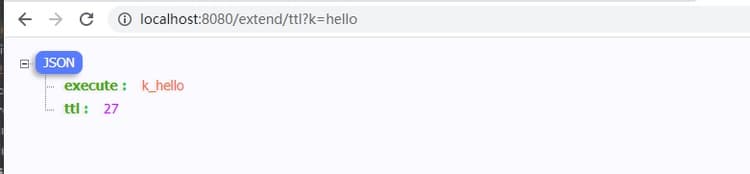
验证结果如下
5. 小结
到此基本上将Spring中缓存注解的常用姿势都介绍了一下,无论是几个注解的使用case,还是自定义的key策略,失效时间指定,单纯从使用的角度来看,基本能满足我们的日常需求场景
下面是针对缓存注解的一个知识点抽象
缓存注解
@Cacheable: 缓存存在,则从缓存取;否则执行方法,并将返回结果写入缓存@CacheEvit: 失效缓存@CachePut: 更新缓存@Caching: 都注解组合
配置参数
cacheNames/value: 可以理解为缓存前缀key: 可以理解为缓存key的变量,支持SpEL表达式keyGenerator: key组装策略condition/unless: 缓存是否可用的条件
默认缓存ke策略y
下面的cacheNames为注解中定义的缓存前缀,两个分号固定
- 单参数:
cacheNames::arg - 无参数:
cacheNames::SimpleKey [], 后面使用SimpleKey []来补齐 - 多参数:
cacheNames::SimpleKey [arg1, arg2...] - 非基础对象:
cacheNames::obj.toString()
缓存失效时间
失效时间,本文介绍了两种方式,一个是集中式的配置,通过设置RedisCacheConfiguration来指定ttl时间
另外一个是扩展RedisCacheManager类,实现自定义的cacheNames扩展解析
Spring缓存注解知识点到此告一段落,我是一灰灰,欢迎关注长草的公众号一灰灰blog
III. 不能错过的源码和相关知识点
0. 项目
系列博文
源码
- 工程:https://github.com/liuyueyi/spring-boot-demo
- 源码:https://github.com/liuyueyi/spring-boot-demo/tree/master/spring-boot/
1. 一灰灰Blog
尽信书则不如,以上内容,纯属一家之言,因个人能力有限,难免有疏漏和错误之处,如发现bug或者有更好的建议,欢迎批评指正,不吝感激
下面一灰灰的个人博客,记录所有学习和工作中的博文,欢迎大家前去逛逛
- 一灰灰Blog个人博客 https://blog.hhui.top
- 一灰灰Blog-Spring专题博客 http://spring.hhui.top
