硬件断点的原理
Intel 80306以上的CPU给我们提供了调试寄存器用于软件调试,硬件断点是通过设置调试寄存器实现的。
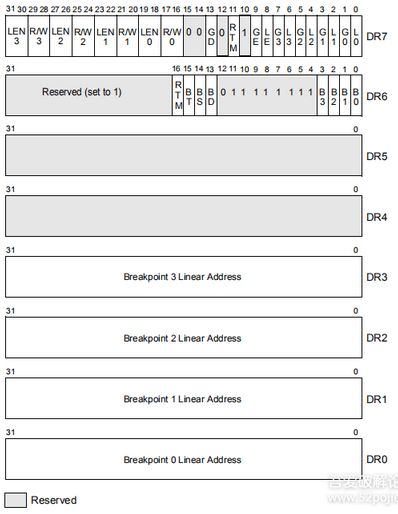
上图为Intel手册提供的32位操作系统下8个调试寄存器的图示(Intel手册卷3 17章第二节 Debug Registers,有兴趣的朋友可以查阅),根据介绍,DR0-DR3为设置断点的地址,DR4和DR5为保留,DR6为调试异常产生后显示的一些信息,DR7保存了断点是否启用、断点类型和长度等信息。
我们在使用硬件断点的时候,就是要设置调试寄存器,将断点的位置设置到DR0-DR3中,断点的长度设置到DR7的LEN0-LEN3中,将断点的类型设置到DR7的RW0-RW3中,将是否启用断点设置到DR7的L0-L3中。设置硬件断点需要的DR0-DR3很简单,就是下断点的地址,DR7寄存器很复杂,位段信息结构体如下:
typedef struct _DBG_REG7
{
        /*
        // 局部断点(L0~3)与全局断点(G0~3)的标记位
        */
        unsigned L0 : 1;  // 对Dr0保存的地址启用 局部断点
        unsigned G0 : 1;  // 对Dr0保存的地址启用 全局断点
        unsigned L1 : 1;  // 对Dr1保存的地址启用 局部断点
        unsigned G1 : 1;  // 对Dr1保存的地址启用 全局断点
        unsigned L2 : 1;  // 对Dr2保存的地址启用 局部断点
        unsigned G2 : 1;  // 对Dr2保存的地址启用 全局断点
        unsigned L3 : 1;  // 对Dr3保存的地址启用 局部断点
        unsigned G3 : 1;  // 对Dr3保存的地址启用 全局断点
                                          /*
                                          // 【以弃用】用于降低CPU频率,以方便准确检测断点异常
                                          */
        unsigned LE : 1;
        unsigned GE : 1;
        /*
        // 保留字段
        */
        unsigned Reserve1 : 3;
        /*
        // 保护调试寄存器标志位,如果此位为1,则有指令修改条是寄存器时会触发异常
        */
        unsigned GD : 1;
        /*
        // 保留字段
        */
        unsigned Reserve2 : 2;

        unsigned RW0 : 2;  // 设定Dr0指向地址的断点类型
        unsigned LEN0 : 2;  // 设定Dr0指向地址的断点长度
        unsigned RW1 : 2;  // 设定Dr1指向地址的断点类型
        unsigned LEN1 : 2;  // 设定Dr1指向地址的断点长度
        unsigned RW2 : 2;  // 设定Dr2指向地址的断点类型
        unsigned LEN2 : 2;  // 设定Dr2指向地址的断点长度
        unsigned RW3 : 2;  // 设定Dr3指向地址的断点类型
        unsigned LEN3 : 2;  // 设定Dr3指向地址的断点长度
}DBG_REG7, *PDBG_REG7;
需要注意的是,设置硬件断点时,断点的长度、类型和地址是有要求的。

上图所示,保存DR0-DR3地址所指向位置的断点类型(RW0-RW3)与断点长度(LEN0-LEN3),状态描述如下:
00:执行 01:写入 11:读写
00:1字节 01:2字节 11:4字节
设置硬件执行断点时,长度只能为1(LEN0-LEN3设置为0时表示长度为1)
设置读写断点时,如果长度为1,地址不需要对齐,如果长度为2,则地址必须是2的整数倍,如果长度为4,则地址必须是4的整数倍。
原理大概就是这么多了,下面就是实现了。
硬件断点的实现
实现硬件断点,首先要获取当前线程环境
//获取线程环境
CONTEXT g_Context = { 0 };
g_Context.ContextFlags = CONTEXT_CONTROL;
GetThreadContext(hThread, &g_Context);
在CONTEXT结构体中,存放了诸多当前线程环境的信息,以下是从winnt.h文件中找到的CONTEXT结构体
typedef struct _CONTEXT {

    //
    // The flags values within this flag control the contents of
    // a CONTEXT record.
    //
    // If the context record is used as an input parameter, then
    // for each portion of the context record controlled by a flag
    // whose value is set, it is assumed that that portion of the
    // context record contains valid context. If the context record
    // is being used to modify a threads context, then only that
    // portion of the threads context will be modified.
    //
    // If the context record is used as an IN OUT parameter to capture
    // the context of a thread, then only those portions of the thread's
    // context corresponding to set flags will be returned.
    //
    // The context record is never used as an OUT only parameter.
    //

    DWORD ContextFlags;

    //
    // This section is specified/returned if CONTEXT_DEBUG_REGISTERS is
    // set in ContextFlags.  Note that CONTEXT_DEBUG_REGISTERS is NOT
    // included in CONTEXT_FULL.
    //

    DWORD   Dr0;
    DWORD   Dr1;
    DWORD   Dr2;
    DWORD   Dr3;
    DWORD   Dr6;
    DWORD   Dr7;

    //
    // This section is specified/returned if the
    // ContextFlags word contians the flag CONTEXT_FLOATING_POINT.
    //

    FLOATING_SAVE_AREA FloatSave;

    //
    // This section is specified/returned if the
    // ContextFlags word contians the flag CONTEXT_SEGMENTS.
    //

    DWORD   SegGs;
    DWORD   SegFs;
    DWORD   SegEs;
    DWORD   SegDs;

    //
    // This section is specified/returned if the
    // ContextFlags word contians the flag CONTEXT_INTEGER.
    //

    DWORD   Edi;
    DWORD   Esi;
    DWORD   Ebx;
    DWORD   Edx;
    DWORD   Ecx;
    DWORD   Eax;

    //
    // This section is specified/returned if the
    // ContextFlags word contians the flag CONTEXT_CONTROL.
    //

    DWORD   Ebp;
    DWORD   Eip;
    DWORD   SegCs;              // MUST BE SANITIZED
    DWORD   EFlags;             // MUST BE SANITIZED
    DWORD   Esp;
    DWORD   SegSs;

    //
    // This section is specified/returned if the ContextFlags word
    // contains the flag CONTEXT_EXTENDED_REGISTERS.
    // The format and contexts are processor specific
    //

    BYTE    ExtendedRegisters[MAXIMUM_SUPPORTED_EXTENSION];

} CONTEXT;
从CONTEXT结构体中我们可以看到存放了调试寄存器 Dr0-Dr3和Dr6、Dr7,通过设置这些寄存器我们可以实现硬件断点。
已经获取了当前线程环境,接下来就是设置调试寄存器
//传入下断点的地址、类型、长度
void SetHardBP(DWORD addr, BreakPointHard type, BreakPointLen len)
{
    //利用上文中的DR7寄存器位段信息
        DBG_REG7 *pDr7 = (DBG_REG7 *)&g_Context.Dr7;

    if (len == 1)
        {
        //两字节的对齐粒度
                addr = addr - addr % 2;
        }
        else if (len == 3)
        {
        //四字节的对齐粒度
                addr = addr - addr % 4;
        }

        if (pDr7->L0 == 0)
        {
                g_Context.Dr0 = addr;   //利用Dr0寄存器存放地址
                pDr7->RW0 = type;       //Dr7寄存器中的RW0设置类型
                pDr7->LEN0 = len;                //Dr7寄存器中的LEN0设置长度
                pDr7->L0 = 1;                    //Dr7寄存器中的L0启用断点
        }
        else if (pDr7->L1 == 0)
        {
                g_Context.Dr1 = addr;
                pDr7->RW1 = type;
                pDr7->LEN1 = len;
                pDr7->L1 = 1;
        }
        else if (pDr7->L2 == 0)
        {
                g_Context.Dr2 = addr;
                pDr7->RW2 = type;
                pDr7->LEN2 = len;
                pDr7->L2 = 1;
        }
        else if (pDr7->L3 == 0)
        {
                g_Context.Dr3 = addr;
                pDr7->RW3 = type;
                pDr7->LEN3 = len;
                pDr7->L3 = 1;
        }
}
调试寄存器的信息设置好之后,我们要将当前环境保存
//设置当前环境
SetThreadContext(hThread, &g_Context);
由此,硬件断点的大致实现思路已经完成。
转自:https://www.52pojie.cn/forum.php?mod=viewthread&tid=846934&extra=page%3D3%26filter%3Dauthor%26orderby%3Ddateline