安装配置
最近用到产品无线功能模块自动化无线连接测试,这次做一个环境部署配置总结,在centos7.7系统内核版本3.10,使用的是RTL8812AU无线芯片网卡,Realtek官方有提供Linux驱动没法编译,国外大佬做了一个可以用于3.1内核的改版驱动,需网上下载:rtl8812au.zip驱动包。
使用make、make install命令编译安装,安装完后最好reboot一下,如果在编译过程中出现问题,一般来说都是依赖没装好,尝试用以下命令解决:
yum update (更新yum软件仓库)
yum install gcc (安装gcc)
安装完后,查看内核是否有加载的8812au模块:
[root@Server ~]# lsmod | grep 8812
8812au 1011830 0
不支持iw命令,例如输入iw dev会显示“nl80211 not found.”,并不影响使用。
使用ip link命令查看网卡设备名,可见下图ens35u1就是无线网卡设备名。

启动无线网卡:ifconfig ens35u1 up
设置WIFI热点:
首先如果还没安装wpa_supplicant的话,请先运行yum install wpa_supplicant
然后修改配置文件:
# vim /etc//wpa_supplicant/wpa_supplicant.conf
ctrl_interface=/var/run/wpa_supplicant/
update_config=1
device_name=RTL8192CU
manufacturer=Realtek
model_name=RTW_STA
model_number=WLAN_CU
serial_number=12345
device_type=1-0050F204-1
os_version=01020300
config_methods=virtual_display virtual_push_button keypad
以上内容就是添加到配置文件里。
服务端wpa_supplicant
wpa_supplicant是一个较好的选择,但缺点是它不支持所有的驱动。请浏览wpa_supplicant网站获得它所支持的驱动列表。另外,wpa_supplicant目前只能连接到那些你已经配置好ESSID的无线网络。wireless-tools支持几乎所有的无线网卡和驱动,但它不能连接到那些只支持WPA的AP。
经过编译后的wpa_supplicant源程序可以看到两个主要的可执行工具:wpa_supplicant和wpa_cli。 wpa_supplicant是核心程序,它和wpa_cli的关系就是服务和客户端的关系:后台运行wpa_supplicant,使用wpa_cli 来搜索、设置、连接网络。
wpa_supplicant接受多个命令行参数,特别是:
-B:在后台执行
-c:文件名 -路径配置文件
-i:接口 - 监听的接口
-D:指定驱动
关于支持的驱动程序的列表,请参考wpa_supplicant -h的输出结果。
- nl80211 是当前的标准,但不是所有的无线芯片的模块支持。
- wext 目前已过时,但仍得到广泛支持。
使用 -D 开关来指定驱动:
# wpa_supplicant -B -i interface -c configuration_file -D driver
启动后台:
wpa_supplicant -D wext -i ens35u1 -c /etc/wpa_supplicant/wpa_supplicant.conf -B
开机启动:
/usr/lib/systemd/system/wpa_supplicant.service
/usr/sbin/wpa_supplicant -u -f /var/log/wpa_supplicant.log -D wext -i ens35u1 -c /etc/wpa_supplicant/wpa_supplicant.conf
systemctl enable wpa_supplicant
wpa_cli交互模式的命令如下表:
|
Full command |
Short command |
Description |
|
status |
stat |
displays the current connection status |
|
disconnect |
disc |
prevents wpa_supplicant from connecting to any access point |
|
quit |
q |
exits wpa_cli |
|
terminate |
term |
kills wpa_supplicant |
|
reconfigure |
recon |
reloads wpa_supplicant with the configuration file supplied (-c parameter) |
|
scan |
scan |
scans for available access points (only scans it, doesn't display anything) |
|
scan_result |
scan_r |
displays the results of the last scan |
|
list_networks |
list_n |
displays a list of configured networks and their status (active or not, enabled or disabled) |
|
select_network |
select_n |
select a network among those defined to initiate a connection (ie select_network 0) |
|
enable_network |
enable_n |
makes a configured network available for selection (ie enable_network 0) |
|
disable_network |
disable_n |
makes a configured network unavailable for selection (ie disable_network 0) |
|
remove_network |
remove_n |
removes a network and its configuration from the list (ie remove_network 0) |
|
add_network |
add_n |
adds a new network to the list. Its id will be created automatically |
|
set_network |
set_n |
shows a very short list of available options to configure a network when supplied with no parameters. See next section for a list of extremely useful parameters to be used with set_network and get_network. |
|
get_network |
get_n |
displays the required parameter for the specified network. See next section for a list of parameters |
|
save_config |
save_c |
saves the configuration |
设置网络的基本格式:set_network <network id> <key> <parameter> [<parameter>]
显示网络信息的基本格式:get_network <network id> <key>
相应的参数如下表:
|
Key |
Description |
Parameters |
|
ssid |
Access point name |
string |
|
id_str |
String identifying the network |
string |
|
priority |
Connection priority over other APs |
number (0 being the default low priority) |
|
bssid |
Mac address of the access point |
mac address |
|
scan_ssid |
Enable/disbale ssid scan |
0, 1, 2 |
|
key_mgmt |
Type of key management |
WPA-PSK, WPA_EAP, None |
|
pairwise |
Pairwise ciphers for WPA |
CCMP, TKIP |
|
group=TKIP |
Group ciphers for WPA |
CCMP, TKIP, WEP104, WEP40 |
|
psk |
Pre-Shared Key (clear or encrypted) |
string |
|
wep_key0 |
WEP key (up to 4: wep_key[0123]) |
string |
|
eap |
Extensible Authentication Protocol |
MD5, MSCHAPV2, OTP, GTC, TLS, PEAP, TTLS |
|
identity |
EAP identity string |
string |
|
password |
EAP password |
string |
|
ca_cert |
Pathname to CA certificate file |
/full/path/to/certificate |
|
client_cert |
Pathname to client certificate |
/full/path/to/certificate (PEM/DER) |
|
private_key |
Pathname to a client private key file |
/full/path/to/private_key (PEM/DER/PFX) |
常见例子:
1、连接无加密的AP
>add_network (It will display a network id for you, assume it returns 0)
>set_network 0 ssid ‘"test"’
>set_network 0 key_mgmt NONE
>enable_network 0
>quit
2、连接WEP加密AP
>add_network (assume return 1)
>set_network 1 ssid ‘"test"’
>set_network 1 key_mgmt NONE
>set_network 1 wep_key0 "'your ap password"'
>enable_network 1
3、连接WPA-PSK/WPA2-PSK加密的AP
>add_network (assume return 2)
>set_network 2 ssid ‘"test"’
>set_network 2 psk '"your pre-shared key"'
>enable_network 2
到此,wifi模块就能连接上AP了。
3、以上是通过命令行工具wpa_cli来实现wifi网络的连接。当然,也可以通过wpa_supplicant的配置文件来实现连接。
再回顾下运行wpa_supplicant时执行的命令:
/system/bin/wpa_supplicant -d -Dwext -iens35u1 -c/etc/wpa_supplicant/wpa_supplicant.conf
我们在执行时加上了-c/etc/wpa_supplicant/wpa_supplicant.conf,可以将我们要连接的AP的设置以一定的格式写入wpa_supplicant.conf配置文件中即可。
例如:
ctrl_interface=/var/run/wpa_supplicant/
network={
ssid="my access point"
proto=WPA
key_mgmt=WPA-PSK
psk='"you pass words"'
}
配置hostap软路由
- 官网下个特别版Hostap,这个程序可以在官方驱动包里找到,位置是:Linuxwpa_supplicant_hostapdwpa_supplicant_hostapd-0.8_rtw_r7475.20130812.tar.gz
- 找到后把它复制到当前目录,如果之前安装过hostapd,可以使用yum remove hostapd命令,把原版的先卸载掉。
解压:
# tar -xzvf wpa_supplicant_hostapd-0.8_rtw_r7475.20130812.tar.gz
# cd wpa_supplicant_hostapd-0.8_rtw_r7475.20130812/hostapd
# make & make install
修改配置文件:
# vim rtl_hostapd.conf
interface=ens35u1
ctrl_interface=/var/run/hostapd
ssid=CentOS_Test
channel=6
wpa=2
wpa_passphrase=12345678
#bridge=br0
eap_server=1
wps_state=2
uuid=12345678-abc5-def0-1234-56789abcdef0
device_name=RTL8192CU
manufacturer=Realtek
model_name=RTW_SOFTAP
model_number=WLAN_CU
serial_number=12345
device_type=6-0050F204-1
os_version=01020300
config_methods=label display push_button keypad
driver=rtl871xdrv
beacon_int=100
hw_mode=g
ieee80211n=1
wme_enabled=1
ht_capab=[SHORT-GI-20][SHORT-GI-40][HT40+]
wpa_key_mgmt=WPA-PSK
wpa_pairwise=CCMP
max_num_sta=8
wpa_group_rekey=86400
上面这个配置文件中,红色部分是需要修改的:
1. interface=无线网卡设备名
2. ssid=自定义热点名
3. wpa_passphrase=密码
4. bridge=网桥名 (如以网桥方式连接的话,要填上网桥名,否则必须注释掉)
5. uuid=通用识别码
详细版本在官方驱动程序包的如下位置:
配置文件:Linuxwpa_supplicant_hostapd
tl_hostapd_2G.conf
PDF说明:LinuxdocumentQuick_Start_Guide_for_SoftAP.pdf
# chmod +x rtl_hostapd.conf
# ./hostapd rtl_hostapd.conf -B (以后台方式启动hostap)
最后,用手机扫描WIFI,会发现有一个名为CentOS_Test的热点,恭喜成功!
综合实践
- WiFi开启
先配置好无线路由器SSID、加密方式等。
# ifconfig ens35u1 up ( 启动无线网卡)
# wpa_supplicant -D wext -i ens35u1 -c /etc/wpa_supplicant/wpa_supplicant.conf -B (启动服务端)
根据配置文件/etc/wpa_supplicant.conf来初始化ens35u1接口
如果wpa_supplicant.conf文件为空,则不会自动连接,需要连接一次网络才行
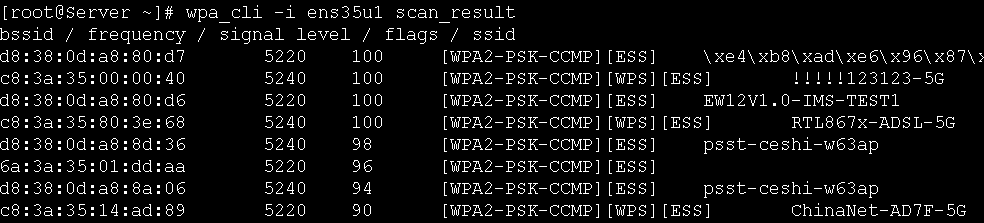
- 扫描热点
命令如下:
wpa_cli -i ens35u1 scan //扫描附近热点
wpa_cli -i ens35u1 scan_result //打印热点信息
- 连接热点
# wpa_cli -i ens35u1 add_network  // 添加一个网络连接,并返回网络ID号,如果wpa_supplicant.conf文件为空,则返回0,表示第一个热点
作用:用来区分用户连接过的每个热点
3.1以连接yj-hello_5G为例
wpa_cli -i ens35u1 set_network 1 ssid '"yj-hello_5G"' //设置ID为0的热点SSID
wpa_cli -i ens35u1 set_network 1 psk '"yj-hello_5G"' //设置ID为0的热点的密码
wpa_cli -i ens35u1 key_mgmt WPA-PSK
PS:如果是没有加密的公共网络,则为NONE:
wpa_cli -i ens35u1 set_network 0 key_mgmt NONE
继续输入:
wpa_cli -i ens35u1 set_network 0 priority 2 //设置当前网络优先级,默认为2
wpa_cli -i ens35u1 set_network 0 scan_ssid 1 //设置ssid默认为1即可
wpa_cli -i ens35u1 enable_network 1 //启动连接ID为0的网络
wpa_cli -i ens35u1 select_network 1 //选择网络0(这样做的好处在于,可以取消先前的其它网络连接)
udhcpc -b -i ens35u1 -q 或 dhclient ens35u1 或 配置静态IP (ifconfig ens35u1 192.168.0.19 netmask 255.255.255.0)
ping路由器网关:

- 保存连接配置
wpa_cli -i ens35u1 save_config //保存当前连接的网络配置到wpa_supplicant.conf文件中,使得下次自动连接
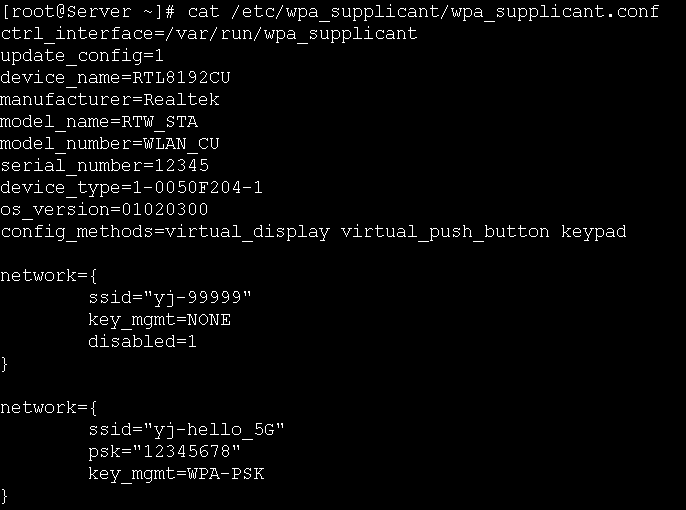
保存后的wpa_supplicant.conf文件如下所示:
查看无线网卡当前连接状态:
# wpa_cli -i ens35u1 status
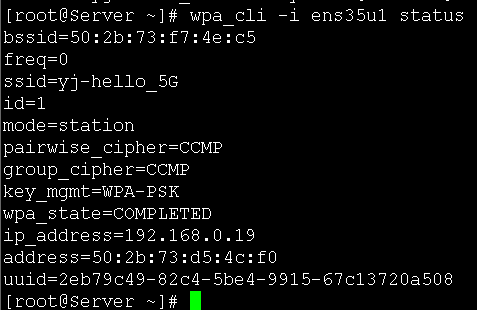
查看当前连接的是哪个网络:
# wpa_cli -i wlan0 list_network
打印如下,可以看到当前连接的ID号为1:

查看当前速率:
[root@Server ~]# iwlist ens35u1 rate
ens35u1 4 available bit-rates :
1 Mb/s
2 Mb/s
5.5 Mb/s
11 Mb/s
Current Bit Rate:867 Mb/s
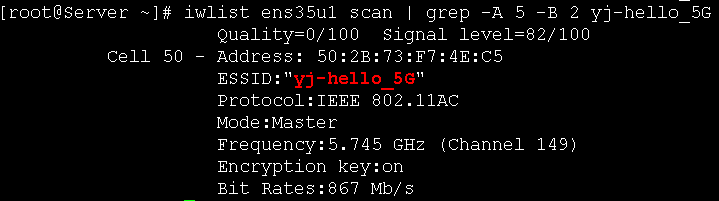
查看当前信道:
[root@Server ~]# iwlist ens35u1 channe | grep Current
Current Frequency:5.745 GHz (Channel 149)
查看更详细信息:
以上的信息数据,自动化测试,用例会到获取速率值或信道值或MAC地址,需要脚本处理字符数据截取出来值。
- 断开热点
wpa_cli -i wlan0 disable_network 0 //与id0的网络进行断开
wpa_cli -i wlan0 remove_network 0 //将id0的网络移除掉,必须先断开才行
wpa_cli -i wlan0 save_config //并更新wpa_supplicant.conf文件
配置后的wpa_supplicant.conf文件如下所示:
ctrl_interface=/var/run/wpa_supplicant/
update_config=1
device_name=RTL8192CU
manufacturer=Realtek
model_name=RTW_STA
model_number=WLAN_CU
serial_number=12345
device_type=1-0050F204-1
os_version=01020300
config_methods=virtual_display virtual_push_button keypad
移除后,只缺少了当前SSID热点数据,以上内容还是默认会保留的。
- 关闭WIFI
# killall udhcpc (如果ens35u1接口配置静态IP,此命令不使用)
# killall wpa_supplicant
# ifconfig ens35u1 down
备注:扫描过程中偶尔会出现如下信息:
Successfully initialized wpa_supplicant
rfkill: Cannot get wiphy information
ioctl[SIOCSIWAP]: Operation not permitted
似乎有一点报错,但实际上对使用并没什么影响。
还可以tail -f /var/log/wap_supplicant.log动态监控查看无线扫描、连接过程打印出来的日志数据。