什么是CGI
CGI全称"通用网关接口"(Common Gateway Interface),用于HTTP服务器与其它机器上的程序服务通信交流的一种工具,CGI程序须运行在网络服务器上。
传统CGI接口方式的主要缺点是性能较差,因为每次HTTP服务器遇到动态程序时都需要重启解析器来执行解析,然后结果被返回给HTTP服务器。这在处理高并发访问几乎是不可用的,因此就诞生了FastCGI。另外传统的CGI接口方式安全性也很差。
什么是FastCGI
FastCGI是一个可伸缩地、高速地在HTTP服务器和动态脚本语言间通信的接口(FastCGI接口在Linux下是socket(可以是文件socket,也可以是ip socket)),主要优点是把动态语言和HTTP服务器分离开来。多数流行的HTTP服务器都支持FastCGI,包括Apache、Nginx和lightpd。
同时,FastCGI也被许多脚本语言所支持,比较流行的脚本语言之一为PHP。FastCGI接口方式采用C/S架构,可以将HTTP服务器和脚本解析服务器分开,同时在脚本解析服务器上启动一个或多个脚本解析守护进程。当HTTP服务器每次遇到动态程序时,可以将其直接交付给FastCGI进程执行,然后将得到的结构返回给浏览器。这种方式可以让HTTP服务器专一地处理静态请求或者将动态脚本服务器的结果返回给客户端,这在很大程度上提高了整个应用系统的性能。
FastCGI的重要特点:
1、FastCGI是HTTP服务器和动态脚本语言间通信的接口或者工具。
2、FastCGI优点是把动态语言解析和HTTP服务器分离开来。
3、Nginx、Apache、Lighttpd以及多数动态语言都支持FastCGI。
4、FastCGI接口方式采用C/S架构,分为客户端(HTTP服务器)和服务端(动态语言解析服务器)。
5、PHP动态语言服务端可以启动多个FastCGI的守护进程。
6、HTTP服务器通过FastCGI客户端和动态语言FastCGI服务端通信。
Nginx FastCGI的运行原理
Nginx不支持对外部动态程序的直接调用或者解析,所有的外部程序(包括PHP)必须通过FastCGI接口来调用。FastCGI接口在Linux下是socket(可以是文件socket,也可以是ip socket)。为了调用CGI程序,还需要一个FastCGI的wrapper,这个wrapper绑定在某个固定socket上,如端口或者文件socket。当Nginx将CGI请求发送给这个socket的时候,通过FastCGI接口,wrapper接收到请求,然后派生出一个新的线程,这个线程调用解释器或者外部程序处理脚本并读取返回数据;接着,wrapper再将返回的数据通过FastCGI接口,沿着固定的socket传递给Nginx;最后,Nginx将返回的数据发送给客户端,这就是Nginx+FastCGI的整个运作过程。
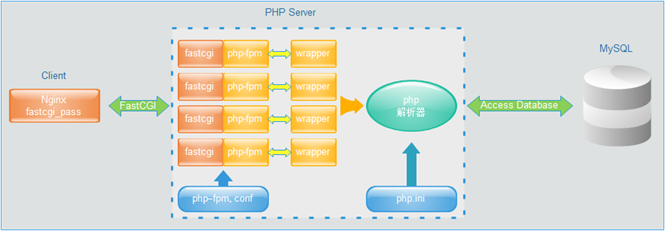
FastCGI的主要优点是把动态语言和HTTP服务器分离开来,是Nginx专一处理静态请求和向后转发动态请求,而PHP/PHP-FPM服务器专一解析PHP动态请求。
检查安装PHP所需lib库
php程序在开发及运行时会调用一些zlib、gb 函数库,因此需要安装下面的库。
- [root@lnmp tools]# yum install zlib-devel libxml2-devel libjpeg-devel libiconv-devel freetype-devel libpng-devel gd-devel curl-devel libxslt-devel -y
安装yum无法安装的libiconv库
- [root@lnmp tools]# wget http://ftp.gnu.org/pub/gnu/libiconv/libiconv-1.14.tar.gz
- [root@lnmp tools]# tar zxf libiconv-1.14.tar.gz
- [root@lnmp tools]# cd libiconv-1.14
- [root@lnmp libiconv-1.14]# ./configure --prefix=/usr/local/libiconv
- [root@lnmp libiconv-1.14]# make && make install
安装libmcrypt库
- [root@lnmp tools]# wget http://sourceforge.net/projects/mcrypt/files/Libmcrypt/2.5.8/libmcrypt-2.5.8.tar.gz
- [root@lnmp libmcrypt-2.5.8]# ./configure
- [root@lnmp libmcrypt-2.5.8]# make && make install
快速安装方法:
安装epel源
- [root@lnmp ~]# wget -O /etc/yum.repos.d/epel.repo http://mirrors.aliyun.com/repo/epel-6.repo
安装PHP依赖包
- [root@lnmp ~]# yum -y install libxml2-devel gd-devel libcurl-devel libxslt-devel libmcrypt-devel mhash mcrypt
安装libicov
同上。
安装libmcrypt
- [root@lnmp yum.repos.d]# yum install libmcrypt-devel -y
- [root@lnmp yum.repos.d]# rpm -qa libmcrypt-devel
- libmcrypt-devel-2.5.8-9.el6.x86_64
安装mhash加密扩展库
Mhash是基于离散数学原理的不可逆向的php加密方式扩展库,其在默认情况下不开启。mhash可以用于创建校验数值、消息摘要、消息认证码,以及无需原文的关键信息保持(如密码)等。
- [root@lnmp ~]# yum install mhash mhash-devel -y
- [root@lnmp ~]# rpm -qa mhash mhash-devel
- mhash-devel-0.9.9.9-3.el6.x86_64
- mhash-0.9.9.9-3.el6.x86_64
安装mcrypt加密扩展库
PHP程序员在编写代码程序时,除了要保证代码的高性能之外,还有一点是非常重要的,那就是程序的安全性保障。PHP除了自带的几种加密函数外,还有功能更全面的PHP加密扩展库mcrypt和mhash。
- [root@lnmp ~]# yum install mcrypt -y
- [root@lnmp ~]# rpm -qa mcrypt
- mcrypt-2.6.8-10.el6.x86_64
安装PHP
lnmp服务器
- [root@lnmp tools]# tar xf php-5.3.28.tar.gz
- [root@lnmp tools]# ls -ld php-5.3.28
- drwxr-xr-x 13 nginx games 4096 Dec 11 2013 php-5.3.28
- [root@lnmp tools]# cd php-5.3.28
编译安装
- ###################输入以下内容
- ./configure
- --prefix=/application/php5.3.28
- --with-mysql=/application/mysql #使用php自带mysql参数:--with-mysql=mysqlnd
- --with-iconv-dir=/usr/local/libiconv
- --with-freetype-dir
- --with-jpeg-dir
- --with-png-dir
- --with-zlib
- --with-libxml-dir=/usr
- --enable-xml
- --disable-rpath
- --enable-safe-mode
- --enable-bcmath
- --enable-shmop
- --enable-sysvsem
- --enable-inline-optimization
- --with-curl
- --with-curlwrappers
- --enable-mbregex
- --enable-fpm
- --enable-mbstring
- --with-mcrypt
- --with-gd
- --enable-gd-native-ttf
- --with-openssl
- --with-mhash
- --enable-pcntl
- --enable-sockets
- --with-xmlrpc
- --enable-zip
- --enable-soap
- --enable-short-tags
- --enable-zend-multibyte
- --enable-static
- --with-xsl
- --with-fpm-user=nginx
- --with-fpm-group=nginx
- --enable-ftp
- ####################编译结果
- creating main/internal_functions.c
- creating main/internal_functions_cli.c
- +--------------------------------------------------------------------+
- | License: |
- | This software is subject to the PHP License, available in this |
- | distribution in the file LICENSE. By continuing this installation |
- | process, you are bound by the terms of this license agreement. |
- | If you do not agree with the terms of this license, you must abort |
- | the installation process at this point. |
- +--------------------------------------------------------------------+
- Thank you for using PHP.
- [root@lnmp php-5.3.28]# echo $?
- 0
- [root@lnmp php-5.3.28]# make
- /usr/bin/ld: cannot find -lltdl
- collect2: ld returned 1 exit status
- make: *** [sapi/fpm/php-fpm] Error 1
- [root@lnmp php-5.3.28]# echo $?
- 2
cannot find –lltdl解决办法,需要安装libltdl。
- [root@lnmp tools]# cd libmcrypt-2.5.8/libltdl/
- [root@lnmp libltdl]# ./configure -enable-ltdl-install
- [root@lnmp libltdl]# make && make install
重新回到PHP的安装目录下进行查询编译PHP。
- [root@lnmp php-5.3.28]# make
- clicommand.inc
- pharcommand.inc
- directorytreeiterator.inc
- invertedregexiterator.inc
- phar.inc
- Build complete.
- Don't forget to run 'make test'.
- [root@lnmp php-5.3.28]# echo $?
- 0
- [root@lnmp php-5.3.28]# make install
创建软连接
- /home/oldboy/tools/php-5.3.28/build/shtool install -c ext/phar/phar.phar /application/php5.3.28/bin
- ln -s -f /application/php5.3.28/bin/phar.phar /application/php5.3.28/bin/phar
- Installing PDO headers: /application/php5.3.28/include/php/ext/pdo/
- [root@lnmp php-5.3.28]# echo $?
- 0
- [root@lnmp php-5.3.28]# ln -s /application/php5.3.28/ /application/php
mysql服务器
- [root@mysql tools]# tar xf php-5.5.38.tar.gz
- [root@mysql tools]# ls -ld php-5.5.38
- drwxr-xr-x 14 1000 1000 4096 Jul 20 2016 php-5.5.38
- [root@mysql tools]# cd php-5.5.38
编译安装
- #############输入以下内容
- ./configure
- --prefix=/application/php5.5.38
- --with-mysql=mysqlnd
- --with-iconv-dir=/usr/local/libiconv
- --with-freetype-dir
- --with-jpeg-dir
- --with-png-dir
- --with-zlib
- --with-libxml-dir=/usr
- --enable-xml
- --disable-rpath
- --enable-bcmath
- --enable-shmop
- --enable-sysvsem
- --enable-inline-optimization
- --with-curl
- --enable-mbregex
- --enable-fpm
- --enable-mbstring
- --with-mcrypt
- --with-gd
- --enable-gd-native-ttf
- --with-openssl
- --with-mhash
- --enable-pcntl
- --enable-sockets
- --with-xmlrpc
- --enable-soap
- --enable-short-tags
- --enable-static
- --with-xsl
- --with-fpm-user=nginx
- --with-fpm-group=nginx
- --enable-ftp
- ############编译结果
- Thank you for using PHP.
- config.status: creating php5.spec
- config.status: executing default commands
- [root@mysql php-5.5.38]# echo $?
- 0
- [root@mysql php-5.5.38]# make
- invertedregexiterator.inc
- clicommand.inc
- directorytreeiterator.inc
- directorygraphiterator.inc
- pharcommand.inc
- phar.inc
- Build complete.
- Don't forget to run 'make test'.
- [root@mysql php-5.5.38]# echo $?
- 0
- [root@mysql php-5.5.38]# make install
- ln -s -f phar.phar /application/php5.5.38/bin/phar
- Installing PDO headers: /application/php5.5.38/include/php/ext/pdo/
- [root@mysql php-5.5.38]# echo $?
- 0
创建软连接
- [root@mysql php-5.5.38]# ln -s /application/php5.5.38/ /application/php
- [root@mysql php-5.5.38]# ls -ld /application/php
- lrwxrwxrwx 1 root root 23 Feb 26 16:08 /application/php -> /application/php5.5.38/
配置PHP引擎配置文件php.ini
- [root@lnmp php-5.3.28]# cp php.ini-production /application/php/lib/php.ini
配置PHP服务(FastCGI模式)配置文件php-fpm.conf
- [root@lnmp php-5.3.28]# cd /application/php/etc/
- [root@lnmp etc]# ls
- pear.conf php-fpm.conf.default
- [root@lnmp etc]# cp php-fpm.conf.default php-fpm.conf
- [root@lnmp etc]# ls
- pear.conf php-fpm.conf php-fpm.conf.default
指定pid路径:pid = /app/logs/php-fpm.pid
进程管理的错误日志路径:error_log = /app/logs/php-fpm.log
错误日志级别:log_level = error
主进程文件描述符:rlimit_files = 32768
模型:events.mechanism = epoll
用户和组:
listen.owner = nginx
listen.group = nginx
最大进程数:pm.max_children = 1024
开始启动进程数:pm.start_servers = 16
最小空闲进程数:pm.min_spare_servers = 5
最大空闲进程数:pm.max_spare_servers = 20
超时时间:pm.process_idle_timeout = 15s;
每个进程最大请求:pm.max_requests = 2048
慢查询:slowlog = /app/logs/$pool.log.slow
超时时间:request_slowlog_timeout = 10
邮箱地址:php_admin_value[sendmail_path] = /usr/sbin/sendmail -t -i -f xxxxxxx@xxx.com
启动PHP
- [root@lnmp etc]# /application/php/sbin/php-fpm
- [root@lnmp etc]# ps -ef|grep php-fpm
- root 1695 1 0 17:32 ? 00:00:00 php-fpm: master process (/application/php5.3.28/etc/php-fpm.conf)
- nginx 1696 1695 0 17:32 ? 00:00:00 php-fpm: pool www
- nginx 1697 1695 0 17:32 ? 00:00:00 php-fpm: pool www
- nginx 1698 1695 0 17:32 ? 00:00:00 php-fpm: pool www
- nginx 1699 1695 0 17:32 ? 00:00:00 php-fpm: pool www
- nginx 1700 1695 0 17:32 ? 00:00:00 php-fpm: pool www
- nginx 1701 1695 0 17:32 ? 00:00:00 php-fpm: pool www
- nginx 1702 1695 0 17:32 ? 00:00:00 php-fpm: pool www
- nginx 1703 1695 0 17:32 ? 00:00:00 php-fpm: pool www
- nginx 1704 1695 0 17:32 ? 00:00:00 php-fpm: pool www
- nginx 1705 1695 0 17:32 ? 00:00:00 php-fpm: pool www
- nginx 1706 1695 0 17:32 ? 00:00:00 php-fpm: pool www
- nginx 1707 1695 0 17:32 ? 00:00:00 php-fpm: pool www
- nginx 1708 1695 0 17:32 ? 00:00:00 php-fpm: pool www
- nginx 1709 1695 0 17:32 ? 00:00:00 php-fpm: pool www
- nginx 1710 1695 0 17:32 ? 00:00:00 php-fpm: pool www
- nginx 1711 1695 0 17:32 ? 00:00:00 php-fpm: pool www
- root 1713 1360 0 17:33 pts/0 00:00:00 grep php-fpm
- [root@lnmp etc]# ps -ef|grep php-fpm|wc -l
- 18
查看端口
- [root@lnmp etc]# netstat -lntup|grep php-fpm
- tcp 0 0 127.0.0.1:9000 0.0.0.0:* LISTEN 1695/php-fpm
- [root@lnmp etc]# ss -lntup|grep php-fpm
- tcp LISTEN 0 128 127.0.0.1:9000 *:* users:(("php-fpm",1695,7),("php-fpm",1696,0),("php-fpm",1697,0),("php-fpm",1698,0),("php-fpm",1699,0),("php-fpm",1700,0),("php-fpm",1701,0),("php-fpm",1702,0),("php-fpm",1703,0),("php-fpm",1704,0),("php-fpm",1705,0),("php-fpm",1706,0),("php-fpm",1707,0),("php-fpm",1708,0),("php-fpm",1709,0),("php-fpm",1710,0),("php-fpm",1711,0))
配置PHP与Nginx
- [root@lnmp ~]# cd /application/nginx/conf/extra/
- [root@lnmp extra]# cat blog.conf
- server {
- listen 80;
- server_name blog.etiantian.org;
- root html/blog;
- location / {
- index index.html index.htm;
- }
- location ~ .*.(php|php5)?$ {
- fastcgi_pass 127.0.0.1:9000;
- fastcgi_index index.php;
- include fastcgi.conf;
- }
- }
- [root@lnmp extra]# ../../sbin/nginx -t
- nginx: the configuration file /application/nginx-1.6.1/conf/nginx.conf syntax is ok
- nginx: configuration file /application/nginx-1.6.1/conf/nginx.conf test is successful
- [root@lnmp extra]# ../../sbin/nginx -s reload
- [root@lnmp extra]# cd /application/nginx/html/blog/
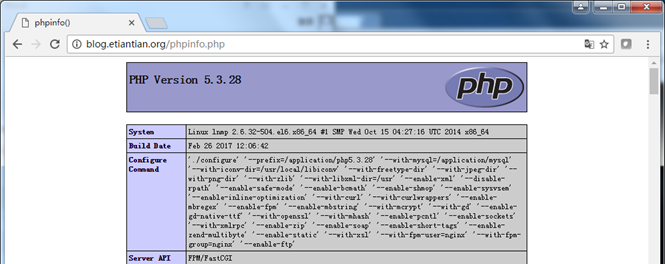
- [root@lnmp blog]# cat phpinfo.php
- <?php
- phpinfo();
- ?>
浏览器访问
配置PHP与MySQL
- [root@lnmp blog]# pwd
- /application/nginx/html/blog
- [root@lnmp blog]# cat test_mysql.php
- <?php
- //$link_id=mysql_connect('主机名','用户','密码');
- $link_id=mysql_connect('localhost','root','system');
- //$link_id=mysql_connect('localhost','test','');
- if($link_id){
- echo "mysql successful by oldboy!";
- }else{
- echo mysql_error();
- }
- //php单行注释
- /*php多行注释*、
- ?>

- [root@lnmp blog]# rm -f phpinfo.php test_mysql.php
部署一个BLOG程序服务

WordPress是一套利用PHP语言和MySQL数据库开发的开源免费的Blog(博客、网站)程序,用户可以在支持PHP环境和MySQL数据库的服务器上建立Blog站点。
WordPress是一个功能非常强大的博客系统,插件众多,易于扩展功能。安装和使用都非常方便。目前WordPress已经成为主流的Blog搭建平台,很多发布平台也是根据WordPress二次开发的。
- [root@lnmp blog]# pwd
- /application/nginx/html/blog
- [root@lnmp blog]# wget https://cn.wordpress.org/wordpress-4.7.2-zh_CN.tar.gz
创建一个专用的数据库WordPress用于存放blog数据。
- [root@lnmp blog]# mysql -uroot -psystem
- mysql> create database wordpress;
- Query OK, 1 row affected (0.00 sec)
- mysql> show databases;
- +--------------------+
- | Database |
- +--------------------+
- | information_schema |
- | mysql |
- | performance_schema |
- | wordpress |
- +--------------------+
- 4 rows in set (0.07 sec)
创建一个管理的数据库WordPress的用户wordpress。
- mysql> grant all on wordpress.* to wordpress@'localhost' identified by 'system';
- Query OK, 0 rows affected (0.00 sec)
- mysql> flush privileges;
- Query OK, 0 rows affected (0.01 sec)
- mysql> select user,host from mysql.user where user='wordpress';
- +-----------+-----------+
- | user | host |
- +-----------+-----------+
- | wordpress | localhost |
- +-----------+-----------+
- 1 row in set (0.00 sec)
部署WordPress
- [root@lnmp blog]# tar xf wordpress-4.7.2-zh_CN.tar.gz
- [root@lnmp blog]# mv wordpress/* .
- [root@lnmp blog]# rm -fr wordpress
- [root@lnmp blog]# cd ../
- [root@lnmp html]# ll -ld blog/
- drwxr-xr-x 5 root root 4096 Feb 27 10:10 blog/
- [root@lnmp html]# find ./blog/ -type f|xargs chmod 644
- [root@lnmp html]# find ./blog/ -type d|xargs chmod 755
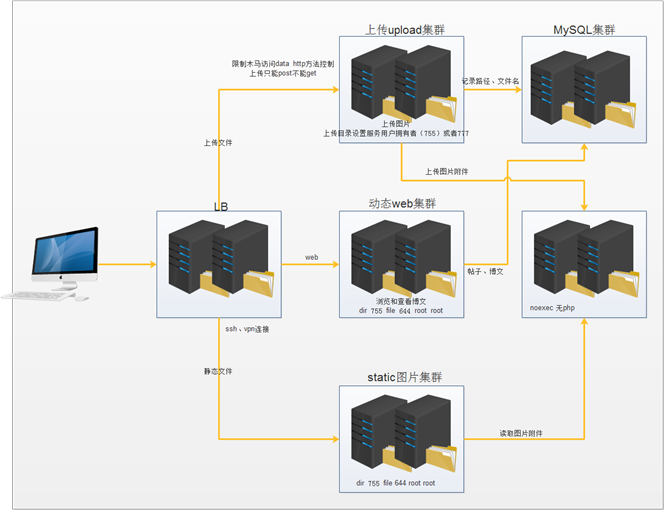
权限设置
默认目录权限:dir 755 root root
默认文件权限:file 644 root root
用户目录权限:dir nginx nginx 755
用户文件权限:file nginx nginx 644
- [root@lnmp html]# chown -R root.root blog/
- [root@lnmp html]# find ./blog/ -type f|xargs chmod 644
- [root@lnmp html]# find ./blog/ -type d|xargs chmod 755
- [root@lnmp html]# mkdir blog/wp-content/uploads
- [root@lnmp html]# chown -R nginx.nginx blog/wp-content/uploads/
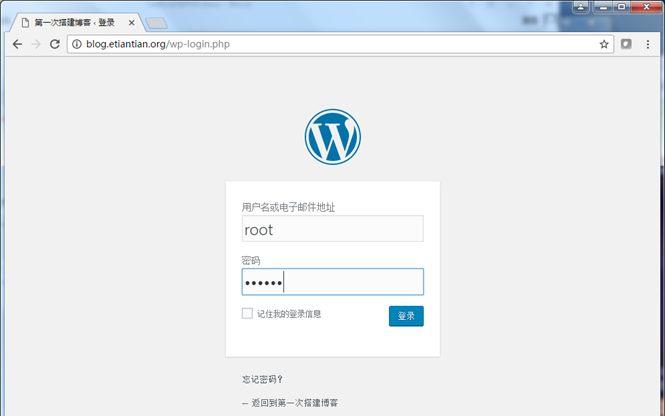
浏览器访问http://blog.etiantian.org/index.php
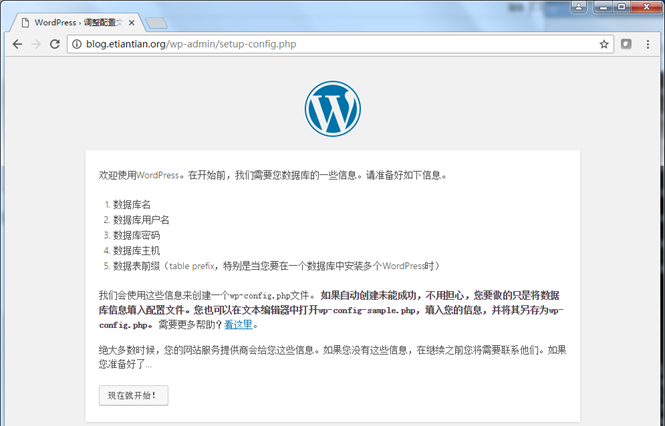

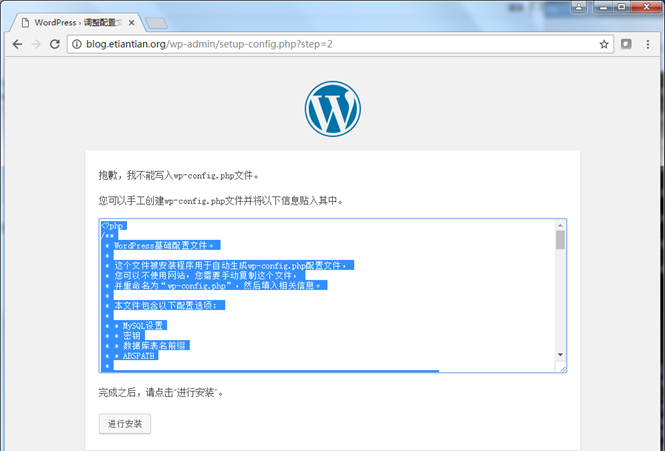
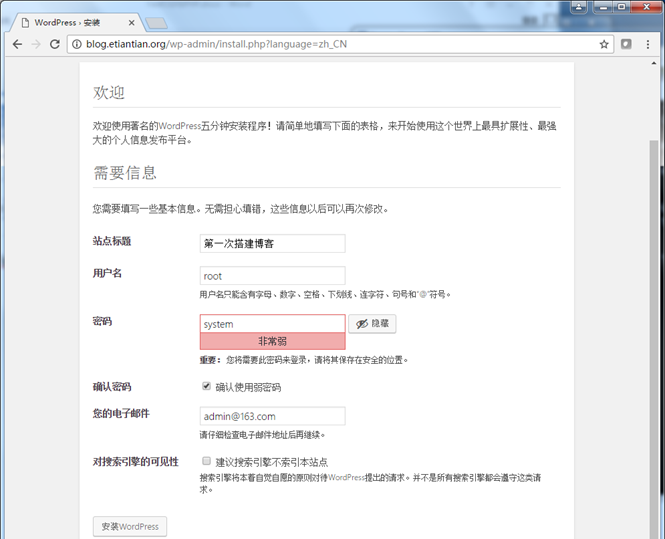
根据提示创建wp-config.php,然后点击"进行安装"。
数据库中查看安装结果
- [root@lnmp blog]# mysql -uroot -psystem
- Welcome to the MySQL monitor. Commands end with ; or g.
- mysql> use wordpress
- Database changed
- mysql> show tables;
- Empty set (0.01 sec)
- mysql> show tables;
- +-----------------------+
- | Tables_in_wordpress |
- +-----------------------+
- | ol_commentmeta |
- | ol_comments |
- | ol_links |
- | ol_options |
- | ol_postmeta |
- | ol_posts |
- | ol_term_relationships |
- | ol_term_taxonomy |
- | ol_termmeta |
- | ol_terms |
- | ol_usermeta |
- | ol_users |
- +-----------------------+
- 12 rows in set (0.00 sec)
- mysql> select * from ol_users;
- +----+------------+------------------------------------+---------------+---------------+----------+---------------------+---------------------+-------------+--------------+
- | ID | user_login | user_pass | user_nicename | user_email | user_url | user_registered | user_activation_key | user_status | display_name |
- +----+------------+------------------------------------+---------------+---------------+----------+---------------------+---------------------+-------------+--------------+
- | 1 | root | $P$BbYLtgyYZ9xItWMJXp4rYB/ggABd9t/ | root | admin@163.com | | 2017-02-27 03:37:27 | | 0 | root |
- +----+------------+------------------------------------+---------------+---------------+----------+---------------------+---------------------+-------------+--------------+
- 1 row in set (0.00 sec)