GitLab安装部署
Git,GitHub,GitLab,这三个东东长得好像呀,都是个啥?
Git是Linus Torvalds(如果不知道这位大神是谁,请出门左转,慢走不送~)为了帮助管理Linux内核而开发的一个开放源代码的版本控制软件。
GitHub,又名全球最大同行交友软件(O(∩_∩)O哈哈~),是一个面向开源及私有项目的托管平台,因为仅仅支持Git作为唯一的版本库格式,故名GitHub。
GitLab是由GitLabInc.开发的,是基于MIT许可证的Git仓库管理工具,具有Wiki和Issue跟踪功能,目前有企业版和社区版两个分支,对于个人来说,社区版应该是完全够用的。
其实,简单来说,可以把GitLab看做是个个人版的GitHub,也就是说,可以在自己服务器上部署一套GitLab服务,该服务可以提供代码仓库托管等功能,用法与GibHub基本一致。
GitLab安装
# 安装并配置必要的依赖
[root@cos ~]# yum install -y curl policycoreutils-python openssh-server
[root@cos ~]# systemctl enable sshd
[root@cos ~]# systemctl start sshd
# CentOS7系统中,在防火墙打开场景下,打开HTTP, HTTPS和SSH访问
[root@cos ~]# firewall-cmd --permanent --add-service=http
[root@cos ~]# firewall-cmd --permanent --add-service=https
[root@cos ~]# systemctl reload firewalld

# 安装Postfix,用来发送通知邮件
[root@cos ~]# yum install postfix
[root@cos ~]# systemctl enable postfix
[root@cos ~]# systemctl start postfix
注意:为了避免下载失败导致GitLab安装失败,可以配置清华镜像,镜像配置操作如下
# GitLab Community Edition镜像使用帮助
# https://mirror.tuna.tsinghua.edu.cn/help/gitlab-ce/
# 1. 新建/etc/yum.repos.d/gitlab-ce.repo, 内容如下
[gitlab-ce]
name=Gitlab CE Repository
baseurl=https://mirrors.tuna.tsinghua.edu.cn/gitlab-ce/yum/el$releasever/
gpgcheck=0
enabled=1
使用yum安装GitLab社区版
# yum安装GitLab社区版
[root@cos ~]# yum makecache
[root@cos ~]# yum install gitlab-ce
Loaded plugins: fastestmirror
Loading mirror speeds from cached hostfile
 * base: mirrors.huaweicloud.com
 * epel: hkg.mirror.rackspace.com
 * extras: mirrors.huaweicloud.com
 * updates: mirrors.huaweicloud.com
Resolving Dependencies
--> Running transaction check
---> Package gitlab-ce.x86_64 0:12.9.1-ce.0.el7 will be installed
--> Finished Dependency Resolution

Dependencies Resolved

=========================================================================================
 Package        Arch        Version            Repository        Size
=========================================================================================
Installing:
 gitlab-ce      x86_64      12.9.1-ce.0.el7    gitlab-ce         721 M

Transaction Summary
=========================================================================================
Install  1 Package

Total download size: 721 M
Installed size: 721 M
Is this ok [y/d/N]: y
Downloading packages:
gitlab-ce-12.9.1-ce.0.el7.x86_64.rpm                                                    | 721 MB  00:01:49
Running transaction check
Running transaction test
Transaction test succeeded
Running transaction
  Installing : gitlab-ce-12.9.1-ce.0.el7.x86_64                                                            1/1
It looks like GitLab has not been configured yet; skipping the upgrade script.

       *.                  *.
      ***                 ***
     *****               *****
    .******             *******
    ********            ********
   ,,,,,,,,,***********,,,,,,,,,
  ,,,,,,,,,,,*********,,,,,,,,,,,
  .,,,,,,,,,,,*******,,,,,,,,,,,,
      ,,,,,,,,,*****,,,,,,,,,.
         ,,,,,,,****,,,,,,
            .,,,***,,,,
                ,*,.


     _______ __  __          __
    / ____(_) /_/ /   ____ _/ /_
   / / __/ / __/ /   / __ `/ __
  / /_/ / / /_/ /___/ /_/ / /_/ /
  \____/_/\__/_____/\__,_/_.___/


Thank you for installing GitLab!

GitLab was unable to detect a valid hostname for your instance.
Please configure a URL for your GitLab instance by setting `external_url`
configuration in /etc/gitlab/gitlab.rb file.
Then, you can start your GitLab instance by running the following command:
  sudo gitlab-ctl reconfigure
For a comprehensive list of configuration options please see the Omnibus GitLab readme
https://gitlab.com/gitlab-org/omnibus-gitlab/blob/master/README.md
GitLab now ships with a newer version of PostgreSQL (11.7), but it is not yet
enabled by default. To upgrade, please see:
https://docs.gitlab.com/omnibus/settings/database.html#upgrade-packaged-postgresql-server

Verifying  : gitlab-ce-12.9.1-ce.0.el7.x86_64                                                            1/1

Installed:
  gitlab-ce.x86_64 0:12.9.1-ce.0.el7

Complete!
安装完成后,重点关注下面提示信息:
GitLab was unable to detect a valid hostname for your instance.
GitLab无法为你的GitLab检测到有效的主机名。

Please configure a URL for your GitLab instance by setting `external_url`
configuration in /etc/gitlab/gitlab.rb file.
请通过配置`external_url`为你的GitLab实例配置一个URL,该配置项在/etc/gitlab/gitlab.rb文件中。

Then, you can start your GitLab instance by running the following command:
  sudo gitlab-ctl reconfigure
然后,通过运行sudo gitlab-ctl reconfigure启动你的GitLab实例
注意:配置完成后,需要使用sudo gitlab-ctl reconfigure命令重新配置并启动GitLab实例才行。
在GitLab安装完成后,首次登录时,需要配置GitLab管理员密码,如下图所示。

注意:管理员账号为root,管理员密码非常重要,是维护GitLab服务的重要账户,尽量不要搞忘了。
GitLab配置及内存优化
根据上面的安装步骤安装完成后后,启动GitLab实例后,你可能会想,这下可以愉快的与GitLab玩耍了吧、
砰,一大盆凉水浇过来、
GitLab是非常吃内存和服务器性能的,为了在自己主机或者虚拟机上正常启动和访问,需要进行下面配置和调优。
先看下官方给出的推荐CPU,内存配置:

GitLab推荐至少2核CPU,只有1核的话,可能会导致GitLab服务卡死,无法正常对外服务。
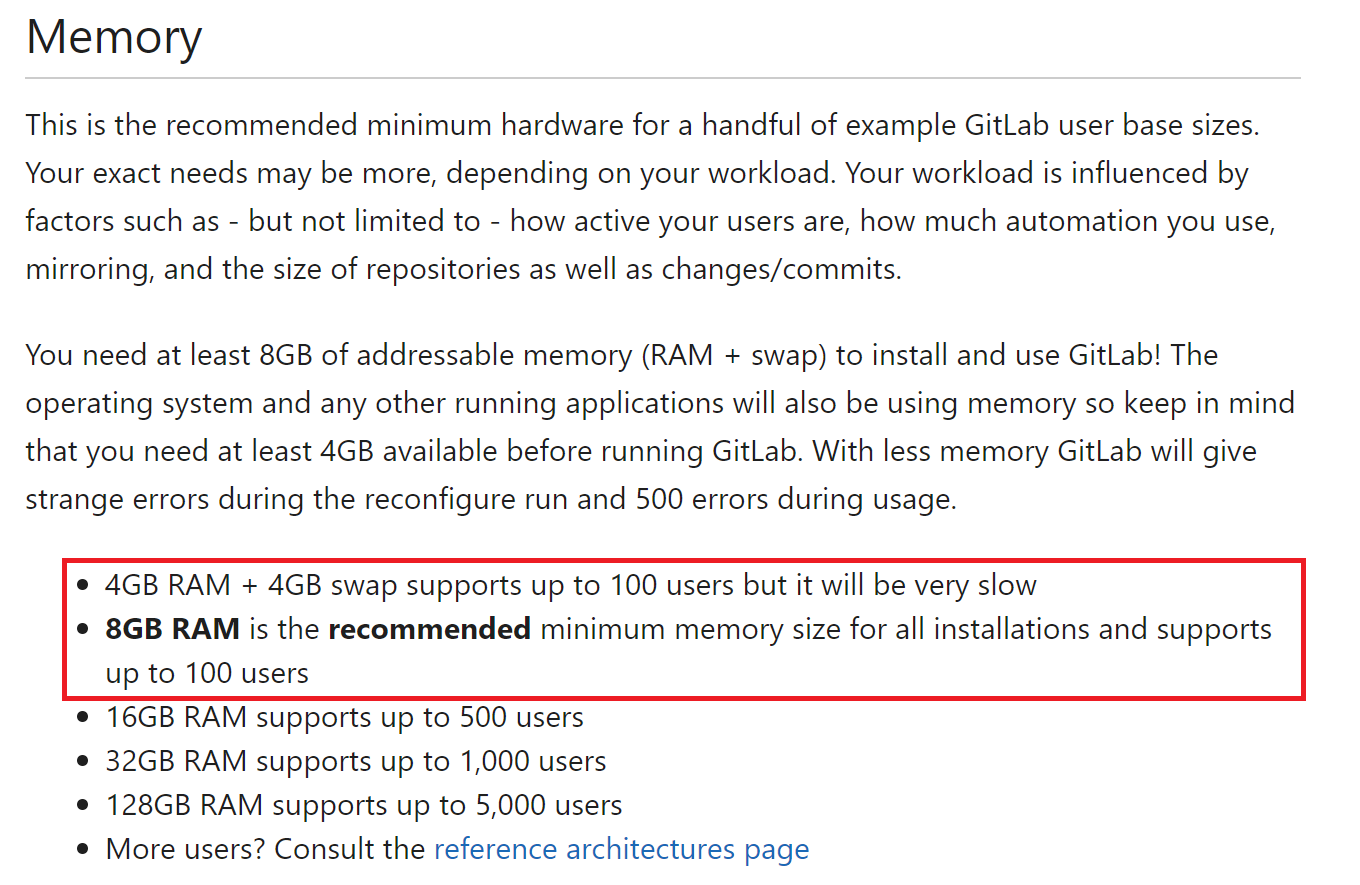
由上可知,内存配置主要影响GitLab服务的并发用户数量,对于自己使用来说,感觉2GB完全够用了。
GitLab配置文件路径:/etc/gitlab/gitlab.rb。下面对GitLab关键配置进行修改:
## GitLab URL
##! URL on which GitLab will be reachable.
##! 用户访问GitLab的URL地址
external_url 'http://cos'

###! Minimum worker_processes is 2 at this moment
###! GitLab默认开启进程数为CPU核数+1,可以提高服务器的相应时间,太吃内存
###! GitLab的最小工作进程,该参数最小值为2,设为1可能导致服务器卡死
unicorn['worker_processes'] = 2

### **Only change these settings if you understand well what they mean**
###! 工程进程的内存限制,默认最小为400MB,最大为650MB
unicorn['worker_memory_limit_min'] = "200 * 1 << 20"
unicorn['worker_memory_limit_max'] = "300 * 1 << 20"

# sidekiq并发数默认值为25
sidekiq['concurrency'] = 5

###! Changing any of these settings requires a restart of postgresql.
###! By default, reconfigure reloads postgresql if it is running. If you
###! change any of these settings, be sure to run `gitlab-ctl restart postgresql`
###! after reconfigure in order for the changes to take effect.
##! **recommend value is 1/4 of total RAM, up to 14GB.**
##! 数据库缓存,默认值为256MB
##!推荐值为1/4的RAM大小,按推荐值肯定崩了
postgresql['shared_buffers'] = "128MB"
##! 数据库并发数
postgresql['max_worker_processes'] = 4
GitLab启动
GitLab安装配置完成后,我们可以通过gitlab-ctl start命令启动,gitlab-ctl stop命令停止GitLab服务。
# 查看GitLab服务状态
[root@cos ~]# gitlab-ctl status
run: gitaly: (pid 2202) 830s; run: log: (pid 2201) 830s
run: gitlab-workhorse: (pid 2212) 830s; run: log: (pid 2211) 830s
run: logrotate: (pid 2217) 830s; run: log: (pid 2214) 830s
run: nginx: (pid 2198) 830s; run: log: (pid 2197) 830s
run: postgresql: (pid 2204) 830s; run: log: (pid 2203) 830s
run: redis: (pid 2213) 830s; run: log: (pid 2210) 830s
run: sidekiq: (pid 2195) 830s; run: log: (pid 2193) 830s
run: unicorn: (pid 2196) 830s; run: log: (pid 2194) 830s
GitLab服务启动后,我们可以通过Web页面访问GitLab服务。
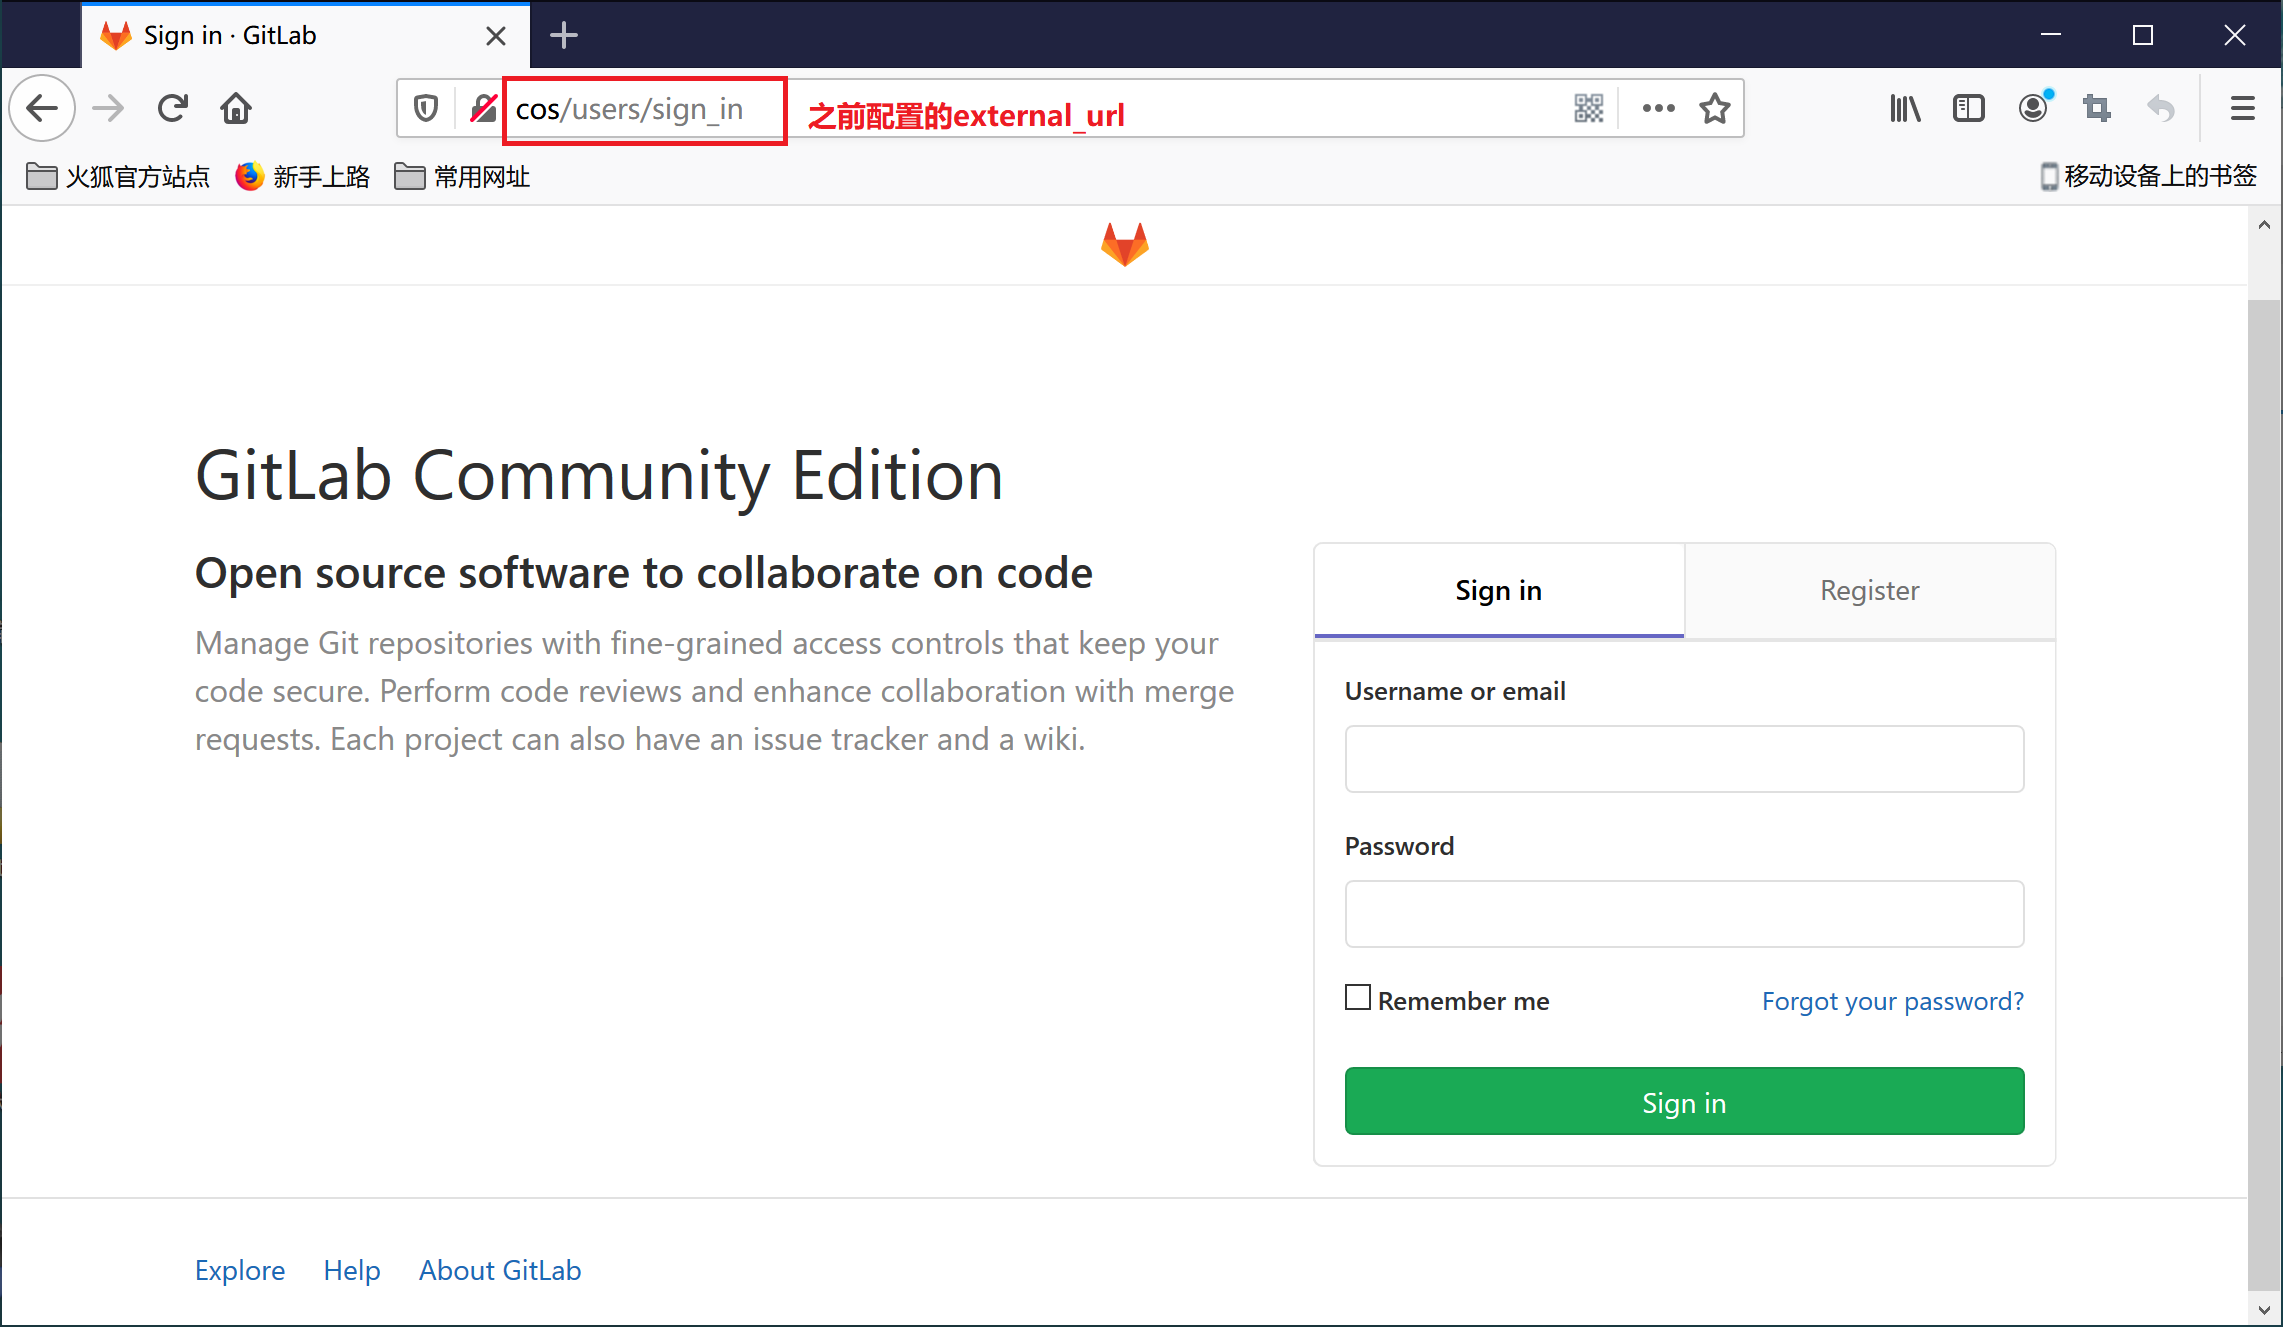
接下来,会专门再写一篇博客讲述如何在Windows上通过Git客户端像访问GitHub一样访问GitLab,敬请期待~