Eureka是什么?
Eureka是Netflix的一个子模块,也是核心模块之一。Eureka是一个基于REST的服务,用于定位服务,以实现云端中间层服务发现和故障转移。
服务注册与发现对于微服务架构来说是非常重要的,有了服务发现与注册,只需要使用服务的标识符,就可以访问到服务,而不需要修改服务调用的配置文件了。功能类似于dubbo的注册中心,比如Zookeeper。
Eureka的基本架构:
Spring Cloud 封装了 Netflix 公司开发的 Eureka 模块来实现服务注册和发现(请对比Zookeeper)。
Eureka 采用了 C-S 的设计架构。Eureka Server 作为服务注册功能的服务器,它是服务注册中心
而系统中的其他微服务,使用 Eureka 的客户端连接到 Eureka Server并维持心跳连接。这样系统的维护人员就可以通过 Eureka Server 来监控系统中各个微服务是否正常运行。SpringCloud的一些其他模块(比如Zuul)就可以通过 Eureka Server 来发现系统中的其他微服务,并执行相关的逻辑。
Eureka和Dubbo的架构对比


Eureka包含两个组件:Eureka Server和Eureka Client
Eureka Server提供服务注册服务
各个节点启动后,会在EurekaServer中进行注册,这样EurekaServer中的服务注册表中将会存储所有可用服务节点的信息,服务节点的信息可以在界面中直观的看到
EurekaClient是一个Java客户端
用于简化Eureka Server的交互,客户端同时也具备一个内置的、使用轮询(round-robin)负载算法的负载均衡器。在应用启动后,将会向Eureka Server发送心跳(默认周期为30秒)。如果Eureka Server在多个心跳周期内没有接收到某个节点的心跳,EurekaServer将会从服务注册表中把这个服务节点移除(默认90秒)
怎样注册服务?
一:EurekaServer
1.导入EurekaServer的依赖
(下面是父工程的依赖,之后使用集群方便些),红色的就是EurekaServer的主要依赖
    <properties>
        <java.version>1.8</java.version>
        <spring-cloud.version>Hoxton.RELEASE</spring-cloud.version>
    </properties>

    <dependencies>
        <dependency>
            <groupId>org.springframework.boot</groupId>
            <artifactId>spring-boot-starter-web</artifactId>
        </dependency>
        <dependency>
            <groupId>org.springframework.cloud</groupId>
            <artifactId>spring-cloud-starter-netflix-eureka-server</artifactId>
        </dependency>
        <!-- actuator监控信息完善 -->
        <dependency>
            <groupId>org.springframework.boot</groupId>
            <artifactId>spring-boot-starter-actuator</artifactId>
        </dependency>

        <dependency>
            <groupId>org.springframework.boot</groupId>
            <artifactId>spring-boot-starter-test</artifactId>
            <scope>test</scope>
            <exclusions>
                <exclusion>
                    <groupId>org.junit.vintage</groupId>
                    <artifactId>junit-vintage-engine</artifactId>
                </exclusion>
            </exclusions>
        </dependency>
    </dependencies>

    <dependencyManagement>
        <dependencies>
            <dependency>
                <groupId>org.springframework.cloud</groupId>
                <artifactId>spring-cloud-dependencies</artifactId>
                <version>${spring-cloud.version}</version>
                <type>pom</type>
                <scope>import</scope>
            </dependency>
        </dependencies>
    </dependencyManagement>
2.EurekaServer的application.yml配置
server:
  port: 7001

eureka:
  instance:
    hostname: localhost #eureka服务端的实例名称
  client:
    register-with-eureka: false #false表示不向注册中心注册自己。
    fetch-registry: false #false表示自己端就是注册中心,我的职责就是维护服务实例,并不需要去检索服务
    service-url:
      defaultZone: http://${eureka.instance.hostname}:${server.port}/eureka/        #设置与Eureka Server交互的地址查询服务和注册服务都需要依赖这个地址。
3.启动类,添加@EnableEurekaServer,激活EurekaServer的相关配置
package com.example.eureke;

import org.springframework.boot.SpringApplication;
import org.springframework.boot.autoconfigure.SpringBootApplication;
import org.springframework.cloud.netflix.eureka.server.EnableEurekaServer;

@EnableEurekaServer
@SpringBootApplication
public class EurekeApplication {

    public static void main(String[] args) {
        SpringApplication.run(EurekeApplication.class, args);
    }

}
4.启动服务,打开浏览器访问本地的7001端口(配置文件中配置的)

二:Eureka Client
1.添加客户端依赖
    <dependency>
        <groupId>org.springframework.cloud</groupId>
        <artifactId>spring-cloud-starter-netflix-eureka-client</artifactId>
    </dependency>
2.配置application.yml
server:
  port: 8001

spring:
  application:
    name: mycloud

eureka:
 client: #客户端注册进eureka服务列表内
  service-url:
   defaultZone: http://localhost:7001/eureka 这里就是服务端的defaultZone的地址
 instance:
   instance-id: ${spring.application.name}:${server.port}  #设置服务器的名称
  # 设置微服务调用地址为IP优先(缺省为false),访问路径可以显示IP地址
   prefer-ip-address: true
  # 心跳时间,即服务续约间隔时间(缺省为30s)
   lease-renewal-interval-in-seconds: 30
  # 发呆时间,即服务续约到期时间(缺省为90s)
   lease-expiration-duration-in-seconds: 90
3.在启动类中添加@EnableEurekaClient
package com.yjc;

import org.springframework.boot.SpringApplication;
import org.springframework.boot.autoconfigure.SpringBootApplication;
import org.springframework.cloud.netflix.eureka.EnableEurekaClient;

@EnableEurekaClient
@SpringBootApplication
public class ClientApplication {
    public static void main(String[] args) {
        SpringApplication.run(ClientApplication.class, args);
    }
}
4.在服务端启动之后启动客户端

5.此时点击右上角的超链接会发生404的异常信息,原因就是没有找到该服务的info信息
那接下来就进行对服务信息的配置
51.在EurekaClient的pom.xml中添加依赖
<!-- actuator监控信息完善 -->
   <dependency>
     <groupId>org.springframework.boot</groupId>
     <artifactId>spring-boot-starter-actuator</artifactId>
   </dependency>
5.2在父工程的pom.xml中添加节点
<build>
   <finalName>microservicecloud</finalName>
   <resources>
     <resource>
       <directory>src/main/resources</directory>
       <filtering>true</filtering>
     </resource>
   </resources>
   <plugins>
     <plugin>
       <groupId>org.apache.maven.plugins</groupId>
       <artifactId>maven-resources-plugin</artifactId>
       <configuration>
         <delimiters>
          <delimit>$</delimit>
         </delimiters>
       </configuration>
     </plugin>
   </plugins>
  </build>
5.3在EurekaClient的Application.yml中添加info的配置信息(值为自定义的)
info:
  app.name: firstclient
  company.name: company.name.value
  build.artifactId: $project.artifactId$
  build.version: $project.version$
5.4重启所有的服务,点击服务的超链接

出现类似于上图的信息就可以了,这些属性可以描述此服务的一些作用
Eureka自我保护机制
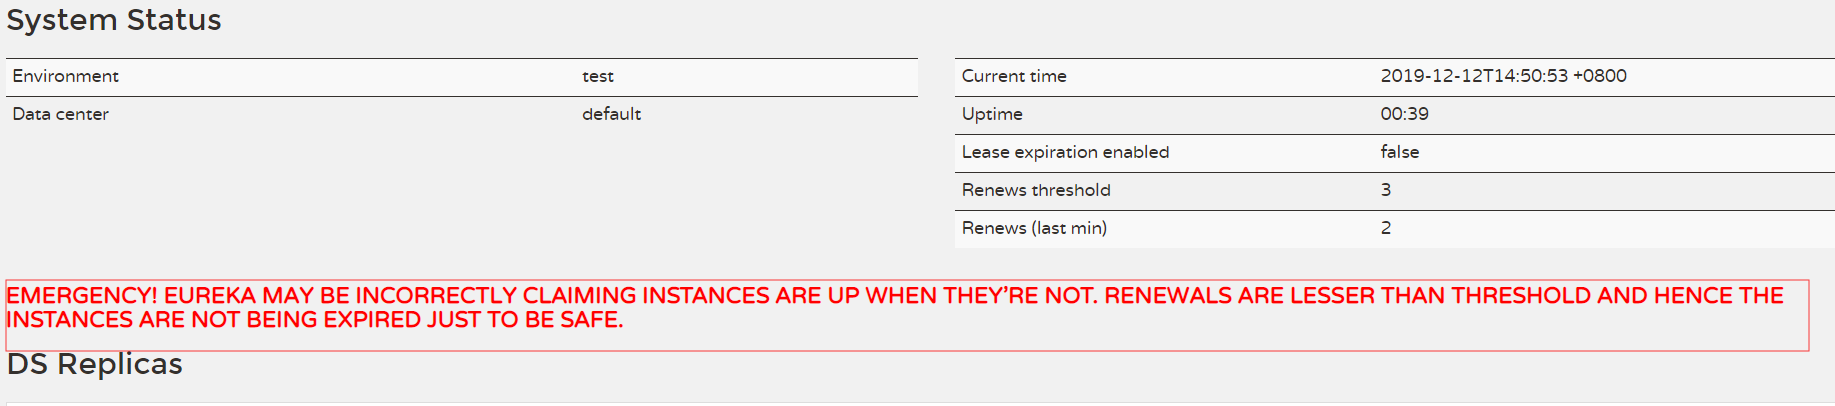
什么是自我保护模式?
默认情况下,如果EurekaServer在一定时间内没有接收到某个微服务实例的心跳,EurekaServer将会注销该实例(默认90秒)。但是当网络分区故障发生时,微服务与EurekaServer之间无法正常通信,以上行为可能变得非常危险了——因为微服务本身其实是健康的,此时本不应该注销这个微服务。Eureka通过“自我保护模式”来解决这个问题——当EurekaServer节点在短时间内丢失过多客户端时(可能发生了网络分区故障),那么这个节点就会进入自我保护模式。一旦进入该模式,EurekaServer就会保护服务注册表中的信息,不再删除服务注册表中的数据(也就是不会注销任何微服务)。当网络故障恢复后,该Eureka Server节点会自动退出自我保护模式。
在自我保护模式中,Eureka Server会保护服务注册表中的信息,不再注销任何服务实例。当它收到的心跳数重新恢复到阈值以上时,该Eureka Server节点就会自动退出自我保护模式。它的设计哲学就是宁可保留错误的服务注册信息,也不盲目注销任何可能健康的服务实例。
综上,自我保护模式是一种应对网络异常的安全保护措施。它的架构哲学是宁可同时保留所有微服务(健康的微服务和不健康的微服务都会保留),也不盲目注销任何健康的微服务。使用自我保护模式,可以让Eureka集群更加的健壮、稳定。
在Spring Cloud中,可以使用eureka.server.enable-self-preservation = false 禁用自我保护模式。
Eureka集群配置
为了保证Eureka的高可用,即使有服务突然down掉了,页不影响服务运行
1.再复制两个之前的Eureka Server
并修改application.yml配置文件,端口分别为7001,7002,7003
2.修改映射配置
2.1找到C:WindowsSystem32driversetc路径下的hosts文件
2.2修改映射配置添加进hosts文件
127.0.0.1  eureka7001.com
127.0.0.1  eureka7002.com
127.0.0.1  eureka7003.com
修改完之后,当你在浏览器中输入eureka7001.com或者其他两个式,就代表127.0.0.1,也就是localhost
3.修改3台eureka服务器的yml配置
7001端口
server:
  port: 7001

eureka:
  instance:
    hostname: eureka7001.com #eureka服务端的实例名称
  client:
    register-with-eureka: false     #false表示不向注册中心注册自己。
    fetch-registry: false     #false表示自己端就是注册中心,我的职责就是维护服务实例,并不需要去检索服务
    service-url:
      #单机 defaultZone: http://${eureka.instance.hostname}:${server.port}/eureka/       #设置与Eureka Server交互的地址查询服务和注册服务都需要依赖这个地址(单机)。
      defaultZone: http://eureka7002.com:7002/eureka/,http://eureka7003.com:7003/eureka/
7002端口
server:
  port: 7002

eureka:
  instance:
    hostname: eureka7002.com #eureka服务端的实例名称
  client:
    register-with-eureka: false     #false表示不向注册中心注册自己。
    fetch-registry: false     #false表示自己端就是注册中心,我的职责就是维护服务实例,并不需要去检索服务
    service-url:
      #defaultZone: http://${eureka.instance.hostname}:${server.port}/eureka/       #设置与Eureka Server交互的地址查询服务和注册服务都需要依赖这个地址。
      defaultZone: http://eureka7001.com:7001/eureka/,http://eureka7003.com:7003/eureka/
7003端口
server:
  port: 7003

eureka:
  instance:
    hostname: eureka7003.com #eureka服务端的实例名称
  client:
    register-with-eureka: false     #false表示不向注册中心注册自己。
    fetch-registry: false     #false表示自己端就是注册中心,我的职责就是维护服务实例,并不需要去检索服务
    service-url:
      #defaultZone: http://${eureka.instance.hostname}:${server.port}/eureka/       #设置与Eureka Server交互的地址查询服务和注册服务都需要依赖这个地址。
      defaultZone: http://eureka7001.com:7001/eureka/,http://eureka7002.com:7002/eureka/
4.最后修改EurekaClient的application.yml中的defaultZone值
eureka:
  client: #客户端注册进eureka服务列表内
    service-url:
      defaultZone: http://eureka7001.com:7001/eureka/,http://eureka7002.com:7002/eureka/,http://eureka7003.com:7003/eureka/
5.启动三个服务端,在启动客户端,结果如下,大功告成
