java.lang包下有二个非常有用的东西:Runnable接口与Thread类,Thread实现了Runnable接口(可以认为Thread是Runnable的子类),利用它们可以实现最基本的多线程开发。
一、Runnable入门示例


 1 public class RunnableDemo1 {
 2
 3     public static void main(String[] args) {
 4         new Runnable() {
 5             public void run() {
 6                 for (int i = 0; i < 5; i++) {
 7                     try {
 8                         Thread.sleep(100);
 9                     } catch (InterruptedException e) {
10                         e.printStackTrace();
11                     }
12                     System.out.println("r1 -> i=" + i);
13                 }
14
15             }
16         }.run();
17
18         new Runnable() {
19             public void run() {
20                 for (int i = 0; i < 5; i++) {
21                     try {
22                         Thread.sleep(100);
23                     } catch (InterruptedException e) {
24                         e.printStackTrace();
25                     }
26                     System.out.println("r2 -> i=" + i);
27                 }
28             }
29         }.run();
30
31     }
32
33 }
代码很简单,每个线程依次输出0-4这5个数字,运行结果:
r1 -> i=0
r1 -> i=1
r1 -> i=2
r1 -> i=3
r1 -> i=4
r2 -> i=0
r2 -> i=1
r2 -> i=2
r2 -> i=3
r2 -> i=4
二、向Runnable传递参数
实际应用中,线程开始处理前,通常会有一些初始参数,如果要传入参数,可以参考下面的方法,先定义一个Runnable的子类
 1 package com.cnblogs.yjmyzz;
 2
 3 public class MyRunnable implements Runnable{
 4
 5     private String name;
 6     private int max;
 7
 8     public MyRunnable(String name,int max){
 9         this.name = name;
10         this.max = max;
11     }
12
13     public void run() {
14         for (int i = 1; i <= max; i++) {
15             try {
16                 Thread.sleep(5);
17                 System.out.println(name + ".i=" + i);
18             } catch (InterruptedException e) {
19                 e.printStackTrace();
20             }
21         }
22     }
23
24 }
然后这样使用:
 1 package com.cnblogs.yjmyzz;
 2
 3 public class RunnableDemo2 {
 4
 5     public static void main(String[] args) {
 6
 7         new MyRunnable("A", 5).run();
 8
 9         new MyRunnable("B", 5).run();
10     }
11
12 }
运行结果:
A.i=1
A.i=2
A.i=3
A.i=4
A.i=5
B.i=1
B.i=2
B.i=3
B.i=4
B.i=5
三、利用Thread并行处理
刚才的二个例子,相当大家也发现了问题,虽然是有二个线程,但是始终是按顺序执行的,上一个线程处理完成前,下一个线程无法开始,这其实跟同步处理没啥二样,可以通过Thread类改变这种局面:
 1 public class RunnableDemo3 {
 2
 3     public static void main(String[] args) {
 4
 5         Runnable r1 = new MyRunnable("A", 5);
 6         Runnable r2 = new MyRunnable("B", 5);
 7
 8         Thread t1 = new Thread(r1);
 9         Thread t2 = new Thread(r2);
10
11         t1.start();
12         t2.start();
13
14     }
15
16 }
Thread通过start方法,可以让多个线程并行处理,运行结果如下:
B.i=1
A.i=1
B.i=2
A.i=2
B.i=3
A.i=3
B.i=4
A.i=4
B.i=5
A.i=5
从输出结果上看,二个线程已经在并行处理了。
四、通过在线抢购示例理解资源共享
双十一刚过,每到这个时候,通常是狼多肉少,下面的OrderRunnable类模拟这种抢购情况,假设产品数只有10个,抢购的客户却有100个
 1 package com.cnblogs.yjmyzz;
 2
 3 public class OrderRunnable implements Runnable{
 4
 5     String taskName;
 6
 7     public OrderRunnable(String taskName){
 8         this.taskName=taskName;
 9     }
10
11     private int productNum = 10;
12
13     private int customerNum = 100;
14
15     public void run() {
16
17         for (int i = 0; i < customerNum; i++) {
18             if (productNum > 0) {
19                 try {
20                     Thread.sleep(50);
21                 } catch (InterruptedException e) {
22                     e.printStackTrace();
23                 }
24                 System.out.println(taskName + " -> order success!");
25                 productNum -= 1;
26             }
27         }
28
29     }
30
31 }
现在想用二个线程来处理:
 1 package com.cnblogs.yjmyzz;
 2
 3 public class RunnableDemo4 {
 4
 5     public static void main(String[] args) {
 6
 7         Runnable r1 = new OrderRunnable("A");
 8         Runnable r2 = new OrderRunnable("B");
 9
10         new Thread(r1).start();
11         new Thread(r2).start();
12
13     }
14
15 }
运行结果:
A -> order success!
B -> order success!
B -> order success!
A -> order success!
B -> order success!
A -> order success!
A -> order success!
B -> order success!
B -> order success!
A -> order success!
B -> order success!
A -> order success!
A -> order success!
B -> order success!
A -> order success!
B -> order success!
A -> order success!
B -> order success!
A -> order success!
B -> order success!
显然,这个结果不正确,只有10个产品,却生成了20个订单!
正确的做法,让多个Thread共同使用一个Runnable:
 1 package com.cnblogs.yjmyzz;
 2
 3 public class RunnableDemo5 {
 4
 5     public static void main(String[] args) {
 6
 7         Runnable r1 = new OrderRunnable("A");
 8
 9         new Thread(r1).start();
10         new Thread(r1).start();
11
12     }
13
14 }
A -> order success!
A -> order success!
A -> order success!
A -> order success!
A -> order success!
A -> order success!
A -> order success!
A -> order success!
A -> order success!
A -> order success!
A -> order success!
五、ThreadPoolExecutor
如果有大量线程,建议使用线程池管理,下面是ThreadPoolExecutor的示例用法:
 1 package com.cnblogs.yjmyzz;
 2
 3 import java.util.concurrent.ArrayBlockingQueue;
 4 import java.util.concurrent.ThreadPoolExecutor;
 5 import java.util.concurrent.TimeUnit;
 6
 7 public class RunnableDemo7 {
 8
 9     public static void main(String[] args) {
10
11         ThreadPoolExecutor threadPool = new ThreadPoolExecutor(2, 10, 1,
12                 TimeUnit.SECONDS, new ArrayBlockingQueue<Runnable>(3));
13
14         for (int i = 0; i < 6; i++) {
15             threadPool.execute(new MyRunnable("R"+i, 5));
16         }
17
18     }
19
20 }
运行结果:
R5.i=1
R0.i=1
R1.i=1
R5.i=2
R1.i=2
R0.i=2
R5.i=3
R1.i=3
R0.i=3
R5.i=4
R1.i=4
R0.i=4
R5.i=5
R0.i=5
R1.i=5
R2.i=1
R3.i=1
R4.i=1
R2.i=2
R3.i=2
R4.i=2
R2.i=3
R3.i=3
R4.i=3
R2.i=4
R4.i=4
R3.i=4
R2.i=5
R4.i=5
R3.i=5
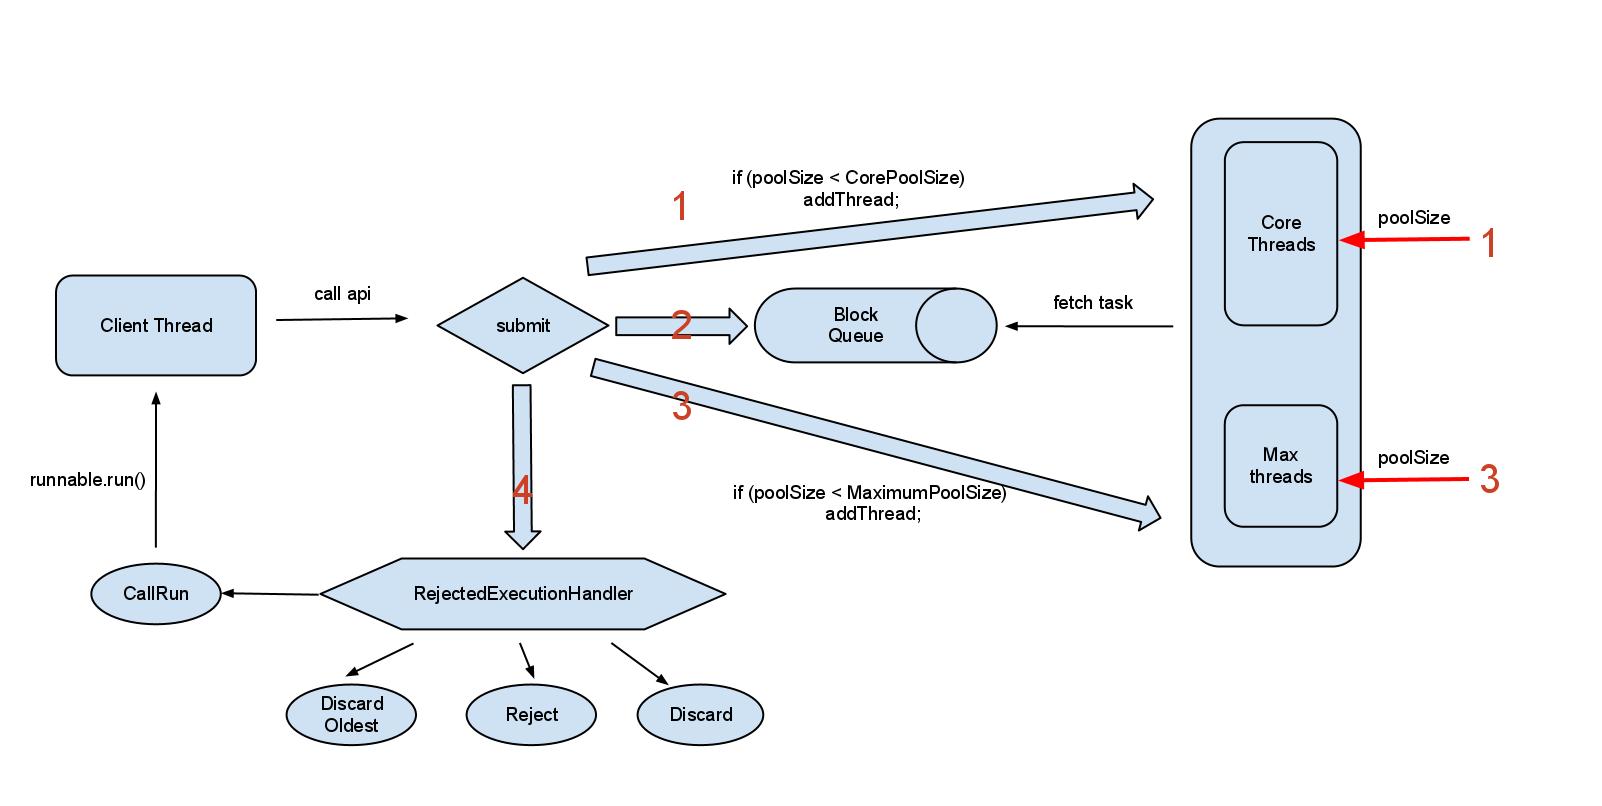
agapple在ITeye上有一篇旧贴子,写得很好,推荐大家去看看,特别是下面这张图:
还有这篇 http://jiaguwen123.iteye.com/blog/1017636,也值得参考
六、ThreadPoolTaskExecutor
终于轮到我大Spring出场了,Spring框架提供了org.springframework.scheduling.concurrent.ThreadPoolTaskExecutor类,可以用注入的形式生成线程池
 1 <?xml version="1.0" encoding="UTF-8"?>
 2 <beans xmlns="http://www.springframework.org/schema/beans"
 3     xmlns:xsi="http://www.w3.org/2001/XMLSchema-instance" xmlns:aop="http://www.springframework.org/schema/aop"
 4     xmlns:tx="http://www.springframework.org/schema/tx" xmlns:jdbc="http://www.springframework.org/schema/jdbc"
 5     xmlns:context="http://www.springframework.org/schema/context"
 6     xsi:schemaLocation="
 7      http://www.springframework.org/schema/context http://www.springframework.org/schema/context/spring-context-3.0.xsd
 8      http://www.springframework.org/schema/beans http://www.springframework.org/schema/beans/spring-beans-3.0.xsd
 9      http://www.springframework.org/schema/jdbc http://www.springframework.org/schema/jdbc/spring-jdbc-3.0.xsd
10      http://www.springframework.org/schema/tx http://www.springframework.org/schema/tx/spring-tx-3.0.xsd
11      http://www.springframework.org/schema/aop http://www.springframework.org/schema/aop/spring-aop-3.0.xsd"
12     default-autowire="byName">
13
14     <bean id="threadPoolTaskExecutor"
15         class="org.springframework.scheduling.concurrent.ThreadPoolTaskExecutor">
16         <property name="corePoolSize" value="2" />
17         <property name="maxPoolSize" value="10" />
18         <property name="queueCapacity" value="1000" />
19         <property name="keepAliveSeconds" value="15" />
20         <property name="rejectedExecutionHandler">
21             <bean class="java.util.concurrent.ThreadPoolExecutor$CallerRunsPolicy" />
22         </property>
23     </bean>
24
25 </beans>
配置好以后,就可以直接使用了
 1 package com.cnblogs.yjmyzz;
 2
 3 import org.springframework.context.ApplicationContext;
 4 import org.springframework.context.support.ClassPathXmlApplicationContext;
 5 import org.springframework.scheduling.concurrent.ThreadPoolTaskExecutor;
 6
 7 public class RunnableDemo8 {
 8
 9     @SuppressWarnings("resource")
10     public static void main(String[] args) {
11
12         ApplicationContext applicationContext = new ClassPathXmlApplicationContext(
13                 "spring.xml");
14         ThreadPoolTaskExecutor taskExecutor = applicationContext.getBean(
15                 "threadPoolTaskExecutor", ThreadPoolTaskExecutor.class);
16
17         for (int i = 0; i < 6; i++) {
18             taskExecutor.execute(new MyRunnable("R" + i, 5));
19         }
20
21     }
22
23 }
七、FutureTask<T>
如果某些线程的处理非常耗时,不希望它阻塞其它线程,可以考虑使用FutureTask,正如字面意义一样,该线程启用后,马上开始,但是处理结果将在"未来"某一时刻,才真正需要,在此之前,其它线程可以继续处理自己的事情
 1 package com.cnblogs.yjmyzz;
 2
 3 import java.util.concurrent.Callable;
 4 import java.util.concurrent.ExecutionException;
 5 import java.util.concurrent.FutureTask;
 6
 7 public class RunnableDemo9 {
 8
 9     public static void main(String[] args) throws InterruptedException,
10             ExecutionException {
11
12         FutureTask<String> task = new FutureTask<String>(
13                 new Callable<String>() {
14                     public String call() throws InterruptedException {
15                         System.out.println("FutureTask开始处理...");
16                         Thread.sleep(1000);
17                         return "hello world";
18                     }
19                 });
20         System.out.println("FutureTask准备开始...");
21         new Thread(task).start();
22         System.out.println("其它处理开始...");
23         Thread.sleep(1000);
24         System.out.println("其它处理完成...");
25         System.out.println("FutureTask处理结果:" + task.get());
26         System.out.println("全部处理完成");
27     }
28
29 }
二个注意点:
a) FutureTask使用Callable接口取得返回值,因为结果可能并不需要立刻返回,而是等到未来真正需要的时候,而Runnable并不提供返回值
b) FutureTask通过Thread的start()调用后,马上就开始处理,但并不阻塞后面的线程,在真正需要处理结果的时候,调用get()方法,这时如果FutureTask本身的处理尚未完成,才会阻塞,等待处理完成
刚才的运行结果:
FutureTask准备开始...
FutureTask开始处理...
其它处理开始...
其它处理完成...
FutureTask处理结果:hello world
全部处理完成
可以看到,“其它处理”并未被FutureTask阻塞,但FutureTask其实已经在后台处理了。