Spring Cloud Gateway + Spring Oauth 2.0 整合(服务端与资源端分离)
个人开发环境
java环境:Jdk1.8.0_60 (idea 需安装lombok插件)
编译器:IntelliJ IDEA 2019.1
框架:spirng cloud Hoxton + springboot 2.2 + spring oauth 2.0 + spring security 5
一、前言
| 服务名 | 注释 | 描述 |
|---|---|---|
| yoci-auth | 鉴权服务 | 实现一个简单的基本的 oauth2鉴权服务 使用 jwt token,使用自定义 JwtTokenStore |
| yoci-api | 资源服务 | 实现简单资源服务,提供简单的 Restful API,通过 gateway调用 |
| yoci-gate | 网关服务 | 使用 spring cloud gateway 实现简单路由,实现统一路由转发 |
依次运行 yoci-auth,yoci-gate,yoci-api
二、父工程构建
1.pom.xml
<properties>
    <project.build.sourceEncoding>UTF-8</project.build.sourceEncoding>
    <project.reporting.outputEncoding>UTF-8</project.reporting.outputEncoding>
    <java.version>1.8</java.version>
    <maven.compiler.source>1.8</maven.compiler.source>
    <maven.compiler.target>1.8</maven.compiler.target>
    <spring-cloud.version>Hoxton.SR1</spring-cloud.version>
    <spring-platform.version>Cairo-SR8</spring-platform.version>
    <alibaba-cloud.version>2.1.1.RELEASE</alibaba-cloud.version>
    <spring-boot.version>2.2.2.RELEASE</spring-boot.version>
</properties>

<modules>
    <module>yoci-auth</module>
    <module>yoci-api</module>
    <module>yoci-gate</module>
</modules>

<!-- 依赖管理,用于管理spring-cloud的依赖 -->
<dependencyManagement>
    <dependencies>
        <!-- spring-boot -->
        <dependency>
            <groupId>org.springframework.boot</groupId>
            <artifactId>spring-boot-dependencies</artifactId>
            <version>${spring-boot.version}</version>
            <type>pom</type>
            <scope>import</scope>
        </dependency>
        <!-- spring-io 版本兼容管理 -->
        <dependency>
            <groupId>io.spring.platform</groupId>
            <artifactId>platform-bom</artifactId>
            <version>${spring-platform.version}</version>
            <type>pom</type>
            <scope>import</scope>
        </dependency>
        <!-- spring-cloud & alibaba-cloud -->
        <dependency>
            <groupId>org.springframework.cloud</groupId>
            <artifactId>spring-cloud-dependencies</artifactId>
            <version>${spring-cloud.version}</version>
            <type>pom</type>
            <scope>import</scope>
        </dependency>
        <dependency>
            <groupId>com.alibaba.cloud</groupId>
            <artifactId>spring-cloud-alibaba-dependencies</artifactId>
            <version>${alibaba-cloud.version}</version>
            <type>pom</type>
            <scope>import</scope>
        </dependency>
    </dependencies>
</dependencyManagement>

<!-- lombok 开发小插件 -->
<dependencies>
    <dependency>
        <groupId>org.projectlombok</groupId>
        <artifactId>lombok</artifactId>
        <version>1.16.14</version>
        <scope>provided</scope>
    </dependency>
</dependencies>

<!-- maven仓库-依赖声明 -->
<repositories>
    <repository>
        <id>oss</id>
        <name>oss</name>
        <url>https://oss.sonatype.org/content/groups/public</url>
    </repository>
    <repository>
        <id>spring-milestones</id>
        <name>Spring Milestones</name>
        <url>https://repo.spring.io/libs-milestone</url>
        <snapshots>
            <enabled>false</enabled>
        </snapshots>
    </repository>
    <repository>
        <id>sonatype-nexus-snapshots</id>
        <name>Sonatype Nexus Snapshots</name>
        <url>https://oss.sonatype.org/content/repositories/snapshots/</url>
    </repository>
</repositories>
三、网关
网关在demo中实现统一路由转发作用,不做安全验证,在实战微服务环境中,也可在gateway网关处实现其提供的相应过滤器进行统一拦截,实现安全验证,此demo为了学习演示方便,采用资源服务器通过远程token校验进行安全验证
1.pom.xml
<artifactId>yoci-gate</artifactId>
<dependencies>
    <!-- spring boot 相关依赖 -->
    <dependency>
        <groupId>org.springframework.boot</groupId>
        <artifactId>spring-boot-starter-actuator</artifactId>
    </dependency>

    <!-- webflux 相关依赖 (spring gateway采用的webflux 无需添加spring-boot-web依赖(会和servlet冲突),) -->
    <dependency>
        <groupId>org.springframework.boot</groupId>
        <artifactId>spring-boot-starter-webflux</artifactId>
    </dependency>
    <!-- spring gateway 相关依赖 -->
    <dependency>
        <groupId>org.springframework.cloud</groupId>
        <artifactId>spring-cloud-starter-gateway</artifactId>
    </dependency>
</dependencies>
2.application.yml
server:
  port: 8082

## gateway
spring:
  application:
    name: yoci-gate
  cloud:
    gateway:
      discovery:
        locator:
          enabled: true               # 开启从注册中心动态创建路由的功能,利用微服务名称进行路由
      routes:
        - id: yoci-api
          # uri: lb://yoci-api        # 动态路由方式需要配合eureka、nacos注册中心使用
          uri: http://localhost:8083
          predicates:
            - Path=/api/**
          filters:
            - StripPrefix=1
        - id: yoci-auth
          # uri: lb://yoci-auth       # 动态路由方式需要配合eureka、nacos注册中心使用
          uri: http://localhost:8081
          predicates:
            - Path=/auth/**
          filters:
            - StripPrefix=1
3.启动类
/**
 * 网关主启动类
 *
 * @author: YoCiyy
 * @date: 2020/6/22
 */
@SpringBootApplication
public class GateBootstrap {
	public static void main(String[] args) {
		SpringApplication.run(GateBootstrap.class, args);
	}
}
四、服务端(鉴权服务 yoci-auth)
1.pom.xml
<artifactId>yoci-auth</artifactId>
<dependencies>
    <!-- spring oauth2.0 (包含了spring security无需单独引入) 相关 -->
    <dependency>
        <groupId>org.springframework.cloud</groupId>
        <artifactId>spring-cloud-starter-oauth2</artifactId>
    </dependency>

    <!-- spring boot 相关依赖 -->
    <dependency>
        <groupId>org.springframework.boot</groupId>
        <artifactId>spring-boot-starter-actuator</artifactId>
    </dependency>
    <dependency>
        <groupId>org.springframework.boot</groupId>
        <artifactId>spring-boot-starter-web</artifactId>
    </dependency>

</dependencies>
2.application.yml
# 服务端口号
server:
  port: 8081

# 服务名
spring:
  application:
    name: yoci-auth

# actuator
management:
  endpoints:
    web:
      exposure:
        include: "*"
3.启动类
/**
 * auth主启动类
 *
 * @author: YoCiyy
 * @date: 2020/6/22
 */
@SpringBootApplication
public class AuthBootstrap {
	public static void main(String[] args) {
		SpringApplication.run(AuthBootstrap.class, args);
	}
}
4.java配置类
创建oauth认证服务器配置AuthorizationServerConfig 配置类,继承AuthorizationServerConfigurerAdapter
/**
 * oauth认证服务器配置
 *
 * @author: YoCiyy
 * @date: 2020/6/22
 */
@Configuration
@AllArgsConstructor
@EnableAuthorizationServer
public class AuthorizationServerConfig extends AuthorizationServerConfigurerAdapter {

	/** 令牌持久化配置 */
	private final TokenStore tokenStore;
	/** 客户端详情服务 */
	private final ClientDetailsService clientDetailsService;
	/** 认证管理器 */
	private final AuthenticationManager authenticationManager;
	/** 授权码服务 */
	private final AuthorizationCodeServices authorizationCodeServices;
	/** jwtToken解析器 */
	private final JwtAccessTokenConverter jwtAccessTokenConverter;

	/**
	 * 客户端详情服务配置 (demo采用本地内存存储)
	 */
	@Override
	public void configure(ClientDetailsServiceConfigurer clients) throws Exception {
		clients
				// 使用本地内存存储
				.inMemory()
				// 客户端id
				.withClient("client_1")
				// 客户端密码
				.secret(new BCryptPasswordEncoder().encode("123456"))
				// 该客户端允许授权的类型
				.authorizedGrantTypes("authorization_code", "password", "client_credentials", "implicit", "refresh_token")
				// 该客户端允许授权的范围
				.scopes("all")
				// false跳转到授权页面,true不跳转,直接发令牌
				.autoApprove(false);
	}

	/**
	 * 配置访问令牌端点
	 */
	@Override
	public void configure(AuthorizationServerEndpointsConfigurer endpoints) {
		endpoints
				// 认证管理器
				.authenticationManager(authenticationManager)
				// 授权码服务
				.authorizationCodeServices(authorizationCodeServices)
				// 令牌管理服务
				.tokenServices(tokenServices())
				.allowedTokenEndpointRequestMethods(HttpMethod.GET, HttpMethod.POST);
	}

	/**
	 * 配置令牌端点安全约束
	 */
	@Override
	public void configure(AuthorizationServerSecurityConfigurer security) {
		security
				// oauth/check_token公开
				.checkTokenAccess("permitAll()")
				// oauth/token_key 公开密钥
				.tokenKeyAccess("permitAll()")
				// 允许表单认证
				.allowFormAuthenticationForClients();
	}

	/**
	 * 令牌服务配置
	 *
	 * @return 令牌服务对象
	 */
	public AuthorizationServerTokenServices tokenServices() {
		DefaultTokenServices tokenServices = new DefaultTokenServices();
		tokenServices.setTokenStore(tokenStore);
		tokenServices.setSupportRefreshToken(true);
		// 令牌增强
		TokenEnhancerChain tokenEnhancerChain = new TokenEnhancerChain();
		tokenEnhancerChain.setTokenEnhancers(Arrays.asList(jwtAccessTokenConverter));
		tokenServices.setTokenEnhancer(tokenEnhancerChain);
		// 令牌默认有效期2小时
		tokenServices.setAccessTokenValiditySeconds(7200);
		// 刷新令牌默认有效期3天
		tokenServices.setRefreshTokenValiditySeconds(259200);
		return tokenServices;
	}

}
创建Security 安全配置类WebSecurityConfig 继承WebSecurityConfigurerAdapter
/**
 * security 安全相关配置类
 *
 * @author: YoCiyy
 * @date: 2020/6/22
 */
@Configuration
public class WebSecurityConfig extends WebSecurityConfigurerAdapter {

	/**
	 * 安全拦截机制
	 */
	@Override
	protected void configure(HttpSecurity http) throws Exception {
		http
				.authorizeRequests()
				// 放行
				.antMatchers("/auth/**")
				.permitAll()
				// 其他请求必须认证通过
				.anyRequest().authenticated()
				.and()
				.formLogin() // 允许表单登录
//                .successForwardUrl("/login-success") //自定义登录成功跳转页
				.and()
				.csrf().disable();

	}

	/**
	 * token持久化配置
	 */
	@Bean
	public TokenStore tokenStore() {
		// 本地内存存储令牌
		return new InMemoryTokenStore();
	}

	/**
	 * 密码加密器
	 */
	@Bean
	public PasswordEncoder passwordEncoder() {
		return new BCryptPasswordEncoder();
	}

	/**
	 * 认证管理器配置
	 */
	@Bean
	@Override
	protected AuthenticationManager authenticationManager() {
		return authentication -> daoAuthenticationProvider().authenticate(authentication);
	}

	/**
	 * 认证是由 AuthenticationManager 来管理的,但是真正进行认证的是 AuthenticationManager 中定义的 AuthenticationProvider,用于调用userDetailsService进行验证
	 */
	@Bean
	public AuthenticationProvider daoAuthenticationProvider() {
		DaoAuthenticationProvider daoAuthenticationProvider = new DaoAuthenticationProvider();
		daoAuthenticationProvider.setUserDetailsService(userDetailsService());
		daoAuthenticationProvider.setHideUserNotFoundExceptions(false);
		daoAuthenticationProvider.setPasswordEncoder(passwordEncoder());
		return daoAuthenticationProvider;
	}

	/**
	 * 用户详情服务
	 */
	@Bean
	@Override
	protected UserDetailsService userDetailsService() {
		// 测试方便采用内存存取方式
		InMemoryUserDetailsManager userDetailsService = new InMemoryUserDetailsManager();
		userDetailsService.createUser(User.withUsername("user_1").password(passwordEncoder().encode("123456")).authorities("ROLE_USER").build());
		userDetailsService.createUser(User.withUsername("user_2").password(passwordEncoder().encode("1234567")).authorities("ROLE_USER").build());
		return userDetailsService;
	}

	/**
	 * 设置授权码模式的授权码如何存取,暂时采用内存方式
	 */
	@Bean
	public AuthorizationCodeServices authorizationCodeServices() {
		return new InMemoryAuthorizationCodeServices();
	}

	/**
	 * jwt token解析器
	 */
	@Bean
	public JwtAccessTokenConverter accessTokenConverter() {

		JwtAccessTokenConverter converter = new JwtAccessTokenConverter();
		// 对称密钥,资源服务器使用该密钥来验证
		converter.setSigningKey("YoCiyy");
		return converter;
	}
}
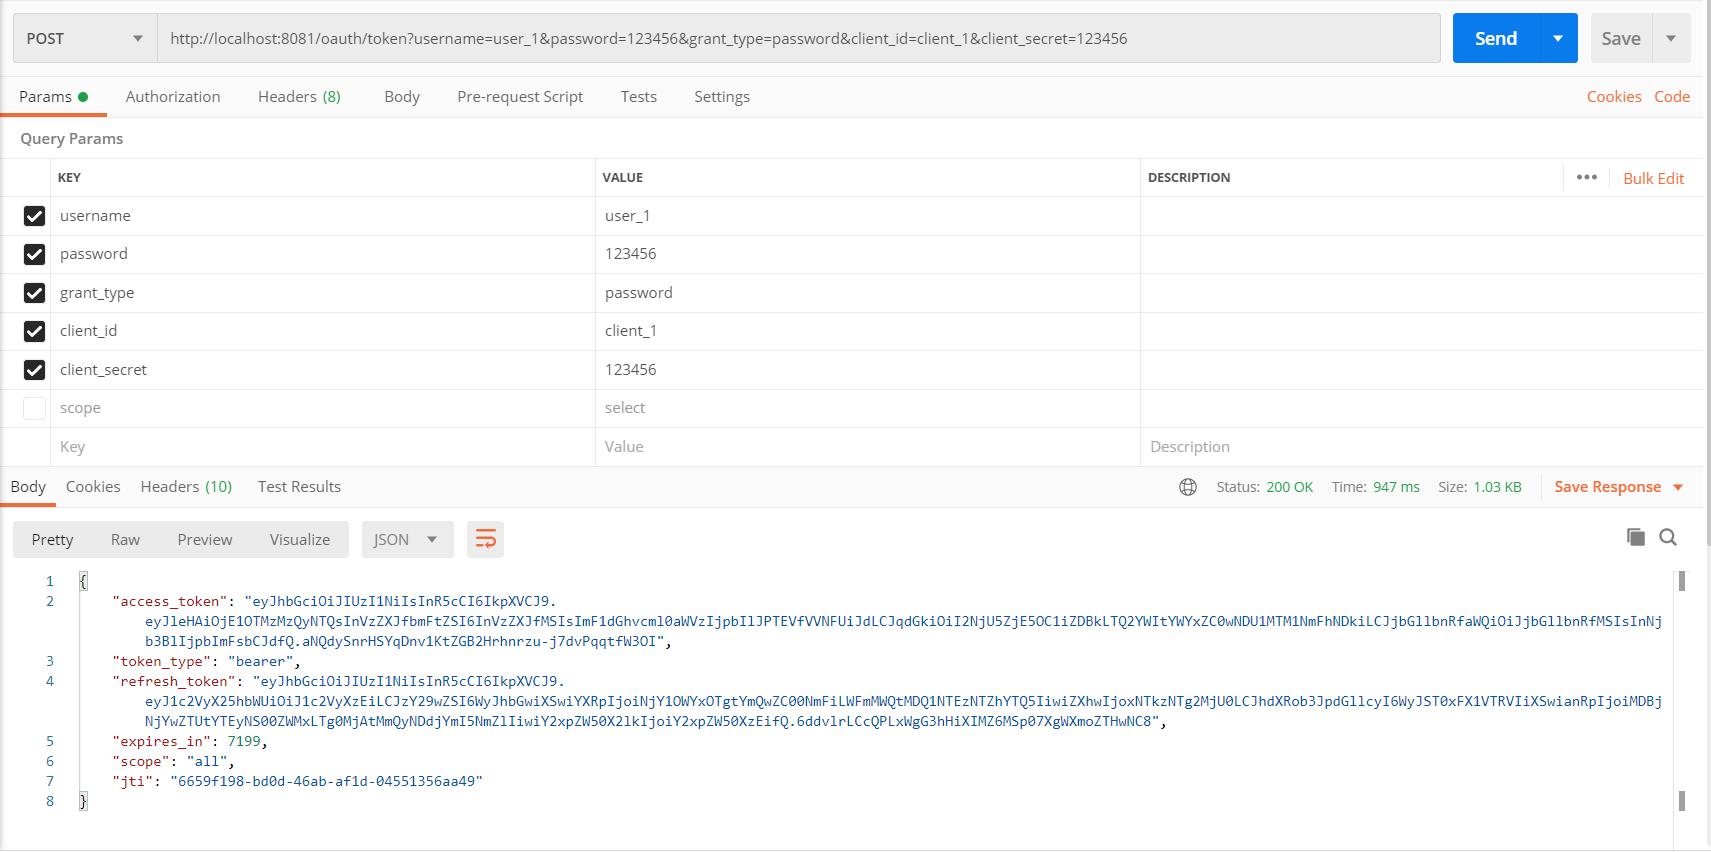
5.postman测试
采用密码模式访问测试
获取jwt token:http://localhost:8081/oauth/token
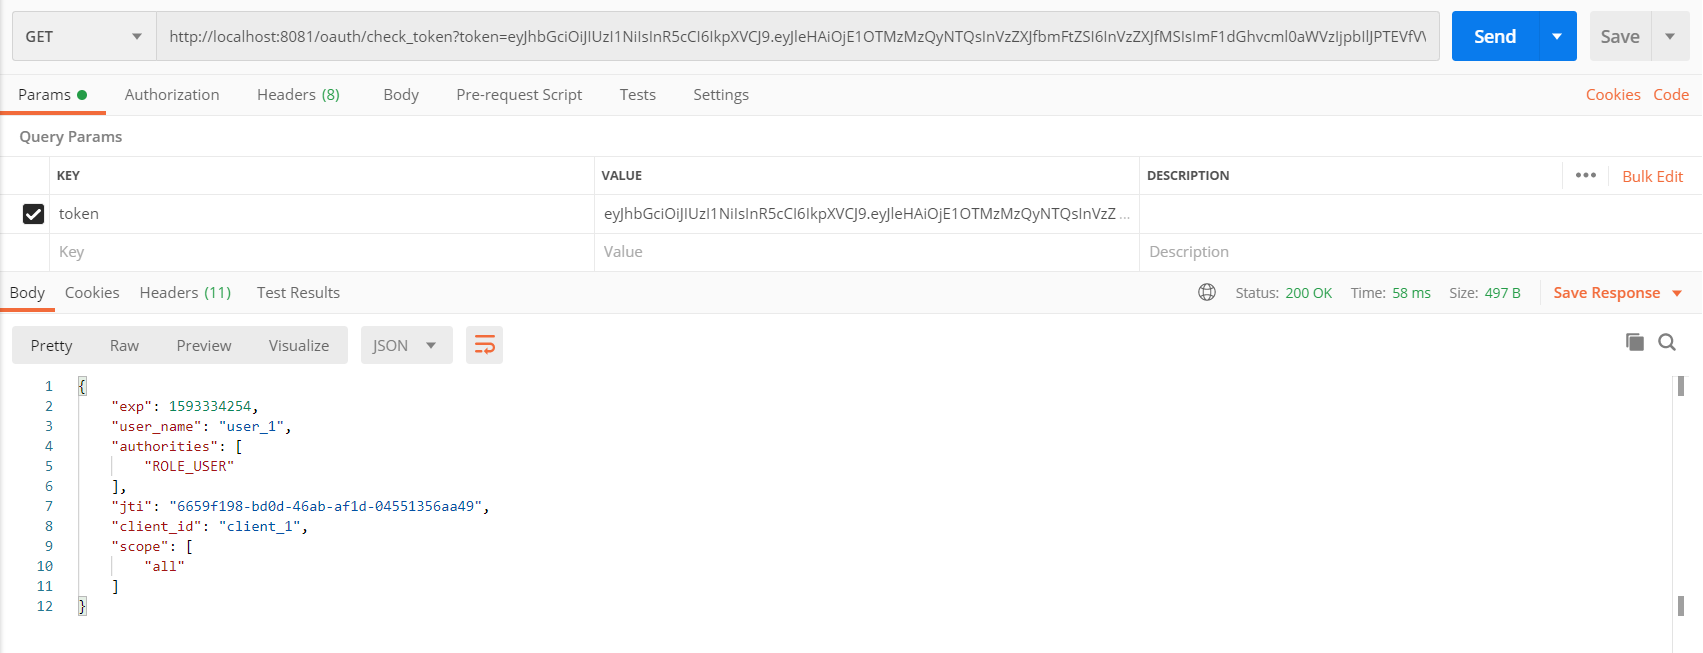
校验jwt token :http://localhost:8081/oauth/check_token
五、资源端(资源服务yoci-api)
1.pom.xml
<artifactId>yoci-api</artifactId>
<dependencies>

    <!-- spring oauth2.0 (包含了spring security无需单独引入) 相关 -->
    <dependency>
        <groupId>org.springframework.cloud</groupId>
        <artifactId>spring-cloud-starter-oauth2</artifactId>
    </dependency>

    <!-- spring boot 相关依赖 -->
    <dependency>
        <groupId>org.springframework.boot</groupId>
        <artifactId>spring-boot-starter-actuator</artifactId>
    </dependency>
    <dependency>
        <groupId>org.springframework.boot</groupId>
        <artifactId>spring-boot-starter-web</artifactId>
    </dependency>

</dependencies>
2.application.yml
server:
  port: 8083

spring:
  application:
    name: yoci-api
3.启动类
/**
 * 模拟接口启动类
 *
 * @author: YoCiyy
 * @date: 2020/6/23
 */
@SpringBootApplication
public class ApiBootstrap {
	public static void main(String[] args) {
		SpringApplication.run(ApiBootstrap.class, args);
	}
}
4.java配置类
创建资源服务配置ResourceServerConfig继承ResourceServerConfigurerAdapter
/**
 * 资源服务配置
 *
 * @author: YoCiyy
 * @date: 2020/6/19
 */
@Configuration
@EnableResourceServer
public class ResourceServerConfig extends ResourceServerConfigurerAdapter {

	/**
	 * token服务配置
	 */
    @Override
	public void configure(ResourceServerSecurityConfigurer resources) throws Exception {
		resources.tokenServices(tokenServices());
	}

	/**
	 * 路由安全认证配置
	 */
	@Override
	public void configure(HttpSecurity http) throws Exception {
		http.authorizeRequests()
				// 配置hello打头的路由需要安全认证,order无配置无需认证
				.antMatchers("/hello/**").authenticated()
				.and().csrf().disable();
	}

	/**
	 * jwt token 校验解析器
	 */
	@Bean
	public TokenStore tokenStore() {
		return new JwtTokenStore(accessTokenConverter());
	}

	/**
	 * Token转换器必须与认证服务一致
	 */
	@Bean
	public JwtAccessTokenConverter accessTokenConverter() {
		JwtAccessTokenConverter accessTokenConverter = new JwtAccessTokenConverter();
		accessTokenConverter.setSigningKey("YoCiyy");
		return accessTokenConverter;
	}

	/**
	 * 资源服务令牌解析服务
	 */
	@Bean
	@Primary
	public ResourceServerTokenServices tokenServices() {
        RemoteTokenServices remoteTokenServices = new RemoteTokenServices();
        remoteTokenServices.setCheckTokenEndpointUrl("http://localhost:8081/oauth/check_token");
        remoteTokenServices.setClientId("client_1");
        remoteTokenServices.setClientSecret("123456");
        return remoteTokenServices;
	}
}
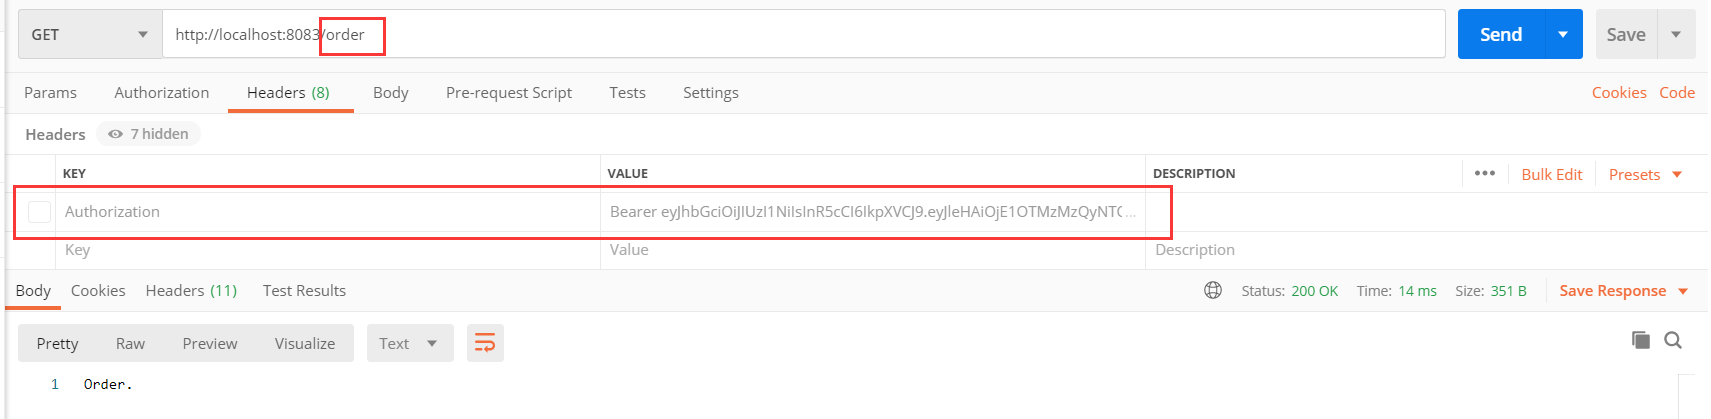
5.postman测试
通过网关路由转发,请求资源服务器
不配置请求头token,直接/order可直接访问成功(在资源服务配置类中,/order打头路由没有配置安全路由)
不配置请求头中的token,访问/hello报401错误

请求头中配置申请到的token,格式 Bearer (申请到的token),访问/hello测试调用资源服务api成功

相关学习资料
Spring Cloud Gateway 基于 OAuth2.0 的身份认证