说明
- 这回主要是回顾一项“古老”的技术:把压缩包藏到图片里
- 贴吧有段时间比较流行这个,不过是过去式了
- 关键命令:
copy /b a.jpg+b.zip c.jpg - 具体做法
- 把图片与压缩包放入同一个文件夹(如
D:magic) - 调出 CMD
cd到目标文件夹- 输入上述“关键命令”
a.jpg: 原图b.zip: 要藏入的压缩包c.jpg: 合成后的图片名
- 把图片与压缩包放入同一个文件夹(如
- 还原方式
- 将后缀改为
zip - 解压
- 将后缀改为
- OK,下面就是别的内容了
Step1
-
打开“画图”,按 Ctrl w 设置分辨率
-
我这儿取
1080p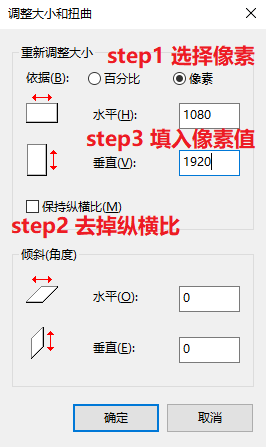
Step2
-
画点东西,用写的也行
-
我这儿用
20号加粗的“微软雅黑” -
颜色选择“灰色-25%”
-
写在左下角

Step3
- 用 Python 的
turtle画一张图
import turtle as tt
from math import sqrt

tt.setup(600, 600)          # 设置 600 x 600 的画布并居中
tt.hideturtle()             # 隐藏画笔
tt.pensize(6)               # 设置画笔粗细
tt.pencolor("#00f5ff")      # 设置画笔颜色

# 走到右上角
tt.seth(45)
tt.pu()
tt.fd(200)
tt.pd()

# 鱼的“脑门”
tt.seth(135)
tt.circle(200, 130)         # 相当于极坐标的 roll(r, angle)

# 鱼嘴
tt.pu()
tt.circle(200, 10)
tt.pd()

# 鱼腹
tt.circle(200, 130)

# 鱼“屁股”
tt.seth(0)
tt.circle(200/sqrt(2), -90)

# 鱼尾(开始)
tt.seth(-90)
tt.circle(100, 135)

tt.seth(0)
tt.circle(100/sqrt(2), -180)

# 鱼尾(结束)
tt.seth(135)
tt.circle(100, 135)

# 鱼“后背”
tt.seth(90)
tt.circle(-200/sqrt(2), 90)

# 鱼目
tt.pu()
tt.goto(-110, 50)
tt.pd()
tt.circle(20)

# 鱼珠
tt.pu()
tt.goto(-113, 70)
tt.pd()
tt.circle(6)

# 鱼嘴旁的小气泡
tt.pu()
tt.goto(-230, 60)
tt.pd()
tt.circle(15)

# 鱼嘴旁的大气泡
tt.pu()
tt.goto(-250, 120)
tt.pd()
tt.circle(30)

# 打个标签
tt.pu()
tt.goto(50, -260)
tt.pd()
tt.write("—— by YorkFish", font=("consolas", 20, "bold"))

tt.done()                   # 绘制结束后停住
>>>

Step4
- 用 Python 的
pillow把图片改成字符画
from PIL import Image, ImageFilter

# 这个字符串是我随便敲的,就是大小写字母加一些常见字符
codeLib = '''ABCDEFGHIJKLMNOPQRSTUVWXYZabcdefghijklmnopqrstuvwxyz<=>:;+~-,.^"'*`_'''
count = len(codeLib)


def transform1(image_file):
    image_file = image_file.convert("L")                # L 为“黑白模式”
    codePic = ""                                        # 存储字符
    for h in range(image_file.size[1]):                 # 图片的纵向像素值
        for w in range(image_file.size[0]):             # 图片的横向像素值
            gray = image_file.getpixel((w, h))          # 计算每个点的“灰度值”,也有别的方法
            codePic += codeLib[ int(count*gray/256)]    # 因为字符串不足 256 个
        codePic += "
"                               # 回车

    return codePic


fp = open(u"fish.png", "rb")                            # 要变成字符画的原图
image_file = Image.open(fp)
image_file = image_file.resize((int(image_file.size[0]*0.5), int(image_file.size[1]*0.25)))  # 高质量缩放

tmp = open("fish.txt", "w")                             # 变成字符画后的文件
tmp.write(transform1(image_file))
tmp.close()
-
为方便查看,我调了一下字体:
记事本菜单栏>格式>字体>consolas>2号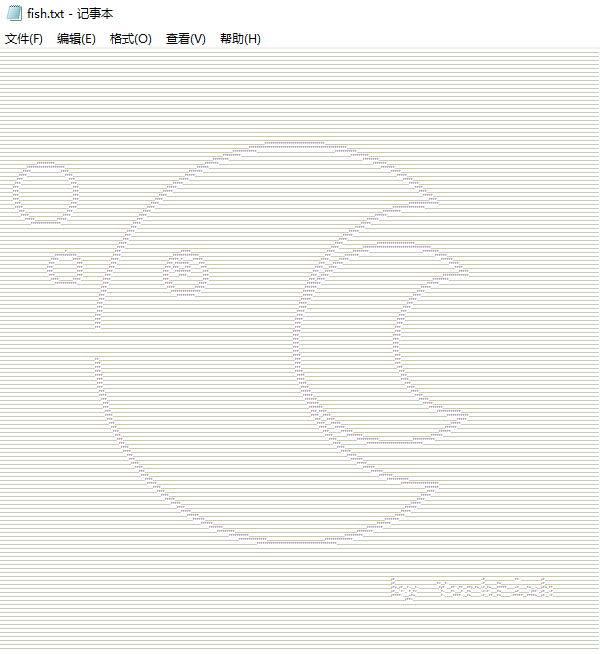
Step5
- 压缩 Step4 生成的字符画
- 借助命令
copy /b a.jpg+b.zip c.jpg将 Step2 生成的图片与刚刚的压缩包合成新的图片