一、自动装配模型
下面是自动连接模式,可以用来指示Spring容器使用自动连接进行依赖注入。您可以使用元素的autowire属性为bean定义指定autowire模式。
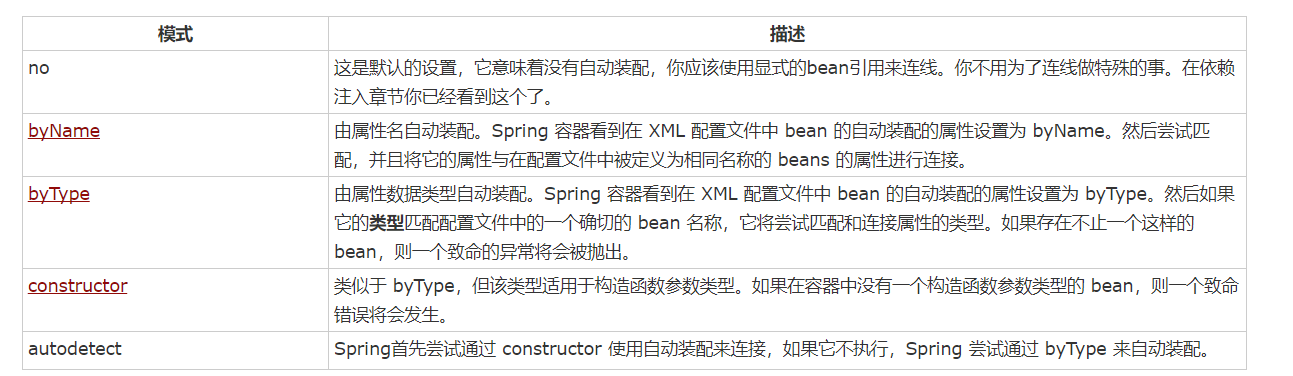
可以使用 byType 或者 constructor 自动装配模式来连接数组和其他类型的集合。
自动装配的局限性
当自动装配始终在同一个项目中使用时,它的效果最好。如果通常不使用自动装配,它可能会使开发人员混淆的使用它来连接只有一个或两个 bean 定义。不过,自动装配可以显著减少需要指定的属性或构造器参数,但你应该在使用它们之前考虑到自动装配的局限性和缺点。

Spring 自动装配 ‘byName’
这种模式由属性名称指定自动装配。Spring 容器看作 beans,在 XML 配置文件中 beans 的 auto-wire 属性设置为 byName。然后,它尝试将它的属性与配置文件中定义为相同名称的 beans 进行匹配和连接。如果找到匹配项,它将注入这些 beans,否则,它将抛出异常。
例如,在配置文件中,如果一个 bean 定义设置为自动装配 byName,并且它包含 spellChecker 属性(即,它有一个 setSpellChecker(...) 方法),那么 Spring 就会查找定义名为 spellChecker 的 bean,并且用它来设置这个属性。你仍然可以使用 <property> 标签连接其余的属性。下面的例子将说明这个概念。
(1)编写TextEditor.java
package com.tutorialspoint;

public class TextEditor {
     private SpellChecker spellChecker;
       private String name;
       public void setSpellChecker( SpellChecker spellChecker ){
          this.spellChecker = spellChecker;
       }
       public SpellChecker getSpellChecker() {
          return spellChecker;
       }
       public void setName(String name) {
          this.name = name;
       }
       public String getName() {
          return name;
       }
       public void spellCheck() {
          spellChecker.checkSpelling();
       }
}
(2)编写SpellChecker.java
package com.tutorialspoint;
public class SpellChecker {
   public SpellChecker() {
      System.out.println("Inside SpellChecker constructor." );
   }
   public void checkSpelling() {
      System.out.println("Inside checkSpelling." );
   }
}
(3)编写MainApp.java
package com.tutorialspoint;

import org.springframework.context.ApplicationContext;
import org.springframework.context.support.ClassPathXmlApplicationContext;

public class MainApp {
     public static void main(String[] args) {
          ApplicationContext context =
                 new ClassPathXmlApplicationContext("Beans.xml");
          TextEditor te = (TextEditor) context.getBean("textEditor");
          te.spellCheck();
       }
}
(4)Beans.xml
<?xml version = "1.0" encoding = "UTF-8"?>

<beans xmlns = "http://www.springframework.org/schema/beans"
   xmlns:xsi = "http://www.w3.org/2001/XMLSchema-instance"
   xsi:schemaLocation = "http://www.springframework.org/schema/beans
   http://www.springframework.org/schema/beans/spring-beans-4.0.xsd">

 <!-- Definition for textEditor bean -->
   <bean id="textEditor" class="com.tutorialspoint.TextEditor"
      autowire="byName">
      <property name="name" value="Generic Text Editor" />
   </bean>

   <!-- Definition for spellChecker bean -->
   <bean id="spellChecker" class="com.tutorialspoint.SpellChecker">
   </bean>

</beans>
(5)运行MainApp.java的main方法
结果如图:

Spring 自动装配 ‘byType’
这种模式由属性类型指定自动装配。Spring 容器看作 beans,在 XML 配置文件中 beans 的 autowire 属性设置为 byType。然后,如果它的 type 恰好与配置文件中 beans 名称中的一个相匹配,它将尝试匹配和连接它的属性。如果找到匹配项,它将注入这些 beans,否则,它将抛出异常。
例如,在配置文件中,如果一个 bean 定义设置为自动装配 byType,并且它包含 SpellChecker 类型的 spellChecker 属性,那么 Spring 就会查找定义名为 SpellChecker 的 bean,并且用它来设置这个属性。你仍然可以使用 <property> 标签连接其余属性。下面的例子将说明这个概念,你会发现和上面的例子没有什么区别,除了 XML 配置文件已经被改变。
byType示例与上述byName除了xml配置之外并无多大区别,只需将xml配置改为这样,运行对应的main方法即可:
<?xml version = "1.0" encoding = "UTF-8"?>

<beans xmlns = "http://www.springframework.org/schema/beans"
   xmlns:xsi = "http://www.w3.org/2001/XMLSchema-instance"
   xsi:schemaLocation = "http://www.springframework.org/schema/beans
   http://www.springframework.org/schema/beans/spring-beans-4.0.xsd">

 <!-- Definition for textEditor bean -->
   <bean id="textEditor" class="com.tutorialspoint.TextEditor"
      autowire="byType">
      <property name="name" value="Generic Text Editor" />
   </bean>

   <!-- Definition for spellChecker bean -->
   <bean id="spellChecker" class="com.tutorialspoint.SpellChecker">
   </bean>

</beans>
Spring 由构造函数自动装配
这种模式与 byType 非常相似,但它应用于构造器参数。Spring 容器看作 beans,在 XML 配置文件中 beans 的 autowire 属性设置为 constructor。然后,它尝试把它的构造函数的参数与配置文件中 beans 名称中的一个进行匹配和连线。如果找到匹配项,它会注入这些 bean,否则,它会抛出异常。
例如,在配置文件中,如果一个 bean 定义设置为通过构造函数自动装配,而且它有一个带有 SpellChecker 类型的参数之一的构造函数,那么 Spring 就会查找定义名为 SpellChecker 的 bean,并用它来设置构造函数的参数。你仍然可以使用 <constructor-arg> 标签连接其余属性。下面的例子将说明这个概念。
一、编写TextEditor.java
package com.tutorialspoint;

public class TextEditor {
      private SpellChecker spellChecker;
       private String name;
       public TextEditor( SpellChecker spellChecker, String name ) {
          this.spellChecker = spellChecker;
          this.name = name;
       }
       public SpellChecker getSpellChecker() {
          return spellChecker;
       }
       public String getName() {
          return name;
       }
       public void spellCheck() {
          spellChecker.checkSpelling();
       }
}
二、编写SpellChecker.java
package com.tutorialspoint;

public class SpellChecker {
     public SpellChecker(){
          System.out.println("Inside SpellChecker constructor." );
       }
       public void checkSpelling()
       {
          System.out.println("Inside checkSpelling." );
       }
}
三、编写MainApp.java
package com.tutorialspoint;

import org.springframework.context.ApplicationContext;
import org.springframework.context.support.ClassPathXmlApplicationContext;

public class MainApp {
     public static void main(String[] args) {
          ApplicationContext context =
                 new ClassPathXmlApplicationContext("Beans.xml");
          TextEditor te = (TextEditor) context.getBean("textEditor");
          te.spellCheck();
       }
}
四、编写Beans.xml
<?xml version = "1.0" encoding = "UTF-8"?>

<beans xmlns = "http://www.springframework.org/schema/beans"
   xmlns:xsi = "http://www.w3.org/2001/XMLSchema-instance"
   xsi:schemaLocation = "http://www.springframework.org/schema/beans
   http://www.springframework.org/schema/beans/spring-beans-4.0.xsd">

 <!-- Definition for textEditor bean -->
   <bean id="textEditor" class="com.tutorialspoint.TextEditor">
      <constructor-arg  ref="spellChecker" />
      <constructor-arg  value="Generic Text Editor"/>
   </bean>

   <!-- Definition for spellChecker bean -->
   <bean id="spellChecker" class="com.tutorialspoint.SpellChecker">
   </bean>


</beans>
五、运行MainApp.java中的main方法
结果如下:
