1. mysql, oracle ,sqlserver各自的默认端口号
sqlserver默认端口号为:1433
URL:"jdbc:microsoft:sqlserver://localhost:1433;DatabaseName=dbname"
DRIVERNAME:"com.microsoft.jdbc.sqlserver.SQLServerDriver";
mysql 默认端口号为:3306
URL:jdbc:mysql://localhost:3306/test? user=root&password=&useUnicode=true&characterEncoding=gbk
DRIVERNAME:"com.mysql.jdbc.Driver";
oracle 默认端口号为:1521
URL:"jdbc:oracle:thin:@localhost :1521:orcl";
DRIVERNAME:"oracle.jdbc.driver.OracleDriver";
2. python连接oracle数据库
2.1 安装模块,使用第三方模块cx_Oracle
pip install cx_Oracle
2.2 三种连接方式
1 import cx_Oracle as cx
2
3 #第一种
4 con = cx.connect('root', 'root123', '127.0.0.1:1521/orcl')
5 #第二种
6 con = cx.connect('root/root123@127.0.0.1:1521/orcl')
7 #第三种
8 dsn = cx.makedsn('127.0.0.1', '1521', 'orcl')
9 connection = cx.connect('root', 'root123', dsn)
2.2 简单使用
# -*- coding: utf-8 -*-
import cx_Oracle as cx      #导入模块
con = cx.connect('root', 'root123', '127.0.0.1:1521/ORCL')  #创建连接
cursor = con.cursor()       #创建游标
cursor.execute("select * from TDER where ID='28'")  #执行sql语句
data = cursor.fetchone()        #获取一条数据
print(data)     #打印数据
cursor.close()  #关闭游标
con.close()     #关闭数据库连接
oracle数据库的操作和mysql的pymysql操作基本相同
2.3 windows下使用注意
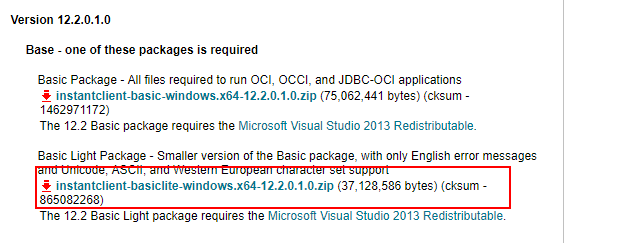
windows下是使用需要安装`Instant Client`
1) 下载 Instant Client
地址:http://www.oracle.com/technetwork/topics/winx64soft-089540.html
2) 解压到一个目录,并添加到环境变量

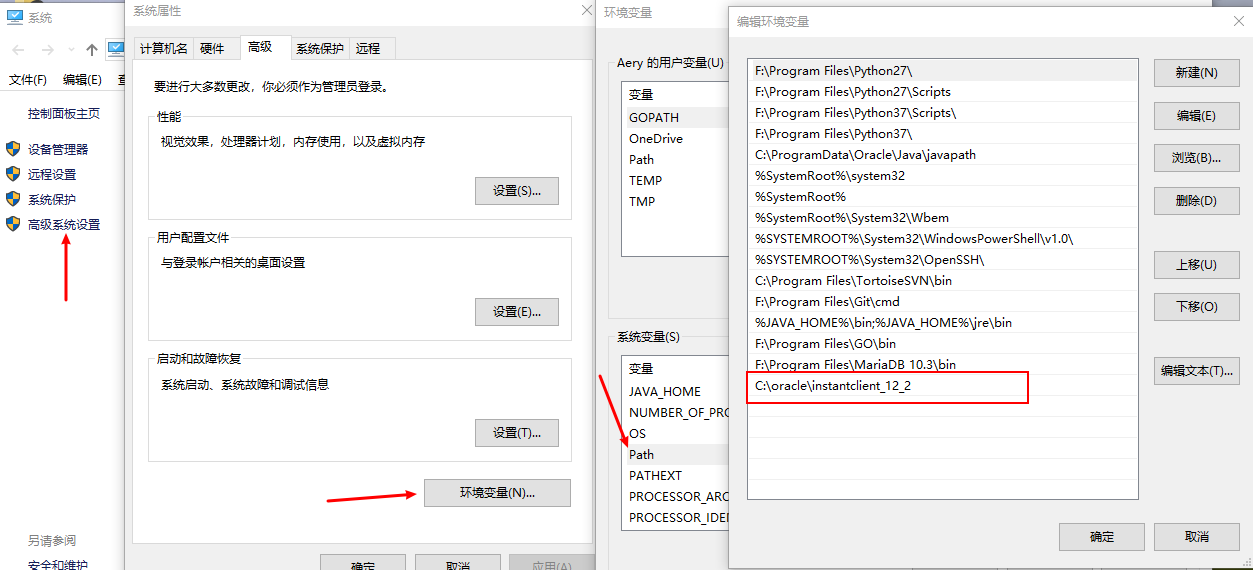
参考 https://www.cnblogs.com/zhichaoma/p/9448571.html
3 . python连接MySQL
过程:
- 引入 API 模块。
- 获取与数据库的连接。
- 执行SQL语句和存储过程。
- 关闭数据库连接
3.1 安装第三方模块
pip install MySQLdb
3.2 创建数据库表
 1 #!/usr/bin/python
 2 # -*- coding: UTF-8 -*-
 3
 4 import MySQLdb
 5
 6 # 打开数据库连接
 7 db = MySQLdb.connect("localhost", "testuser", "test123", "TESTDB", charset='utf8' )
 8
 9 # 使用cursor()方法获取操作游标
10 cursor = db.cursor()
11
12 # 如果数据表已经存在使用 execute() 方法删除表。
13 cursor.execute("DROP TABLE IF EXISTS EMPLOYEE")
14
15 # 创建数据表SQL语句
16 sql = """CREATE TABLE EMPLOYEE (
17          FIRST_NAME  CHAR(20) NOT NULL,
18          LAST_NAME  CHAR(20),
19          AGE INT,
20          SEX CHAR(1),
21          INCOME FLOAT )"""
22
23 cursor.execute(sql)
24
25 # 关闭数据库连接
26 db.close()
3.3 插入数据库
#!/usr/bin/python
# -*- coding: UTF-8 -*-

import MySQLdb

# 打开数据库连接
db = MySQLdb.connect("localhost", "testuser", "test123", "TESTDB", charset='utf8' )

# 使用cursor()方法获取操作游标
cursor = db.cursor()

# SQL 插入语句
sql = "INSERT INTO EMPLOYEE(FIRST_NAME, \
       LAST_NAME, AGE, SEX, INCOME) \
       VALUES (%s, %s, %s, %s, %s )" % \
       ('Mac', 'Mohan', 20, 'M', 2000)
try:
   # 执行sql语句
   cursor.execute(sql)
   # 提交到数据库执行
   db.commit()
except:
   # 发生错误时回滚
   db.rollback()

# 关闭数据库连接
db.close(
参考:https://www.runoob.com/python/python-mysql.html