一、前言
本篇文章介绍两个重点
(1) 工程核心配置文件application.yml
(2) 如何在一个标准的的SpringCloud工程上构建起一个基本的web结构
二、配置文件application.yml
下面贴一个简单的application.yml配置文件,以此展开说明
# 默认日志配置
logging:
file: Aooms.log
config: # 日志配置文件,Spring Boot默认使用classpath路径下的日志配置文件,如:logback.xml
level:
root: info # 全局默认级别
#net.aooms.core: info # 项目级别,覆盖root默认
# 默认项目配置
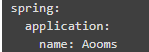
spring:
application:
name: Aooms
profiles:
active: dev
thymeleaf:
cache: false
mode: HTML5
prefix: /
suffix: .html
mvc:
static-path-pattern: /** #可不配置,默认也是此路径
(1)默认情况下,application.yml放在src / main / resources 根目录下,如果想更改配置文件路径或自定义配置文件名称,需要启动时指定如下,一般不建议修改:
java -jar myproject.jar --spring.config.location=classpath:/default.properties,classpath:/override.properties(2)你也可以使用application.properties,只需要将yml文件的属性层级结构在properties文件中改为一行即可,使用的时候与yml一致,如下图
 --->
---> ![]()
(3)配置属性 spring.profiles.active,此属性可指定在不同环境下使用对应环境的配置文件,如下
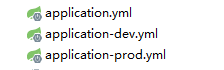
定义了application-dev.yml 与 application-prod.yml 文件 ,分别代表 开发环境 下的配置与 生成环境 下的配置,通过spring.profiles.active = dev 指定使用哪个配置文件,dev则代表使用application-dev.yml。
另外,如果你不想定义很多配置文件,还可以通过 “---”方式在同一个文件中进行不同环境下属性的定义,如下
# 默认日志配置
logging:
  file: Aooms.log
  config:    # 日志配置文件,Spring Boot默认使用classpath路径下的日志配置文件,如:logback.xml
  level:
    root: info  # 全局默认级别
    #net.aooms.core: info # 项目级别,覆盖root默认

# 默认项目配置
spring:
  application:
    name: Aooms
  profiles:
    active: dev

  thymeleaf:
    cache: false
    mode: HTML5
    prefix: /
    suffix: .html
  mvc:
    static-path-pattern: /**  #可不配置,默认也是此路径


---
# 开发环境
spring:
  profiles: dev
server:
  port: 9000

---
# 生产环境
spring:
  profiles: prod
server:
  port: 9001
---注 开始---
关于“---”:“---”在yml文件中的作用用来区分多个文件,写了几个“---”等同于写了几个配置文件,最终的效果是一样的,关于yml文件的介绍与基本使用,大家自行查阅,此处不做过多介绍,这里给大家推荐一篇:http://www.ruanyifeng.com/blog/2016/07/yaml.html?f=tt
---注 结束---
当然spring.profiles.active属性的应用不止于此,你可以根据实际情况灵活运用
三、application.yml配置文件读取
application.yml配置文件读取有3中方式,分别如下:
(1)使用@Value注解
![]()
如上图所示,可以直接在属性上定义@Value注解,可以使用SpEL表达式,${} 中的属性对应配置文件的属性名称
(2)使用@ConfigurationProperties注解,配合Pojo类实现
配置定义类如下,使用@ConfigurationProperties,同时使用@Component 声明为Spring组件,在任意使用的地方进行注入
package net.aooms.core.properties;


import org.springframework.beans.factory.annotation.Autowired;
import org.springframework.boot.context.properties.ConfigurationProperties;
import org.springframework.boot.context.properties.ConfigurationPropertiesBinding;
import org.springframework.context.annotation.Configuration;
import org.springframework.core.env.Environment;
import org.springframework.stereotype.Component;

/**
 * application.yml 配置文件映射
 * Created by cccyb on 2018-02-06
 */
@Component
@ConfigurationProperties(prefix="spring.application")
public class PropertiesApplication {

    private String name;

    public String getName() {
    return name;
}

    public void setName(String name) {
        this.name = name;
    }
}
具体使用
package net.aooms.core.web;
import net.aooms.core.properties.PropertiesApplication;
import net.aooms.core.properties.PropertiesTest;
import org.slf4j.Logger;
import org.slf4j.LoggerFactory;
import org.springframework.beans.factory.annotation.Autowired;
import org.springframework.beans.factory.annotation.Value;
import org.springframework.boot.env.PropertySourceLoader;
import org.springframework.core.env.Environment;
import org.springframework.web.bind.annotation.GetMapping;
import org.springframework.web.bind.annotation.RestController;
import org.springframework.web.servlet.ModelAndView;
import javax.servlet.http.HttpServletRequest;
/**
* 一个完整的控制器Demo,方便框架内部调试
* Created by cccyb on 2018-02-06
*/
@RestController
public class TestController {
private static Logger logger = LoggerFactory.getLogger(TestController.class);
@Autowired
private PropertiesApplication propertiesApplication;
@Value("${spring.application.name}")
private String name;
@GetMapping(value="/get")
public String get(String id) {
logger.error(" value from propertiesApplication : {} ",propertiesApplication.getName());
return "get do success";
}
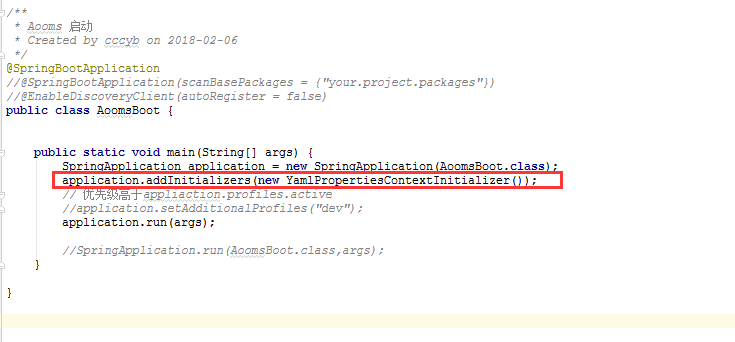
}(3)自定义ApplicationContextInitializer,配合Environment类实现
自定义ApplicationContextInitializer类
package net.aooms.core.properties;


import org.springframework.boot.env.YamlPropertySourceLoader;
import org.springframework.context.ApplicationContextInitializer;
import org.springframework.context.ConfigurableApplicationContext;
import org.springframework.core.env.PropertySource;
import org.springframework.core.io.Resource;
import org.springframework.util.StringUtils;

import java.io.IOException;

/**
 * 自定义yaml文件加载
 * Created by cccyb on 2018-02-06
 */
public class YamlPropertiesContextInitializer implements ApplicationContextInitializer<ConfigurableApplicationContext> {

    @Override
    public void initialize(ConfigurableApplicationContext applicationContext) {
        try {
            Resource resource = applicationContext.getResource("classpath:/application.yml");
            String name = StringUtils.stripFilenameExtension(resource.getFilename());
            YamlPropertySourceLoader sourceLoader = new YamlPropertySourceLoader();
            PropertySource<?> yamlProperties = sourceLoader.load(name, resource, null);
            applicationContext.getEnvironment().getPropertySources().addFirst(yamlProperties);
        } catch (IOException e) {
            throw new RuntimeException(e);
        }
    }
}
添加到启动
具体使用
package net.aooms.core.web;

import net.aooms.core.properties.PropertiesApplication;
import net.aooms.core.properties.PropertiesTest;
import org.slf4j.Logger;
import org.slf4j.LoggerFactory;
import org.springframework.beans.factory.annotation.Autowired;
import org.springframework.beans.factory.annotation.Value;
import org.springframework.boot.env.PropertySourceLoader;
import org.springframework.core.env.Environment;
import org.springframework.web.bind.annotation.GetMapping;
import org.springframework.web.bind.annotation.RestController;
import org.springframework.web.servlet.ModelAndView;

import javax.servlet.http.HttpServletRequest;

/**
 * 一个完整的控制器Demo,方便框架内部调试
 * Created by cccyb on 2018-02-06
 */
@RestController
public class TestController {

    private static Logger logger = LoggerFactory.getLogger(TestController.class);

    @Autowired
    private Environment environment;

    @GetMapping(value="/get")
    public String get(String id) {
        logger.error(" id value from environment : {} ", environment.getProperty("server.port"));

        return "get do success";
    }

}
四、自定义配置文件的读取
自定义yml配置文件的读取,可使用如下两种方式
(1)可以通过上面的第三中自定义ApplicationContextInitializer实现,关于自定义及使用参考上面
(2)properties文件可以直接使用@PropertySource配合pojo实现,yml文件无法使用@PropertySource注解,可以使用@PropertySource结合@ConfigurationProperties的方式
配置定义类如下,使用@ConfigurationProperties,同时使用@Component 声明为Spring组件,在任意使用的地方进行注入
package net.aooms.core.properties;


import org.springframework.boot.context.properties.ConfigurationProperties;
import org.springframework.context.annotation.PropertySource;
import org.springframework.stereotype.Component;

/**
 * 测试自定义配置文件映射
 * Created by cccyb on 2018-02-06
 */
@Component
@ConfigurationProperties("test")
@PropertySource("/aooms/my.yml")
public class PropertiesTest {

    private String name;

    public String getName() {
        return name;
    }

    public void setName(String name) {
        this.name = name;
    }
}
具体使用
package net.aooms.core.web;

import net.aooms.core.properties.PropertiesApplication;
import net.aooms.core.properties.PropertiesTest;
import org.slf4j.Logger;
import org.slf4j.LoggerFactory;
import org.springframework.beans.factory.annotation.Autowired;
import org.springframework.beans.factory.annotation.Value;
import org.springframework.boot.env.PropertySourceLoader;
import org.springframework.core.env.Environment;
import org.springframework.web.bind.annotation.GetMapping;
import org.springframework.web.bind.annotation.RestController;
import org.springframework.web.servlet.ModelAndView;

import javax.servlet.http.HttpServletRequest;

/**
 * 一个完整的控制器Demo,方便框架内部调试
 * Created by cccyb on 2018-02-06
 */
@RestController
public class TestController {

    private static Logger logger = LoggerFactory.getLogger(TestController.class);


    @Autowired
    private PropertiesTest propertiesTest;


    @GetMapping(value="/get")
    public String get(String id) {
        logger.error(" id value from testApplication : {} ", propertiesTest.getName());
        return "get do success";
    }


}
四、日志框架logback配置
Aooms目前使用的SpringBoot版本是2.0.0.M7,默认内置日志框架为logback,集成了logback的默认配置文件,可在spring-boot.jar包org.springframework.boot.logging.logback中找到,配置在application.yml中可进行定义,如下:
# 默认日志配置
logging:
  file: Aooms.log
  config:    # 日志配置文件,Spring Boot默认使用classpath路径下的日志配置文件,如:logback.xml
  level:
    root: info  # 全局默认级别
    #net.aooms.core: info # 项目级别,覆盖root默认
五、简单的控制器Demo
一个简单的控制器,为了方面后面框架的测试、调试,此demo会随着框架不断更新,最终会是一个完整的包含SpringMVC各种情况的使用
package net.aooms.core.web;
import net.aooms.core.properties.PropertiesApplication;
import net.aooms.core.properties.PropertiesTest;
import org.slf4j.Logger;
import org.slf4j.LoggerFactory;
import org.springframework.beans.factory.annotation.Autowired;
import org.springframework.beans.factory.annotation.Value;
import org.springframework.boot.env.PropertySourceLoader;
import org.springframework.core.env.Environment;
import org.springframework.web.bind.annotation.GetMapping;
import org.springframework.web.bind.annotation.RestController;
import org.springframework.web.servlet.ModelAndView;
import javax.servlet.http.HttpServletRequest;
/**
* 一个完整的控制器Demo,方便框架内部调试
* Created by cccyb on 2018-02-06
*/
@RestController
public class TestController {
private static Logger logger = LoggerFactory.getLogger(TestController.class);
@Autowired
private PropertiesApplication propertiesApplication;
@Autowired
private PropertiesTest propertiesTest;
@Value("${spring.application.name}")
private String name;
@Autowired
private Environment environment;
@GetMapping(value="/get")
public String get(String id) {
logger.error(" value from propertiesApplication : {} ",propertiesApplication.getName());
logger.error(" value from property : {} ", name);
logger.error(" id value from param : {} ", id);
logger.error(" id value from testApplication : {} ", propertiesTest.getName());
logger.error(" id value from environment my.yml: {} ", environment.getProperty("my","test.name"));
logger.error(" id value from environment my2.yml: {} ", environment.getProperty("my2","test.name"));
return "get do success";
}
@GetMapping(value="/get2")
public String get2(HttpServletRequest request) {
logger.error(" id value from param : {} ", request.getParameter("id"));
return "get2 do success";
}
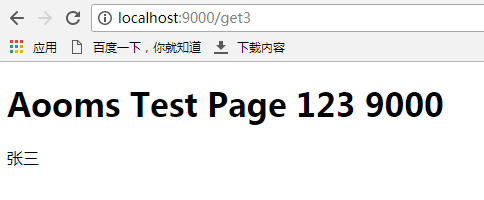
@GetMapping(value="/get3")
public ModelAndView get3(HttpServletRequest request,ModelAndView mv) {
logger.error(" id value from param : {} ", request.getParameter("id"));
mv.addObject("name", "张三");
mv.setViewName("/test.html");
return mv;
}
}六、页面、静态资源的集成
SpringBoot默认加载的静态资源路径为/static /public /resources /META-INF/resources,默认的搜索路径为/**,也就是会在上面的所有路径中进行资源搜索加载,可以通过spring.mvc.static-path-pattern=/resources/** 进行路径自定义
SpringBoot默认使用的模版引擎为thymeleaf,首先需要添加maven依赖
<dependency>
      <groupId>org.springframework.boot</groupId>
      <artifactId>spring-boot-starter-thymeleaf</artifactId>
</dependency>
然后thymeleaf 在application.yml中的配置如下
thymeleaf:
    cache: false  #禁用缓存
    mode: HTML5   #html5标准
    prefix: /     #前缀路径
    suffix: .html #模版文件后缀
Aooms框架中,将静态资源全部放在/META-INF/resources目录下,Servlet3.0规范也是定义了资源文件在/META-INF/resources目录下,为了提高框架的兼容性,统一结构,因此将资源文件放置在此目录下。
七、调试、访问
/META-INF/resources目录下有 test.html 与 jquery.min.js 文件

TestController控制器 get3 方法渲染了test.html模版
@GetMapping(value="/get3")
public ModelAndView get3(HttpServletRequest request,ModelAndView mv) {
    logger.error(" id value from param : {} ", request.getParameter("id"));
    mv.addObject("name", "张三");
    mv.setViewName("/test.html");
    return mv;
}
启动应用后,访问http://localhost:9000/get3,出现如下内容,说明一个基本的web工程构建及配置文件定义完成