静态成员变量
在c++中,静态成员是属于整个类的而不是某个对象,静态成员变量只存储一份供所有对象共用,所以在所有对象中都可以共享它。使用静态成员变量实现多个对象之间的数据共享不会破坏隐藏的规则,保证了安全性还可以节省内存。
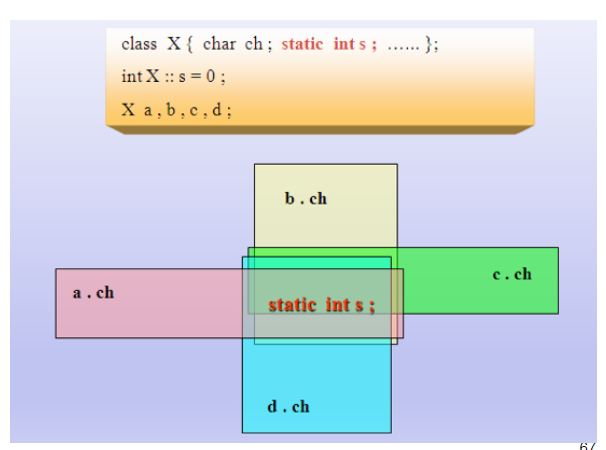
类的静态成员,属于类,也属于对象,但终归属于类。
//声明
static 数据类型 成员变量;//在类的内部

//初始化
数据类型 类名::静态数据成员 = 初值://在类的外部

//调用
类名::静态数据成员
类对象.静态数据成员
1、static成员变量实现了同类对象间信息共享;
2、static成员类外存储,求类大小,并不包含在内;
3、static成员是命名空间属于类的全局变量,存储在data区;
4、static成员只能类外初始化;
5、可以通过类名访问(无对象生成时亦可),也可以通过对象访问。
静态成员函数
//声明
static 函数声明

//调用
类名::函数调用
类对象。函数调用
1、静态成员函数的意义,不在于信息共享,数据沟通,而在于管理静态数据成员,完成对静态数据成员的封装。
2、静态成员函数只能访问静态数据成员。原因:非静态成员函数在调用时,this指针被当作参数传递。而静态成员函数属于类,而不属于对象,没有this指针。
案例一:生成一个Box类,要求所在Box的高度一致。
#define _CRT_SECURE_NO_WARNINGS
#include <iostream>
using namespace std;

class Box
{
public:
    Box(int l, int w) :m_len(l), m_width(w)
    {

    }
    void volume()
    {
        int v = m_len*m_width*m_height;
        cout << "长方体的高度是:" << m_height << endl;
        cout << "长方体的体积是:" << v << endl;
    }

    static int m_height;//静态成员变量类内声明
private:
    int m_len;
    int m_width;
};

int Box::m_height = 5;//静态成员变量类外初始化

int main(void)
{
    Box b1(2, 3);
    b1.volume();

    Box b2(1, 3);
    b2.volume();

    Box::m_height = 6;//或者b1.m_height = 6;或者b2.m_height = 6;
    //因为类的静态成员既属于类,也属于对象。
    //也由此可见,静态变量m_height是被共用的,
    b1.volume();
    b2.volume();

    return 0;
}

        /*屏幕显示结果:
        长方体的高度是:5
        长方体的体积是:30
        长方体的高度是:5
        长方体的体积是:15
        长方体的高度是:6
        长方体的体积是:36
        长方体的高度是:6
        长方体的体积是:18
        */
案例二:生成一个Student类,要求得出学生的平均分。
方法一:
#define _CRT_SECURE_NO_WARNINGS
#include <iostream>
using namespace std;

class Student
{
public:
    Student(int id,double score)
    {
        //创建一个学生
        m_id = id;
        m_score = score;

        m_counts++;//每创建一个学生就累加一个个数
        m_sum += score;
    }

    static int getCounts()
    {
        return m_counts;
    }

    static double getAverage()
    {
        return m_sum/m_counts;
    }

    ~Student()
    {
        m_counts--;
        m_sum -= m_score;
    }

private:
    int m_id;
    double m_score;//得分

    static int m_counts;//统计学生个数的静态成员变量

    static double m_sum;//统计学生总分数的静态成员变量
};

int Student::m_counts = 0;
double Student::m_sum = 0.0;

int main(void)
{

    Student s1(1, 80);
    Student s2(2, 90);
    Student s3(3, 100);

    cout << "学生的总人数:" << Student::getCounts() << endl;
    cout << "学生的平均分:" << Student::getAverage() << endl;

    return 0;
}
方法二:
#include <iostream>
using namespace std;

class Student
{
public:
    Student(int id,double score):m_id(id),m_score(score){}

    void total()
    {
        m_count++;
        m_sum += m_score;
    }
    static int getCount()
    {
        return m_count;
    }

    static double getAverage()
    {
        return m_sum / m_count;
    }
private:
    int m_id;
    double m_score;
    static int m_count;
    static double m_sum;

};

int Student::m_count = 0;
double Student::m_sum = 0.0;

int main(void)
{
    Student stu[3] = {
        Student(1,70),
        Student(2,70),
        Student(3,70)
    };

    for (int i = 0;i < 3;i++)
    {
        stu[i].total();
        cout << "学生人数:" << Student::getCount() << endl;
        cout << "学生平均分:" << Student::getAverage() << endl;
    }

    return 0;
}