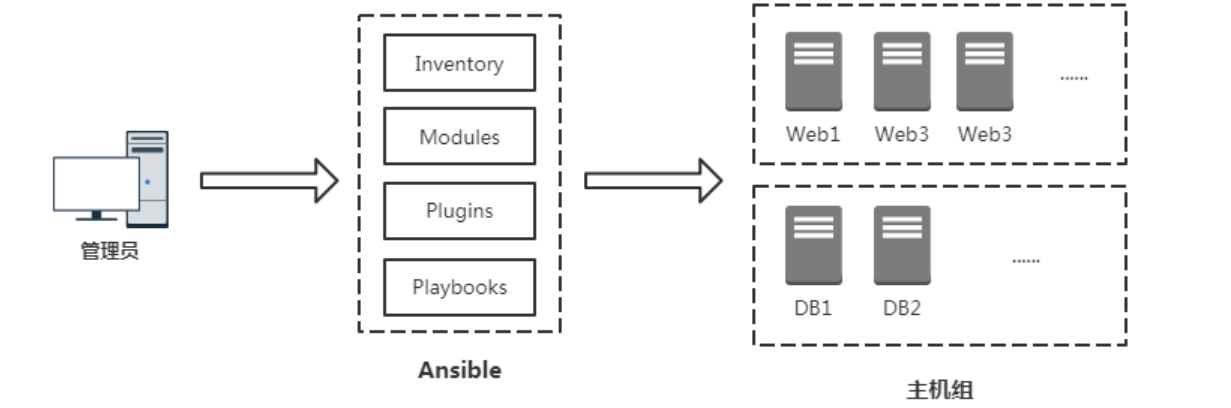
ansible简介
Ansible是一种IT自动化工具。它可以配置系统,部署软件以及协调更高级的IT任务,例如持续部署,滚动更新。Ansible适用于管理企业IT基础设施,从具有少数主机的小规模到数千个实例的企业环境。Ansible也是一种简单的自动化语言,可以完美地描述IT应用程序基础结构。
-
简单:减少学习成本
-
强大:协调应用程序生命周期
-
ansible安装
yum -y install ansible
-
-
Modules:任务均有模块完成,也可以自定义模块,例如经常用的脚本。
-
Plugins:使用插件增加Ansible核心功能,自身提供了很多插件,也可以自定义插件。例如connection插件,用于连接目标主机。
-
主机清单
[webservers]
alpha.example.org
beta.example.org
192.168.1.100
www[001:006].example.com

[dbservers]
db01.intranet.mydomain.net
db02.intranet.mydomain.net
10.25.1.56
10.25.1.57
db-[99:101]-node.example.com
命令行使用
ansible all -m ping
ansible all -m shell -a "ls /root" -u root -k
ansible webservers -m copy –a "src=/etc/hosts dest=/tmp/hosts"
ad-hoc命令是理解Ansible和在学习playbooks之前需要掌握的基础知识。
SSH密码认证:
[webservers]
192.168.1.100:22 ansible_ssh_user=root ansible_ssh_pass=’123456’
192.168.1.101:22 ansible_ssh_user=root ansible_ssh_pass=’123456’


SSH密钥对认证
[webservers]
10.206.240.111:22 ansible_ssh_user=root ansible_ssh_key=/root/.ssh/id_rsa
10.206.240.112:22 ansible_ssh_user=root

也可以ansible.cfg在配置文件中指定:
[defaults]
private_key_file = /root/.ssh/id_rsa  # 默认路径
常用选项:
| 描述 | |
|---|---|
| -C, --check | 运行检查,不执行任何操作 |
| -e EXTRA_VARS,--extra-vars=EXTRA_VARS | 设置附加变量 key=value |
| -u REMOTE_USER, --user=REMOTE_USER | SSH连接用户,默认None |
| -k, --ask-pass | SSH连接用户密码 |
| -b, --become | 提权,默认root |
| -K, --ask-become-pass |
常用模块
ansible-doc –s copy 查看模块文档
模块文档:https://docs.ansible.com/ansible/latest/modules/modules_by_category.html
shell:在目标主机执行shell命令
- name: 将命令结果输出到指定文件
  shell: somescript.sh >> somelog.txt
- name: 切换目录执行命令
  shell:
    cmd: ls -l | grep log
    chdir: somedir/
- name: 编写脚本
  shell: |
      if [ 0 -eq 0 ]; then
         echo yes > /tmp/result
      else
         echo no > /tmp/result
      fi
  args:
    executable: /bin/bash
copy:将文件复制到远程主机
- name: 拷贝文件
  copy:
    src: /srv/myfiles/foo.conf
    dest: /etc/foo.conf
    owner: foo
    group: foo
    mode: u=rw,g=r,o=r
    # mode: u+rw,g-wx,o-rwx
    # mode: '0644'
    backup: yes
file:管理文件和文件属性
- name: 创建目录
  file:
    path: /etc/some_directory
    state: directory
    mode: '0755'
- name: 删除文件
  file:
    path: /etc/foo.txt
    state: absent
- name: 递归删除目录
  file:
    path: /etc/foo
    state: absent
yum:软件包管理
- name: 安装最新版apache
  yum:
    name: httpd
    state: latest
- name: 安装列表中所有包
  yum:
    name:
      - nginx
      - postgresql
      - postgresql-server
    state: present
- name: 卸载apache包
  yum:
    name: httpd
    state: absent
- name: 更新所有包
  yum:
    name: '*'
    state: latest
- name: 安装nginx来自远程repo
  yum:
    name: http://nginx.org/packages/rhel/7/x86_64/RPMS/nginx-1.14.0-1.el7_4.ngx.x86_64.rpm
    # name: /usr/local/src/nginx-release-centos-6-0.el6.ngx.noarch.rpm
    state: present
service/systemd:管理服务
- name: 服务管理
  service:
    name: etcd
    state: started
    #state: stopped
    #state: restarted
    #state: reloaded
- name: 设置开机启动
  service:
    name: httpd
    enabled: yes


- name: 服务管理
  systemd:
    name=etcd
    state=restarted
    enabled=yes
    daemon_reload=yes
unzrchive:
- name: 解压
  unarchive:
    src=test.tar.gz
    dest=/tmp
debug:执行过程中打印语句
- debug:
    msg: System {{ inventory_hostname }} has uuid {{ ansible_product_uuid }}

- name: 显示主机已知的所有变量
  debug:
    var: hostvars[inventory_hostname]
    verbosity: 4
Playbook
如果Ansible模块是您工作中的工具,那么Playbook就是您的使用说明书,而您的主机资产文件就是您的原材料。
与adhoc任务执行模式相比,Playbooks使用ansible是一种完全不同的方式,并且功能特别强大。
---
- hosts: webservers
  vars:
    http_port: 80
    server_name: www.xxx.com
  remote_user: root
  gather_facts: false
  tasks:
  - name: 安装nginx最新版
    yum: pkg=nginx state=latest
  - name: 写入nginx配置文件
    template: src=nginx.conf dest=/etc/nginx/nginx.conf
    notify:
    - restart nginx
  - name: 确保nginx正在运行
    service: name=nginx state=started enabled=yes
  handlers:
    - name: restart nginx
      service: name=nginx state=reloaded

......
server {
listen {{ inventory_hostename }}:{{ http_port }};
listen {{ server_name }};
server_name _;
root /usr/share/nginx/html;
location / {
}
}
主机和用户
- hosts: webservers
  remote_user: user1
  become: yes
  become_user: root
定义变量
#变量是应用于多个主机的便捷方式; 实际在主机执行之前,变量会对每个主机添加,然后在执行中引用。
###命令行传递
-e VAR=VALUE

###主机变量与组变量
#在Inventory中定义变量。
[webservers]
192.168.1.100 ansible_ssh_user=root hostname=web1
192.168.1.100 ansible_ssh_user=root hostname=web2

[webservers:vars]
ansible_ssh_user=root hostname=web1


###单文件存储
Ansible中的首选做法是不将变量存储在Inventory中。
除了将变量直接存储在Inventory文件之外,主机和组变量还可以存储在相对于Inventory文件的单个文件中。
组变量:
group_vars 存放的是组变量
group_vars/all.yml  表示所有主机有效,等同于[all:vars]
grous_vars/etcd.yml 表示etcd组主机有效,等同于[etcd:vars]
# vi /etc/ansible/group_vars/all.yml
work_dir: /data
# vi /etc/ansible/host_vars/webservers.yml
nginx_port: 80

###在playbook中定义
- hosts: webservers
  vars:
    http_port: 80
    server_name: www.xxx.com

###Register变量
- shell: /usr/bin/uptime
  register: result
- debug:
    var: result
列表任务
#每个play包含一系列任务。这些任务按照顺序执行,在play中,所有主机都会执行相同的任务指令。play目的是将选择的主机映射到任务。
  tasks:
  - name: 安装nginx最新版
    yum: pkg=nginx state=latest
任务控制
#如果你有一个大的剧本,那么能够在不运行整个剧本的情况下运行特定部分可能会很有用。
  tasks:
  - name: 安装nginx最新版
    yum: pkg=nginx state=latest
    tags: install
  - name: 写入nginx配置文件
    template: src=/srv/httpd.j2 dest=/etc/nginx/nginx.conf
    tags: config

使用:
ansible-playbook example.yml --tags "install"
ansible-playbook example.yml --tags "install,config"
ansible-playbook example.yml --skip-tags "install"
流程控制
常用循环语句:
| 描述 | |
|---|---|
| with_items | 标准循环 |
| with_fileglob | 遍历目录文件 |
| with_dict |
#条件
tasks:
- name: 只在192.168.1.100运行任务
  debug: msg="{{ansible_default_ipv4.address}}"
  when: ansible_default_ipv4.address == '192.168.1.100'

#循环
tasks:
- name: 批量创建用户
  user: name={{ item }} state=present groups=wheel
  with_items:
     - testuser1
     - testuser2

- name: 解压
  copy: src={{ item }} dest=/tmp
  with_fileglob:
    - "*.txt"
模板
vars:
    domain: "www.xxx.com"
 tasks:
  - name: 写入nginx配置文件
    template: src=/srv/server.j2 dest=/etc/nginx/conf.d/server.conf

# server.j2
{% set domain_name = domain %}
server {
   listen 80;
   server_name {{ domain_name }};
   location / {
        root /usr/share/html;
   }
}

#在jinja里使用ansible变量直接 {{ }}引用。使用ansible变量赋值jinja变量不用{{ }}引用。
定义变量:
{% set local_ip = inventory_hostname %}

条件和循环:
{% set list=['one', 'two', 'three'] %}
{% for i in list %}
    {% if i == 'two' %}
        -> two
    {% elif loop.index == 3 %}
        -> 3
    {% else %}
        {{i}}
    {% endif %}
{% endfor %}
# tree .
.
├── ansible.cfg
├── docker_deploy.retry
├── docker_deploy.yaml
├── files
│   ├── daemon.json
│   ├── docker-18.09.6.tgz
│   └── docker.service
└── hosts

# cat docker_deploy.yaml
---
- hosts: docker
  vars:
    tmp_dir: '/tmp/docker'
  remote_user: root
  gather_facts: false

  tasks:

  - name: 创建临时目录
    file: dest={{ tmp_dir }} state=directory

  - name: 分发并解压docker二进制包
    unarchive: src={{ item }} dest={{ tmp_dir }}
    with_fileglob:
      - "files/docker-*.tgz"

  - name: 移动docker二进制文件
    shell: cp -rf {{ tmp_dir }}/docker/* /usr/bin

  - name: 分发service文件
    copy: src=files/docker.service dest=/usr/lib/systemd/system/

  - name: 创建目录
    file: dest=/etc/docker state=directory

  - name: 配置docker
    copy: src=files/daemon.json dest=/etc/docker/daemon.json

  - name: 启动docker
    systemd: name=docker state=restarted enabled=yes daemon_reload=yes

  - name: 查看状态
    shell: docker info
    register: docker
  - debug: var=docker.stdout_lines

# ansible-playbook -i hosts docker_deploy.yaml -k -K
# cat generate_tls.yaml
---
- hosts: localhost
  vars:
    current_dir: "{{ lookup('env', 'PWD') }}"
  remote_user: root
  gather_facts: false

  tasks:

  - name: 创建工作目录
    file: dest={{ current_dir }}/tls/cert state=directory

  - name: 准备cfssl工具
    unarchive: src=tls/cfssl.tar.gz dest=/usr/bin/ mode=u+x

  - name: 准备etcd证书请求文件
    template: src=tls/{{ item }} dest={{ current_dir }}/tls/cert/{{ item.split('.')[:-1]|join('.') }}
    with_items:
      - ca-config.json.j2
      - ca-csr.json.j2
      - server-csr.json.j2

  - name: 生成etcd证书
    shell: |
      cd {{ current_dir }}/tls/cert
      cfssl gencert -initca ca-csr.json | cfssljson -bare ca -
      cfssl gencert -ca=ca.pem -ca-key=ca-key.pem -config=ca-config.json -profile=www server-csr.json | cfssljson -bare server

# cat etcd_cluster_deploy.yaml
---
- hosts: etcd
  vars:
    etcd_work_dir: '/opt/etcd'
    tmp_dir: '/tmp/k8s'
  remote_user: root
  gather_facts: false

  tasks:

  - name: 创建工作目录
    file: dest={{ etcd_work_dir }}/{{ item }} state=directory
    with_items:
      - bin
      - cfg
      - ssl

  - name: 创建临时目录
    file: dest={{ tmp_dir }} state=directory

  - name: 分发并解压etcd二进制包
    unarchive: src={{ item }} dest={{ tmp_dir }}
    with_fileglob:
      - "files/etcd-v*.tar.gz"

  - name: 移动etcd二进制文件
    shell: cp -rf {{ tmp_dir }}/etcd-v*/{etcd,etcdctl} {{ etcd_work_dir }}/bin

  - name: 分发证书
    copy: src=tls/cert/{{ item }} dest={{ etcd_work_dir }}/ssl
    with_items:
      - ca.pem
      - server.pem
      - server-key.pem

  - name: 分发etcd配置文件
    template: src=files/etcd.conf.j2 dest={{ etcd_work_dir }}/cfg/etcd.conf

  - name: 分发service文件
    template: src=files/etcd.service.j2 dest=/usr/lib/systemd/system/etcd.service

  - name: 启动etcd
    systemd: name=etcd state=restarted enabled=yes daemon_reload=yes

  - name: 分发etcd脚本
    template: src=files/etcd.sh.j2 dest={{ tmp_dir }}/etcd.sh mode=u+x

  - name: 获取etcd集群状态
    shell: /bin/bash {{ tmp_dir }}/etcd.sh
    register: status
  - debug: var=status.stdout_lines

# tree .
.
├── ansible.cfg
├── docker_deploy.yaml
├── etcd_cluster_deploy.retry
├── etcd_cluster_deploy.yaml
├── files
│   ├── etcd.conf.j2
│   ├── etcd.service.j2
│   ├── etcd.sh.j2
│   └── etcd-v3.3.10-linux-amd64.tar.gz
├── generate_tls.yaml
├── hosts
└── tls
    ├── ca-config.json.j2
    ├── ca-csr.json.j2
    ├── cert
    ├── cfssl.tar.gz
    ├── generate_etcd_cert.sh
    └── server-csr.json.j2

# ansible-playbook -i hosts generate_tls.yaml
# ansible-playbook -i hosts etcd_cluster_deploy.yaml -k -K
site.yml
webservers.yml
fooservers.yml
roles/
   common/
     tasks/
     handlers/
     files/
     templates/
     vars/
     defaults/
     meta/
   webservers/
     tasks/
     defaults/
     meta/
-
-
handlers-包含处理程序,此角色甚至在此角色之外的任何地方都可以使用这些处理程序。 -
defaults-角色的默认变量 -
vars-角色的其他变量 -
files-包含可以通过此角色部署的文件。 -
templates-包含可以通过此角色部署的模板。 -
meta
# roles/webservers/tasks/main.yml
- name: added in 2.4, previously you used 'include'
  import_tasks: redhat.yml
  when: ansible_facts['os_family']|lower == 'redhat'
- import_tasks: debian.yml
  when: ansible_facts['os_family']|lower == 'debian'

# roles/webservers/tasks/redhat.yml
- yum:
    name: "httpd"
    state: present

# roles/webservers/tasks/debian.yml
- apt:
    name: "apache2"
    state: present
使用角色
# site.yml
- hosts: webservers
  roles:
    - common
    - webservers

定义多个:
- name: 0
  gather_facts: false
  hosts: all
  roles:
    - common

- name: 1
  gather_facts: false
  hosts: all
  roles:
    - webservers
角色控制
- name: 0.系统初始化
  gather_facts: false
  hosts: all
  roles:
    - common
  tags: common