接触Silverlight已经有两三个月了,开始一直感觉他和Winform很相似,拖拖控件就行了,所以一直把经历放在了研究后台和服务器交互和性能优化上面,很少去仔细研究Silverlight的页面。前几天,公司突然让修改一个Winform的项目,再回过头来看Winform,有种"不堪回首"的感觉。
十一长假即将来临,在这里先祝大家假期快乐。今天难得有空,抽出点时间研究了一下Silverlight的继承和触发器,拿出来和大家分享一下。Silverlight和WPF中页面布局使用的都是XAML,颇为相似,学习WPF的也可以参考一下。
一、Silverlight中的继承
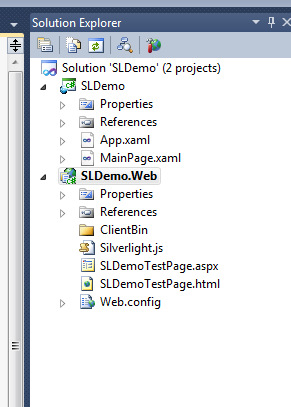
那么先来说一下Silverlight中的继承吧,我们经常在后台代码中使用继承,实现代码的重用。那么在前端页面是否可以使用继承,实现代码和控件的重用呢?答案是可以的。通过学习继承,我们可以更深入的理解XAML。下面来写一个Demo,一起来看一下,首先新建一个Silverlight项目,名字就叫SLDemo吧,添加默认的网站,建完项目后目录如下:
既然要说继承,那么首先要有个父类,新加一个Class,名字就叫BaseView,添加一些属性,代码如下:
using System;
using System.Net;
using System.Windows;
using System.Windows.Controls;
using System.Windows.Documents;
using System.Windows.Ink;
using System.Windows.Input;
using System.Windows.Media;
using System.Windows.Media.Animation;
using System.Windows.Shapes;

namespace SLDemo
{
   public class BaseView : UserControl
   {
      public string Title { get; set; }
      public int WinWidth { get; set; }
      public int WinHeight { get; set; }
   }
}
这里简单添加一些属性,我们看到所有的页面控件都继承自UserControl,所以我们这个父类也要继承UserControl,然后修改MainPage代码,来继承我们这个类。
这里要注意的是,Silverlight里面页面和后台cs文件要继承自同一个父类,所以前端和后台都要改,后台cs文件很简单,修改后代码如下:
namespace SLDemo
{
   public partial class MainPage : BaseView
   {
      public MainPage()
      {
         InitializeComponent();
      }
   }
}
只是把父类UserControl改成BaseView即可,然后来看前端页面的修改方法:
<sld:BaseView x:Class="SLDemo.MainPage"
    xmlns:sld="clr-namespace:SLDemo"
    xmlns="http://schemas.microsoft.com/winfx/2006/xaml/presentation"
    xmlns:x="http://schemas.microsoft.com/winfx/2006/xaml"
    xmlns:d="http://schemas.microsoft.com/expression/blend/2008"
    xmlns:mc="http://schemas.openxmlformats.org/markup-compatibility/2006"
    mc:Ignorable="d"
    d:DesignHeight="400" d:DesignWidth="600">

    <Grid x:Name="LayoutRoot" Background="White">

   </Grid>
</sld:BaseView>
来看一下代码变成什么样了?是不是和之前大不一样了,<Usercontrol></Usercontrol>没有了?是不是有种"高大尚"的感觉,瞬间感觉让人看不懂了?下面我来解释一下:
注意看第二行,我们引入了一个命名空间,XAML中引入命名空间就是
xmlns:{前缀}="clr-namespace:{命名空间}"
这里我们把前缀写成了sld(SLDemo的前三个字母),然后把Usercontrol改成我们的BaseView,和后台cs文件统一。实际上,XAML中应该这样写:
<命名空间:类名></命名空间:类名>
但是由于Usercontrol是系统默认的,所以前面的命名空间就省了。接下来,先拖几个控件上去看看,会发生什么,这里拖一个TabControl和一个Button吧,代码如下:
<sld:BaseView x:Class="SLDemo.MainPage"
    xmlns:sld="clr-namespace:SLDemo"
    xmlns="http://schemas.microsoft.com/winfx/2006/xaml/presentation"
    xmlns:x="http://schemas.microsoft.com/winfx/2006/xaml"
    xmlns:d="http://schemas.microsoft.com/expression/blend/2008"
    xmlns:mc="http://schemas.openxmlformats.org/markup-compatibility/2006"
    mc:Ignorable="d"
    d:DesignHeight="400" d:DesignWidth="600"
    xmlns:sdk="http://schemas.microsoft.com/winfx/2006/xaml/presentation/sdk">

    <Grid x:Name="LayoutRoot" Background="White">
      <Button Content="Button" Height="23" HorizontalAlignment="Left" Margin="308,119,0,0" Name="button1" VerticalAlignment="Top" Width="75" />
      <sdk:TabControl Height="100" HorizontalAlignment="Left" Margin="210,205,0,0" Name="tabControl1" VerticalAlignment="Top" Width="200" />
   </Grid>
</sld:BaseView>
可以看到,Button和之前一样,tabcontrol和之前还是一样(都要引用命名空间),这里主要说一下命名空间,可以看到上面多了一行代码:
 xmlns:sdk="http://schemas.microsoft.com/winfx/2006/xaml/presentation/sdk">
这里引入TabControl的命名空间,看我标红的,然后用这个前缀去添加Tabcontrol,所以以后我们引用自己的自定义控件也是这样,先引用命名控件,然后通过前缀来访问。
  当然,写了这么多,我们还是再写一个控件,其实Silverlight中Page大多用来显示控件,页面都是由控件堆出来的,然后在窗体显示时,设置他的Content属性来呈现。
到这里,大家就可以通过继承来重写和扩展控件了。(今天先说到这里,以后会详细介绍开发自定义控件)。
二、Silverlight的Trigger、Action和Behavior
现在比较流行用MVVM来开发Silverlight项目,目的是实现XAML和代码的分离。今天就来说一下Trigger、Action和Behavior.
首先来说一下三者的关系:
Trigger : 触发器,就像他的名字一样,是用来监听事件,然后执行某段代码
Action: 动作,就是执行一段代码
Behavior: 行为,看起来好像不太好理解,其实他可以看作是Trigger和Action的组合
首先来说一下Trigger和Action吧,首先来写一个Action,新建一个类MyAction,在写代码之前,我们要先引入一个命名空间,如图:
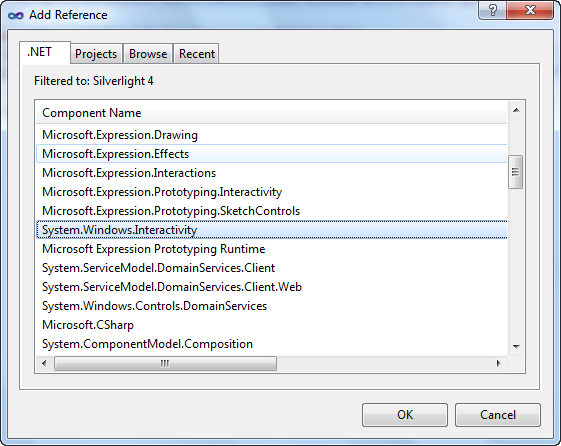
然后在代码中引用命名空间System.Windows.Interactivity;继承TriggerAction类,代码如下:
using System;
using System.Net;
using System.Windows;
using System.Windows.Controls;
using System.Windows.Documents;
using System.Windows.Ink;
using System.Windows.Input;
using System.Windows.Media;
using System.Windows.Media.Animation;
using System.Windows.Shapes;
using System.Windows.Interactivity;

namespace SLDemo
{
   public class MyAction : TriggerAction<DependencyObject>
   {
      protected override void Invoke(object parameter)
      {
         MessageBox.Show("你触发了一个Action!");
      }
   }
}
这里我们重写了Invoke方法,让他弹出一条消息。下面我们来使用这个Action,让他来响应一个事件,修改XAML代码如下:
<sld:BaseView x:Class="SLDemo.MainPage"
    xmlns:sld="clr-namespace:SLDemo"
    xmlns="http://schemas.microsoft.com/winfx/2006/xaml/presentation"
    xmlns:x="http://schemas.microsoft.com/winfx/2006/xaml"
    xmlns:d="http://schemas.microsoft.com/expression/blend/2008"
    xmlns:mc="http://schemas.openxmlformats.org/markup-compatibility/2006"
    xmlns:i="http://schemas.microsoft.com/expression/2010/interactivity"
    mc:Ignorable="d"
    d:DesignHeight="400" d:DesignWidth="600"
    xmlns:sdk="http://schemas.microsoft.com/winfx/2006/xaml/presentation/sdk">

    <Grid x:Name="LayoutRoot" Background="White">
      <Button Content="Button" Height="23" HorizontalAlignment="Left" Margin="308,119,0,0" Name="button1" VerticalAlignment="Top" Width="75">
         <i:Interaction.Triggers>
            <i:EventTrigger EventName="Click">
               <sld:MyAction />
            </i:EventTrigger>
         </i:Interaction.Triggers>
      </Button>

   </Grid>
</sld:BaseView>
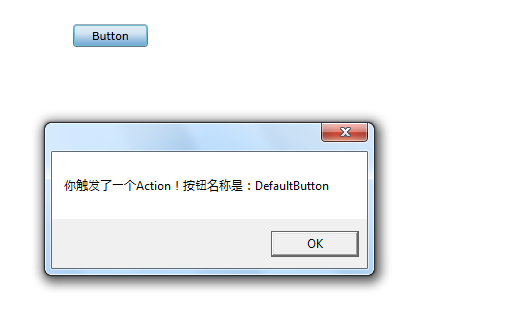
这里我们给一个按钮添加了一个Trigger来侦听单击事件,然后绑定MyAction,运行后我们单击按钮,会弹出消息框。
下面,我们来给Action传递一个参数,当然你可以多加几个,我们就传递一个BtnName属性吧,修改MyAction代码如下:
namespace SLDemo
{
   public class MyAction : TriggerAction<DependencyObject>
   {
      public string BtnName { get; set; }
      protected override void Invoke(object parameter)
      {
         MessageBox.Show("你触发了一个Action!按钮名称是:" + this.BtnName);
      }
   }
}
我们只是添加了一个属性,下面来看看如何使用:
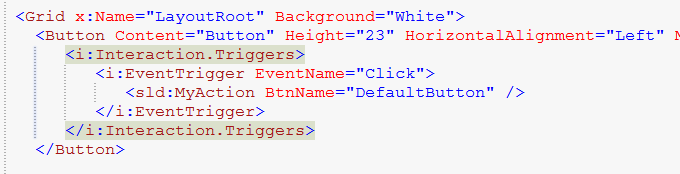
运行效果如下:
我们就像平常写XAML那样,写一个属性就可以传递一个参数到Action里面,当然这里也可以绑定一个变量。但是实际开发中,我们不需要这样做,因为我们把变量写在ViewModel中,写Action可以给一些Combox绑定SelectedChanged事件,目的还是实现布局和代码分离。
Behavior
下面来看一下神奇的Behavior吧,有了Behavior,可以实现一些特效的重复使用,下面来写一个简单的例子看一下,就写一个关于Textbox的吧,新建一个类,名字叫做TextboxBehavior,代码如下:
using System;
using System.Net;
using System.Windows;
using System.Windows.Controls;
using System.Windows.Documents;
using System.Windows.Ink;
using System.Windows.Input;
using System.Windows.Media;
using System.Windows.Media.Animation;
using System.Windows.Shapes;
using System.Windows.Interactivity;

namespace SLDemo
{
   public class TextboxBehavior : Behavior<TextBox>
   {
      protected override void OnAttached()
      {
         base.OnAttached();
         AssociatedObject.TextChanged += new TextChangedEventHandler(AssociatedObject_TextChanged);
      }

      void AssociatedObject_TextChanged(object sender, TextChangedEventArgs e)
      {
         if (AssociatedObject.Text.Length < 6)
         {
            AssociatedObject.Foreground = new SolidColorBrush(Color.FromArgb(200, 255, 0, 0));
         }
         else
         {
            AssociatedObject.Foreground = new SolidColorBrush(Color.FromArgb(200, 0, 255, 0));
         }
      }
   }
}
然后在XAML中添加如下代码:

这个时候,Textbox就绑定了我们的TextboxBehavior了,运行看下效果:
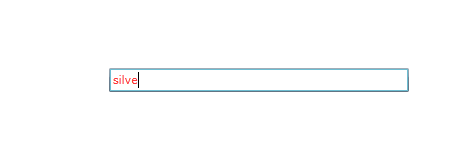
当输入的内容小于六个字符的时候,显示红色
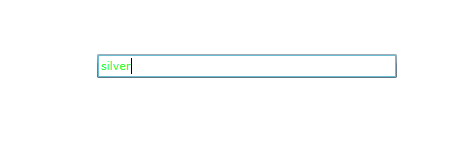
大于等于六个字符时就变成绿色。
我们一旦写好了这个Behavior,所有页面的Textbook都可以使用,是不是感觉很强大!源码已经上传,在下面下载。