本文系微博运维数据平台(DIP)在Flume方面的优化扩展经验总结,在使用Flume FileChannel的场景下将吞吐率由10M/s~20M/s提升至80M/s~90M/s,分为四个部分进行介绍:
- 应用场景
- Flume实例架构
- Flume调试及优化扩展
- Flume Todo
- 生产环境部署
1. 应用场景
我们的应用场景是一个典型的实时数据传输(接收)过程,架构图如下:
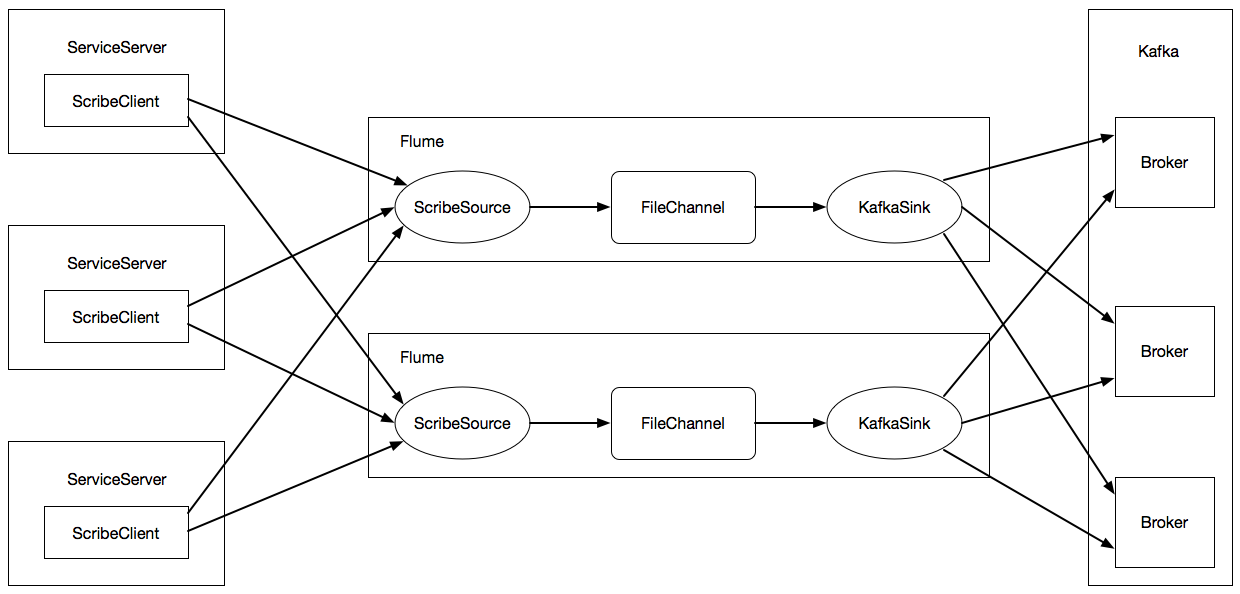
包括三个组件:
(1)ServiceServer ScribeClient:业务产生的日志以“Log”的形式写入业务部署服务器的本地磁盘,然后通过ScribeClient传输至我们的Flume集群;
(2)Flume:使用多个Flume实例构建Flume集群,通过动态域名、VIP对外提供服务;其中,每一个Flume实例使用ScribeSource接收ServcieServer ScribeClient传输过来的日志数据,然后使用FileChannel将ScribeSource接收过来的数据以“事务”的形式持久化至本地磁盘,最近通过KafkaSink将FileChannle中的数据输出至Kafka集群;
(3)Kakfa:Kafka集群接收Flume集群传输过来的日志数据,用于后续的实时计算;
可以看出,以上整个过程就是日志实时写入Kafka集群的过程,有几点需要特殊说明:
(1)既然是实时数据传输,为什么不直接通过Kafka Producer API(或基于此实现的开源组件)将日志数据直接写入Kafka集群,而是使用Scribe间接传输数据?
假设我们有一个Web服务,需要将Web的访问日志实时写入Kafka集群,这个可以通过Log4j扩展实现(不确定是否已有开源组件支持),这种方式数据实时性较强,但是Kafka集群运行过程中一旦出现异常(如:网络流量波动)会直接影响该Web服务的运行状态,进而影响线上业务,因此不能使用这种直接传输的方式;
Scribe可以在数据接收服务(这里特指Flume集群,也可以是Kafka)出现异常或不可用的情况下,暂时将数据缓存至本地磁盘,待数据接收服务恢复之后,继续数据传输;虽然数据传输的实时性有所损耗,但整个数据传输过程更加可靠,而且避免了数据传输对线上服务的影响,因此使用这种间接传输的方式。
(2)Flume为什么使用FileChannel,而不使用吞吐率更高的MemoryChannel?
MemoryChannel使用内存存储事务,吞吐率极高,但基于内存的事务实现模式在Flume部署服务器宕机或Flume实例异常终止的情况下,所有存储在内存中的日志数据将全部丢失;另外,内存空间受限于RAM和JVM的约束,数据传输量波动(如数据量猛增)的情况下可能会引发异常;
FileChannel使用基于本地磁盘的事务实现模式,即使出现Flume部署服务器宕机或Flume实例异常终止的情况,因为接收到的日志数据都以事务的形式持久化至本地磁盘,可以在Flume实例恢复正常之后继续数据传输,不会有数据丢失的情况;而且本地磁盘相对于内存而言,存储空间比较富余,数据可靠性较强,因此使用FileChannel。
2. Flume实例架构
在我们的应用场景中,对于单独一个Flume实例而言,架构如下:
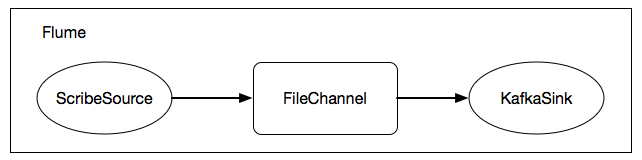
宏观上看,Flume实例内部仅有三个组件:ScribeSource、FileChannel、KafkaSink,实际上内部的结构还是比较复杂的,如下图所示:
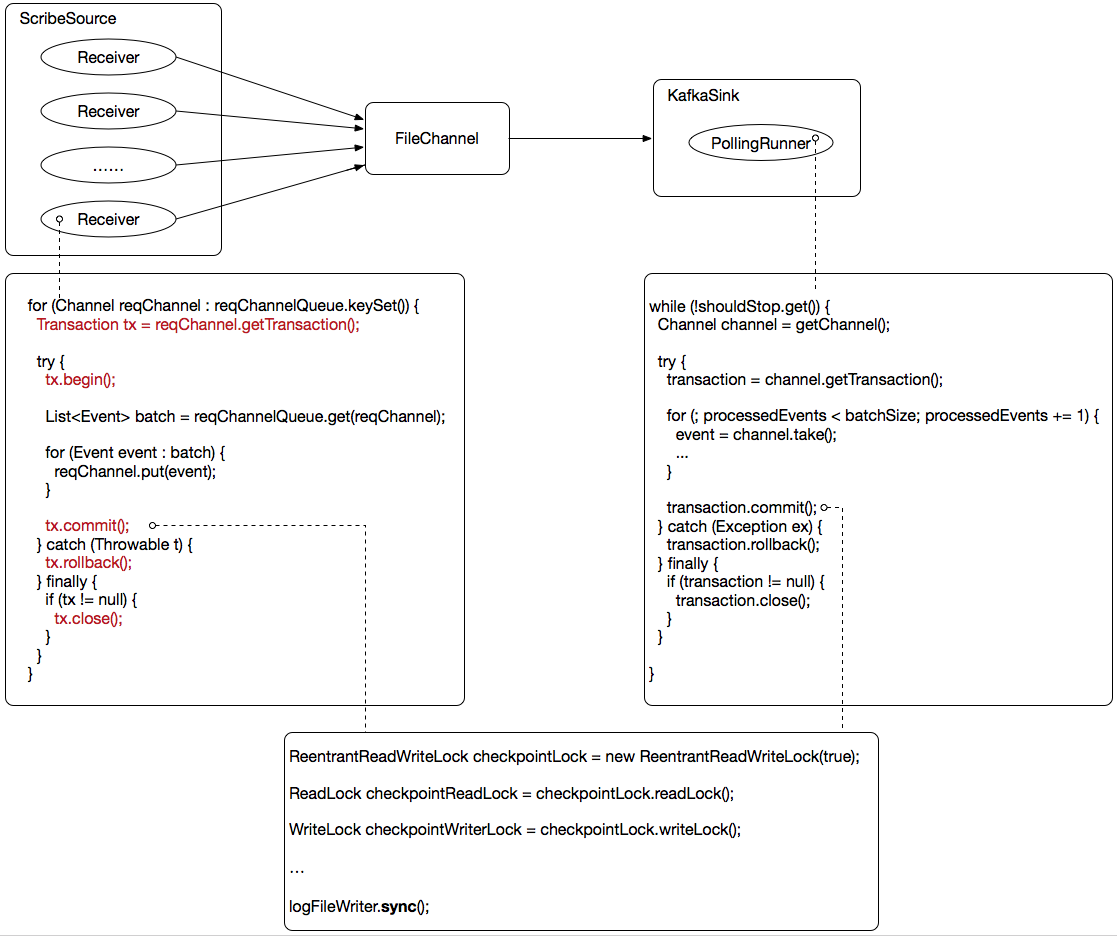
这里先介绍两个比较重要的实例:
Receiver:Receiver是一个线程,对于Flume ScribeSource而言可以设置多个Receiver线程(通过指定ScribeSource workerThreads数值实现),它不断地将Flume ScribeSource接收到的数据以“事务”的形式写入FileChannel;
PollingRunner:PollingRunner也是一个线程,它不断地将FileChannel中的数据以“事务”的形式读取出来并写入Kafka;
对应的Flume配置文件:
myagent.sources = scribe_source
myagent.channels = file_channel
myagent.sinks = kafka_sink
# define scribe source
myagent.sources.scribe_source.type = org.apache.flume.source.scribe.ScribeSource
myagent.sources.scribe_source.port = 1466
myagent.sources.scribe_source.workerThreads = 5
# define file channel
myagent.channels.file_channel.type = file
myagent.channels.file_channel.checkpointDir = /data0/flume/checkpoint
myagent.channels.file_channel.dataDirs = /data0/flume/data
# define kafka sink
myagent.sinks.kafka_sink.type = org.apache.flume.sink.kafka.KafkaSink
myagent.sinks.kafka_sink.topic = mytopic
myagent.sinks.kafka_sink.brokerList = kafkahost:9092
myagent.sinks.kafka_sink.requiredAcks = 1
myagent.sinks.kafka_sink.batchSize = 1000
# Bind the source and sink to the channel
myagent.sources.scribe_source.channels = file_channel
myagent.sinks.kafka_sink.channel = file_channel
3. Flume调试及优化扩展
为了方便Flume的调试,我们自己开发模拟了一个Scrbie Client Simulator实例,可以兼容Scribe通信协议,以每秒大约90M/s的速率输出数据至Flume(这里特指单实例Flume),其中模拟的日志数据来源于我们平台常见的业务数据,后续的讨论均建立在这个Scribe Client Simulator实例的基础上。
3.1 ScribeSource
ScribeSource中有一个非常重要的配置属性“workerThreads”,如上所述,它的值被设定为5,那么这个值是如何得出的呢,它又会产生什么样的作用?
ScribeSource中的每一个WorkerThread就是一个Receiver实例,即“workerThreads”的值决定着ScribeSource中有几个Receiver实例,有多少个Receiver实例直接影响着ScribeSource接收数据的速率,调试过程如下:
(1)为了避免Channel自身的性能瓶颈对ScribeSource的影响,我们这里使用吞吐率极高的MemoryChannel;
(2)为了避免Sink自身的性能瓶颈对ScribeSource、MemoryChannel的影响,我们这里使用NullSink,它会将消费到的数据直接丢弃;
经过上述两步,我们可以认为Flume ScribeSource的调试过程中完全可以忽略MemoryChannel、NullSink的影响。
(3)启动Scrbie Client Simulator实例,使它不断地往我们的Flume实例写入数据,观察Flume实例部署机器的网络写入流量情况,进而调整“workerThreads”值的大小(建议数值从1开始,逐渐增大),使该机器的网络写入流量达到业务需求;
根据我们场景的具体情况,经过上述三步的测试,最终将ScribeSource workerThreads的值选定为5,吞吐率大致为80~90M/s,这是我们认为的一个理想峰值。
Flume配置如下:
myagent.sources = scribe_source
myagent.channels = memory_channel
myagent.sinks = null_sink
# define scribe source
myagent.sources.scribe_source.type = org.apache.flume.source.scribe.ScribeSource
myagent.sources.scribe_source.port = 1466
myagent.sources.scribe_source.workerThreads = 5
# define memory channel
myagent.channels.memory_channel.type = memory
myagent.channels.memory_channel.capacity = 10000
myagent.channels.memory_channel.transactionCapacity = 10000
myagent.channels.memory_channel.byteCapacityBufferPercentage = 20
myagent.channels.memory_channel.byteCapacity = 800000
# define null sink
myagent.sinks.null_sink.type = null
# Bind the source and sink to the channel
myagent.sources.scribe_source.channels = memory_channel
myagent.sinks.null_sink.channel = memory_channel
3.2 FileChannel
3.2.1 默认FileChannel
经过3.1的测试之后,我们可以认为Flume ScribeSource不存在接收数据的性能瓶颈,接下来开始调试FileChannel,关于使用FileChannel的原因可以参考1.(2)。
在3.1Flume配置的基础之上,修改为FileChannel,其余配置保持不变,如下:
myagent.sources = scribe_source
myagent.channels = file_channel
myagent.sinks = null_sink
# define scribe source
myagent.sources.scribe_source.type = org.apache.flume.source.scribe.ScribeSource
myagent.sources.scribe_source.port = 1466
myagent.sources.scribe_source.workerThreads = 5
# define file channel
myagent.channels.file_channel.type = file
myagent.channels.file_channel.checkpointDir = /data0/flume/checkpoint
myagent.channels.file_channel.dataDirs = /data0/flume/data
# define null sink
myagent.sinks.null_sink.type = null
# Bind the source and sink to the channel
myagent.sources.scribe_source.channels = memory_channel
myagent.sinks.null_sink.channel = memory_channel
再次重复3.1的调试过程,使用Scrbie Client Simulator实例进行数据写入测试时, 我们发现Flume实例部署机器的网络写入流量下降很多,大约只有10M/s~20M/s。可以看出,在吞吐率方面,FileChannel与MemoryChannel之间有很大的差距。我们来分析一下具体的原因。
根据2.中的Flume实例架构图,我们可以大致得出ScribeSource中的某一个Receiver与FileChannel的交互流程,如下图:

Receiver的工作实际是一个将数据循环写入FileChannel的过程,每一次的循环可以理解为一个指处理(批量写入),每一次的批处理都需要经过以下几个步骤:
(1)获取FileChannel的事务——getTransaction;
(2)打开事务——begin;
(3)批量写入数据——put;
(4)提交或回滚事务——commit or rollback;
(5)关闭事务——close;
经过对Flume FileChannel相关源码的分析,导致FileChannel吞吐率下降的主要原因集中于事务的提交过程——commit,有以下两点:
(1)锁竞争,从上图中可以看出,Receiver的每一次批量写入过程中都会涉及到事务提交(不考虑异常回滚的情况),事务提交的内部过程涉及到读锁或写锁的“加锁”操作,多个Receiver(WorkerThread线程)共存的情况下锁竞争的情况就会比较严重;
(2)Writer sync,FileChanel是基于本地磁盘实现的事务模式,每一次事务的提交都会伴随着一次“sync”,众所周知,“sync”是一种系统性能开销比较大的操作;
综合上述两点,我们可以得出,多个Receiver的存在导致FileChannel存在资源竞争的问题(多个Receiver之间无法安全的共享一个FileChannel的事务),因为需要加锁,必然带来相互之间锁的竞争;某一个Receiver获得锁之后,又需要进行系统性能开销比较大的“sync”操作,且耗时相对较长,这就意味着该Receiver从获取锁到释放锁的过程会花费比较长的时间,在这段时间内该Receiver独占FileChannel,其它Receiver只能处于阻塞状态,直至可以获取到锁;基于上述两个原因,导致FileChannel在多Receiver的环境下吞吐率严重下降。
3.2.2 扩展FileChannel
FileChannel的实现过程是比较复杂的,直接优化FileChannel的代码不太现实,那么是否可以通过多个FileChannel的方式来解决吞吐率严重下降的问题呢?如果FileChannel的数目大于或等于ScribeSource Receiver的数目,ScribeSource Receiver使用“哈希”(Hash)的方式来选取FileChannel,就可以避免ScribeSource Receiver之间相互竞争FileChannel资源,如下图所示:

虽然对于某一个FileChannel来说,与它交互的Receiver依然要经过获取锁——sync——释放锁的过程,但多个Receiver之间是并行的,总体上吞吐率得到提升。
那么如何实现这个方案呢?这里我们需要用到Flume提供的“Custom Channel Selector”机制,即实现我们自己的“Channel Selector”,代码如下:
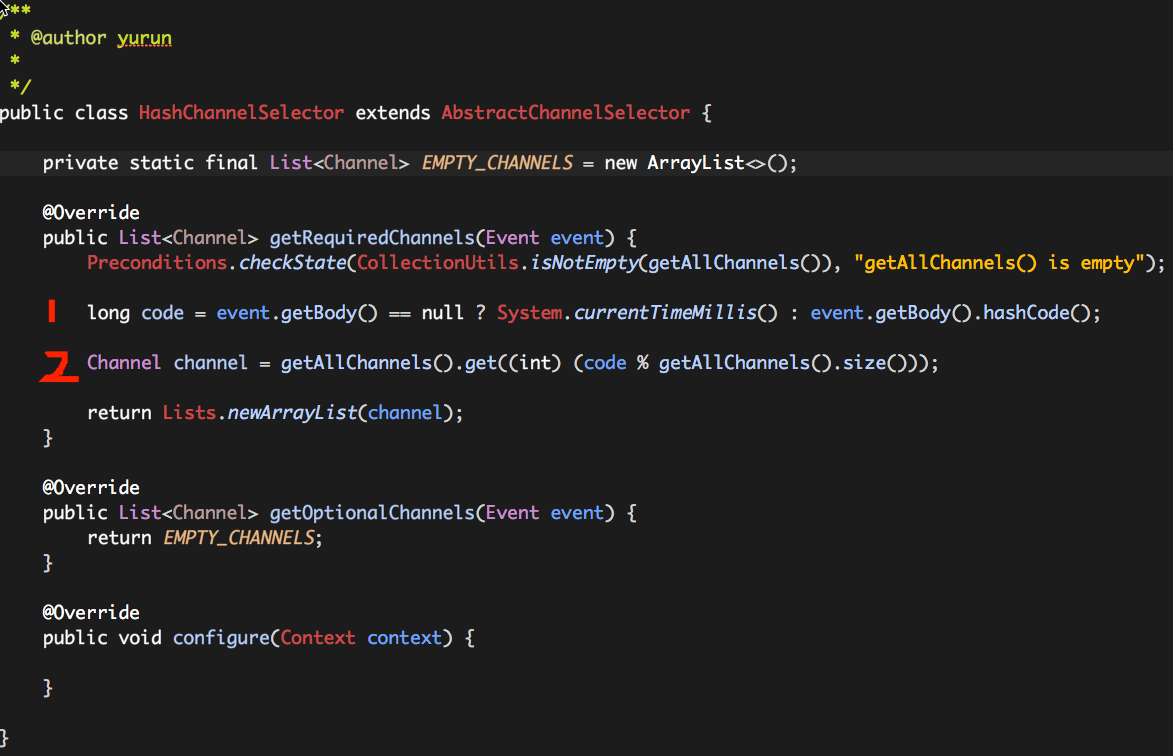
这里有两个关键点:
(1)随机code的生成,目前代码实现提供两种选择:event.getBody().hashCode()或者System.currentTimeMillis();
(2)根据随机code的值对FileChannel的数目取余(哈希),从而选取出一个FileChannel并返回;
那么如何使用上述方案及自己的扩展呢?Flume配置文件如下:
myagent.sources = scribe_source
myagent.channels = file_channel file_channel2 file_channel3
myagent.sinks = kafka_sink
# define scribe source
myagent.sources.scribe_source.type = org.apache.flume.source.scribe.ScribeSource
myagent.sources.scribe_source.port = 1466
myagent.sources.scribe_source.workerThreads = 5
myagent.sources.scribe_source.selector.type = com.weibo.dip.flume.extension.channel.selector.HashChannelSelector
# define file channel
myagent.channels.file_channel.type = file
myagent.channels.file_channel.checkpointDir = /data0/flume/checkpoint
myagent.channels.file_channel.dataDirs = /data0/flume/data
# define file channel2
myagent.channels.file_channel2.type = file
myagent.channels.file_channel2.checkpointDir = /data0/flume/checkpoint2
myagent.channels.file_channel2.dataDirs = /data0/flume/data2
# define file channel3
myagent.channels.file_channel3.type = file
myagent.channels.file_channel3.checkpointDir = /data0/flume/checkpoint3
myagent.channels.file_channel3.dataDirs = /data0/flume/data3
# define kafka sink
myagent.sinks.kafka_sink.type = org.apache.flume.sink.kafka.KafkaSink
myagent.sinks.kafka_sink.topic = mytopic
myagent.sinks.kafka_sink.brokerList = kafkahost:9092
myagent.sinks.kafka_sink.requiredAcks = 1
myagent.sinks.kafka_sink.batchSize = 1000
# Bind the source and sink to the channel
myagent.sources.scribe_source.channels = file_channel file_channel2 file_channel3
myagent.sinks.kafka_sink.channel = file_channel
配置中需要显示指定使用我们自己扩展的“Channel Selector”:myagent.sources.scribe_source.selector.type = com.weibo.dip.flume.extension.channel.selector.HashChannelSelector;然后指定三个FileChannel,并分别关联至ScribeSource和NullSink。
经过我们的测试大概需要10-12个FileChannel(注意:这里的数值考虑了后续的KafkaSink,详情见后),吞吐率即可达到80~90M/s。
FileChannel的吞吐率虽然得到提升,但是这么多的FileChannel使用上述逐个配置FileChannel的方式是极其不方便维护的,应该只使用一个“FileChannel”,如下图:

我们应该利用Flume提供的“Custom Channel”机制,自己扩展一个“FileChannel”,取名为MultithreadingFileChannel,使其内部包含多个FileChannel,从而达到简化配置的目的,核心源码如下:

MultithreadingFileChannel不再需要“Channel Selector”的参与,自身内部封装了FileChannel之间的“哈希”处理逻辑,具体体现在创建事务(createTransaction)的过程中。
使用MultithreadingFileChannel的Flume配置如下:
myagent.sources = scribe_source
myagent.channels = file_channel
myagent.sinks = null_sink
# define scribe source
myagent.sources.scribe_source.type = org.apache.flume.source.scribe.ScribeSource
myagent.sources.scribe_source.port = 1466
myagent.sources.scribe_source.workerThreads = 5
# define file channel
myagent.channels.file_channel.type = com.weibo.dip.flume.extension.channel.MultithreadingFileChannel
amyagent.channels.file_channel.channels = 12
myagent.channels.file_channel.checkpointDir = /data0/flume/checkpoint
myagent.channels.file_channel.dataDir = /data0/flume/data
# define null sink
myagent.sinks.null_sink.type = null
# Bind the source and sink to the channel
myagent.sources.scribe_source.channels = file_channel
myagent.sinks.null_sink.channel = file_channel
3.2.3 KafkaSink
经过3.1、3.2的调试过程之后,我们可以认为Flume ScribeSource、MultithreadingFileChannel不存在性能瓶颈,接下来开始调试KafkaSink。
我们将3.2.2中的NullSink替换为KafkaSink,如下图:

Flume配置文件如下:
myagent.sources = scribe_source
myagent.channels = file_channel
myagent.sinks = kafka_sink
# define scribe source
myagent.sources.scribe_source.type = org.apache.flume.source.scribe.ScribeSource
myagent.sources.scribe_source.port = 1466
myagent.sources.scribe_source.workerThreads = 5
# define file channel
myagent.channels.file_channel.type = com.weibo.dip.flume.extension.channel.MultithreadingFileChannel
amyagent.channels.file_channel.channels = 12
myagent.channels.file_channel.checkpointDir = /data0/flume/checkpoint
myagent.channels.file_channel.dataDir = /data0/flume/data
# define kafka sink
myagent.sinks.kafka_sink.type = org.apache.flume.sink.kafka.KafkaSink
myagent.sinks.kafka_sink.topic = mytopic
myagent.sinks.kafka_sink.brokerList = kafkahost:9092
myagent.sinks.kafka_sink.requiredAcks = 1
myagent.sinks.kafka_sink.batchSize = 1000
# Bind the source and sink to the channel
myagent.sources.scribe_source.channels = file_channel
myagent.sinks.null_sink.channel = file_channel
启动调试过程后我们发现,Flume实例部署机器的网络写入流量大约为90M/s左右,而Kakfa实例(单机版)的网络写入流量(即Flume实例部署机器的网络写出流量)仅为60M左右。熟悉Kafka的同学可能知道,这并不是因为Kafka单机版实例导致的,究其原因,主要有以下几点:
(1)KafkaSink是一个单实例,它从MultithreadingFileChannel中读取数据时也需要事务的参与(实际上它是与MultithreadingFileChannel中的某一个FileChannel建立事务);虽然ScribeSource与MultithreadingFileChannel FileChannels之间、MultithreadingFileChannel FileChannels与KafkaSink之间使用了“Channels Hash”机制,但不能完全排除“碰撞”发生的可能性;一旦“碰撞”发生,则表示“碰撞”发生期间,KafkaSink从MultithreadingFileChannel中读取不到任何数据;这也是为什么MultithreadingFileChannel中的FileChannels数目需要明显大于ScribeSource Receiver数目的原因;
(2)KafkaSink Producer也是一个单实例,也就是说只有一个Producer在写出数据,对吞吐率也会带来一定的影响;
参考3.2.2的方案,我们尝试使用多个KafkaSink实例来解决这个问题,如下图:

Flume配置文件如下:
myagent.sources = scribe_source
myagent.channels = file_channel
myagent.sinks = kafka_sink kafka_sink2 kafka_sink3
# define scribe source
myagent.sources.scribe_source.type = org.apache.flume.source.scribe.ScribeSource
myagent.sources.scribe_source.port = 1466
myagent.sources.scribe_source.workerThreads = 5
# define file channel
myagent.channels.file_channel.type = com.weibo.dip.flume.extension.channel.MultithreadingFileChannel
amyagent.channels.file_channel.channels = 12
myagent.channels.file_channel.checkpointDir = /data0/flume/checkpoint
myagent.channels.file_channel.dataDir = /data0/flume/data
# define kafka sink
myagent.sinks.kafka_sink.type = org.apache.flume.sink.kafka.KafkaSink
myagent.sinks.kafka_sink.topic = mytopic
myagent.sinks.kafka_sink.brokerList = kafkahost:9092
myagent.sinks.kafka_sink.requiredAcks = 1
myagent.sinks.kafka_sink.batchSize = 1000
# define kafka sink2
myagent.sinks.kafka_sink2.type = org.apache.flume.sink.kafka.KafkaSink
myagent.sinks.kafka_sink2.topic = mytopic
myagent.sinks.kafka_sink2.brokerList = kafkahost:9092
myagent.sinks.kafka_sink2.requiredAcks = 1
myagent.sinks.kafka_sink2.batchSize = 1000
# define kafka sink3
myagent.sinks.kafka_sink3.type = org.apache.flume.sink.kafka.KafkaSink
myagent.sinks.kafka_sink3.topic = mytopic
myagent.sinks.kafka_sink3.brokerList = kafkahost:9092
myagent.sinks.kafka_sink3.requiredAcks = 1
myagent.sinks.kafka_sink3.batchSize = 1000
# Bind the source and sink to the channel
myagent.sources.scribe_source.channels = file_channel
myagent.sinks.kafka_sink.channel = file_channel
myagent.sinks.kafka_sink2.channel = file_channel
myagent.sinks.kafka_sink3.channel = file_channel
经过我们的测试大概需要8-10个KafkaSink,吞吐率即可达到80~90M/s,这么多的KafkaSink使用上述逐个配置KafkaSink的方式是极其不方便维护的,应该只使用一个“KafkaSink”,如下图:
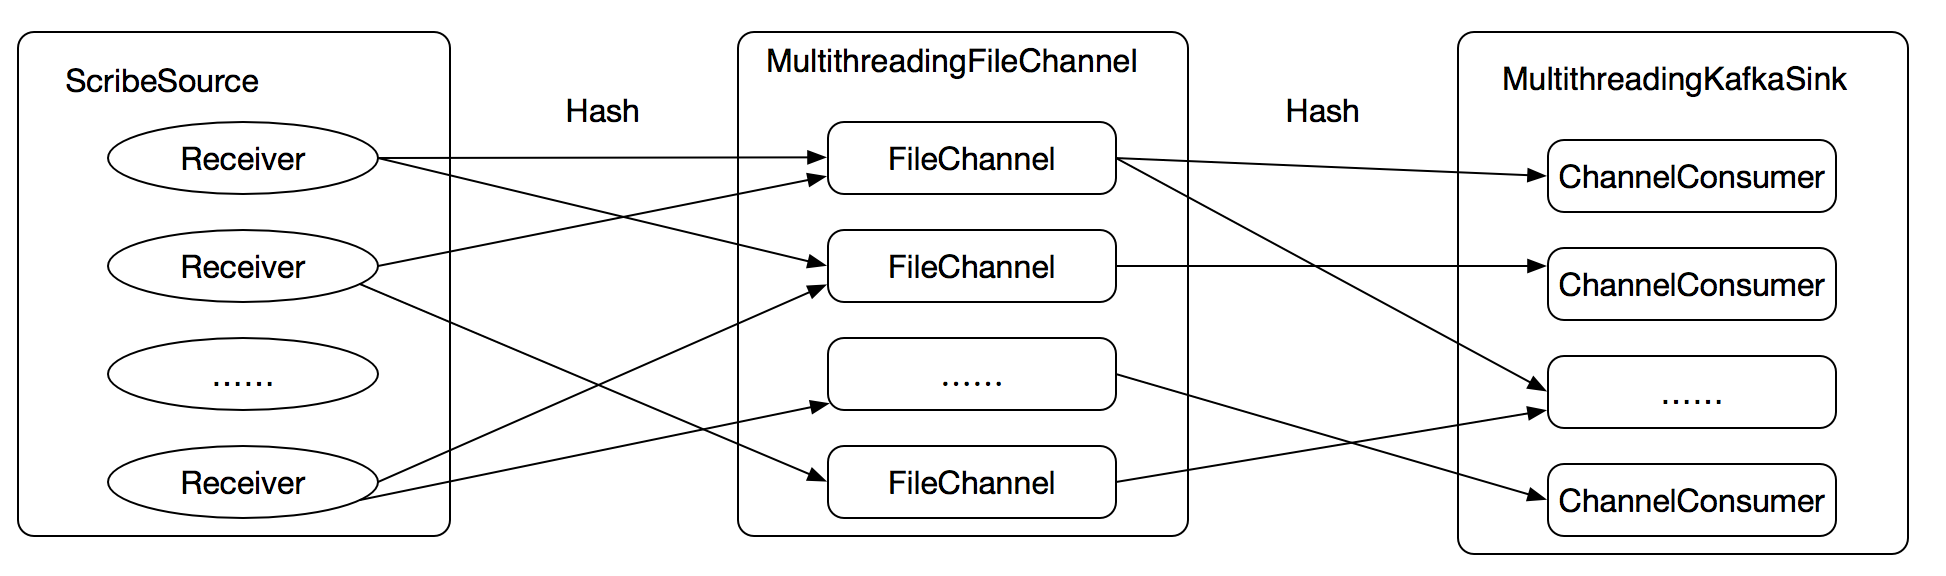
MultithreadingKafkaSink与MultithreadingFileChannel不同,内部并不会包含多个KafkaSink,而是包含多个ChannelConsumer;每一个ChannelConsumer都从MultithreadingFileChannel读取数据并通过自身内部的Kafka Producer实例(也就是说,每一个ChannelConsumer实例都包含一个Kafka Producer实例)将数据写入Kakfa。
Flume配置文件如下:
myagent.sources = scribe_source
myagent.channels = file_channel
myagent.sinks = kafka_sink
# define scribe source
myagent.sources.scribe_source.type = org.apache.flume.source.scribe.ScribeSource
myagent.sources.scribe_source.port = 1466
myagent.sources.scribe_source.workerThreads = 5
# define file channel
myagent.channels.file_channel.type = com.weibo.dip.flume.extension.channel.MultithreadingFileChannel
amyagent.channels.file_channel.channels = 12
myagent.channels.file_channel.checkpointDir = /data0/flume/checkpoint
myagent.channels.file_channel.dataDir = /data0/flume/data
# define kafka sink
myagent.sinks.kafka_sink.type = com.weibo.dip.flume.extension.sink.MultithreadingKafkaSink
myagent.sinks.kafka_sink.topicHeaderName = category
myagent.sinks.kafka_sink.consumers = 10
myagent.sinks.kafka_sink.brokerList = kafkahost:9092
myagent.sinks.kafka_sink.batchSize = 1000
# Bind the source and sink to the channel
myagent.sources.scribe_source.channels = file_channel
myagent.sinks.null_sink.channel = file_channel
综上所述,通过我们的优化扩展和相应的参数调优,我们将ScribeClient、Flume(使用FileChannel)、Kafka之间的数据传输速率提升至80~90M/s。
4. Flume Todo
虽然ScribeClient、Flume、Kafka之间的数据传输速率经过我们的扩展优化之后达到我们的预设值,但扩展过程中引入的ScribeSource.Receivers、MultithreadingFileChannel、MultithreadingKafkaSink是否也会对Flume实例或Flume实例部署服务器带来一些问题,这里仅仅阐述一些可能出现的问题。
(1)ScribeSource.Receivers多个线程实例、MultithreadingKafkaSink.ChannelConsumers多个线程实例是否会导致Flume实例或Flume实例部署服务器CPU使用率或负载过高?
(2)MultithreadingFileChannel多个FileChannel的使用,是否会导致Flume实例部署服务器带来过多的磁盘开销?
5. 生产环境部署

(1)假设Flume集群的域名为flume.dip.weibo.com,端口为1466,ScribeClient通过该域名和端口发送数据;
(2)flume.dip.weibo.com指向若干个动态域名,这些动态域名依据不同的机房进行划分,如flume.cluster.dip.weibo.com、flume.cluster2.dip.weibo.com、flume.cluster3.dip.weibo.com;动态域名在这里的作用:不同的机房的ScribeClient在向flume.dip.weibo.com写入数据时,网络层面会自动根据ScribeClient所在的机房将数据导入至该机房对应的Flume动态域名,即:机房内数据传输;
(3)每一个动态域名被映射至一个VIP;
(4)每一个VIP被映射至多个Flume实例;(3)和(4)的作用体现在Flume故障转换和负载均衡。
备注:调试过程中我们发现,数据吞吐率达到80~90M/s时,JVM大致需要15G MEM。