今天暂停看书本上的内容,看一个例程detect_indent_fft
先小结一下最近遇到的一些困难:
- 书本理论性太强,有应用但是一点代码示例都没有,读不下去,很多算法无从下手;
- 更希望能够找到在halcon中提供的算子去替代书上的那些算法,但是不容易找到;
- 网络上关于halcon的资料太少,很多算子的详细用法看帮助文档最合适,网上几乎找不到更多的说明。
在慕课上找了武汉理工大学数字图像处理课程听一下,看了一下绪论ppt中的图很多用的还是我正在看的教材上的图,准备大概快速地听几节课感受一下。
* 示范了怎样通过快速傅里叶变换在塑料制品表面发现小的纹理缺陷
* This program demonstrates how to detect small texture
* defects on the surface of plastic items by using the fast
* fourier transform (FFT).
* 构造一个合适的高斯滤波器,在空间域上做卷积
* 之后用形态学算子发现缺陷
* First, we construct a suitable filter using Gaussian
* filters. Then, the images and the filter are convolved
* by using fast fourier transforms. Finally, the defects
* are detected in the filtered images by using
* morphology operators.
*
* Initializations
dev_update_off ()
dev_close_window ()
read_image (Image, 'plastics/plastics_01')
get_image_size (Image, Width, Height)
dev_open_window (0, 0, Width, Height, 'black', WindowHandle)
set_display_font (WindowHandle, 14, 'mono', 'true', 'false')
dev_set_draw ('margin')
dev_set_line_width (3)
dev_set_color ('red')
*
* Optimize the fft speed for the specific image size
optimize_rft_speed (Width, Height, 'standard')
*
* 通过结合两个高斯滤波器得到一个合适的高斯滤波器
* Construct a suitable filter by combining two gaussian
* filters
Sigma1 := 10.0
Sigma2 := 3.0
gen_gauss_filter (GaussFilter1, Sigma1, Sigma1, 0.0, 'none', 'rft', Width, Height)
gen_gauss_filter (GaussFilter2, Sigma2, Sigma2, 0.0, 'none', 'rft', Width, Height)
sub_image (GaussFilter1, GaussFilter2, Filter, 1, 0)
*
* Process the images iteratively
NumImages := 11
for Index := 1 to NumImages by 1
    *
    * Read an image and convert it to gray values
    * 转换成单通道灰度图像
    read_image (Image, 'plastics/plastics_' + Index$'02')
    rgb1_to_gray (Image, Image)
    * Perform the convolution in the frequency domain
    rft_generic (Image, ImageFFT, 'to_freq', 'none', 'complex', Width)
    convol_fft (ImageFFT, Filter, ImageConvol)
    rft_generic (ImageConvol, ImageFiltered, 'from_freq', 'n', 'real', Width)
    *
    * Process the filtered image
    * 计算10*10区域内灰度最大最小值的差
    gray_range_rect (ImageFiltered, ImageResult, 10, 10)
    min_max_gray (ImageResult, ImageResult, 0, Min, Max, Range)
    threshold (ImageResult, RegionDynThresh, max([5.55,Max * 0.8]), 255)
    connection (RegionDynThresh, ConnectedRegions)
    select_shape (ConnectedRegions, SelectedRegions, 'area', 'and', 4, 99999)
    union1 (SelectedRegions, RegionUnion)
    * 通过圆形结构元将区域闭合
    closing_circle (RegionUnion, RegionClosing, 10)
    connection (RegionClosing, ConnectedRegions1)
    select_shape (ConnectedRegions1, SelectedRegions1, 'area', 'and', 10, 99999)
    area_center (SelectedRegions1, Area, Row, Column)
    *
    * Display the results
    dev_display (Image)
    Number := |Area|
    if (Number)
        * 把缺陷用圆标记起来
        gen_circle_contour_xld (ContCircle, Row, Column, gen_tuple_const(Number,30), gen_tuple_const(Number,0), gen_tuple_const(Number,rad(360)), 'positive', 1)
        ResultMessage := ['Not OK',Number + ' defect(s) found']
        Color := ['red','black']
        dev_display (ContCircle)
    else
        ResultMessage := 'OK'
        Color := 'forest green'
    endif
    disp_message (WindowHandle, ResultMessage, 'window', 12, 12, Color, 'true')
    if (Index != NumImages)
        disp_continue_message (WindowHandle, 'black', 'true')
        stop ()
    endif
endfor
简述一下步骤:
- 灰度域上使用高斯滤波器滤波
- 计算10*10矩形范围内灰度最大最小值之差
- 过滤出灰度值偏大的区域并且面积达到一定大小的区域并连通起来,这样就已经把问题区域找出来了
- 用圆形轮廓标记出来
记一点听课的笔记
点运算
- 图像的线性点运算,通过调整a,b,可以调整图像的对比度,调整灰度范围
[s = ar + b
]
- 分段线性点运算
只调整感兴趣的灰度范围
在halcon中要怎么操作呢?用threshold筛选 - 非线性点运算,这一段在前面已经学过理论值了。
具有针对性,对我们感兴趣的区域做扩展,不感兴趣的区域做压缩。
与分段线性点运算在某些情况下有相似的作用。
注意要理解不同的变换有什么样的作用。
点运算不会改变点的坐标
线性运算和非线性运算的区别是什么?
代数运算
是图像间的灰度级上的运算
-
加法运算
多张同一场景的图像加在一起求均值,能够起到消减噪音的作用
生成图像的叠加效果 -
减法运算
同一场景在不同时间或不同波段做减法,得到差值图像,用于动态监测,运动目标检测和跟踪,图像背景消除,目标识别:差影法
几何运算
改变图像上的点的坐标,不改变灰度
- 图像平移
dev_close_window ()
read_image(Image, 'Fig0340(a)(dipxe_text)')
get_image_size(Image, Width, Height)
dev_open_window(0, 0, Width, Height, 'black', WindowHandle)
dev_display (Image)
threshold(Image, Region, 100, 255)
* 创建一个平移用的矩阵
hom_mat2d_identity (HomMat2DIdentity)
* 矩阵设置成在列上移动10,其实就是向右移动10
hom_mat2d_translate(HomMat2DIdentity, 0, 10, HomMat2DTranslate)
* 移动指定区域
affine_trans_region (Region, RegionAffineTrans, HomMat2DTranslate, 'nearest_neighbor')

* 这是将整个图片平移
affine_trans_image (Image, ImageAffineTrans, HomMat2DTranslate, 'constant', 'false')

图上绿色部分就是移动后的区域,红色部分是我想要移动的区域
- 镜像翻转
* 上下翻转
mirror_region(Region, RegionMirror, 'row', Height)
* 左右翻转
mirror_region(Region, RegionMirror1, 'column', Width)
图像整体变换使用mirror_image
- 图像旋转
area_center(Region, Area, Row, Column)
hom_mat2d_rotate (HomMat2DTranslate, 0.78, Row, Column, HomMat2DRotate)
affine_trans_region(Region, RegionAffineTrans1, HomMat2DRotate, 'constant')
- 图像缩放
zoom_region(Region, RegionZoom, 0.9, 0.9)
zoom_image_size(Image, ImageZoom, 0.5 * Width, 0.5 * Height, 'constant')
上面一些代码中,用到了'constant',‘nearest_neighbor’这样的字符串,这个参数是在图像变换时使用的插值法。
练习过程中遇到的要记录下来的tips
- threshold之后会提取到整个阈值范围内的区域,作为一整个区域,这时候如果想要对其中某些部分做操作,使用connection算子,可以将区域分成一小块一小块的,只将连通域连接成一个区域
运用今天看的例程和今天学习的内容,做了一个小练习,通过拍到的照片检测瑕疵,(代码就不上了)
带有瑕疵的原图:
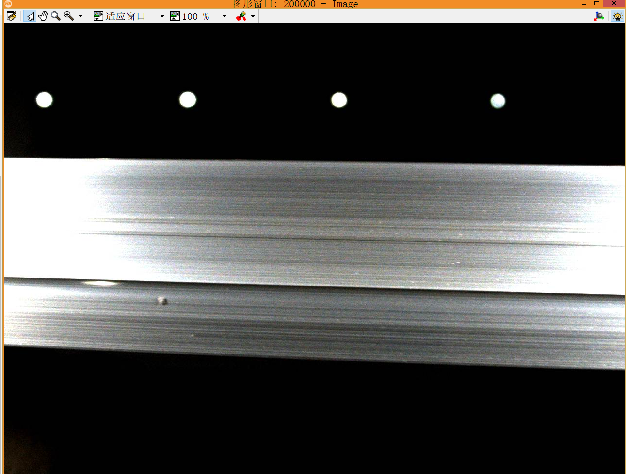
检测到的结果图:

有一些参数是按照我想要达到的目标调整的,可以说为了尽量达到目标,拼命凑了一些参数。这方面还需要改进,也是因为手头上只有两张有这样的问题的图片和几张没有这样问题的图片,都能准确判断出来,不确定遇到其他有问题的图片是否能找出来。
记录一下总体思路:
- 为了降低顶上四个灯泡一样的东西的影响,通过阈值处理和面积筛选出了他们,在稍加膨胀之后把他们的颜色变成了黑色,使这几个点融入背景中;
- 通过阈值和面积过滤出主体部分(有这步的话其实上面那步也没什么用啊。。。就当我上面那步是做着练手的吧),并且裁切出这部分,也是为了降低其他东西的影响
- 高斯滤波
- 运用了一下今天例程里看到的gray_range_rect,接下去就是各种筛选啊之类的,和例程类似啦。
出效果时感觉还是很棒的,虽然还是有点稀里糊涂。