Step by step to create a springMVC demo.
1. 创建一个dynamic web 工程。
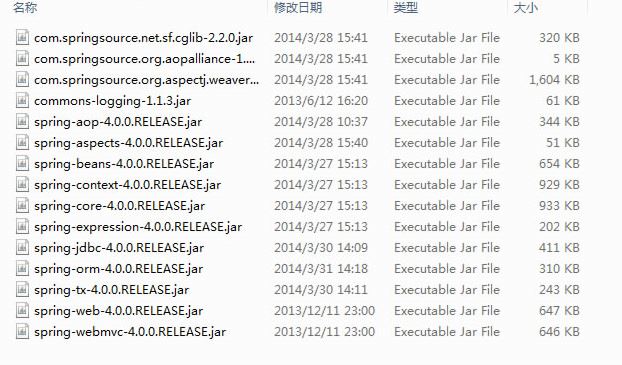
2. 添加需要的jar文件,如下图:
3. 配置web.xml:配置dispatcher servlet; 配置hiddenhttpmethod
|
1
2
3
4
5
6
7
8
9
10
11
12
13
14
15
16
17
18
19
20
21
22
23
24
25
26
27
28
29
30
31
32
33
34
35
36
37
|
<?xml version="1.0" encoding="UTF-8"?><web-app xmlns:xsi="http://www.w3.org/2001/XMLSchema-instance" xmlns="http://java.sun.com/xml/ns/javaee" xsi:schemaLocation="http://java.sun.com/xml/ns/javaee http://java.sun.com/xml/ns/javaee/web-app_3_0.xsd" id="WebApp_ID" version="3.0"> <display-name>Curd</display-name> <!-- The front controller of this Spring Web application, responsible for handling all application requests --> <servlet> <servlet-name>springDispatcherServlet</servlet-name> <servlet-class>org.springframework.web.servlet.DispatcherServlet</servlet-class> <init-param> <param-name>contextConfigLocation</param-name> <param-value>classpath:springmvc.xml</param-value> </init-param> <load-on-startup>1</load-on-startup> </servlet> <!-- Map all requests to the DispatcherServlet for handling --> <servlet-mapping> <servlet-name>springDispatcherServlet</servlet-name> <url-pattern>/</url-pattern> </servlet-mapping> <filter> <filter-name>HiddenHttpMethodFilter</filter-name> <filter-class>org.springframework.web.filter.HiddenHttpMethodFilter</filter-class> </filter> <filter-mapping> <filter-name>HiddenHttpMethodFilter</filter-name> <url-pattern>/*</url-pattern> </filter-mapping></web-app> |
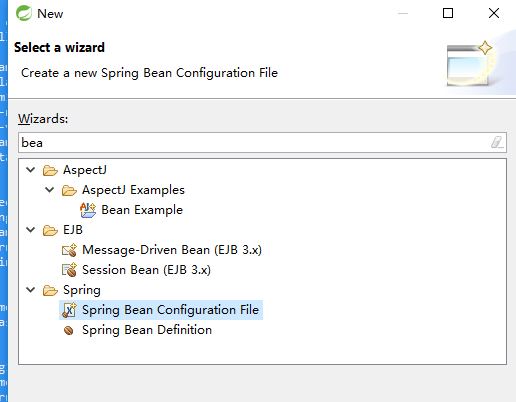
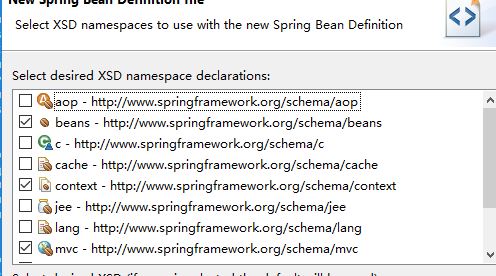
4. 创建SpringMVC.xml,创建Spring Bean Configuration file. 选中bean, context, mvc命名空间。
5. 编辑springmvc.xml文件。配置context:component-scan 和 InternalResourceViewResolver

<?xml version="1.0" encoding="UTF-8"?>
<beans xmlns="http://www.springframework.org/schema/beans"
    xmlns:xsi="http://www.w3.org/2001/XMLSchema-instance"
    xmlns:context="http://www.springframework.org/schema/context"
    xmlns:mvc="http://www.springframework.org/schema/mvc"
    xsi:schemaLocation="http://www.springframework.org/schema/mvc http://www.springframework.org/schema/mvc/spring-mvc-4.3.xsd
        http://www.springframework.org/schema/beans http://www.springframework.org/schema/beans/spring-beans.xsd
        http://www.springframework.org/schema/context http://www.springframework.org/schema/context/spring-context-4.3.xsd">


    <!-- autoScanComponent -->

    <context:component-scan base-package="com.atguigu.springmvc"></context:component-scan>

    <!-- 视图解析器 -->
    <bean class="org.springframework.web.servlet.view.InternalResourceViewResolver">
        <property name="prefix" value="/WEB-INF/views/"></property>
        <property name="suffix" value=".jsp"></property>
    </bean>

</beans>
6.其它文件结构图如下:

7. 创建index.jsp文件。内容如下:
<%@ page language="java" contentType="text/html; charset=ISO-8859-1"
    pageEncoding="ISO-8859-1"%>
<!DOCTYPE html PUBLIC "-//W3C//DTD HTML 4.01 Transitional//EN" "http://www.w3.org/TR/html4/loose.dtd">
<html>
<head>
<meta http-equiv="Content-Type" content="text/html; charset=ISO-8859-1">
<title>Insert title here</title>
</head>
<body>

<a href="listAllEmployees">list all employees</a>


</body>
</html>
8. 创建entity和service Dao。entity定义了对象结构。service dao定义了对象业务操作行为,如创建,查询和删除。
Department类:
package com.atguigu.springmvc.entities;

public class Department {


    private Integer id;
    private String departmentName;


    public Department(Integer id, String departmentName) {
        super();
        this.id = id;
        this.departmentName = departmentName;
    }

    public Integer getId() {
        return id;
    }
    public void setId(Integer id) {
        this.id = id;
    }
    public String getDepartmentName() {
        return departmentName;
    }
    public void setDepartmentName(String departmentName) {
        this.departmentName = departmentName;
    }


}
Employee类:
package com.atguigu.springmvc.entities;

import java.util.Date;

public class Employee {


    private Integer id;
    private String lastname;
    private String email;
    private Integer gender;
    private Department department;
    private Date birth;
    private Float salary;


    public Employee(Integer id, String lastname, String email, Integer gender, Department department, Date birth,
            Float salary) {
        super();
        this.id = id;
        this.lastname = lastname;
        this.email = email;
        this.gender = gender;
        this.department = department;
        this.birth = birth;
        this.salary = salary;
    }


    public Integer getId() {
        return id;
    }
    public void setId(Integer id) {
        this.id = id;
    }
    public String getLastname() {
        return lastname;
    }
    public void setLastname(String lastname) {
        this.lastname = lastname;
    }
    public String getEmail() {
        return email;
    }
    public void setEmail(String email) {
        this.email = email;
    }
    public Integer getGender() {
        return gender;
    }
    public void setGender(Integer gender) {
        this.gender = gender;
    }
    public Department getDepartment() {
        return department;
    }
    public void setDepartment(Department department) {
        this.department = department;
    }
    public Date getBirth() {
        return birth;
    }
    public void setBirth(Date birth) {
        this.birth = birth;
    }
    public Float getSalary() {
        return salary;
    }
    public void setSalary(Float salary) {
        this.salary = salary;
    }


}
9. Dao类 demo代码如下:
DepartmentDao:
package com.atguigu.springmvc.dao;

import java.util.Collection;
import java.util.HashMap;
import java.util.Map;

import org.springframework.stereotype.Repository;

import com.atguigu.springmvc.entities.Department;

@Repository
public class DepartmentDao {

    private static Map<Integer, Department> departments = null;

    static{
        departments = new HashMap<>();
        departments.put(101, new Department(101,"D-AA"));
        departments.put(102, new Department(101,"D-AA"));
        departments.put(103, new Department(101,"D-AA"));
        departments.put(104, new Department(101,"D-AA"));
        departments.put(105, new Department(101,"D-AA"));
    }

    public Collection<Department> getDepartment(Integer id) {
        System.out.println(departments.values().getClass());
        System.out.println(departments.values());
        return departments.values();
    }

}
EmployeeDao:
package com.atguigu.springmvc.dao;

import java.util.Collection;
import java.util.Date;
import java.util.HashMap;
import java.util.Map;

import org.springframework.beans.factory.annotation.Autowired;
import org.springframework.stereotype.Repository;

import com.atguigu.springmvc.entities.Department;
import com.atguigu.springmvc.entities.Employee;

@Repository
public class EmployeeDao {

    private static Map<Integer, Employee> employess = null;

    @Autowired
    private DepartmentDao departmentDao;

    static{
        employess = new HashMap<>();

        employess.put(1001, new Employee(1001,"E-AA", "aa@163.com", 1, new Department(101, "D-AA"), new Date(), (float) 123));
        employess.put(1002, new Employee(1002,"E-AA", "aa@163.com", 1, new Department(102, "D-AA"), new Date(), (float) 124));
        employess.put(1003, new Employee(1003,"E-AA", "aa@163.com", 1, new Department(103, "D-AA"), new Date(), (float) 125));
        employess.put(1004, new Employee(1004,"E-AA", "aa@163.com", 1, new Department(104, "D-AA"), new Date(), (float) 126));
        employess.put(1005, new Employee(1005,"E-AA", "aa@163.com", 1, new Department(105, "D-AA"), new Date(), (float) 127));
    }


    public Collection<Employee> getAll() {
        return employess.values();
    }

}
10. 通过Controller控制listAllEmployees action的视图返回,在该controller方法中,把所有的employess对象通过一个集合的方式传到视图中,视图可以通过获取该session attribute,从而获取相关数据。
package com.atguigu.springmvc.handlers;

import java.util.Map;

import org.springframework.beans.factory.annotation.Autowired;
import org.springframework.stereotype.Controller;
import org.springframework.web.bind.annotation.RequestMapping;

import com.atguigu.springmvc.dao.EmployeeDao;

@Controller
public class ListEmployees {

    @Autowired
    private EmployeeDao employeeDao;

    @RequestMapping("listAllEmployees")
    public String listAllEmployees(Map<String,Object> map) {
        map.put("employees",employeeDao.getAll());
        return "list";
    }

}
11. 上面代码使返回视图为list.jsp。
<%@ page language="java" contentType="text/html; charset=ISO-8859-1"
    pageEncoding="ISO-8859-1"%>
<%@ taglib prefix="c" uri="http://java.sun.com/jsp/jstl/core" %>

<!DOCTYPE html PUBLIC "-//W3C//DTD HTML 4.01 Transitional//EN" "http://www.w3.org/TR/html4/loose.dtd">
<html>
<head>
<meta http-equiv="Content-Type" content="text/html; charset=ISO-8859-1">
<title>Insert title here</title>
</head>
<body>
    <h1>hello world</h1>

    <c:if test="${empty requestScope.employees }">
        <h1>no employee</h1>
    </c:if>

    <c:if test="${!empty requestScope.employees }">
        <table border="1" cellpadding="10" cellspacing="0">
            <tr>
                <th>ID</th>
                <th>LastName</th>
                <th>Email</th>
                <th>Gender</th>
                <th>Department</th>
                <th>Edit</th>
                <th>Delete</th>
            </tr>
            <c:forEach items="${requestScope.employees }" var="emp">
                <tr>
                    <td>${emp.id }</td>
                    <td>${emp.lastname }</td>
                    <td>${emp.email }</td>
                    <td>${emp.gender == 0 ? "Female" : "Male" }</td>
                    <td>${emp.department.departmentName }</td>
                    <td><a href="">Edit</a></td>
                    <td><a href="">Delete</a></td>
                </tr>
            </c:forEach>
        </table>
    </c:if>

</body>
</html>
12. 完成以上代码后,可以执行测试。