1、知识点
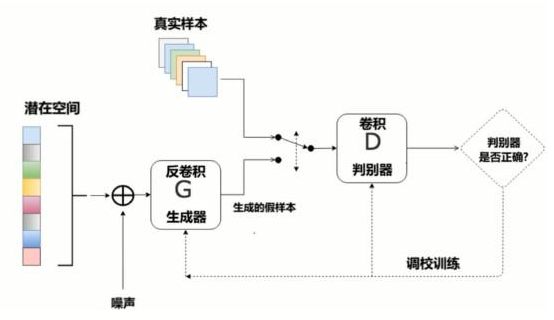
"""
DCGAN:相比GAN而言,使用了卷积网络替代全连接
卷积:256*256*3 --- > 28*28*14  -->结果 ,即H,W变小,特征图变多
反卷积(就是把卷积的前向和反向传播完全颠倒了) :4*4*1024 ---> 28 * 28 *1  -->结果 即H,W变大,特征图变少

特点:
    1、判别模型:使用带步长的卷积(strided convolutions)取代了的空间池化(spatial pooling),容许网络学习自己的空间下采样(spatial downsampling)。
    2、生成模型:使用微步幅卷积(fractional strided),容许它学习自己的空间上采样(spatial upsampling)。
    3、激活函数: LeakyReLU
    4、Batch Normalization 批标准化:解决因糟糕的初始化引起的训练问题,使得梯度能传播更深层次。 Batch Normalization证明了生成模型初始化的重要性,避免生成模型崩溃:生成的所有样本都在一个点上(样本相同),这是训练GANs经常遇到的失败现象。

简而言之,DCGAN是利用数据生成图片的过程
"""
2、代码


# coding: utf-8
import numpy as np
import tensorflow as tf
import pickle
import matplotlib.pyplot as plt
get_ipython().run_line_magic('matplotlib', 'inline')

from tensorflow.examples.tutorials.mnist import input_data

mnist = input_data.read_data_sets('/MNIST_data/')


# ## 获得数据

# In[4]:


def get_inputs(noise_dim, image_height, image_width, image_depth):

    inputs_real = tf.placeholder(tf.float32, [None, image_height, image_width, image_depth], name='inputs_real')
    inputs_noise = tf.placeholder(tf.float32, [None, noise_dim], name='inputs_noise')

    return inputs_real, inputs_noise


# # 生成器

# In[5]:


def get_generator(noise_img, output_dim, is_train=True, alpha=0.01):


    with tf.variable_scope("generator", reuse=(not is_train)):
        # 100 x 1 to 4 x 4 x 512
        # 全连接层
        layer1 = tf.layers.dense(noise_img, 4*4*512)
        layer1 = tf.reshape(layer1, [-1, 4, 4, 512])
        # batch normalization
        layer1 = tf.layers.batch_normalization(layer1, training=is_train)
        # Leaky ReLU
        layer1 = tf.maximum(alpha * layer1, layer1)
        # dropout
        layer1 = tf.nn.dropout(layer1, keep_prob=0.8)

        # 4 x 4 x 512 to 7 x 7 x 256
        layer2 = tf.layers.conv2d_transpose(layer1, 256, 4, strides=1, padding='valid')
        layer2 = tf.layers.batch_normalization(layer2, training=is_train)
        layer2 = tf.maximum(alpha * layer2, layer2)
        layer2 = tf.nn.dropout(layer2, keep_prob=0.8)

        # 7 x 7 256 to 14 x 14 x 128
        layer3 = tf.layers.conv2d_transpose(layer2, 128, 3, strides=2, padding='same')
        layer3 = tf.layers.batch_normalization(layer3, training=is_train)
        layer3 = tf.maximum(alpha * layer3, layer3)
        layer3 = tf.nn.dropout(layer3, keep_prob=0.8)

        # 14 x 14 x 128 to 28 x 28 x 1
        logits = tf.layers.conv2d_transpose(layer3, output_dim, 3, strides=2, padding='same')
        # MNIST原始数据集的像素范围在0-1,这里的生成图片范围为(-1,1)
        # 因此在训练时,记住要把MNIST像素范围进行resize
        outputs = tf.tanh(logits)

        return outputs


# ## 判别器

# In[6]:


def get_discriminator(inputs_img, reuse=False, alpha=0.01):


    with tf.variable_scope("discriminator", reuse=reuse):
        # 28 x 28 x 1 to 14 x 14 x 128
        # 第一层不加入BN
        layer1 = tf.layers.conv2d(inputs_img, 128, 3, strides=2, padding='same')
        layer1 = tf.maximum(alpha * layer1, layer1)
        layer1 = tf.nn.dropout(layer1, keep_prob=0.8)

        # 14 x 14 x 128 to 7 x 7 x 256
        layer2 = tf.layers.conv2d(layer1, 256, 3, strides=2, padding='same')
        layer2 = tf.layers.batch_normalization(layer2, training=True)
        layer2 = tf.maximum(alpha * layer2, layer2)
        layer2 = tf.nn.dropout(layer2, keep_prob=0.8)

        # 7 x 7 x 256 to 4 x 4 x 512
        layer3 = tf.layers.conv2d(layer2, 512, 3, strides=2, padding='same')
        layer3 = tf.layers.batch_normalization(layer3, training=True)
        layer3 = tf.maximum(alpha * layer3, layer3)
        layer3 = tf.nn.dropout(layer3, keep_prob=0.8)

        # 4 x 4 x 512 to 4*4*512 x 1
        flatten = tf.reshape(layer3, (-1, 4*4*512))
        logits = tf.layers.dense(flatten, 1)
        outputs = tf.sigmoid(logits)

        return logits, outputs


# ## 目标函数

# In[7]:


def get_loss(inputs_real, inputs_noise, image_depth, smooth=0.1):

    g_outputs = get_generator(inputs_noise, image_depth, is_train=True)
    d_logits_real, d_outputs_real = get_discriminator(inputs_real)
    d_logits_fake, d_outputs_fake = get_discriminator(g_outputs, reuse=True)

    # 计算Loss
    g_loss = tf.reduce_mean(tf.nn.sigmoid_cross_entropy_with_logits(logits=d_logits_fake,
                                                                    labels=tf.ones_like(d_outputs_fake)*(1-smooth)))

    d_loss_real = tf.reduce_mean(tf.nn.sigmoid_cross_entropy_with_logits(logits=d_logits_real,
                                                                         labels=tf.ones_like(d_outputs_real)*(1-smooth)))
    d_loss_fake = tf.reduce_mean(tf.nn.sigmoid_cross_entropy_with_logits(logits=d_logits_fake,
                                                                         labels=tf.zeros_like(d_outputs_fake)))
    d_loss = tf.add(d_loss_real, d_loss_fake)

    return g_loss, d_loss


# ## 优化器

# In[8]:


def get_optimizer(g_loss, d_loss, beta1=0.4, learning_rate=0.001):

    train_vars = tf.trainable_variables()

    g_vars = [var for var in train_vars if var.name.startswith("generator")]
    d_vars = [var for var in train_vars if var.name.startswith("discriminator")]

    # Optimizer
    with tf.control_dependencies(tf.get_collection(tf.GraphKeys.UPDATE_OPS)):
        g_opt = tf.train.AdamOptimizer(learning_rate).minimize(g_loss, var_list=g_vars)
        d_opt = tf.train.AdamOptimizer(learning_rate).minimize(d_loss, var_list=d_vars)

    return g_opt, d_opt


# In[9]:


def plot_images(samples):
    fig, axes = plt.subplots(nrows=1, ncols=25, sharex=True, sharey=True, figsize=(50,2))
    for img, ax in zip(samples, axes):
        ax.imshow(img.reshape((28, 28)), cmap='Greys_r')
        ax.get_xaxis().set_visible(False)
        ax.get_yaxis().set_visible(False)
    fig.tight_layout(pad=0)


# In[10]:


def show_generator_output(sess, n_images, inputs_noise, output_dim):

    cmap = 'Greys_r'
    noise_shape = inputs_noise.get_shape().as_list()[-1]
    # 生成噪声图片
    examples_noise = np.random.uniform(-1, 1, size=[n_images, noise_shape])

    samples = sess.run(get_generator(inputs_noise, output_dim, False),
                       feed_dict={inputs_noise: examples_noise})


    result = np.squeeze(samples, -1)
    return result


# ## 训练网络

# In[11]:


# 定义参数
batch_size = 64
noise_size = 100
epochs = 5
n_samples = 25
learning_rate = 0.001


# In[12]:


def train(noise_size, data_shape, batch_size, n_samples):


    # 存储loss
    losses = []
    steps = 0

    inputs_real, inputs_noise = get_inputs(noise_size, data_shape[1], data_shape[2], data_shape[3])
    g_loss, d_loss = get_loss(inputs_real, inputs_noise, data_shape[-1])
    g_train_opt, d_train_opt = get_optimizer(g_loss, d_loss, beta1, learning_rate)

    with tf.Session() as sess:
        sess.run(tf.global_variables_initializer())
        # 迭代epoch
        for e in range(epochs):
            for batch_i in range(mnist.train.num_examples//batch_size):
                steps += 1
                batch = mnist.train.next_batch(batch_size)

                batch_images = batch[0].reshape((batch_size, data_shape[1], data_shape[2], data_shape[3]))
                # scale to -1, 1
                batch_images = batch_images * 2 - 1

                # noise
                batch_noise = np.random.uniform(-1, 1, size=(batch_size, noise_size))

                # run optimizer
                _ = sess.run(g_train_opt, feed_dict={inputs_real: batch_images,
                                                     inputs_noise: batch_noise})
                _ = sess.run(d_train_opt, feed_dict={inputs_real: batch_images,
                                                     inputs_noise: batch_noise})

                if steps % 101 == 0:
                    train_loss_d = d_loss.eval({inputs_real: batch_images,
                                                inputs_noise: batch_noise})
                    train_loss_g = g_loss.eval({inputs_real: batch_images,
                                                inputs_noise: batch_noise})
                    losses.append((train_loss_d, train_loss_g))
                    # 显示图片
                    samples = show_generator_output(sess, n_samples, inputs_noise, data_shape[-1])
                    plot_images(samples)
                    print("Epoch {}/{}....".format(e+1, epochs),
                          "Discriminator Loss: {:.4f}....".format(train_loss_d),
                          "Generator Loss: {:.4f}....". format(train_loss_g))


# In[13]:


with tf.Graph().as_default():
    train(noise_size, [-1, 28, 28, 1], batch_size, n_samples)
3、结构图