jenkins安装和配置


1.安装jenkins
  1.yum install java
   wget -O /etc/yum.repos.d/jenkins.repo https://pkg.jenkins.io/redhat/jenkins.repo
   rpm --import https://pkg.jenkins.io/redhat/jenkins.io.key

  2.yum install jenkins

2.启动jenkins
  [root@localhost sysconfig]# systemctl start jenkins
[root@localhost sysconfig]# java -version
openjdk version "1.8.0_181"
OpenJDK Runtime Environment (build 1.8.0_181-b13)
OpenJDK 64-Bit Server VM (build 25.181-b13, mixed mode)
[root@localhost sysconfig]# ss -tnl
State       Recv-Q Send-Q               Local Address:Port                              Peer Address:Port

LISTEN      0      50                              :::8080

jenkins默认监听8080端口

登录jenkins
  http://192.168.11.129:8080
  cat /var/lib/jenkins/secrets/initialAdminPassword
  admin
  632569a8b45b46d2b7799291e79bd958
SVN服务器搭建
svn来自于软件包subversion 安装完成这个包之后自动包含svn服务器端和客户端命令
搭建svn服务器
  1.yum install subversion
  2.创建svn版本库目录
    mkdir -p /var/svn/svnrepos
  3.创建版本库
    svnadmin create /var/svn/svnrepos
    会自动创建出一系列固定的目录
    [root@localhost subversion]# cd /var/svn/svnrepos/
    [root@localhost svnrepos]# ls
      conf  db  format  hooks  locks  README.txt
  4.修改配置文件
    进入conf目录(该svn版本库配置文件)/var/svn/svnrepos/conf
    authz文件是权限控制文件
    passwd是帐号密码文件
    svnserve.conf SVN服务配置文件
   5.设置帐号密码
     vi passwd
     在[users]块中添加用户和密码,格式:帐号=密码,如dan=dan
   6.设置权限
      vi authz
      在末尾添加如下代码:
      [/]
       dan=rw
       w=r
      意思是版本库的根目录dan对其有读写权限,w只有读权限
   7.修改svnserve.conf文件
     anon-access = read #匿名用户可读
     auth-access = write #授权用户可写
     password-db = passwd #使用哪个文件作为账号文件
     authz-db = authz #使用哪个文件作为权限文件
     realm = /var/svn/svnrepos # 认证空间名,版本库所在目录
   8.启动svn版本库
    svnserve -d -r /var/svn/svnrepos
    监听的端口是 3690
6.把s2目录下所有的源代码文件导入到svn管理库
    svn import /root/s2 svn://192.168.11.130/ -m "import tree"
  7.查看远程svn服务器代码
    [root@localhost s2]# svn list --verbose svn://192.168.11.130
      4 yxh                   9月 05 14:39 ./
      4 yxh                 7 9月 05 14:39 222.txt
      3 yxh                26 9月 05 14:36 index.html
      2 yxh                10 9月 05 14:32 test2.txt
  8.从svn中拉取最新代码
     mkdir /data/test
     svn checkout svn://192.168.255.12/ /data/test --username oldboy --password oldboysecret
    [root@localhost s2]# svn co svn://192.168.11.130/
     A    index.html
     A    test2.txt
     C     222.txt
     取出版本 4。
    [root@localhost s2]# ls
      222.txt  index.html  test2.txt
  9.把本地文件提交到svn服务器中
    [root@localhost svntest]# svn add index.html
    [root@localhost svntest]# svn ci index.html -m "111"
     正在增加       index.html
     传输文件数据.
     提交后的版本为3
jenkins执行shell脚本
需要注意两点:
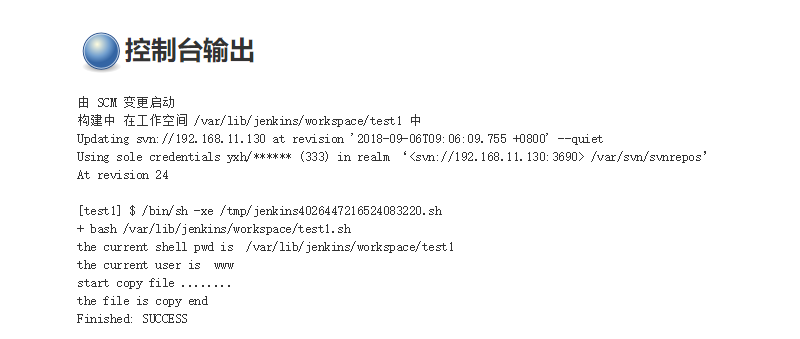
1.执行脚本当前所在的路径是jenkins当前任务的工作目录 比如构建test1任务的时候/var/lib/jenkins/workspace/test1
2.执行脚本的当前用户是启动jenkins用户 默认为jenkins这个普通用户 所以可能会遇到权限不足的情况
jenkins服务器和web服务器主机都需要创建
  [root@localhost html]# groupadd -g 1001 www
  [root@localhost html]# useradd -u 1001 -g www www
  [root@localhost html]# echo "123456" | passwd --stdin www

实现www用户无密码ssh登录
  [root@localhost ~]# su www
  [www@localhost root]$ ssh-keygen
  [www@localhost root]$ ssh-copy-id www@192.168.11.131
[root@localhost ~]# vim /etc/sysconfig/jenkins
                              JENKINS_USER="www"
[root@localhost ~]# chown -R www:www /var/lib/jenkins
[root@localhost ~]# chown -R www:www /var/cache/jenkins
[root@localhost ~]# chown -R www:www /var/log/jenkins
[root@localhost ~]# systemctl stop jenkins
[root@localhost ~]# systemctl start jenkins
[root@localhost ~]# ps -ef |grep jenkins
www        3904      1 99 09:03 ?        00:00:21 /etc/alternatives/java -Dcom.sun.akuma.Daemon=daemonized -Djava.awt.headless=true -DJENKINS_HOME=/var/lib/jenkins -jar /usr/lib/jenkins/jenkins.war --logfile=/var/log/jenkins/jenkins.log --webroot=/var/cache/jenkins/war --daemon --httpPort=8080 --debug=5 --handlerCountMax=100 --handlerCountMaxIdle=20
root       3953   3762  0 09:03 pts/2    00:00:00 grep --color=auto jenkins
#!/bin/bash -ilex
echo "the current shell pwd is  $PWD"
echo "the current user is  $USER"
echo "start copy file ........"
scp index.html www@192.168.11.131:/usr/share/nginx/html
echo "the file is copy end"
jenkins页面设置
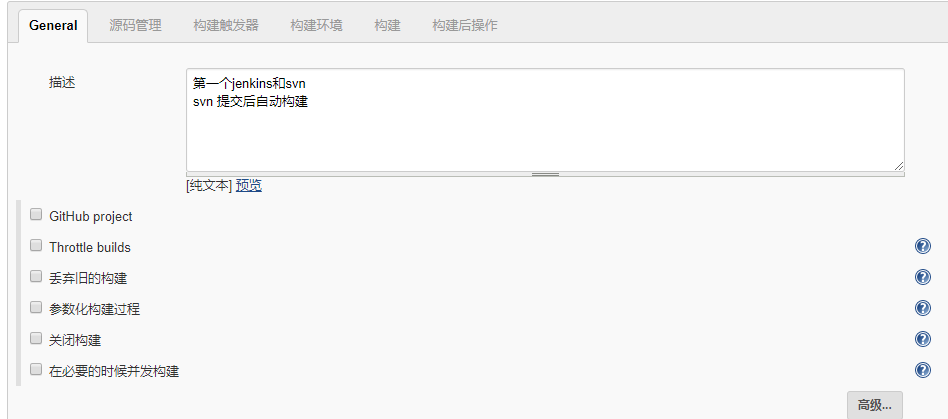
1.给当前构建任务添加描述信息
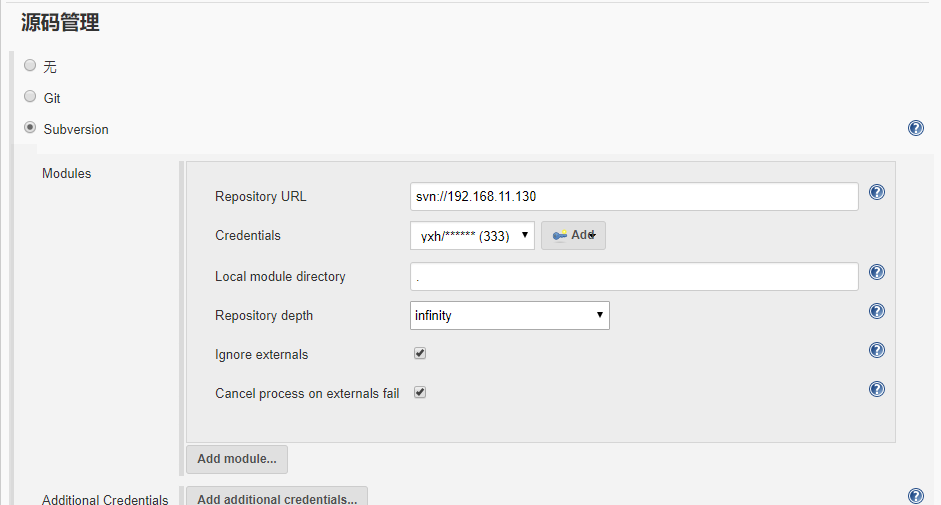
2.设置源码管理后 每次构建的时候都会自动从svn代码仓库中拉取代码到当前jenkins工作空间目录下
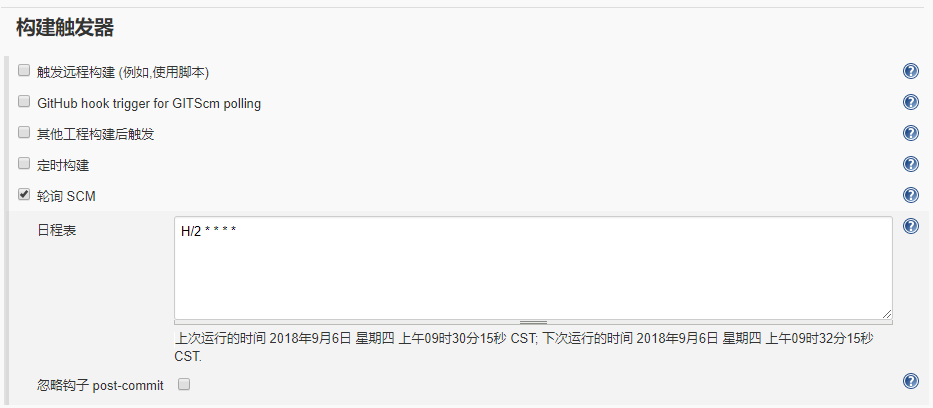
3.实现每隔2分钟探测下是否有人提交最新代码到svn中 如果检测到代码发生变化则立马自动构建 否则不会自动构建
4.jenkins从svn拉取到最新代码后执行test1.sh脚本

5.查看构建结果日志
jenkins构建失败自动发送邮件
1.配置邮件发送服务器 以QQ邮箱为示例
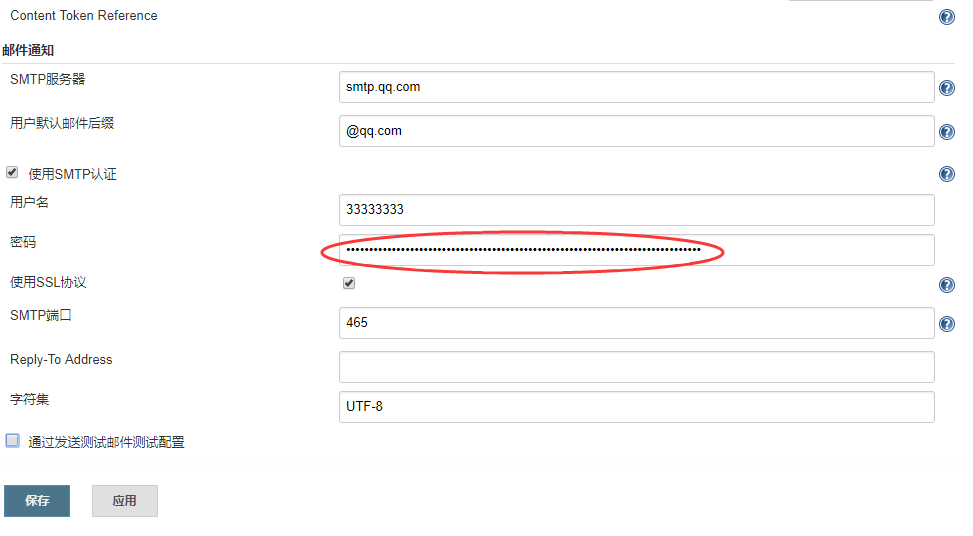
jenkins 》 系统管理 》 系统设置

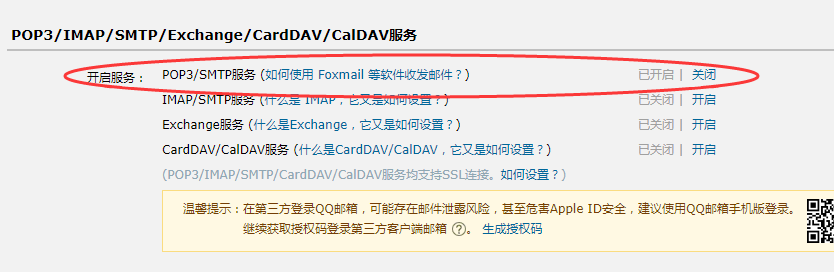
这里输入的密码不是qq登录密码 而是需要在qq邮箱的设置中开启SMTP服务时候获取的16位授权码
QQ邮箱 》 设置 》 帐户 》
2.添加设置构建后操作

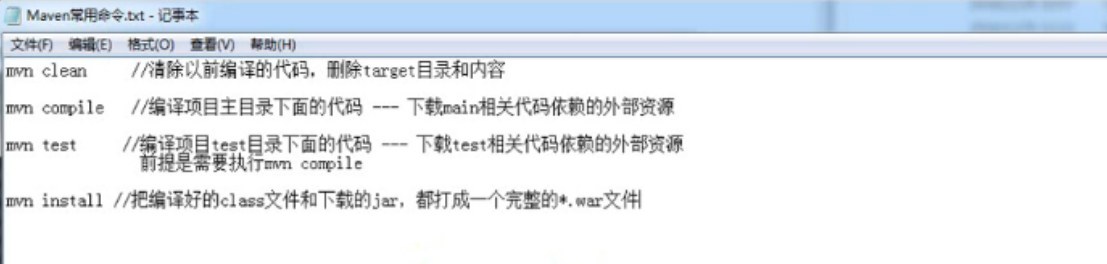
Maven的用途
1.从远程仓库中下载项目依赖到的jar包到本地
2.把java代码编译成对应的class文件
3.把下载好的jar包和class文件合并成为一个war包