参考地址:http://www.cnblogs.com/zhili/p/4039111.html
一、如何在Windows Services中寄宿WCF服务
- 第一步:创建Windows 服务项目,具体添加步骤为右键解决方案->添加->新建项目,在已安装模板中选择Windows 服务模板,具体如下图示所示:
- 第二步:添加Windows服务之后,修改对应的Service1.cs文件
using System;
using System.Collections.Generic;
using System.ComponentModel;
using System.Data;
using System.Diagnostics;
using System.Linq;
using System.ServiceModel;
using System.ServiceModel.Description;
using System.ServiceProcess;
using System.Text;
using System.Threading.Tasks;
using Service;

namespace WindowsService1
{
    public partial class Service1 : ServiceBase
    {
        public Service1()
        {
            InitializeComponent();
        }

        private ServiceHost serviceHost;
        /// <summary>
        /// 启动Windows服务
        /// </summary>
        /// <param name="args"></param>
        protected override void OnStart(string[] args)
        {
            if (serviceHost != null)
            {
                serviceHost.Close();
            }
            serviceHost = new ServiceHost(typeof(Service.CalculatorService));
            //可以使用代码
            //serviceHost.AddServiceEndpoint(typeof(ICalculatorService), new WSHttpBinding(),
            //       "http://127.0.0.1:3721/calculatorservice");
            //if (serviceHost.Description.Behaviors.Find<ServiceMetadataBehavior>() == null)
            //{

            //    ServiceMetadataBehavior behavior = new ServiceMetadataBehavior();
            //    behavior.HttpGetEnabled = true;
            //    behavior.HttpGetUrl = new Uri("http://127.0.0.1:3721/calculatorservice/metadata");//通过该地址获取服务相关的元数据
            //    serviceHost.Description.Behaviors.Add(behavior);
            //}
            serviceHost.Open();
        }

        /// <summary>
        /// 停止Windows服务
        /// </summary>
        protected override void OnStop()
        {
            if (serviceHost != null)
            {
                serviceHost.Close();
                serviceHost = null;
            }
        }
    }
}
using System;
using System.Collections.Generic;
using System.Linq;
using System.ServiceModel;
using System.Text;
using System.Threading.Tasks;

namespace Service
{
    [ServiceContract(Name = "CalculatorService1",//服务契约的名称,也就是客户端调用者生成代理类的接口名称
        Namespace = "http://www.yxl.com")]//服务契约命名空间
    public interface ICalculatorService
    {
        [OperationContract]
        double Add(double x, double y);
    }
    public class CalculatorService : ICalculatorService
    {
        public double Add(double x, double y)
        {
            return x + y;
        }
    }

}
<?xml version="1.0" encoding="utf-8" ?>
<configuration>
  <startup>
    <supportedRuntime version="v4.0" sku=".NETFramework,Version=v4.5" />
  </startup>
 <system.serviceModel>
    <behaviors>
      <serviceBehaviors>
        <behavior name="metadataBehavior">
          <serviceMetadata httpGetEnabled="true" httpGetUrl="http://127.0.0.1:3721/calculatorservice/metadata"/><!--调用地址-->
        </behavior>
      </serviceBehaviors>
    </behaviors>
    <services>
      <service name="Service.CalculatorService" behaviorConfiguration="metadataBehavior">
        <endpoint address="http://127.0.0.1:3721/calculatorservice" binding="wsHttpBinding" contract="Service.ICalculatorService" />
      </service>
    </services>
  </system.serviceModel>
</configuration>
- 第三步:在WindowsService的设计界面,右键选择添加安装程序,具体操作如下图所示。

添加安装程序之后,会多出一个ProjectInstaller.cs文件,然后在其设计页面修改ServiceProcessInstaller和ServiceInstaller对象属性,具体设置的值如下图所示:

经过上面的步骤,程序的代码就都已经全部实现了,接下来要做的是安装Windows 服务和启动Windows服务。
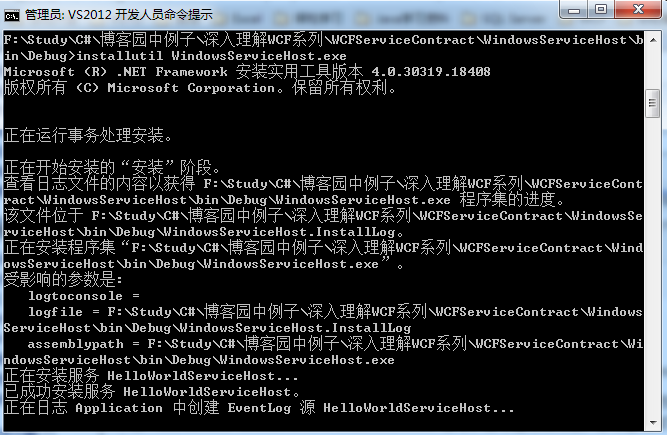
首先是安装Windows服务:以管理员身份运行VS2012开发命令提示,进入项目的对应的exe所在的文件夹,这里的指的是WindowsServiceHost.exe所在的文件夹,然后运行 “installutil WindowsServiceHost.exe”命令,命令运行成功后,你将看到如下所示的运行结果:
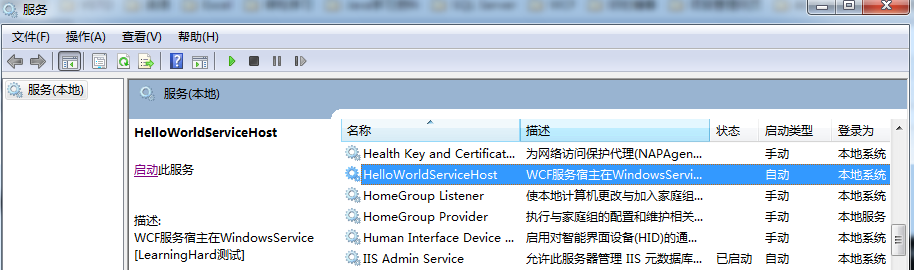
安装成功之后,你可以运行 “net start HelloWorldServiceHost” 命令来启动服务。因为开始设置服务的名称是HelloWorldServiceHost。你也可以通过Services中来手动启动服务,启动成功之后,你将在服务窗口看到启动的服务。具体效果如下图所示。
服务启动后,在客户端中同样是添加服务引用的方式来添加服务引用
二、使用WindowsService作为宿主的好处:
- windows服务可以在系统后台长时间运行,由操作系统控制。
- windows服务可以通过管理器方便的暂停、停止、启动,方便管理程序。
- 最重要的一点就是windows服务是我们开发中常用到的,我们不可能运行一个控制台程序一直在服务器运行,因为不知道哪个人就会关闭掉,安全性较差。
- 简单的运行wcf服务在windows服务中还看不出来复杂性,随着项目的复杂,配置项也是方便管理的,因为可以停止、重新启动。
三、解决WCF操作契约重载问题
C#语言是支持操作重载的,然而在WCF实现操作重载有一定的限制。错误的操作重载实例:
[ServiceContract(Name = "HellworldService", Namespace = "http://www.Learninghard.com")]
    public interface IHelloWorld
    {
        [OperationContract]
        string GetHelloWorld();

        [OperationContract]
        string GetHelloWorld(string name);
    }
如果你像上面一样来实现操作重载的话,在开启服务的时候,你将收到如下图所示的异常信息:

然而,为什么WCF不允许定义两个相同的操作名称呢?原因很简单,因为WCF的实现是基于XML的,它是通过WSDL来进行描述,而WSDL也是一段XML。在WSDL中,WCF的一个方法对应一个操作(operation)标签。我们可以参考下面一段XML,它是从一个WCF的WSDL中截取下来的。
<wsdl:import namespace="http://www.Learninghard.com" location="http://localhost:9999/GetHelloWorldService?wsdl=wsdl0"/>
<wsdl:types/>
<wsdl:binding name="BasicHttpBinding_HellworldService" type="i0:HellworldService">
<soap:binding transport="http://schemas.xmlsoap.org/soap/http"/>
<wsdl:operation name="GetHelloWorldWithoutParam">
<soap:operation soapAction="http://www.Learninghard.com/HellworldService/GetHelloWorldWithoutParam" style="document"/>
<wsdl:input>
<soap:body use="literal"/>
</wsdl:input>
<wsdl:output>
<soap:body use="literal"/>
</wsdl:output>
</wsdl:operation>
<wsdl:operation name="GetHelloWorldWithParam">
<soap:operation soapAction="http://www.Learninghard.com/HellworldService/GetHelloWorldWithParam" style="document"/>
<wsdl:input>
<soap:body use="literal"/>
</wsdl:input>
<wsdl:output>
<soap:body use="literal"/>
</wsdl:output>
</wsdl:operation>
</wsdl:binding>
<wsdl:service name="HelloWorldService">
<wsdl:port name="BasicHttpBinding_HellworldService" binding="tns:BasicHttpBinding_HellworldService">
<soap:address location="http://localhost:9999/GetHelloWorldService"/>
</wsdl:port>
</wsdl:service>
从上面的代码可以看出,每个Operation由一个operation XML Element表示,而每个Operation还应该具有一个能够唯一表示该Operation的ID,这个ID则是通过name属性来定义。Operation元素的Name属性通常使用方法名来定义,所以,如果WCF服务契约中,包含两个相同的操作方法名时,此时就违背了WSDL的规定,这也是WCF不可以使用操作重载的原因。
如何解决呢?
指定操作契约名称:
namespace Contract
{
    [ServiceContract(Name = "HellworldService", Namespace = "http://www.Learninghard.com")]
    public interface IHelloWorld
    {
        [OperationContract(Name = "GetHelloWorldWithoutParam")]
        string GetHelloWorld();

        [OperationContract(Name = "GetHelloWorldWithParam")]
        string GetHelloWorld(string name);
    }
}
这种方式在客户端生成的代理类的方法名分别为GetHelloWorldWithoutParam和GetHelloWorldWithParam,看不出来是重载方法,可以自己实现客户端代理类,而不是由VS代码生成工具。具体重新的proxy Class的实现代码代码如下所示:
using Contract;
using System.ServiceModel;
namespace Client2
{
    class HellworldServiceClient : ClientBase<IHelloWorld>, IHelloWorld
    {
        #region IHelloWorld Members
        public string GetHelloWorld()
        {
            return this.Channel.GetHelloWorld();
        }

        public string GetHelloWorld(string name)
        {
            return this.Channel.GetHelloWorld(name);
        }
        #endregion
    }
}
此时客户端的实现代码和配置文件如下所示:
namespace Client2
{
    class Program
    {
        static void Main(string[] args)
        {
            using (var proxy = new HellworldServiceClient())
            {
                // 通过自定义代理类来调用进行服务方法的访问
                Console.WriteLine("服务返回的结果是: {0}", proxy.GetHelloWorld());
                Console.WriteLine("服务返回的结果是: {0}", proxy.GetHelloWorld("Learning Hard"));
            }

            Console.Read();
        }
    }
}
对应的配置文件如下所示:
<configuration>
  <system.serviceModel>
    <client>
      <endpoint address="http://localhost:9999/GetHelloWorldService"
                binding ="basicHttpBinding"
                contract ="Contract.IHelloWorld"/>
    </client>
  </system.serviceModel>
</configuration>