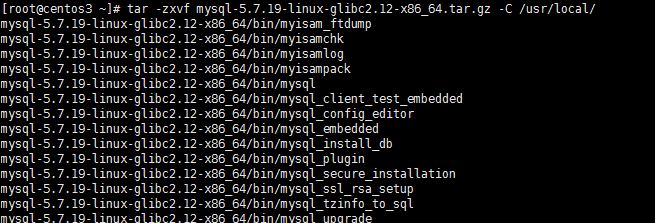
1.解压文件
[root@centos3 ~]# tar -zxvf mysql-5.7.19-linux-glibc2.12-x86_64.tar.gz -C /usr/local/
2.重命名
[root@centos3 ~]# cd /usr/local/
[root@centos3 local]# mv mysql-5.7.19-linux-glibc2.12-x86_64/ mysql

3.配置环境变量
[root@centos3 local]# vi + /etc/profile
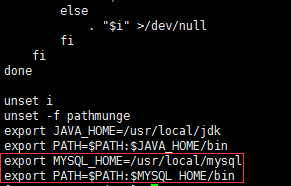
[root@centos3 local]# source /etc/profile
4.创建组和用户并授权
[root@centos3 local]# groupadd mysql
[root@centos3 local]# useradd -r -g mysql -s /bin/false mysql
[root@centos3 local]# chown -R mysql mysql/
[root@centos3 local]# chgrp -R mysql mysql/

5.初始化并记住最后的12位密码
[root@centos3 local]# /usr/local/mysql/bin/mysqld --initialize --user=mysql --basedir=/usr/local/mysql/ --datadir=/usr/local/mysql/data/ --lc_messages_dir=/usr/local/mysql/share --lc_messages=zh_CN

如果报以下错误
报错还提示找不到libaio.so.1
error while loading shared libraries: libaio.so.1: cannot open shared object file: No such file or directory
Warning
MySQL has a dependency on the libaio library. Data directory initialization and subsequent server startup steps will fail if this library is not installed locally. If necessary, install it using the appropriate package manager. For example, on
Yum-based systems:
shell> yum search libaio  # search for info
shell> yum install libaio # install library- 1
- 2
Or, on APT-based systems:
shell> apt-cache search libaio # search for info
shell> apt-get install libaio1 # install library- 1
- 2
Mysql 对 libaio library有依赖关系。
安装好libaio后
root@Fan:/data# /usr/local/mysql/bin/mysqld --initialize --defaults-file=/data/mysqldata/3306/my.cnf --datadir=/data/mysqldata/3306/data --basedir=/usr/local/mysql --user=mysql
2015-12-04T13:22:01.848446Z 0 [Warning] TIMESTAMP with implicit DEFAULT value is deprecated. Please use --explicit_defaults_for_timestamp server option (see documentation for more details).
2015-12-04T13:22:03.639997Z 0 [Warning] InnoDB: New log files created, LSN=45790
2015-12-04T13:22:04.002719Z 0 [Warning] InnoDB: Creating foreign key constraint system tables.
2015-12-04T13:22:04.167369Z 0 [ERROR] unknown variable 'defaults-file=/data/mysqldata/3306/my.cnf'
2015-12-04T13:22:04.167408Z 0 [ERROR] Aborting
6.修改mysql.server.文件并复制到 /etc/init.d/目录下
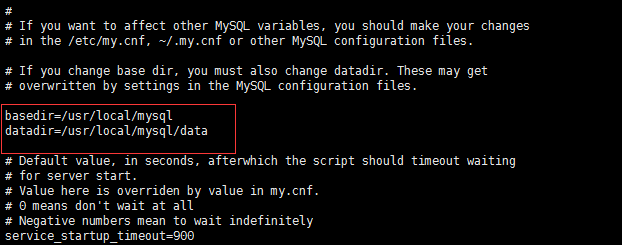
[root@centos3 local]# cd /usr/local/mysql/support-files/
[root@centos3 support-files]# vi mysql.server
[root@centos3 support-files]# cp mysql.server /etc/init.d/mysqld
7.重命名my.cnf
[root@centos3 support-files]# mv /etc/my.cnf /etc/my_default.cnf
8.设置开机启动
[root@centos3 support-files]# chmod +x /etc/init.d/mysqld
[root@centos3 support-files]# chkconfig --add mysqld
[root@centos3 support-files]# chkconfig mysqld on
//查看开机启动是否成功
[root@centos3 support-files]# chkconfig --list mysqld

9.启动服务
[root@centos3 support-files]# /etc/init.d/mysqld start
[root@centos3 support-files]# service mysql start

如果 service mysql start
mysql: unrecognized service错误的
解决方案如下
[root@ctohome.com ~]# service mysql start
mysql: unrecognized service
[root@ctohome.com ~]# service mysql restart
mysql: unrecognized service
[root@ctohome.com ~]# rpm -q mysql 查询发现mysql已经正常安装
mysql-5.1.52-jason.1
rpm -q mysql 有可能查看不到,不急用 rpm -qa| grep mysql
rpm -q 服务名 的确可以查看已经安装的 mysql服务,但是服务名必须是全称才可以查到。
rpm -qa| grep mysql 查看一下系统是否已经安装了mysql,在使用rpm -q mysql-community-server-5.7.17-1.el7.x86_64 查看是否启动。
[root@ctohome.com ~]# /etc/rc.d/init.d/mysqld start 直接启动没问题
Starting mysqld: [ OK ]
[root@ctohome.com ~]# ls /etc/rc.d/init.d/mysqld -l
-rwxr-xr-x 1 root root 5509 Dec 18 02:31 /etc/rc.d/init.d/mysqld
[root@ctohome.com ~]# chkconfig mysqld on 设置mysql开机启动
[root@ctohome.com ~]# chmod 755 /etc/rc.d/init.d/mysqld 修改mysqld执行权限
[root@ctohome.com ~]# service mysqld start 搞定
Starting mysqld: [ OK ]
[root@ctohome.com ~]# service mysqld start
Starting mysqld: [ OK ]
[root@ctohome.com ~]# service mysqld status
mysqld (pid 9487) is running...
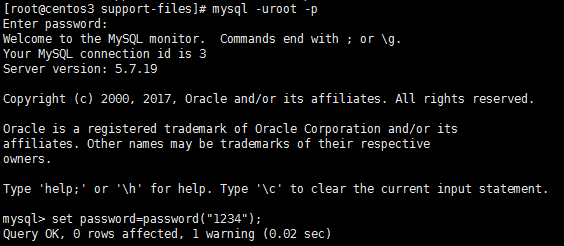
10.登录修改密码,密码就是第5步系统生成的
[root@centos3 support-files]# mysql -uroot -p
mysql> set password=password("1234");